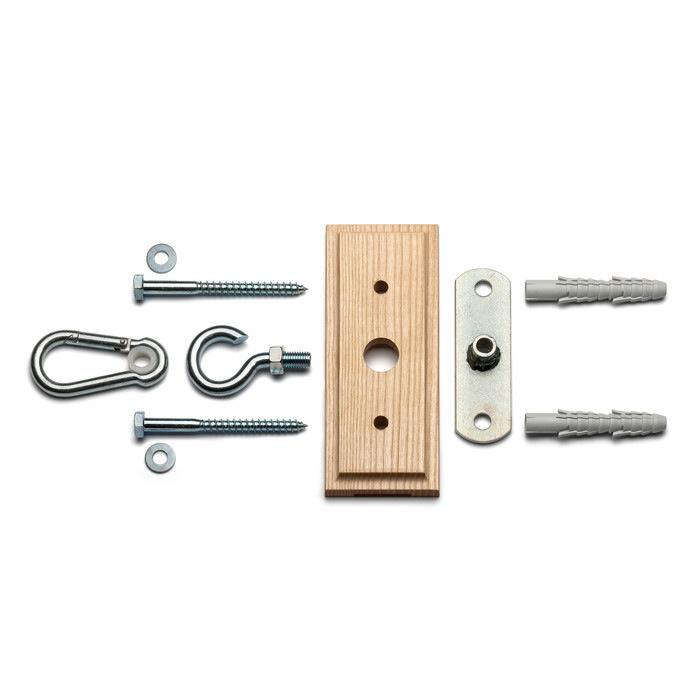
A wall holder for hammocks sounds like one of those simple pieces of hardware that should require about twelve seconds of thought: buy hook, screw hook, nap heroically. Unfortunately, gravity has a rude sense of humor. A hammock is not a picture frame, a coat rack, or that decorative shelf holding one lonely succulent. It carries moving weight, side-to-side force, and the full emotional investment of someone who expects to float, not flop.
The good news? A properly chosen and installed hammock wall holder can turn a bedroom, porch, sunroom, reading corner, garage lounge, or backyard wall into a comfortable relaxation zone. The key is understanding what the holder does, where it should be mounted, which hardware is safe, and how to avoid the classic mistake of trusting drywall with your dignity.
This guide explains how wall holders for hammocks work, what to look for before buying, how to plan your hanging height and distance, and how to maintain your setup so your hammock remains a nap machine instead of a surprise home repair project.
Important note: This article provides general guidance only. Always follow the hammock and hardware manufacturer’s instructions, check weight ratings, and consult a qualified contractor if you are unsure whether your wall, post, beam, or porch structure can safely support a hammock.
What Is a Wall Holder for Hammocks?
A wall holder for hammocks is a fixed mounting point that allows you to attach a hammock to a wall, beam, porch post, or other solid structure. It may also be called a hammock wall mount, hammock hanging kit, anchor hook, wall hook, eye bolt, swing hanger, or hammock bracket. The purpose is simple: create a strong, reliable anchor point so the hammock can hang securely between two supports.
Most setups use two wall holders, one at each end of the hammock. The hammock then connects to the holders using carabiners, S-hooks, chains, ropes, straps, or adjustable suspension links. Some hammock chairs use one overhead or angled wall-mounted holder, but traditional lying hammocks generally need two anchor points.
Common Types of Hammock Wall Holders
The most common hammock wall holder styles include heavy-duty eye bolts, plate-mounted hooks, swivel hooks, J-hooks, S-hook systems, and complete hammock hanging kits. Eye bolts are simple and strong when installed correctly into solid wood. Plate-mounted hooks spread fasteners across a small base plate and often look cleaner indoors. Swivel hooks are more common for hammock chairs and porch swings because they allow rotation. Complete kits usually include anchors, lag screws, washers, and carabiners, which makes them easier for beginners.
The best choice depends on the hammock type, the mounting surface, the load rating, and whether the installation is indoors, outdoors, or in a covered porch area.
Why a Good Wall Holder Matters
A hammock does not load a wall the same way a shelf does. When someone sits or lies in a hammock, the force pulls inward and downward at the anchor points. If the hammock is pulled too tight, the horizontal force on the wall increases. That is why a wall holder needs more than a nice shiny finish. It needs strength, correct placement, and a solid structural connection.
A weak holder can bend. A poorly installed screw can pull out. A mount placed only into drywall can fail quickly. And a metal stud, while useful in many buildings, is usually not the right anchor for hammock loads unless a professional reinforces the structure. In plain English: the wall holder is the handshake between your hammock and your house. Make sure it has a firm grip.
Where Can You Install a Hammock Wall Holder?
A hammock wall holder should be installed only into a strong structural support. Common safe mounting locations include solid wood wall studs, ceiling joists, exposed beams, sturdy porch posts, and properly built wood frames. Concrete or masonry walls may also work with the correct expansion anchors or masonry-rated hardware, but that requires the right fasteners for the surface.
Drywall alone is not suitable for hanging a hammock. Drywall anchors may hold mirrors, small shelves, or lightweight decor, but they are not designed for a person swinging in suspended fabric. The same goes for decorative porch columns. Some columns look strong enough to support a pirate ship but are really just trim covering something else. Before installing, confirm that the support is structural.
Indoor Locations
Indoors, popular spots include bedrooms, lofts, reading nooks, finished basements, and living rooms. A diagonal corner-to-corner installation can help if the room is too short. For example, a small room may not have enough straight wall distance, but a diagonal layout may create the extra span needed for a comfortable hang.
Outdoor and Porch Locations
Outdoors, wall holders can work on covered patios, pergolas, porch posts, and solid exterior walls. Stainless steel or corrosion-resistant hardware is especially important outside. Rain, humidity, and changing temperatures can make cheap hardware age faster than a banana forgotten in a gym bag.
How Far Apart Should Hammock Wall Holders Be?
The right distance depends on the hammock’s total length, fabric stretch, and desired sag. Many gathered-end hammocks work well with anchor points roughly 9 to 14 feet apart, while some larger spreader-bar hammocks need more room. A common rule is to allow a hanging distance slightly longer than the hammock’s overall length, but manufacturer instructions should always come first.
If the wall holders are too close together, the hammock may sag too low once someone gets in. If they are too far apart, the hammock may become tight, uncomfortable, and harder on the fabric and anchors. Hammocks are supposed to curve. If yours looks like a tightrope, something is probably off.
The 30-Degree Comfort Zone
Many hammock users aim for a suspension angle around 30 degrees. This angle usually creates a comfortable sag and reduces excessive stress on the anchor points. A hammock that is too flat may feel unstable and can increase force on the wall holders. A hammock with too much sag may feel like climbing into a soft taco. Comfortable? Maybe. Elegant? Not always.
How High Should You Install a Hammock Wall Holder?
Height depends on the distance between anchor points and the style of hammock. Many indoor hammock kits suggest starting around 50 inches from the floor for gathered-end hammocks, then adjusting based on the actual hammock length and personal comfort. For some rope or spreader-bar hammocks, the installation height may vary more because the design stretches differently.
As a practical test, the empty hammock should hang with enough clearance so that when someone gets in, the lowest point remains safely above the floor. Many people prefer the loaded hammock to sit around chair height, roughly 18 inches off the ground. This makes entry and exit easier and prevents the awkward “roll out and crawl away” maneuver.
Choosing the Best Wall Holder for Hammocks
Before buying a wall holder, compare more than price. The cheapest hook may look tempting, but a hammock mount is not where you want mystery metal and wishful thinking. Focus on load capacity, material, compatibility, included hardware, installation surface, and adjustability.
1. Check the Weight Capacity
Choose a wall holder or hanging kit with a load rating that exceeds the combined weight of the hammock and its users. If two people may use the hammock, account for both. Also remember that movement creates dynamic force, so bigger safety margins are better. A 400-pound rated kit may be suitable for many single or double hammock setups when installed exactly as directed, while other heavy-duty kits advertise higher ratings. The listed capacity only matters when the mount is installed into the correct surface with the correct fasteners.
2. Match the Hardware to the Wall
Wood studs usually require lag screws or wood stud bolts. Concrete or brick requires masonry anchors or expansion bolts. Outdoor posts may need corrosion-resistant bolts. Do not assume the screws included with a kit are right for every surface. A screw that is perfect for wood may be useless in masonry, and a masonry anchor does not magically become a wood fastener because it was included in the box.
3. Choose Corrosion-Resistant Materials
For outdoor or humid areas, stainless steel, zinc-plated steel, galvanized steel, or powder-coated hardware is preferred. Stainless steel is popular because it resists rust well. Zinc-plated hardware can also be durable, especially for indoor or covered use. If you live near the coast, corrosion resistance matters even more because salty air loves to snack on metal.
4. Think About Appearance
Indoor hammock holders do not have to look like they escaped from a construction site. Some kits use sleek plates, low-profile brackets, or hidden fasteners. Black, silver, and brushed metal finishes can blend with modern interiors. If the hammock is part of your decor, choose a holder that looks intentional rather than “temporary solution from the garage.”
Tools You May Need for Installation
A typical hammock wall holder installation may require a stud finder, tape measure, pencil, drill, correct drill bit, wrench or socket, level, and safety glasses. For wood studs, you may need a pilot hole before driving lag screws or eye bolts. For masonry, you may need a masonry bit and anchors rated for the material. For outdoor installations, a ladder and weather-resistant sealant may also be useful.
Take your time measuring. Hammock hardware is not like a poster you can move three inches to the left without consequences. Extra holes in drywall are annoying. Extra holes in structural wood are even more annoying. Measure twice, drill once, nap many times.
Step-by-Step Guide to Installing a Wall Holder for Hammocks
Step 1: Read the Instructions
Start with the hammock and hardware manuals. Each product may have specific spacing, height, fastener depth, and weight limits. Manufacturer instructions are not decorative paper confetti; they are part of the safety system.
Step 2: Locate Strong Structural Supports
Use a stud finder to locate wood studs or joists. Mark the center of the stud, not just the edge. For best strength, the fastener should enter the center of solid wood. If the wall has metal studs, do not install a hammock holder without professional advice and proper reinforcement.
Step 3: Measure Distance and Height
Lay the hammock on the floor to estimate the distance between the connection points. Mark the wall holder locations at the recommended height. Use a level or measuring tape to make sure both anchor points are even unless the manufacturer specifies otherwise.
Step 4: Drill Pilot Holes
Drill pilot holes using the bit size recommended for your hardware. Pilot holes help prevent wood splitting and make it easier to drive bolts straight. Avoid oversized holes because they can reduce holding power.
Step 5: Install the Wall Holders
Drive the lag screws, bolts, or eye bolts firmly into the structural support. Use washers if the kit includes them. The fastener should sit tight against the mount without wobbling. Do not overtighten to the point of damaging the wood or stripping the hole.
Step 6: Attach the Hammock
Connect the hammock using carabiners, chains, S-hooks, straps, or ropes rated for the load. Avoid thin decorative chain or hardware that does not list a weight rating. Every link in the system should be strong enough: wall holder, fastener, connector, and hammock end loop.
Step 7: Test Gradually
Before fully relaxing, pull down on the suspension, then apply body weight slowly. Sit near the center first. Listen for creaks, movement, or cracking. A tiny squeak may be normal; a loud structural complaint from the wall is your cue to stop immediately.
Common Mistakes to Avoid
The biggest mistake is mounting into drywall alone. The second biggest is using hardware with no clear load rating. Another common error is hanging the hammock too tight. A tight hammock feels less comfortable and puts greater pulling force on the wall holders. People also forget to inspect hardware over time, especially outside where rust and weather can weaken components.
A less obvious mistake is ignoring the hammock’s design. A Brazilian-style hammock, camping hammock, rope hammock, spreader-bar hammock, and hammock chair all behave differently. Some stretch more. Some need more distance. Some need one overhead point rather than two wall points. Match the holder to the hammock, not just to the photo that looks coolest online.
Wall Holder vs. Hammock Stand: Which Is Better?
A wall holder is ideal when you want a permanent or semi-permanent setup that saves floor space. It can look cleaner, feel sturdier, and allow you to hang a hammock indoors without a bulky frame. It is also great for porches and patios where strong posts or beams already exist.
A hammock stand is better if you rent, cannot drill, have metal studs, or want to move the hammock around. Stands take up more space but require no structural modification. For apartments, dorms, and anyone with commitment issues toward wall holes, a stand may be the smarter choice.
Maintenance Tips for Hammock Wall Holders
Inspect your wall holders regularly. Look for rust, loose bolts, bent hooks, cracked wood, damaged straps, and worn carabiners. Outdoor hardware should be checked more often because weather exposure speeds up wear. If anything looks questionable, stop using the hammock until the issue is fixed.
Clean metal hardware with a dry cloth and mild soap when needed. Avoid harsh chemicals that may damage coatings. If your hammock is near the ocean or in a humid climate, rinse and dry outdoor hardware periodically to reduce corrosion. Tighten fasteners only if they have loosened; do not repeatedly crank them tighter for fun. Hardware is not a pickle jar.
Best Uses for a Wall Holder for Hammocks
A wall holder can create a cozy reading spot in a bedroom, a breezy porch lounge, a meditation corner, a nap zone in a sunroom, or a flexible guest sleeping option. Some people install holders in a garage or basement for testing camping hammocks before outdoor trips. Others use them on patios where trees are unavailable.
For families, a hammock corner can become a popular place for quiet time. For remote workers, it can be a reward after long screen sessions. For pets, it may become an object of suspicion, curiosity, or total ownership. Do not be surprised if your cat claims the hammock before you do.
Real-Life Experiences With Wall Holders for Hammocks
The first thing most people learn after installing a wall holder for hammocks is that measurement matters more than enthusiasm. Many beginners imagine the process as “two hooks and done,” then discover that the hammock hangs too low, too tight, or slightly crooked. A real-world setup often involves testing the height, sitting gently, adjusting the connectors, and learning that a small change in anchor distance can dramatically change comfort.
One common experience is the “almost perfect” first hang. The wall holders are strong, the hammock looks beautiful, and the room suddenly feels like a boutique vacation rental. Then someone sits down and sinks closer to the floor than expected. This does not always mean the installation failed. It may simply mean the hammock fabric stretches, the suspension chain needs a higher link, or the anchor points need more distance. Cotton and rope hammocks can stretch noticeably after use, so a setup that seems high at first may settle into the perfect position later.
Another useful lesson is that wall holders make hammocks easier to use every day. With tree straps, you need trees. With a stand, you need floor space. With properly mounted wall holders, the hammock can be clipped on in seconds and removed just as quickly. This is especially convenient indoors. A bedroom can be a normal bedroom in the morning and a hammock lounge by evening. The hardware stays on the wall, and the fabric can be stored in a closet when not in use.
People also notice the difference between cheap connectors and quality hardware. A sturdy wall holder paired with noisy, thin, or awkward connectors can make the setup feel less polished. Smooth carabiners, properly sized S-hooks, or short adjustable chains make entry and exit easier. Chains are especially helpful because each link offers a new adjustment point. That flexibility is useful when different people use the same hammock.
Outdoor users often learn about weather the hard way. A wall holder under a covered porch may stay clean for years, while exposed hardware can show rust or discoloration much sooner. Even stainless steel benefits from occasional cleaning. The best outdoor setups use corrosion-resistant hardware, weather-friendly rope or straps, and a habit of storing the hammock fabric when storms arrive. Leaving a hammock out permanently may look relaxed, but mildew is not part of the luxury experience.
The biggest experience-based tip is to test slowly and inspect often. A properly installed wall holder should feel boringly solid. No shifting. No cracking sounds. No heroic faith required. Once the setup is dialed in, the reward is simple: a dependable place to read, nap, think, scroll, or pretend to read while actually napping. And that, honestly, is the kind of home improvement project that deserves applause.
Conclusion
A wall holder for hammocks can turn unused wall space into a comfortable, stylish, and practical relaxation area. The secret is choosing weight-rated hardware, mounting it into real structural support, following the correct spacing and height, and inspecting the setup over time. Drywall alone is never enough, metal studs require caution, and outdoor hardware should resist corrosion.
Whether you want a cozy indoor reading nook, a breezy porch hammock, or a permanent place to escape the daily chaos, the right hammock wall holder makes the whole setup safer and easier. Install it carefully, test it gradually, and your reward is a floating lounge that is always ready when your back, brain, or mood says, “Please place me horizontally.”