Your bathroom may look innocent enough at first glance. White tile. Shiny faucet. A tub that once had dreams of becoming a luxury spa. Then sunlight hits the grout at just the right angle, and suddenly you discover a gray, crusty civilization growing between the tiles.
The good news: you do not need a cabinet full of expensive mystery sprays to clean grout, tile, and tubs. A few common household ingredients can handle everyday soap scum, water spots, body oil, grime, and dingy grout lines. The even better news is that you can make several DIY bathroom cleaners in minutes without turning your bathroom into a chemistry lab run by raccoons.
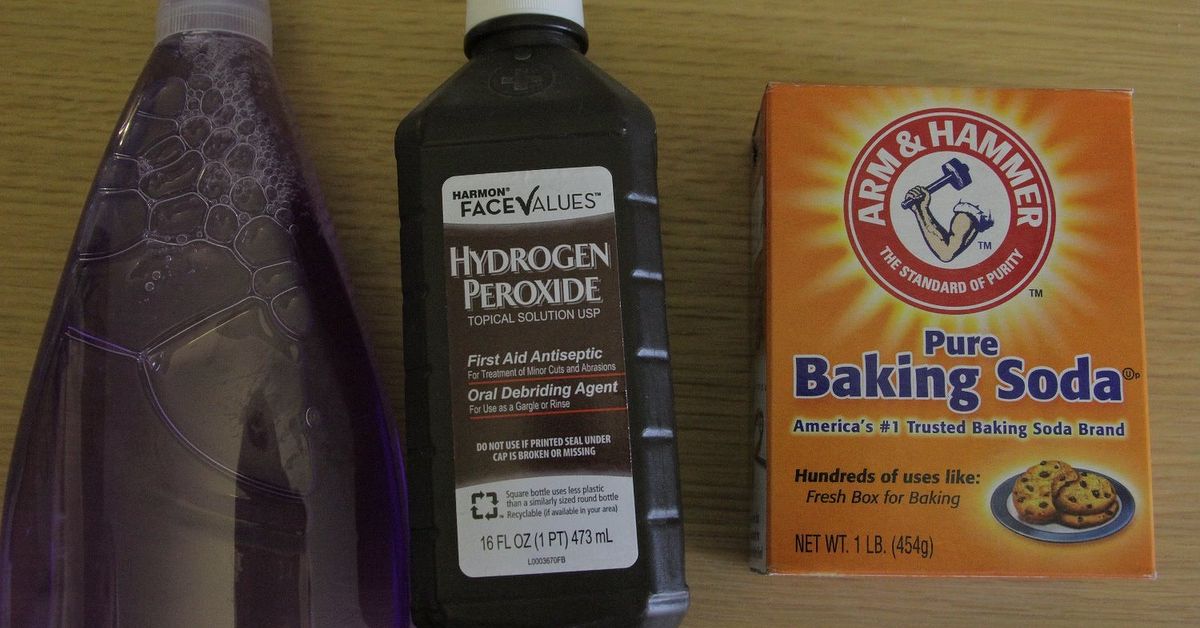
This guide explains how to make DIY grout cleaner, homemade tile cleaner, and a gentle tub scrub using practical ingredients such as baking soda, hydrogen peroxide, dish soap, vinegar, and warm water. You will also learn which surfaces need extra care, what not to mix, and how to keep your bathroom from returning to its swamp-era origins.
Before You Mix Anything: Know What You Are Cleaning
Bathrooms collect several kinds of buildup, and each one behaves a little differently. Soap scum is a waxy combination of soap residue, body oils, and minerals in water. Hard-water spots are usually caused by mineral deposits. Grout gets dirty because it is textured and porous, which means it happily collects moisture and grime like a tiny sponge with a bad attitude.
A DIY grout, tile, and tub cleaner works best when you match the cleaner to the mess. A mild dish-soap spray may be enough for a weekly wipe-down. A baking soda paste is better for stained grout or stuck-on tub residue. Vinegar can help with mineral film on many glazed ceramic or porcelain surfaces, but it is not the right choice for every bathroom.
Important safety note: Never mix bleach with vinegar, ammonia, hydrogen peroxide, toilet-bowl cleaner, or any other cleaning product. Do not mix hydrogen peroxide and vinegar in the same bottle either. Use one cleaner at a time, rinse the surface thoroughly, and keep the room ventilated. A clean tub is wonderful; creating mystery fumes is not part of the spa package.
Your Basic DIY Bathroom Cleaning Kit
You do not need much equipment to make an effective homemade bathroom cleaner. Gather these supplies before you begin:
- Baking soda
- 3% hydrogen peroxide
- Distilled white vinegar
- Mild liquid dish soap
- Warm water
- A small bowl or cup for mixing
- A soft nylon scrub brush or grout brush
- Microfiber cloths
- A non-scratch sponge
- A spray bottle for water-based cleaners
- Rubber gloves
For grout, skip wire brushes and overly aggressive scrubbers. They may make the grout look cleaner for a day, but they can also wear down the surface and create more places for dirt to settle later. Your grout is not a grill grate. Treat it accordingly.
DIY Grout Cleaner Recipe for Dingy Grout Lines
Baking Soda and Hydrogen Peroxide Grout Paste
This is the heavy-lifter of the DIY bathroom-cleaner world. Baking soda provides mild scrubbing power, while hydrogen peroxide can help brighten surface stains. It is especially useful on pale grout that has become dull, gray, or vaguely haunted-looking.
Ingredients:
- 1/2 cup baking soda
- 1/4 cup 3% hydrogen peroxide
- 1 teaspoon mild liquid dish soap, optional
Instructions:
- Mix the baking soda and hydrogen peroxide in a small bowl until you have a thick, spreadable paste.
- Add the dish soap if the grout also has oily residue or soap buildup.
- Apply the paste directly to grout lines using an old toothbrush, grout brush, or small spoon.
- Let the paste sit for about 10 to 15 minutes.
- Scrub gently with a nylon brush, working in small sections.
- Rinse with warm water and wipe dry with a clean microfiber cloth.
Do not make a giant batch and store it for later. Hydrogen peroxide gradually loses strength, especially when exposed to light. Mix only what you expect to use that day. Think of it as fresh salsa: better made in small batches and not left to become suspicious in the refrigerator.
For very stubborn grout stains, repeat the process rather than scrubbing with superhero-level force. A second gentle cleaning session is usually kinder to the grout than one angry battle with a brush.
DIY Tile Cleaner for Soap Scum and Water Spots
Warm Water and Dish Soap Tile Spray
For routine cleaning of ceramic or porcelain tile, a simple dish-soap solution is often enough. It cuts through body oil and soap residue without leaving your bathroom smelling like a chemical warehouse.
Ingredients:
- 2 cups warm water
- 1 teaspoon mild liquid dish soap
Pour the ingredients into a spray bottle and swirl gently. Do not shake it like you are auditioning for a cocktail bar, unless you enjoy foam erupting from the nozzle.
Spray the tile, let the solution sit for a few minutes, then wipe with a microfiber cloth or non-scratch sponge. Rinse with clean water and dry the surface to reduce water spots.
Vinegar Tile Spray for Mineral Film
If your glazed ceramic or porcelain shower tile has cloudy hard-water buildup, a vinegar solution can help loosen the mineral film.
Ingredients:
- 1 cup distilled white vinegar
- 1 cup warm water
- 1 teaspoon mild liquid dish soap
Combine the ingredients in a spray bottle. Spray the tile surface, avoiding unsealed grout as much as possible. Let the solution sit for five to 10 minutes, then wipe or scrub gently with a non-scratch sponge. Rinse thoroughly with clean water and dry with a microfiber cloth.
Do not use vinegar on natural stone. Marble, travertine, limestone, granite, and other stone surfaces can be damaged or dulled by acidic cleaners. Vinegar may also be too harsh for some older, fragile, or unsealed grout. When in doubt, use warm water and a pH-neutral dish soap instead.
DIY Tub Cleaner for Soap Scum and Stubborn Rings
Baking Soda and Dish Soap Tub Scrub
A bathtub can collect body oil, soap film, bath-product residue, and enough mystery grit to make you question whether the family dog has been taking secret baths. A simple baking soda scrub can remove everyday buildup without relying on harsh abrasives.
Ingredients:
- 1/2 cup baking soda
- 2 to 3 tablespoons mild liquid dish soap
- A small splash of warm water, if needed
Mix the baking soda and dish soap into a soft paste. Add a little warm water only if the mixture is too thick to spread. Apply it to the tub with a damp sponge, focusing on the ring around the waterline, textured floor areas, and corners where soap scum likes to build a retirement home.
Let the paste sit for about 10 minutes. Scrub with a non-scratch sponge, rinse well, and dry the surface with a microfiber cloth. Drying matters more than it seems: it helps prevent new mineral spots from appearing as soon as you turn your back.
For fiberglass, acrylic, or reglazed tubs, start gently. Avoid harsh powders, steel wool, stiff abrasive pads, and strong acids unless the tub manufacturer specifically allows them. A damaged finish is much harder to clean than a dirty one.
How To Deep Clean Grout, Tile, and Tub Step by Step
Cleaning works better when you tackle the bathroom in the right order. Starting with grout before cleaning the tile may feel backward, but it keeps dirty runoff from ruining your freshly wiped surfaces.
- Ventilate the room. Open a window, run the exhaust fan, or leave the door open.
- Remove bottles and clutter. Shampoo bottles are tiny obstacles designed to topple over at the least convenient moment.
- Rinse the surfaces with warm water. This loosens light grime and helps the cleaner spread more evenly.
- Apply grout paste first. Work in manageable sections so it does not dry completely before you scrub.
- Scrub grout gently. Use a nylon brush and moderate pressure. Let the cleaner do some of the work.
- Clean the tile next. Use either the dish-soap tile spray or a vinegar solution if the material is suitable.
- Clean the tub last. Apply the baking soda scrub, wait a few minutes, then wipe and rinse.
- Rinse everything thoroughly. Residue from cleaner can attract more dirt, which feels deeply unfair but is true.
- Dry the surfaces. Use a microfiber towel or squeegee to reduce water spots and mildew-friendly moisture.
Which DIY Cleaner Is Safe for Your Bathroom Surface?
Ceramic and Porcelain Tile
Glazed ceramic and porcelain tile are usually the easiest bathroom surfaces to clean. Warm water, mild dish soap, baking soda paste, and diluted vinegar are commonly suitable choices. Still, test a small hidden area first, especially if the tile has a matte glaze, decorative finish, or older grout.
Natural Stone Tile
Natural stone needs a gentler approach. Avoid vinegar, lemon juice, and acidic bathroom cleaners on marble, travertine, limestone, granite, and other stone surfaces. Use warm water, a small amount of pH-neutral dish soap, and a soft microfiber cloth. If your stone shower has heavy buildup, choose a cleaner specifically labeled for natural stone.
Colored Grout
Colored grout can fade or change appearance if treated with strong bleach or aggressive chemicals. Use a small test patch before applying hydrogen peroxide paste over a large area. Mild dish soap and warm water may be the safest first move for darker grout.
Acrylic, Fiberglass, and Reglazed Tubs
These surfaces scratch more easily than traditional porcelain enamel. Stick with mild dish soap, baking soda used gently, microfiber cloths, and non-scratch sponges. Do not attack a fiberglass tub with steel wool unless you are hoping to create a modern abstract-art installation.
DIY Bathroom Cleaning Mistakes To Avoid
The biggest DIY cleaning mistake is assuming that more ingredients automatically equal more power. Sometimes they simply cancel each other out. Baking soda and vinegar fizz dramatically, but the bubbling show does not always translate into a better cleaner. It can be useful for loosening light residue in some situations, but it is not a magical all-purpose solution.
Another mistake is leaving cleaner on too long. A product or homemade mixture may dry on the tile, making it harder to rinse. Work in sections and follow a reasonable dwell time instead of applying cleaner to every square inch of the bathroom and then getting distracted by a three-hour video about restoring antique lamps.
Also avoid using one brush for everything. Keep a dedicated grout brush, tub sponge, and toilet brush. The toilet brush should remain in its own lane. It does not need career growth.
How To Keep Grout, Tile, and Tubs Cleaner Longer
The easiest deep clean is the one you do not have to do. After showering, run the exhaust fan for at least 20 minutes or until moisture has cleared. Use a squeegee on shower walls, wipe up pooled water, and leave the shower curtain or door open enough for air to circulate.
Once a week, spray tile with your warm-water and dish-soap cleaner, wipe the tub, and give grout a quick look. Catching soap scum early prevents it from becoming a full-scale archaeological dig later. If grout repeatedly gets dark, damp, or musty, inspect for poor ventilation, leaking fixtures, or damaged caulk rather than endlessly scrubbing the symptom.
Conclusion: A Cleaner Bathroom Without a Chemistry Degree
Making DIY grout, tile, and tub cleaner is mostly about using simple ingredients with a little patience. A baking soda and hydrogen peroxide paste can refresh stained grout. Dish soap and warm water are excellent for routine tile cleaning. Baking soda and dish soap make a gentle tub scrub that handles soap scum without harsh abrasives.
The secret is not a single miracle ingredient. It is using the right cleaner for the right material, giving it time to work, rinsing thoroughly, and keeping moisture under control afterward. Your grout may never write you a thank-you note, but it will stop looking like it has been through several winters without sunlight.
Note: DIY cleaners are intended for routine cleaning. Always test a small hidden area first, follow manufacturer guidance for specialty surfaces, and use a registered disinfectant only when disinfection is specifically needed.
Experience-Based Lessons From Cleaning Grout, Tile, and Tubs
Anyone who has cleaned a bathroom for more than five minutes eventually learns the same lesson: grout does not get dirty all at once. It becomes grimy through tiny daily deposits that feel invisible until one morning you notice the floor looks like it has been lightly shaded with charcoal. That is why the most successful DIY cleaning routines are not built around one dramatic deep-cleaning marathon. They are built around small habits that prevent buildup from becoming a weekend event.
One common experience is discovering that the cleaner is not always the main problem. People often try three sprays, two scrub brushes, and one questionable internet hack before realizing the bathroom fan barely works or the shower door stays closed all day. When moisture cannot escape, tile and grout remain damp longer, and the bathroom becomes a very comfortable hotel for mildew. Improving ventilation often makes future cleaning easier than switching to a stronger cleaner.
Another useful lesson is that patience beats panic. A person may spray a cleaner, scrub furiously for 20 seconds, and decide it does not work. But most soap scum and stained grout respond better when the cleaner is allowed to sit for a few minutes first. That dwell time softens residue and reduces the need for aggressive scrubbing. The difference can be dramatic: less elbow grease, fewer scratched surfaces, and a much lower chance of muttering things that would concern the neighbors.
Many people also learn that not every bathroom surface is created equal. Ceramic tile can be forgiving. Marble can be moody. Fiberglass tubs can scratch if you glare at them too intensely. A DIY vinegar cleaner may work beautifully on glazed shower tile but can dull natural stone. A baking soda paste may help one tub but feel too abrasive on another finish. Testing a small spot first may seem overly cautious, but it is far easier than explaining a permanent dull patch to yourself every morning.
There is also the reality of cleaning tools. An old toothbrush can work for narrow grout lines, but it is usually slow and tiring for an entire shower. A small nylon grout brush often makes the job faster and more consistent. Microfiber cloths are equally useful because they pick up loosened grime instead of simply pushing it around like a tiny dirty snowplow. A squeegee may look like an unnecessary bathroom accessory until you use one for a week and realize the shower stays cleaner with almost no effort.
Finally, the best DIY grout, tile, and tub cleaner routine is the one you will actually repeat. A perfect recipe that requires six ingredients, twelve minutes of stirring, and a moonlit ceremony is less useful than a simple spray you can use after a shower. Start with the gentle cleaner, save the stronger paste for stubborn areas, and make regular maintenance your secret weapon. The bathroom may never become a five-star hotel spa, but it can absolutely stop looking like a place where soap scum pays rent.