Building a DIY handheld game can sound like a project reserved for people who casually discuss clock cycles over breakfast. In reality, it often starts with a tiny screen, a few buttons, a battery, and one pixelated hero that refuses to move without leaving a trail of digital confetti behind it.
That is where simple sprite routines earn their keep. Instead of writing a miniature game engine before your character has taken a single step, you can rely on a small set of functions that draw a sprite, move it, erase its old position, and detect whether it has bumped into something important. Suddenly, your homemade handheld is not just an expensive blinking badge. It is a game machine with ambition.
The original appeal of lightweight sprite routines for boards such as the PyBadge and PyGamer was their practicality: an 8-by-8 sprite could be plotted, moved without obvious flicker, and checked against selected screen colors for collision. That is enough logic to create a maze game, a simple platformer, a ball-rolling challenge, or a tiny space shooter without turning a weekend project into a semester-long software thesis.
This guide explains why simple sprite routines make handheld gaming DIY more approachable, how to organize them, what beginner builders should prioritize, and how a modest collection of graphics functions can grow into a genuinely playable device.
Why Sprite Routines Matter in DIY Handheld Gaming
A sprite is a small graphic object that represents something active in a game: a player, enemy, ball, spaceship, collectible, cursor, or suspiciously determined potato. In a handheld project, sprites are especially useful because they give a game visual life without demanding giant art files, complicated 3D rendering, or enough memory to run a small moon landing.
The real benefit is not merely that sprites look charming. It is that they help separate a game into manageable jobs. The player sprite has a position. The enemy sprite has a position. The wall has a color or tile value. The game loop checks the buttons, updates positions, redraws the screen, and repeats. Once those jobs are divided, debugging becomes much less mysterious.
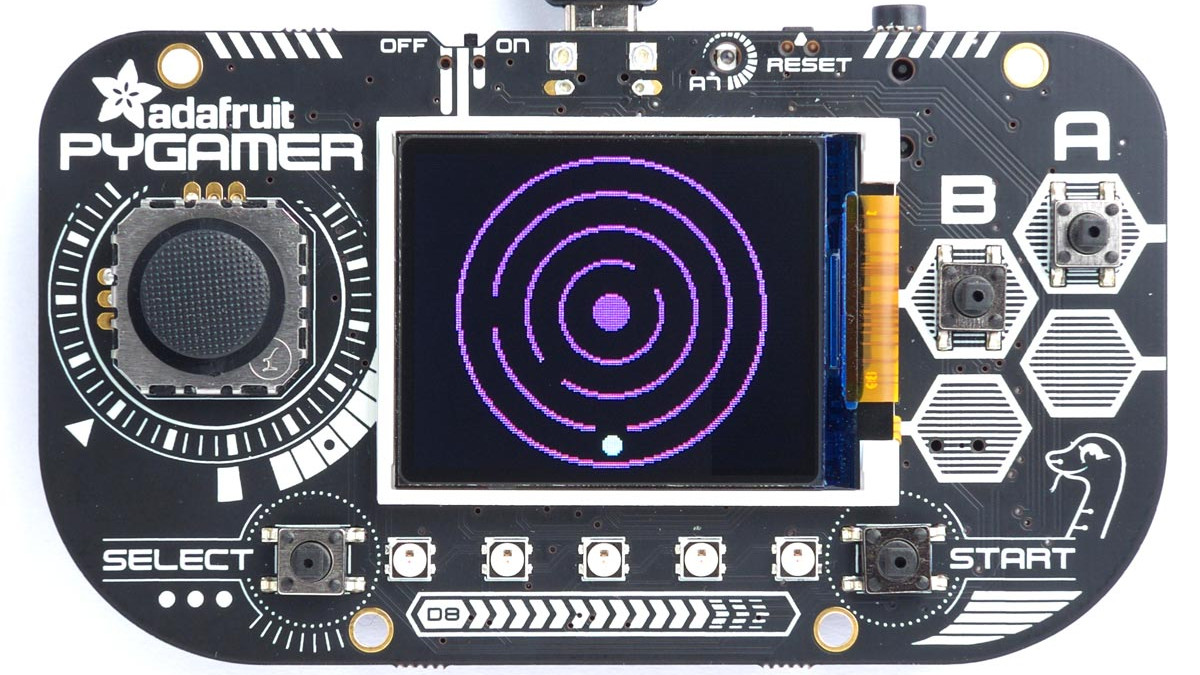
On compact handheld boards, the screen and available memory are limited. The Adafruit PyGamer, for example, uses a 160-by-128 color display and includes onboard buttons, an analog control, battery support, storage, and display hardware intended for DIY game development. That combination makes it possible to prototype a handheld game without first designing every electrical subsystem from scratch.
Still, hardware does not magically create game logic. A display can show pixels all day, but it cannot decide whether your hero hit a wall, collected a coin, or wandered off the screen like it suddenly remembered an appointment. Simple sprite routines fill that gap.
The Three Core Sprite Jobs
A lightweight handheld game can begin with three essential routines: one to draw a sprite, one to move it, and one to check collisions. You can add menus, sound effects, animated explosions, and boss battles later. First, make one tiny object behave correctly.
1. Drawing a Sprite
The first routine places a small bitmap on the display. In the original simple-sprite approach, an XOR-style function can plot an 8-by-8 sprite using a selected color. XOR drawing has a neat retro trick: drawing the same sprite in the same location again can restore the previous pixels, which makes it useful for certain low-overhead visual effects.
For a beginner-friendly game, a sprite can be represented as a small grid of bits. A value of 1 means “draw this pixel,” while a value of 0 means “leave this pixel alone.” That is enough to make a smiling astronaut, a bouncing ball, or a goblin who looks like a toasted marshmallow. Pixel art has range.
The drawing routine reads each row, checks each bit, and plots pixels where the bit is active. In a modern graphics library, you may use a bitmap, tile grid, sprite sheet, or framebuffer call instead. The underlying idea is unchanged: the program needs a small image and a coordinate where that image belongs.
2. Moving a Sprite Cleanly
Movement is where many first DIY games become haunted. A character moves right, but the old character remains behind. Move again, and suddenly the screen contains six versions of your hero, all staring into the middle distance. Congratulations: you have invented accidental time travel.
A good movement routine handles the old position and new position as one task. It removes or restores the sprite at its previous coordinates, updates the position, then draws the sprite at its new coordinates. The original PyBadge/PyGamer routine was designed to move an 8-by-8 sprite one pixel at a time without visible flicker, which is exactly the sort of small but important detail that helps a homemade game feel polished.
For a small maze game, movement can remain gloriously simple:
Before accepting the new position, the game should check whether the sprite would leave the display area or collide with a wall. This keeps your character from escaping the screen and starting a new life in the margins.
3. Detecting Collisions
Collision detection sounds intimidating until you reduce it to a simple question: “Would this sprite overlap something it should not?” In a maze, that something may be a wall color. In a shooter, it may be an enemy sprite. In a platform game, it may be a floor tile, a spike, or a suspiciously enthusiastic lava pit.
The simple routine described for the PyBadge and PyGamer checks whether a sprite intersects a screen element of a given color. This is an elegant shortcut for games that use color-coded obstacles. A wall might be blue, a goal tile might be green, and danger might be red because red has been warning humanity since the invention of stop signs.
For more advanced projects, collision checks can compare rectangular boundaries:
This is commonly called bounding-box collision. It is fast, understandable, and usually sufficient for a small handheld game. Pixel-perfect collision can wait until your project has survived its first battery replacement.
A Simple Game Loop Is Better Than a Fancy Mess
The sprite routines are only part of the story. They become useful when placed inside a consistent game loop. A basic loop repeatedly reads input, updates the game state, checks collisions, refreshes graphics, and controls timing.
This structure is not glamorous, but it is sturdy. It prevents your program from becoming a pile of unrelated button checks and display commands scattered around like socks after laundry day.
Handheld game libraries often package these jobs into higher-level tools. CircuitPython’s displayio, for example, is designed to compose display objects efficiently and update regions that change rather than treating every frame as a giant fresh painting. Its object model can work with bitmaps, palettes, tile grids, and groups, which gives DIY developers a cleaner path toward animated graphics.
That does not mean beginners should ignore simple routines. Quite the opposite. Understanding a small movement function makes higher-level libraries easier to use. You learn what a sprite needs: image data, position, movement rules, visibility, and collision behavior. Libraries then become helpful tools instead of magical boxes that occasionally throw errors in all caps.
Choose Hardware That Lets You Focus on the Game
You can build a handheld game system from individual parts: a microcontroller, a TFT display, buttons, a speaker, a battery-management circuit, and an enclosure. That route is wonderfully educational, but it also creates more opportunities for a loose wire to become the main character.
For faster progress, an integrated gaming board is often the calmer choice. The PyGamer platform combines a color display, buttons, an analog thumbstick, speaker support, storage, a battery connector, and extra expansion options. This means you can spend more of your early project time designing a game instead of diagnosing why your “A” button is actually connected to the backlight.
Boards such as PyBadge and PyGamer also support multiple programming paths, including Arduino-style development, CircuitPython, and MakeCode Arcade workflows. That flexibility matters because there is no single correct toolchain. Some builders enjoy writing compact C or C++ routines. Others would rather prototype visual logic quickly in MakeCode. Others prefer CircuitPython because saving a file and seeing the game update feels pleasantly close to wizardry.
How to Design a First DIY Handheld Game
The best beginner project is usually not an open-world fantasy adventure with a branching storyline and seventeen species of dragon. It is a tiny game with one clear goal.
Start With a Maze Game
A maze game is almost perfect for learning sprite routines. Draw walls in one color, put the player sprite at the start, place a goal at the end, and allow movement in four directions. The collision routine stops the player from passing through walls. The win check triggers when the player reaches the goal.
This simple format teaches nearly everything important: input handling, position tracking, collision detection, screen boundaries, win conditions, and frame updates. It also produces something playable very quickly, which is important because motivation is a fragile creature. Feed it small victories.
Add One Mechanic at a Time
Once the maze works, add one improvement. Maybe a timer. Maybe a score. Maybe collectible stars. Maybe an enemy that moves every fourth frame. Do not add all of them at once unless you enjoy debugging a game that behaves like a squirrel driving a forklift.
A sensible upgrade sequence looks like this:
- Make the player sprite appear.
- Read button input.
- Move the sprite.
- Prevent movement through walls.
- Add a finish tile.
- Add a score or timer.
- Add one moving obstacle.
- Add sound only after the rest is stable.
Each step is small enough to test. That is the secret ingredient in embedded game development: test constantly, because your hardware is very good at revealing assumptions you forgot you made.
Sprites, Framebuffers, and Screen Refresh Strategy
There are several ways to draw graphics on a handheld display. You can draw directly to the screen, draw into a framebuffer first, or use an object-based display library. Each approach has tradeoffs.
Direct drawing is simple and uses less memory, but moving graphics may flicker if the display updates visibly between erase and redraw steps. A framebuffer lets the game prepare an entire frame in memory before sending it to the display. This can produce cleaner animation, though it consumes RAM. The Arcada graphics environment, for example, supports framebuffer allocation and can transfer the finished buffer to the display either in a blocking way or through non-blocking background drawing.
For a first handheld project, direct drawing plus careful sprite movement is often enough. If you build a game with dozens of sprites, scrolling terrain, particle effects, and an unnecessarily emotional title screen, a framebuffer or optimized display library becomes more attractive.
The rule is simple: use the least complicated rendering approach that gives your game a stable, readable image. Fancy graphics are fun, but a player should never lose because the screen is flickering like a haunted refrigerator light.
Pixel Art Tips for Small Screens
Small displays reward clarity. A 160-by-128 screen does not need a detailed cinematic portrait of your hero’s emotional journey. It needs a character you can recognize while your thumb is covering half the controls.
Use high-contrast colors. Make the player sprite visually distinct from walls and background tiles. Limit each sprite to a few meaningful colors. Give enemies shapes that differ from the player. A round hero and a square enemy are easier to read than two similar blobs that both resemble pieces of cereal.
Sprite sheets are useful when you want animation. A sprite sheet stores several frames in one image, such as standing, walking left, walking right, jumping, or dramatically regretting a bad decision. Libraries built around tiles and grids can select individual frames from that larger bitmap, which reduces duplicated asset handling. CircuitPython display tools support combinations of bitmap data, palettes, tile grids, and groups that fit this kind of organization.
Common Problems and the Simple Fixes
The Sprite Leaves Ghost Images
This usually means the old sprite position is not being erased or restored before the new sprite is drawn. Track both the previous and current coordinates. Clear or redraw the old location first.
The Character Moves Too Fast
Your game loop may be running much faster than your intended frame rate. Add timing control, such as a short delay or a frame timer. A character that moves one pixel per frame can cross the screen almost instantly if the processor loops at maximum speed.
Buttons Trigger Multiple Moves
Mechanical buttons can bounce electrically, causing a single press to register more than once. Use debouncing in hardware or software, and consider movement cooldowns so the player moves at a controlled pace.
Collision Feels Unfair
Check whether the sprite’s visible shape matches its collision box. A wide collision rectangle around a thin spaceship can make players feel cheated. Keep collision boundaries close to the meaningful part of the sprite.
The Game Works on USB but Not on Battery
Check battery voltage, wiring, connector polarity, power-switch position, and current draw. A display backlight, speaker, and microcontroller can make a small battery work harder than expected. Test the game unplugged before declaring victory.
Experience Lessons From Building With Simple Sprite Routines
The most useful experience in DIY handheld gaming is discovering that progress rarely comes from a giant breakthrough. It comes from tiny, repeatable wins. The first time a sprite appears on screen feels modest. The first time it moves when you press a button feels better. The first time it stops at a wall instead of tunneling through it like an overcaffeinated ghost feels like a genuine engineering milestone.
Simple sprite routines are valuable because they encourage that kind of progress. They give you a narrow target. Instead of asking, “How do I build a handheld console?” you ask, “How do I draw an 8-by-8 character at coordinates 40, 60?” Then you ask, “How do I move it right?” Then, “How do I stop it from moving into a wall?” Each question is answerable. Each answer becomes part of the game.
Builders often learn that the game design itself changes once the hardware is in their hands. A control scheme that felt obvious in a text editor may feel clumsy on physical buttons. A sprite that looked fine on a computer monitor may become invisible on a tiny TFT display. A movement speed that seemed slow in theory may become ridiculous when the character zips across a handheld screen in half a second. These are not failures. They are the useful feedback that only a real device provides.
Another common lesson is that small games benefit from visible state. During development, it helps to display temporary values such as the player’s coordinates, frame count, health, or collision status. It may make the screen look like a calculator having a midlife crisis, but it helps you understand what the code is actually doing. Once the game behaves properly, remove the debugging text and enjoy the illusion that everything was intentional.
Audio is another place where experience changes expectations. A single beep on a handheld speaker can feel more satisfying than a fancy animation because it confirms that an action happened. A pickup sound, wall-bump sound, or game-over chirp gives the player feedback even when the screen is busy. The same is true for simple vibration motors or status LEDs. Tiny physical signals make a homemade handheld feel less like a board and more like an object with personality.
Perhaps the biggest experience lesson is that limitations can improve game design. A small screen encourages readable art. Limited buttons encourage simple controls. Modest processing power encourages efficient rules. Limited memory encourages smaller levels and tighter gameplay. Constraints prevent feature creep from eating your project alive, which is a remarkably common fate for games that began as “just a quick weekend build.”
A practical DIY handheld game does not need dozens of levels, online multiplayer, or a soundtrack performed by an orchestra of robots. It needs a clear goal, responsive controls, clean sprite movement, fair collisions, and enough charm to make someone press “play again.” Simple sprite routines help create exactly that foundation.
Start with one sprite. Make it move. Make it collide. Make it win. Once that works, you are no longer merely experimenting with a display. You are making a gameand that is when the tiny handheld in your hands starts to feel surprisingly alive.
Conclusion
Simple sprite routines ease handheld gaming DIY because they turn a complicated-looking challenge into a sequence of small, testable tasks. Drawing, movement, collision checks, and a basic game loop are enough to transform a microcontroller board into a playable handheld experience.
Whether you use a PyBadge, PyGamer, Arduino-compatible board, CircuitPython device, or another microcontroller platform, the principle stays the same: begin with the smallest possible interactive game. A tiny sprite with reliable movement teaches more than a giant unfinished project ever will. Keep the graphics clear, the controls responsive, the code organized, and the ambition one level ahead of the current buildnot ten levels ahead wearing a cape.