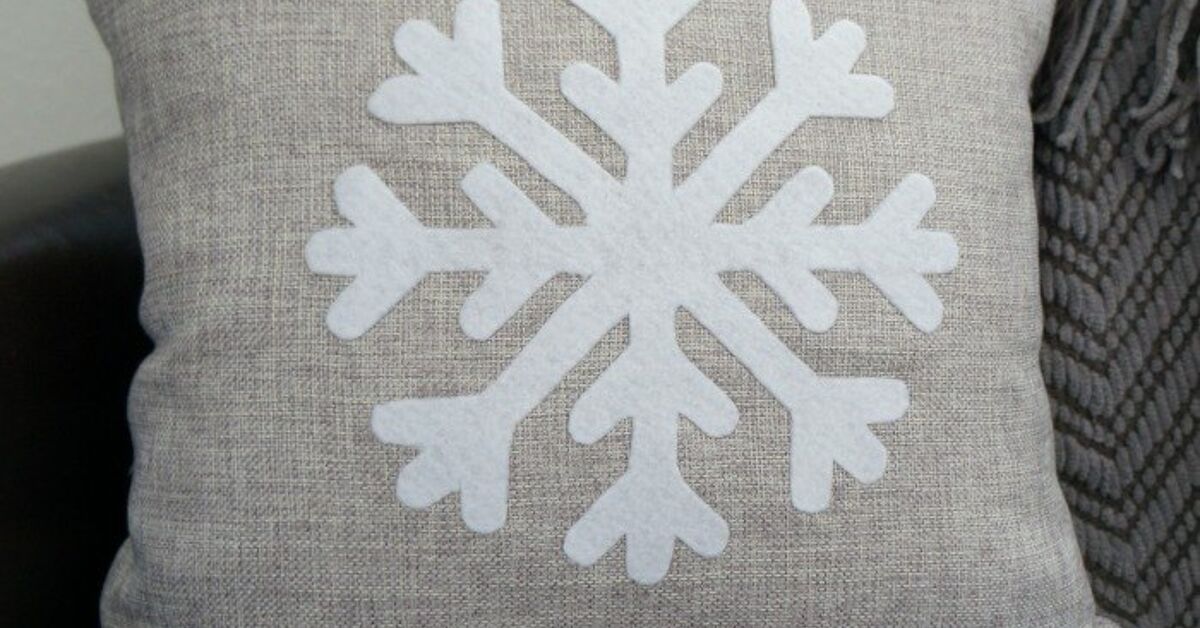
Winter decorating has a funny way of sneaking up on us. One minute you are calmly drinking coffee in October, and the next minute your sofa looks like it missed the holiday memo. That is where a No Sew Felt Snowflake Pillow Cover comes in: cozy, festive, beginner-friendly, and blissfully free of sewing-machine drama.
This DIY holiday pillow cover is the kind of project that looks boutique but does not require boutique patience. You need felt, a pillow cover, a snowflake template, adhesive, scissors, and a flat surface that is not currently buried under gift wrap. The result is a soft winter accent pillow that can dress up a couch, armchair, bed, entry bench, or reading nook without demanding a needle, thread, or advanced crafting degree.
Best of all, this project is flexible. You can make it clean and Scandinavian with white felt on gray linen, playful with blue felt on a red cover, rustic with wool-blend felt on burlap, or glamorous with metallic accents. A no sew felt pillow cover lets you decorate for Christmas, winter, cabin season, or “I just want my living room to look like a snow globe, but classy.”
What Is a No Sew Felt Snowflake Pillow Cover?
A no sew felt snowflake pillow cover is a decorative pillow cover made by attaching felt snowflake shapes to a fabric pillow cover without stitching. Instead of sewing, you use fabric glue, fusible adhesive, iron-on bonding sheets, or hot glue depending on the look, durability, and materials you prefer.
The design usually starts with a plain pillow cover. Felt snowflakes are cut from craft felt, wool felt, or felted sweater material, then placed on the pillow front as a central motif, scattered pattern, border, or layered applique. Because felt does not fray the way many woven fabrics do, it is perfect for crisp cutouts and decorative shapes. Snowflakes, with their charming points and tiny branches, are especially good candidates.
This project is popular because it combines three things people love: seasonal decor, budget-friendly supplies, and the sweet relief of not dragging out a sewing machine. It is also a great craft for beginners, renters, families, classrooms, and anyone who wants custom winter pillow covers without paying custom winter pillow prices.
Why Felt Works So Well for Snowflake Pillow Covers
Felt is the quiet hero of winter crafting. It is soft, sturdy, easy to cut, and forgiving when your snowflake points are not perfectly symmetrical. In fact, real snowflakes are famously unique, so if your DIY version has one arm that looks like it made a questionable life choice, congratulations: nature approves.
Felt Has Clean Edges
One major advantage of felt is that its edges stay neat after cutting. That means you can create detailed snowflake shapes without hemming, sealing, or stitching every tiny edge. This is exactly why felt is often used for applique, ornaments, banners, garlands, and decorative pillows.
Felt Adds Texture
A plain pillow cover can look flat, especially in winter when rooms often need warmth and softness. Felt adds a raised, cozy texture that catches light and gives the pillow a handmade feel. A white felt snowflake on a deep navy cover instantly feels snowy and crisp. Cream felt on oatmeal fabric feels warm and rustic. Silver-gray felt on charcoal feels modern and grown-up, like a snowflake that pays taxes.
Felt Is Beginner-Friendly
Unlike slippery satin, stretchy knits, or fabrics that unravel if you look at them too sternly, felt behaves. It stays where you put it, cuts easily, and works well with many adhesives. This makes it one of the best materials for a no sew pillow cover project.
Supplies You Will Need
You do not need a giant craft-room empire to make this pillow cover. A simple supply list is enough:
- One plain pillow cover, preferably cotton, linen, canvas, velvet, or a sturdy blend
- One pillow insert that fits the cover, such as 16 x 16 inches, 18 x 18 inches, or 20 x 20 inches
- Craft felt, wool-blend felt, or felted sweater material
- Snowflake template or printable pattern
- Sharp fabric scissors or small detail scissors
- Fabric glue, permanent fabric adhesive, fusible web, or iron-on adhesive sheets
- Pencil, chalk pencil, or disappearing fabric marker
- Cardstock for making a reusable template
- Ruler or measuring tape
- Parchment paper or pressing cloth if using iron-on adhesive
- Heavy books, clips, or pins to hold glued pieces while drying
If you want extra sparkle, add small rhinestones, mini pom-poms, embroidery floss, silver ribbon, or glitter felt. Use embellishments sparingly unless your design goal is “snowflake attending a holiday gala,” which is also valid.
Choosing the Best Pillow Cover
The pillow cover is your background, so choose it thoughtfully. A smooth, medium-weight fabric usually works best because it gives adhesive a stable surface. Cotton canvas, duck cloth, linen blends, and plain cotton pillow covers are excellent choices. Velvet can look beautiful, but adhesive may behave differently on plush textures, so test a small area first.
Best Colors for a Snowflake Design
Classic winter color combinations include white felt on navy, ivory felt on gray, pale blue felt on white, silver felt on charcoal, and cream felt on red. For farmhouse decor, try natural linen with white or oatmeal felt. For modern decor, use black, slate, or forest green pillow covers with high-contrast snowflakes.
Pick the Right Size
An 18 x 18-inch pillow cover is a great all-purpose size for a sofa. A 20 x 20-inch cover makes a stronger statement on a bed or deep chair. Smaller 12 x 20-inch lumbar pillows work well with a row of mini snowflakes or one elongated snowflake branch pattern.
For a full, designer-style look, use a pillow insert that is 1 to 2 inches larger than the cover. For example, an 20-inch insert inside an 18-inch cover creates a plumper shape. Your pillow should look cozy, not like it gave up halfway through December.
How to Make a No Sew Felt Snowflake Pillow Cover
The basic process is simple: create a snowflake pattern, cut the felt, arrange the design, attach it, dry or press it, then style the pillow. The magic is in taking your time with placement and using the right adhesive for your materials.
Step 1: Prepare the Pillow Cover
Start with a clean, dry pillow cover. If it is wrinkled, iron it before adding the felt. A smooth surface helps the snowflake sit flat and keeps the final design from looking lumpy. If the cover is new and washable, consider prewashing it first to reduce future shrinkage.
Step 2: Make or Print a Snowflake Template
You can draw your own snowflake, print a template, trace a paper snowflake, or use a cutting machine design. For a handmade look, fold paper into a triangle and cut small notches to create a traditional snowflake pattern. Open it carefully, flatten it, and trace it onto cardstock. The cardstock version will be sturdier and easier to trace onto felt.
If you want a clean modern design, choose a simple six-point snowflake with bold arms. Detailed designs are beautiful, but tiny felt cuts can become fiddly. Unless you enjoy negotiating with scissors for half an hour, start with medium-sized openings and sturdy lines.
Step 3: Trace the Snowflake onto Felt
Place the template on the back side of the felt. Trace lightly with a pencil, chalk pencil, or fabric marker. If your felt has a prettier side, make sure the traced side will face down on the pillow. For symmetrical designs, it usually does not matter, but metallic or glitter felt often has one decorative side.
Step 4: Cut Slowly and Cleanly
Use sharp scissors and cut the outside edges first. Then cut inner shapes and notches. Small detail scissors help with tight corners. Rotate the felt as you cut instead of twisting your hand into the shape of a pretzel. If a branch snaps or a point looks uneven, trim the opposite side slightly to balance it.
A single large snowflake can look elegant, while several smaller snowflakes create a playful falling-snow effect. You can also layer a smaller snowflake on top of a larger one for dimension.
Step 5: Arrange Before You Glue
Lay the pillow cover flat and place the felt snowflakes on top. Step back and look at the layout. Centered designs feel classic. Off-center designs feel modern. A diagonal cascade of snowflakes feels lively and cheerful. Take a photo with your phone before gluing so you can remember the arrangement if anything shifts.
Step 6: Attach the Felt
If using fabric glue, apply a thin, even line or small dots along the back of the felt, paying extra attention to points and edges. Do not overload the glue. Too much adhesive can bleed through, stiffen the pillow, or create shiny patches.
If using fusible web or iron-on adhesive, follow the product directions carefully. Most fusible products require controlled heat, no steam, and a pressing cloth. Felt can melt or flatten if overheated, so test a scrap first. Press rather than slide the iron, because sliding can shift delicate snowflake points.
Step 7: Let It Dry or Cure Completely
This is the part where patience enters wearing tiny winter boots. Let fabric glue dry according to the adhesive instructions. Many glues need several hours to dry and longer to cure fully. Place parchment paper over the design and set a heavy book on top if the snowflake edges want to curl.
Step 8: Insert the Pillow Form
Once the design is secure, insert the pillow form. Fluff the corners and smooth the front. If your cover has an envelope back or zipper, the project remains removable and easier to store. If you glued a cover completely closed around stuffing, it becomes permanent, which is fine for seasonal decor but less convenient for washing.
Design Ideas for a Felt Snowflake Pillow Cover
One of the best things about a no sew felt snowflake pillow cover is that it can match almost any decorating style. Here are a few ideas to help you move beyond the basic white snowflake.
Classic Christmas Snowflake Pillow
Use a red pillow cover with white felt snowflakes. Add one small green felt holly leaf in a corner if you want a Christmas touch. Keep the layout simple so it does not compete with patterned throws or tree decorations.
Modern Winter Minimalist Pillow
Choose a charcoal, black, or deep navy pillow cover. Add one oversized white or light gray snowflake slightly off center. This style looks sharp on leather sofas, neutral bedding, or modern farmhouse benches.
Cozy Cabin Snowflake Pillow
Use plaid fabric, burlap-look cotton, or a sweater-textured pillow cover. Add cream wool-blend felt snowflakes. The finished pillow feels perfect for cabins, fireplaces, hot cocoa stations, and pretending you chop your own firewood.
Kids’ Room Snowflake Pillow
Try bright felt colors like turquoise, pink, lavender, and mint. Use several small snowflakes in different shapes. Add felt initials for personalization. Kids love the raised texture, and you can make the design cheerful rather than overly formal.
Glam Snowflake Pillow
Use silver, gold, or glitter felt on a velvet pillow cover. Add a few rhinestones at the center of each snowflake. Keep the rest of the pillow simple so the sparkle feels intentional, not like a craft drawer exploded.
Common Mistakes and How to Avoid Them
Using Too Much Glue
More glue does not mean more strength. It often means more mess. Use a thin layer and press the felt firmly into place. Add small dots at snowflake tips and delicate branches.
Skipping the Test Patch
Always test adhesive on a scrap of felt and similar fabric if possible. Some glues dry stiff, some show through pale fabrics, and some do not bond well to textured covers. A two-minute test can save your pillow from becoming a decorative cautionary tale.
Cutting a Design That Is Too Delicate
Snowflakes are beautiful because they are detailed, but felt has limits. If the lines are too thin, they may stretch, tear, or curl. Use bold branches for your first pillow, then try more intricate shapes once you know how your felt behaves.
Not Letting Adhesive Cure
A pillow is handled, fluffed, leaned on, and occasionally attacked by pets who believe all soft objects belong to them. Let the adhesive cure completely before using the pillow. This helps the snowflake stay attached through normal seasonal use.
How to Care for Your No Sew Felt Snowflake Pillow Cover
Because this project uses felt and adhesive, gentle care is best. Spot clean with a damp cloth when possible. Avoid soaking the pillow unless your adhesive and pillow cover are both labeled washable. If the cover must be washed, turn it inside out, use cold water, and air dry. However, for most handmade seasonal pillow covers, spot cleaning is the safer choice.
Store the pillow cover flat or loosely folded. Avoid crushing the felt under heavy decorations. If a snowflake edge lifts after storage, reattach it with a small amount of fabric glue and press it under a book until dry.
Budget-Friendly Tips
This DIY snowflake pillow cover can be very affordable. Start with pillow covers you already own and add removable seasonal designs. Use felt sheets from a craft store, leftover wool felt, or felted sweater scraps. Thrifted sweaters can become charming snowflake material if they are felted properly and cut cleanly.
You can also make several covers from one pack of felt. A single large snowflake on each pillow creates a coordinated set without requiring identical designs. Mix colors and sizes for a layered winter look across the sofa.
If you want to decorate on a tight budget, use one high-impact pillow in the center of your sofa rather than making six. Pair it with plain neutral pillows and a textured throw. The snowflake pillow becomes the star, and your wallet gets to keep its dignity.
Where to Use a Felt Snowflake Pillow
A no sew felt snowflake pillow cover works in more places than the living room. Place one on a guest bed to make the room feel ready for holiday visitors. Add one to an entry bench so your home feels festive the moment guests walk in. Use a small lumbar version on a dining chair, reading chair, or nursery rocker.
For a porch or covered entry, choose outdoor-safe fabric and adhesive, but keep felt away from heavy moisture. Felt is cozy, not waterproof. It wants cocoa and candles, not sideways rain.
Extra Experience Notes: What Making This Pillow Cover Teaches You
Making a no sew felt snowflake pillow cover teaches one big lesson quickly: simple crafts look best when you slow down at the beginning. The cutting and gluing are easy, but the planning makes the difference between “handmade and charming” and “I wrestled a snowflake and lost.” Before attaching anything, spend a few minutes choosing the right contrast. White felt on a white pillow can look elegant in person, but it may disappear in photos. If the pillow will be used in holiday blog images, shop photos, or social media posts, choose enough contrast so the snowflake reads clearly.
Another useful experience is learning how different felt types behave. Cheap acrylic felt is easy to find and works well for casual decor, but it can stretch slightly when cut into narrow branches. Wool-blend felt often feels richer, cuts cleaner, and looks more polished. Felted sweater material adds gorgeous texture, though it may be thicker and harder to glue flat at tiny points. If this is your first attempt, make one test snowflake from scrap felt before cutting your final design. You will quickly learn whether your scissors are sharp enough and whether the template needs thicker lines.
Adhesive choice also changes the personality of the project. Fabric glue is beginner-friendly because you can position the snowflake by hand and adjust it briefly before it sets. Fusible adhesive gives a flatter, more professional applique look, but it requires careful heat control. Hot glue is fast, but it can create bumps and stiff ridges, so it is better for small accents than large flat snowflakes. For pillow covers that people will actually lean against, flexible fabric glue or fusible web usually feels more comfortable.
One practical trick is to insert a piece of cardboard inside the pillow cover before gluing. This prevents adhesive from seeping through to the back layer and accidentally turning your pillow cover into a sealed fabric sandwich. Another smart habit is to place a ruler across the pillow front to check whether your center snowflake is truly centered. The human eye is good, but it also lies when distracted by holiday music and snacks.
Finally, this project is a confidence builder. Once you make one snowflake pillow, you can adapt the same no sew applique method for stars, trees, hearts, leaves, letters, moons, or monograms. The technique is simple enough for beginners but customizable enough for experienced crafters. It is also forgiving, which is exactly what a holiday project should be. December already has enough pressure. Your pillow cover should not be one of them.
Conclusion
A No Sew Felt Snowflake Pillow Cover is one of the easiest ways to bring winter charm into your home without sewing, overspending, or surrendering your dining table to a complicated craft project for three days. With a plain pillow cover, felt, a snowflake template, and the right adhesive, you can create a custom seasonal accent that looks thoughtful, cozy, and handmade in the best possible way.
The key is to choose sturdy materials, cut a bold snowflake design, test your adhesive, and let everything dry completely. Whether your style is rustic farmhouse, modern minimalist, playful Christmas, or elegant winter lodge, this DIY felt pillow cover can be adapted to match your space. It is budget-friendly, beginner-friendly, and delightfully low-stress. In other words, it is the rare holiday decoration that will not ask you to untangle lights, climb a ladder, or explain glitter to your vacuum cleaner.
Note: This article is an original, publish-ready guide based on practical no-sew pillow-cover methods, felt applique techniques, adhesive-use best practices, and winter craft design principles.