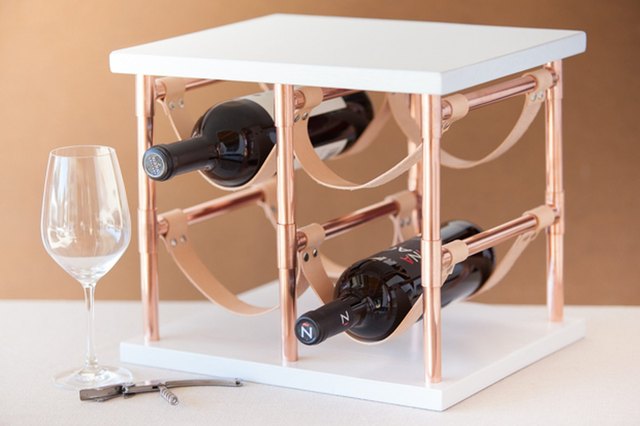
A copper pipe and leather wine rack is one of those rare DIY projects that looks expensive, feels custom, and does not require you to remortgage the house or befriend a blacksmith. With a handful of copper fittings, a strip of sturdy leather, a pipe cutter, and a free afternoon, you can build a modern wine rack that feels right at home on a kitchen counter, bar cart, dining room shelf, or cozy home wine corner.
The beauty of this project is the mix of materials. Copper brings warmth, shine, and a slightly industrial edge. Leather softens the structure and cradles the bottles like a very stylish hammock. Together, they create a small-space wine storage solution that is practical, attractive, and surprisingly beginner-friendly. If you can measure carefully, tighten your grip without panicking, and avoid gluing your fingers into a permanent peace sign, you can make this rack.
This guide explains how to make a copper pipe and leather wine rack from start to finish, including materials, measurements, cutting tips, assembly, leather strap installation, finishing ideas, safety notes, troubleshooting, and real-world experience from building and using this kind of project. The finished rack described here holds three standard 750 ml wine bottles horizontally, which helps keep corks moist and makes the rack both decorative and functional.
Why Build a Copper Pipe and Leather Wine Rack?
Store-bought wine racks are everywhere, but many of them fall into two categories: too plain or strangely dramatic. One looks like it belongs in a utility closet; the other looks like it expects you to introduce it at dinner. A DIY copper pipe wine rack lands in the sweet spot. It is compact, handsome, useful, and easy to customize.
Copper pipe is strong, widely available at hardware stores, and easy to cut with a simple tubing cutter. It also ages beautifully. Fresh copper has a bright rose-gold tone, while untreated copper slowly develops a deeper patina. Leather adds texture and support, holding the bottles gently without scratching the glass. The combination works especially well in modern farmhouse, industrial, rustic, midcentury, boho, and transitional interiors.
Another advantage is size control. A homemade wine rack can be built for a small apartment counter, a narrow cabinet shelf, or a home bar where every inch matters. You can make it taller, wider, darker, shinier, more rustic, or more polished depending on your taste. Unlike some DIY projects that begin with optimism and end in a garage full of regret, this one is manageable.
Project Overview
This version creates a freestanding three-bottle rack using a rectangular copper frame and leather bottle slings. The copper frame provides the structure. The leather strips run across the frame and support the bottles on their sides. The rack is designed for countertop or shelf use, not wall mounting.
Skill Level
Beginner to intermediate. No welding is required. Soldering is optional, but not necessary if you use strong epoxy and allow proper cure time.
Estimated Time
About 2 to 4 hours of active work, plus curing time if you use adhesive.
Finished Size
Approximately 14 inches wide, 9 inches deep, and 8 inches tall, depending on your exact pipe lengths and fittings.
Capacity
Three standard 750 ml wine bottles. Champagne bottles and wider Burgundy-style bottles may need more spacing.
Materials You Will Need
Before cutting anything, gather all supplies and lay them out. This prevents the classic DIY tragedy of discovering you own twelve elbows, two tees, and zero patience.
- One 10-foot length of 1/2-inch copper pipe or tubing
- Eight 1/2-inch copper 90-degree elbows
- Four 1/2-inch copper tees
- Two-part epoxy suitable for metal, or soldering supplies if preferred
- Leather strip, about 34 inches long by 8 inches wide, or several precut leather straps
- Line snaps, rivets, Chicago screws, or brass fasteners
- Optional felt pads for the bottom of the frame
- Optional clear lacquer or wax for protecting the copper finish
Tools You Will Need
- Pipe cutter or tubing cutter
- Tape measure
- Permanent marker
- Deburring tool, round file, or utility knife
- Fine-grit sandpaper or steel wool
- Leather punch or rotary hole punch
- Rivet setter, snap setter, or screwdriver for Chicago screws
- Clamps or painter’s tape for holding joints while curing
- Safety glasses and work gloves
Recommended Cut List
The following cut list works well for a compact three-bottle rack. Dry-fit the frame before gluing or soldering, because copper fittings can slightly change the finished dimensions.
- Four copper pieces at 14 inches for the front and back horizontal rails
- Four copper pieces at 7 inches for the side depth rails
- Four copper pieces at 6 inches for the vertical supports
- Two copper pieces at 5 inches for center supports, if using tees for extra stability
If you want a wider rack for larger bottles, increase the 14-inch rails to 16 inches. If you want a smaller two-bottle rack, reduce the width to about 10 or 11 inches and use fewer leather slings.
Step 1: Measure and Mark the Copper Pipe
Start with the copper pipe on a clean, flat surface. Use a tape measure and permanent marker to mark each cut. Accuracy matters here because uneven pieces can make the finished rack wobble. The rack does not need aerospace precision, but it should not look like it was assembled during an earthquake.
Measure each piece twice before cutting. If possible, mark all pieces of the same length at once. For example, mark all four 14-inch rails before cutting them. This helps keep the frame symmetrical and saves time.
Step 2: Cut the Copper Pipe
A tubing cutter is the best tool for clean, straight cuts. Place the cutter wheel on your mark, tighten it lightly, and rotate it around the pipe. Tighten a little after every few turns until the pipe separates. Do not over-tighten too quickly, because that can crush or deform the pipe.
If you use a hacksaw, secure the pipe carefully and cut slowly. A saw can work, but it usually leaves rougher edges and requires more cleanup. For a decorative project like this, clean cuts make a noticeable difference.
Step 3: Deburr and Smooth the Pipe Ends
After cutting, the inside edge of the copper pipe may have sharp burrs. Remove them with a deburring tool, round file, or carefully handled utility knife. Smooth the outside edges with fine-grit sandpaper or steel wool.
This step is easy to skip and annoying to fix later. Burrs can prevent fittings from seating properly, create sharp edges, and make assembly uneven. A few minutes of smoothing now saves you from wrestling with crooked joints later.
Step 4: Clean and Polish the Copper
Wipe the copper pieces with a clean cloth to remove dust, oils, and metal shavings. If the copper is dull or has printed markings, use fine steel wool or a copper-safe cleaner to brighten it. For a soft brushed look, rub in one direction rather than scrubbing randomly.
You can leave the copper unfinished and let it patina naturally, or apply a clear protective coating after assembly. Natural patina gives the rack character over time. Clear lacquer keeps the copper brighter and more polished. Both choices are valid; it depends whether you prefer “shiny cocktail party” or “handsome old library.”
Step 5: Dry-Fit the Copper Frame
Before using adhesive, assemble the entire frame without glue. Connect the elbows, tees, and pipe sections to form a rectangular base and top frame. The vertical pieces should connect the top and bottom sections, creating a sturdy open box.
Check that the rack sits flat on the table. If one corner rises, adjust the pipe depth inside the fittings. Copper fittings allow small corrections during dry-fitting. Once epoxy is added, your correction window becomes much shorter, so do not rush.
Step 6: Choose Your Joining Method
You have two main options for securing the copper frame: epoxy or solder. Solder creates a permanent metal bond and is excellent for strength, but it requires a torch, flux, solder, and more safety precautions. Epoxy is easier for most home crafters and avoids open flame. For a decorative countertop wine rack, a high-quality two-part metal epoxy is usually sufficient when used correctly.
If using epoxy, roughen the pipe ends lightly with sandpaper where they enter the fittings. Clean the surfaces, mix the epoxy according to the manufacturer’s directions, apply a small amount inside the fittings, and assemble the frame. Use clamps or painter’s tape to hold the shape while it cures. Let the rack cure fully before adding bottles. A joint that feels dry after ten minutes may still need many hours to reach full strength.
If soldering, work in a safe, ventilated area away from flammable materials. Clean and flux the pipe and fittings, heat evenly, and apply solder carefully. For beginners, practice on scrap pipe first. Since this is not a plumbing project, the goal is structural stability and clean appearance rather than watertight performance.
Step 7: Cut the Leather Straps
The leather straps are the bottle supports. For a three-bottle rack, cut three strips about 2 inches wide and 12 to 14 inches long. The exact length depends on your frame depth and how much sag you want. The strap should cradle the bottle, not let it swing like a porch hammock in a thunderstorm.
Use vegetable-tanned leather, upholstery leather, or sturdy faux leather. Avoid thin fashion leather that stretches too much. A thickness of about 4 to 6 ounces is a good general range for strength and flexibility. If using faux leather, choose a reinforced material with minimal stretch.
Step 8: Punch Holes for Snaps or Rivets
Wrap one leather strip around the front and back copper rails to test the fit. Mark the hole locations with a pencil or awl. The strip should loop around the copper pipe and fasten securely underneath or on the side where the hardware is less visible.
Punch clean holes using a rotary punch or leather hole punch. Do not stab holes with random kitchen tools unless you enjoy ragged edges and personal disappointment. Clean holes make the hardware easier to install and help prevent tearing.
Step 9: Attach the Leather Straps
Install snaps, rivets, Chicago screws, or brass fasteners through the punched holes. Snaps make the straps removable, which is useful if you want to clean or replace them later. Rivets create a more permanent hold. Chicago screws are strong and adjustable, making them a good choice if you want a polished look without specialized leatherworking tools.
Space the three straps evenly across the width of the rack. Place one near the left side, one in the center, and one near the right side. Test with empty bottles first. The bottles should rest securely in the leather slings without rolling forward or leaning too much.
Step 10: Add Stability and Surface Protection
Once the frame is cured and the straps are attached, place the rack on a flat surface and test for wobble. If needed, add small felt pads to the bottom corners. Felt pads protect countertops and help correct tiny differences in height.
For extra stability, you can add a narrow copper crossbar along the back or use tees in the frame to create a center brace. This is especially useful if the rack will be moved often or used in a busy kitchen.
Step 11: Test the Rack Safely
Do not immediately load the rack with your most precious bottle. Start with empty bottles or inexpensive full bottles and observe how the frame behaves. Make sure the leather does not stretch excessively and the joints do not twist. Leave the test bottles in place for an hour, then recheck the straps and fittings.
A good wine rack should feel calm and boring once loaded. If it creaks, leans, or shifts, fix the issue before using it for regular storage. Wine belongs in glasses, not rolling dramatically across the floor.
Design Variations
Make It a Two-Bottle Rack
Shorten the width and use two leather straps. This is ideal for apartments, small bars, or gifting.
Create a Dark Leather and Aged Copper Look
Use brown or black leather and leave the copper untreated. Over time, the copper will darken and develop a warmer vintage character.
Use Faux Leather for a Vegan-Friendly Version
Choose a thick, reinforced faux leather or vinyl. Make sure it has enough strength to hold full bottles without stretching.
Add Decorative Hardware
Brass rivets, antique snaps, or black Chicago screws can change the whole personality of the rack. Hardware is small, but visually powerful.
Build a Wider Rack
Increase the horizontal copper rails and add more leather slings. For more than four bottles, consider adding a center support to prevent flexing.
Where to Place Your Wine Rack
A copper pipe and leather wine rack looks great on display, but wine still prefers stable conditions. Place the rack away from direct sunlight, ovens, stovetops, radiators, fireplaces, and the top of the refrigerator. Heat and light can damage wine quality over time, especially if bottles sit there for weeks or months.
A cool, shaded spot is best. A dining room cabinet, pantry shelf, sideboard, or bar area away from heat sources works well. This rack is perfect for short-term storage and display. If you are storing collectible wine for years, use a proper wine fridge or cellar environment.
Common Mistakes to Avoid
Skipping the Dry Fit
Dry-fitting is the difference between a clean geometric rack and a shiny copper puzzle with attitude. Always assemble before gluing.
Cutting Too Fast
Rushing pipe cuts can dent the copper or create uneven pieces. Tighten the cutter gradually and rotate smoothly.
Using Stretchy Leather
Soft, stretchy leather may look beautiful but sag under bottle weight. Choose sturdy leather that holds its shape.
Loading Bottles Before Adhesive Cures
Epoxy needs full cure time to reach maximum strength. Follow the product instructions and resist the urge to test too early.
Placing the Rack Near Heat
A wine rack near the oven may look charming, but wine dislikes heat. Choose beauty and common sense. They can sit together.
Maintenance Tips
Dust the copper with a soft cloth. If you want the copper to stay bright, polish it occasionally and consider a clear protective coating. If you like patina, clean gently and avoid abrasive products. For leather, wipe with a dry or slightly damp cloth and condition natural leather occasionally to prevent drying. Avoid soaking the leather, especially around hardware.
Check the fasteners every few months. If a snap loosens or a screw backs out, tighten it before placing bottles back on the rack. Small maintenance habits keep the wine rack safe, handsome, and ready for guests.
Real-World Experience: What You Learn While Making a Copper Pipe and Leather Wine Rack
The first thing you learn while making a copper pipe and leather wine rack is that measuring is not a suggestion. It is the quiet boss of the entire project. A difference of even one-eighth of an inch can make the frame sit slightly crooked. During a real build, the smartest move is to cut one piece, use it as a reference for the matching pieces, and label groups with painter’s tape. This keeps the four long rails together, the side rails together, and the vertical supports from wandering into the wrong part of the frame like confused little copper tourists.
The second lesson is that dry-fitting feels slow but saves the project. Copper fittings can be snug, loose, or slightly inconsistent depending on the brand and manufacturing tolerance. When you assemble everything before adhesive, you can rotate fittings, adjust depth, and check squareness. Once epoxy enters the chat, your calm little craft session becomes a timed event. Having the whole layout already tested makes final assembly much smoother.
Leather also teaches patience. It is tempting to cut the straps exactly to the first measurement, punch the holes, and call it done. But leather behaves differently depending on thickness, finish, and flexibility. A strap that looks perfect flat may sag too much once a full bottle rests on it. The best approach is to cut one test strap slightly longer than needed, wrap it around the frame, place an empty bottle on it, and adjust from there. After the first strap fits well, use it as the template for the others.
Hardware choice matters more than many beginners expect. Snaps are convenient because the leather can be removed, but weak snaps may pop open under load. Rivets are strong and clean-looking, but they are permanent. Chicago screws are forgiving because they can be tightened, removed, or replaced. For a first build, Chicago screws are often the easiest path to a professional result without buying an entire leather shop’s worth of tools.
Another practical discovery is that copper fingerprints are real. The frame may look perfect during assembly, then suddenly show smudges under bright kitchen lighting. A final wipe with a soft cloth makes a big difference. If you plan to seal the copper, clean it thoroughly first, because a clear coating can trap fingerprints and tarnish marks underneath.
Finally, the finished rack changes how a room feels. It is small, but it adds intention. Three bottles lined up in leather slings look more thoughtful than bottles standing randomly beside the toaster. Guests notice it. Someone will probably ask where you bought it. That is your moment. Smile modestly, say “I made it,” and try not to immediately explain every fitting, strap, and measurement unless they ask. They came for wine, not a copper dissertation.
Conclusion
Making a copper pipe and leather wine rack is a satisfying DIY project because it balances style, function, and approachability. You do not need advanced woodworking skills, expensive machinery, or a workshop that looks like a television renovation show. With careful measuring, clean pipe cuts, strong joints, sturdy leather, and a little patience, you can create a custom wine rack that looks polished and personal.
This project is also easy to adapt. Make it compact for two bottles, wider for four, bright and modern with polished copper, or rustic with darker leather and natural patina. The final piece stores wine properly on its side, adds warmth to your space, and gives you the deep satisfaction of building something useful with your own hands. That satisfaction pairs nicely with dinner, by the way.