Blank walls have a strange talent for making a perfectly nice room feel like a waiting area at a dentist’s office. The good news: you do not need a gallery budget, advanced woodworking skills, or a garage full of tools to fix that problem. A pile of inexpensive wood shims, a little paint, and some creative arranging can become a bold piece of DIY wall art that looks far more expensive than it really is.
This easy wood shim wall art project creates a textured sunburst design that works in modern, farmhouse, boho, rustic, and eclectic spaces. You can make it in an afternoon, customize the colors to fit your room, and proudly say, “Yes, I made that,” while pretending the project did not involve standing back every five minutes and squinting at the wall.
Why Wood Shims Are Perfect for Cheap DIY Wall Art
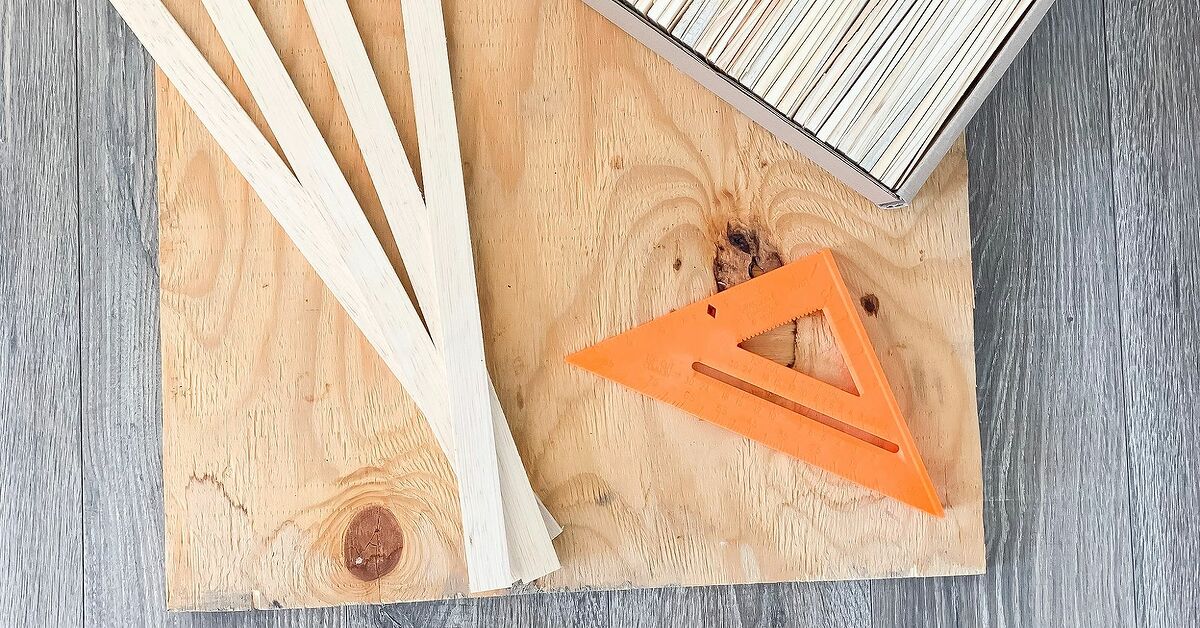
Wood shims are thin, tapered pieces of wood usually used to level doors, cabinets, furniture, and other building materials. Their wedge shape makes them especially interesting for decorative projects because they naturally create movement, texture, and dimension without requiring complicated cuts.
For DIY wall décor, shims have several advantages. They are lightweight, inexpensive, easy to paint or stain, and available in bundles at most home improvement stores. Their tapered ends also make it easy to build sunburst patterns, geometric designs, chevrons, arrows, mountain shapes, or abstract wall sculptures.
The best part is that wood shims do not need to look perfect. A few natural knots, slightly different grain patterns, or uneven edges can make the finished piece feel handmade rather than factory-produced. In wall art, “perfectly uniform” is often another way of saying “kind of boring.”
What You Need for This DIY Wood Shim Wall Art Project
This project is designed to be simple and affordable. You can use materials you already have, swap finishes, or make the artwork larger if your wall is feeling particularly dramatic.
Materials
- One bundle of unfinished wood shims
- A 12-inch to 16-inch plywood square, MDF board, wood panel, or sturdy craft board
- A small unfinished wood circle, coaster, plaque, or cardboard circle for the center
- Wood glue or construction adhesive
- Acrylic craft paint, latex paint samples, wood stain, or spray paint
- Painter’s tape
- Optional clear sealer, polyurethane, or matte topcoat
- Picture-hanging hardware, sawtooth hanger, or adhesive picture strips
Tools
- Fine-grit sandpaper or a sanding sponge
- Soft cloth or tack cloth
- Pencil
- Ruler or measuring tape
- Paintbrushes or foam brushes
- Glue gun only for temporary positioning, if desired
- Safety glasses and a dust mask for sanding
Light sanding helps remove rough spots and gives paint or stain a better surface to grip. Always wipe away sanding dust before painting or staining.
Choose a Design Before You Start Gluing
The easiest design for beginners is a sunburst. The thick ends of the shims point outward, while the narrow ends tuck underneath a center circle. The result looks like a decorative wooden sun, a flower, or the glamorous cousin of a giant wooden snowflake.
Simple Color Ideas for Wood Shim Wall Art
- Natural and stained: Use walnut, oak, or weathered gray stain for warm rustic wall décor.
- Black, white, and wood: Alternate painted shims with natural shims for a modern geometric look.
- Coastal: Try soft blue, seafoam green, cream, and pale gray.
- Boho: Use terracotta, mustard, blush, muted green, and natural wood tones.
- Bold and graphic: Paint the center black, then use gold, white, and charcoal around it.
Before committing to paint, lay several shims together and test your colors. Wood can absorb stain unevenly, especially soft wood, so testing on a spare shim is worth the extra few minutes. Wood-finishing guidance also recommends sanding lightly and testing stain before finishing the entire project.
How to Make DIY Wall Art With Wood Shims: Step-by-Step
Step 1: Prepare Your Work Area
Cover your table with cardboard, a drop cloth, or an old sheet. Open windows if you are using paint, stain, spray paint, or strong adhesives. Good ventilation helps reduce indoor buildup from paint vapors and other finishing products.
Put on safety glasses before sanding, and wear an appropriate dust mask if you create visible wood dust. Even small sanding projects can create irritating dust for the eyes, skin, and respiratory system.
Step 2: Sort the Wood Shims
Spread out all of your shims and separate them into groups. Set aside the straightest, cleanest, and most attractive pieces for the front of the artwork. Save cracked or rough pieces for areas that will be hidden beneath the center circle.
Do not worry if every shim is slightly different. That variation creates texture. Think of each piece as having a tiny personality. Some are neat and polished. Some are weird little goblins. Both can belong in art.
Step 3: Sand the Rough Edges
Lightly sand the face and edges of each shim, especially if you plan to paint it. Sand in the direction of the grain whenever possible so scratches do not show through the stain or finish.
You do not need to sand every shim until it feels like a baby’s cheek. The goal is simply to remove splinters, rough fibers, and sharp corners that could catch paint or snag your fingers later.
Step 4: Mark the Center of Your Backing Board
Find the center of your plywood or MDF board by drawing light pencil lines from corner to corner. Place your center circle over the middle. This circle will hide the narrow ends of the shims, so it gives you permission to be slightly less precise. This is a gift. Accept it.
Step 5: Dry-Fit the Sunburst Pattern
Arrange the shims around the center circle before adding any glue. Place the narrow ends toward the middle and fan the wider ends outward. Start with four shims at the top, bottom, left, and right sides to create a cross shape. Then fill the spaces between them.
For a fuller sunburst, use more shims and overlap them slightly. For a cleaner, more minimalist design, leave even gaps between each shim. Rotate some shims, layer a few over others, or create two rows for extra depth.
Step back and inspect the layout from a few feet away. Your goal is balance, not mathematical perfection. If one side looks heavier, move a shim or two. This is much easier now than after the glue has decided to become emotionally attached.
Step 6: Glue the Shims to the Board
Once you like the layout, take a quick photo with your phone. That picture becomes your backup map in case the arrangement gets scrambled while you work.
Lift one shim at a time, apply a thin layer of wood glue or construction adhesive to the back, and press it onto the board. Continue from the center outward. Use painter’s tape, books, cans, or small weights to hold stubborn pieces flat while the adhesive sets.
Read the adhesive label and allow the full recommended cure time before moving or hanging the art. Some wood glues may set quickly but require much longer to reach full strength.
Step 7: Attach the Center Circle
Glue your wood circle, coaster, plaque, or painted cardboard circle over the narrow shim ends. This piece creates a polished focal point and hides the spot where your pattern gets a little chaotic.
You can leave the center natural, paint it a contrasting color, cover it with metallic leaf, or add a small family initial. For a modern look, choose black, white, or matte gold. For farmhouse wall art, try stained wood with a simple white-painted letter.
Step 8: Paint, Stain, or Leave It Natural
You can paint the shims before assembly or after they are glued down. Painting before assembly gives cleaner color blocks. Painting afterward creates a more unified finish and makes the project feel like one sculptural piece.
For paint, use thin coats and let each coat dry before adding another. Bare wood often benefits from primer because primer seals porous surfaces and can improve paint coverage.
For stain, apply a wood conditioner first if you want a more even result, especially on soft or porous wood. Then wipe on stain in the direction of the grain and remove excess stain with a clean cloth.
Step 9: Add a Protective Finish
A clear matte, satin, or gloss topcoat is optional, but it can make your DIY wall art easier to dust and more resistant to scuffs. Matte finishes keep the look soft and handmade. Satin adds a subtle glow. Gloss says, “Yes, I enjoy being noticed.”
Let every paint, stain, and sealant layer dry according to its label. Rushing the finish is one of the easiest ways to leave fingerprints, drag marks, or mysterious pet hair permanently trapped in your masterpiece.
Step 10: Hang Your Wood Shim Wall Art
For lightweight art, a sawtooth hanger or picture-hanging strips may work well. If you use adhesive hanging strips, follow the package instructions carefully, including wall cleaning, placement, and weight limits. Command recommends cleaning the wall with rubbing alcohol rather than household cleaners before applying picture-hanging strips.
For larger or heavier pieces, use traditional picture hardware attached to the wood backing. Hang the art at eye level, usually around 57 to 60 inches from the floor to the center of the piece, then step back and admire your wall’s new personality.
Easy DIY Wood Shim Wall Art Variations
Chevron Wall Art
Arrange the shims in repeating V-shapes. Paint alternating rows in two or three colors for an easy geometric statement piece. This style works beautifully above a desk, hallway table, or bed.
Wood Shim Mountains
Use the shims to create layered mountain peaks. Paint the lower shims deep green or charcoal, then fade upward into gray, cream, and white. Add a small painted moon or sun near the top for a simple landscape.
Herringbone Pattern
Place shims in angled rows that meet in the middle. This design takes a little more patience, but it looks polished and expensive. It is also a fantastic use for shims that are too short or oddly shaped for a sunburst.
Abstract Color Block Art
Paint groups of shims in different colors, then arrange them at random angles on a square backing board. There is no wrong layout here. If someone asks what it represents, say, “A visual exploration of structural asymmetry,” and leave the room before they ask another question.
Common DIY Wood Shim Wall Art Mistakes to Avoid
- Using too much glue: Excess adhesive can squeeze out around the shims and make finishing messy.
- Skipping the dry layout: Arrange the design first so you do not discover your “sunburst” resembles a confused sea creature after gluing.
- Painting before sanding: Rough fibers can show through paint and make the finish feel scratchy.
- Ignoring cure time: Adhesive and paint may feel dry before they are fully cured.
- Choosing weak hanging hardware: Always match the hanger to the finished weight of the art.
- Overthinking every imperfect shim: Handmade texture is part of the charm.
How to Keep This DIY Wall Art Project Cheap
The magic of cheap DIY wall art is not buying the cheapest possible thing at every turn. It is choosing a few simple materials that create a high-impact result. Use leftover paint samples, a scrap plywood board, an old coaster for the center circle, and shims from a previous home project.
You can also skip stain and use diluted craft paint for a washed-wood look. Mix a small amount of paint with water, brush it on, and wipe away excess with a rag. This lets the wood grain show through while using only a tiny amount of paint.
For a more upscale look without a larger budget, use one metallic accent color instead of painting every shim gold. A few gold shims among natural wood pieces can create a designer-style finish without turning your living room into a trophy case.
Real-World DIY Experience: What I Learned Making Wood Shim Wall Art
The first time I made DIY wall art with wood shims, I assumed the project would be almost suspiciously easy. I had a bag of shims, a scrap board, leftover paint, and the kind of confidence that usually appears right before someone glues their sleeve to a table. The basic process was easy, but the little decisions made all the difference.
My first lesson was that laying out the design is not optional. I started arranging shims around the center circle and immediately realized that the pieces looked very different once they were grouped together. Some were wider, some were darker, and some had little knots that suddenly looked charming instead of annoying. I moved the nicest pieces toward the front and used less attractive shims under the center circle. Nobody ever noticed the hidden pieces, which was excellent news for both the artwork and my ego.
The second lesson was to use less glue than I thought I needed. Wood glue is powerful, but it also has a dramatic streak. Too much glue squeezed out from the edges and left shiny marks that were hard to hide under stain. A thin, even layer worked much better. I also learned that painter’s tape is surprisingly useful. It held a few stubborn shims in place while the glue dried, and it prevented me from spending an hour pressing pieces down with my fingers like I was trying to calm a tiny wooden rebellion.
Painting was the most fun part because it changed the entire personality of the piece. Natural wood looked warm and rustic. White paint made it feel cleaner and more modern. A few dark blue shims added contrast without overwhelming the design. I found that painting every single shim a different color made the project look busy, while using three or four coordinated shades made it look intentional. Apparently, restraint is not just for fancy restaurants and people who own matching socks.
I also learned that the center circle matters more than expected. At first, I used a plain wooden coaster. It looked fine, but after I painted it matte black, the whole project suddenly looked finished. The center gave the eye somewhere to rest and made the sunburst pattern feel organized. It also covered the narrow shim ends, which was lucky because those ends had become less “carefully arranged” and more “tiny lumber traffic jam.”
Finally, hanging the piece taught me to check the weight before choosing hardware. The wall art looked lightweight, but the plywood backing, glue, shims, and sealer added up. I used sturdy picture hardware instead of hoping one tiny nail would perform heroically. Once it was on the wall, the art looked far more expensive than the supplies suggested. That is the true joy of a wood shim project: it transforms basic construction material into something personal, textured, and surprisingly stylish.
The biggest takeaway is that this project rewards experimentation. You do not need exact measurements, perfect shims, or professional painting skills. You need a simple plan, patience while the glue dries, and enough confidence to call your favorite mistake “intentional texture.”
Conclusion
Cheap and easy DIY wall art with wood shims proves that creative home décor does not need expensive materials or complicated tools. With a simple backing board, a bundle of shims, paint or stain, and a little patience, you can create textured wall décor that feels custom-made for your home.
Start with a sunburst design if you want a beginner-friendly project, then experiment with chevrons, mountains, herringbone, or abstract patterns once you get comfortable. The goal is not to make something that looks mass-produced. The goal is to make something that makes your wall feel more like you.
Note: Always follow the safety, ventilation, adhesive curing, paint, and hanging-hardware instructions provided by the product manufacturers you choose for your project.