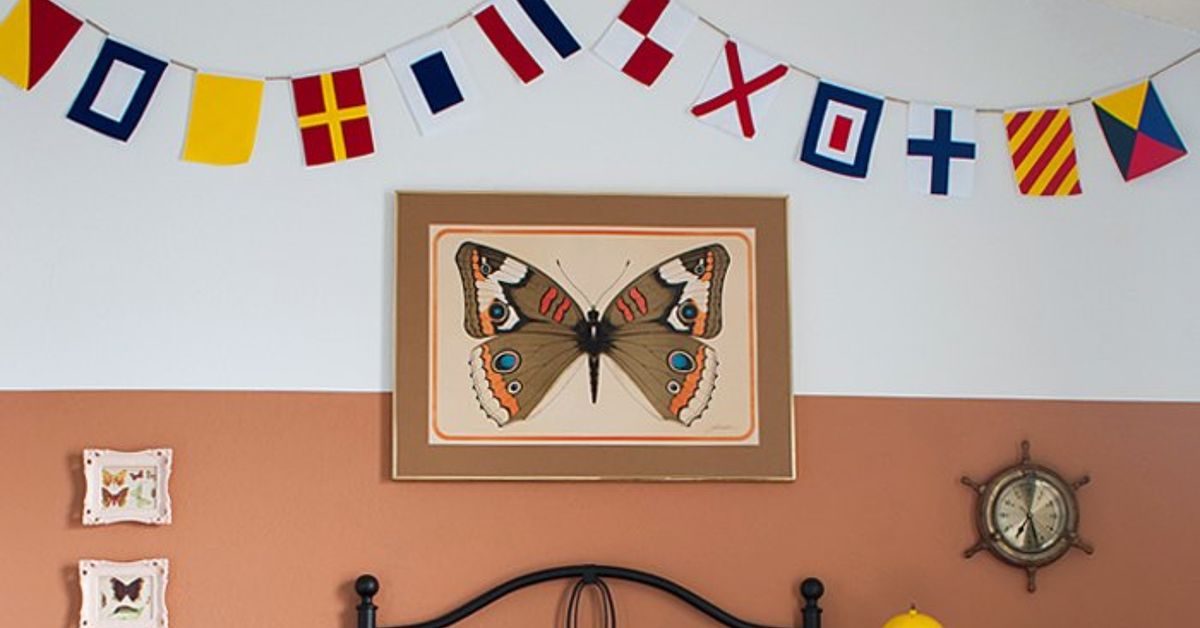
A DIY nautical flag banner can make a plain wall feel ready for salt air, striped umbrellas, and a suspiciously expensive lobster roll. With bold blocks of red, blue, yellow, white, and black, this easy coastal craft works in a beach house, lake cabin, nautical nursery, patio, summer party, or any room that needs a cheerful maritime accent.
This tutorial creates a reusable fabric banner inspired by international maritime signal flags. You can sew the flags for a crisp, durable finish or use the no-sew variation for a faster project. The guide covers sizing, templates, appliqué, assembly, hanging, outdoor care, common mistakes, and the practical lessons that make a first attempt look polished.
What Is a Nautical Flag Banner?
A nautical flag banner is a garland made from colorful flags modeled after the International Code of Signals. Each letter and number has a distinct pattern. For home décor, you can reproduce those patterns to spell a name, boat name, place, or short word such as “BEACH” or “SAIL.” You can also arrange the designs purely for color and balance.
Signal flags are especially suitable for DIY décor because their stripes, crosses, checkerboards, and diagonals can be built from simple fabric shapes. Even tiny scraps become useful, which is excellent news for the yellow cotton square that has been living in your craft drawer since 2019.
Materials and Tools
- Medium-weight cotton, canvas, felt, or outdoor fabric in nautical colors
- Lightweight fusible web and optional fusible interfacing
- Extra-wide double-fold bias tape, cotton flag tape, twill tape, or soft rope
- Polyester thread, fabric glue, or hot glue
- Cardstock for templates
- Fabric scissors or rotary cutter, ruler, iron, pressing cloth, clips, and sewing machine
Quilting cotton is easiest for beginners. Canvas hangs with more body, while felt is ideal for a quick indoor no-sew banner because it does not fray. For a covered porch, choose outdoor-rated fabric and avoid leaving the finished banner in storms or harsh sun. Fade-, moisture-, and mildew-resistant materials generally perform better outdoors, but regular care still matters.
Plan the Banner Size
A finished flag size of 5 by 7 inches is large enough to show the pattern clearly without overwhelming a mantel or wall. For a porch railing, use 8-by-10-inch flags. Leave 1 to 2 inches between flags and at least 18 inches of extra tape at each end for tying.
Measure the display area with plain string first, including the curve of the swag. Make one cardstock template for the base and separate templates for stripes, squares, triangles, or crosses. Label each design with its letter and position; several flags look unexpectedly similar when rotated.
How to Make a DIY Nautical Flag Banner
1. Prepare the Fabric
Prewash washable cotton if the banner may be cleaned later. Press it flat before cutting. If the fabric feels limp, fuse interfacing to the wrong side according to the manufacturer’s instructions. Test the iron on a scrap because heat, steam, pressure, and pressing time vary by product.
2. Choose and Arrange the Flag Designs
Use a reliable signal-flag chart to translate a name or message. Draw or print each flag, number the designs in order, and break them into basic color shapes. Lay the paper versions in a row before cutting fabric. This preview helps prevent a cluster of dark flags on one side and catches backward or upside-down patterns.
3. Cut the Base Pieces
For each finished 5-by-7-inch sewn flag, cut two rectangles approximately 5.5 by 7.5 inches. One becomes the decorated front and one the backing. Cut directly to finished size when using felt. A rotary cutter and clear ruler make crisp rectangles, but sharp scissors work well if the fabric is cut one or two layers at a time.
4. Make the Color-Block Appliqué
Trace each colored shape onto the paper side of fusible web. Reverse asymmetrical shapes before tracing because the design flips during application. Rough-cut the web, fuse it to the wrong side of the colored fabric, let it cool, and cut on the final outline.
Peel away the backing, arrange the pieces on the flag front, and press with a pressing cloth using the product’s recommended time and temperature. For a banner that will be handled often, stitch around each shape with a narrow zigzag or straight stitch. Fusible web holds the layout in place; edge stitching adds long-term security.
5. Sew the Flags
Place each decorated front and backing right sides together. Sew the sides and bottom with a 1/4-inch seam allowance, leaving the top open. Trim the lower corners, turn right side out, press, and topstitch about 1/8 inch from the edge. Baste the open top closed. Repeat until your worktable resembles the headquarters of a tiny, extremely organized navy.
6. Attach the Header
Press the bias tape or flag tape flat and mark its center. Arrange the flags outward from the middle, keeping the spacing consistent. Sandwich each raw top edge inside the folded tape and secure it with clips. Sew along the open edge from one end to the other, catching every flag top. Flag tape is made to wrap and reinforce a flag edge; extra-wide double-fold bias tape is a practical craft-store substitute.
7. Hang and Adjust
Hang the banner temporarily and step back. Adjust the curve, spacing, and center position before tying permanent knots. Use removable hooks indoors or secure loops on a covered porch. Keep fabric banners away from candles, grills, heaters, and open flames.
No-Sew Nautical Flag Banner
Cut base flags from felt or interfaced fabric, then apply the geometric pieces with fusible web or fabric glue. Fold the top inch around cord and glue it closed, or glue the flag tops inside double-fold bias tape. Use a thin layer of adhesive to avoid stiff ridges, and let it cure fully before hanging. This version is ideal for parties, dorm rooms, children’s spaces, or anyone whose sewing machine is currently functioning as decorative furniture.
Styling Ideas
Spell Something Personal
Translate a child’s name for a nautical nursery, a family surname for a cabin, or a favorite coastal town for a vacation home. Initials work well in a small room.
Create a Summer Holiday Banner
Use red, white, and blue signal-inspired designs for Memorial Day, Independence Day, or a cookout. Mix in ticking stripe, anchor stencils, or sailboat silhouettes for a softer farmhouse-coastal look. Uniform templates and measured gaps keep the banner intentional.
Add Rope Details
Finish the ends with wooden beads, short tassels, or simple rope loops. One or two accents are enough; too many can make the banner look as though a craft store collided with a marina.
Common Problems and Fixes
Flags curl or flop: Add interfacing, use a heavier backing, or topstitch the edges.
Appliqué lifts: Repress it using the exact fusible-web directions, then stitch around the edges.
The banner sags: Shorten the header, move the hooks farther apart, or replace soft ribbon with twill tape or rope.
Colors fade: Use outdoor fabric, display the banner in a covered area, and store it indoors when not in use. Brush away dirt, clean gently with mild soap when suitable for the material, rinse thoroughly, and air-dry.
The message is backward: Check the final order from the viewer’s side before permanently attaching the flags.
Time and Cost
A six- to eight-flag sewn banner generally takes two to four hours. A no-sew version may take about an hour plus drying time. Using fabric scraps can keep the cost under $20. New outdoor fabric, fusible web, tape, and decorative rope may bring the total closer to $30–$50, with enough leftovers for matching coasters or a second banner.
Maker Experience: What to Expect From the Project
The most satisfying part of making a DIY nautical flag banner is watching plain scraps become a visual language. The construction looks simplerectangles, geometric pieces, and tapebut small decisions shape the result. A stripe that is slightly off center seems harmless on one flag. Across eight flags, repeated inconsistencies can make the entire row feel restless. Cardstock templates and a clear ruler are not exciting tools, yet they do more for the finished appearance than any decorative tassel.
A first build also teaches the value of arranging every flag before sewing. Individual designs may look excellent on the table but compete when placed side by side. Yellow is visually loud, navy can dominate, and white gives the sequence breathing room. Photographing the planned layout helps because a phone screen often reveals imbalance faster than eyes that have been staring at tiny triangles for an hour.
Fusible web is usually the most technical part. It creates crisp shapes without complicated piecing, but it rewards patience. The adhesive needs the correct heat, pressure, and cooling time. Peeling the backing too soon may pull the web away from the fabric. Pressing too long can leave shine or flatten texture. Testing a scrap may feel like a delay until it saves the best piece of canvas from becoming an iron-shaped cautionary tale.
The sewing stage is more forgiving. Once the pieces are fused, topstitching becomes pleasantly repetitive. Slightly uneven corners usually disappear when the banner is viewed from across the room. That makes this a good beginner project and a useful exercise for anyone trying to loosen perfectionist habits.
Attaching the flags to the header is where planning matters most. Without a center mark, it is easy to finish with a long tie on one side and a tiny tail on the other. Starting from the middle prevents this problem. Clips also hold thick folded tape more evenly than pins.
The final hanging often changes the maker’s opinion of the project. A sequence that looks busy on the worktable settles into a unified design once it curves across a blank wall. Natural light strengthens the contrast, while a small amount of movement gives the room energy. The banner stores flat, weighs almost nothing, and can be repaired one flag at a time.
Storage creates one final lesson. Folding the banner tightly can crease the appliqué and bend the corners, so rolling it loosely around a cardboard tube or hanging it from a padded hanger works better. If it must be folded, place tissue paper between the flags and keep it in a dry container. Labeling the storage bag also prevents next summer’s search through a mysterious pile of seasonal decorations.
The best lesson is to let the result look handmade. Signal flags are bold, functional graphics; they do not need heavy embellishment. Clean shapes, strong contrast, even spacing, and secure construction provide most of the style. Add one personal detaila name, harbor initials, weathered denim, or rope loopsand stop before the project begins resembling floating craft-store inventory.
Conclusion
A DIY nautical flag banner delivers a polished coastal look with basic materials and beginner-friendly techniques. Measure the display area, use templates, stabilize soft fabric, fuse or sew the color blocks, and attach the flags to sturdy tape. Whether the banner spells a message or simply celebrates maritime color, it can bring summer personality to a wall, party table, nursery, cabin, or covered porch.
Note: This banner is decorative. Do not rely on homemade flags for navigation, emergency communication, or boating safety.