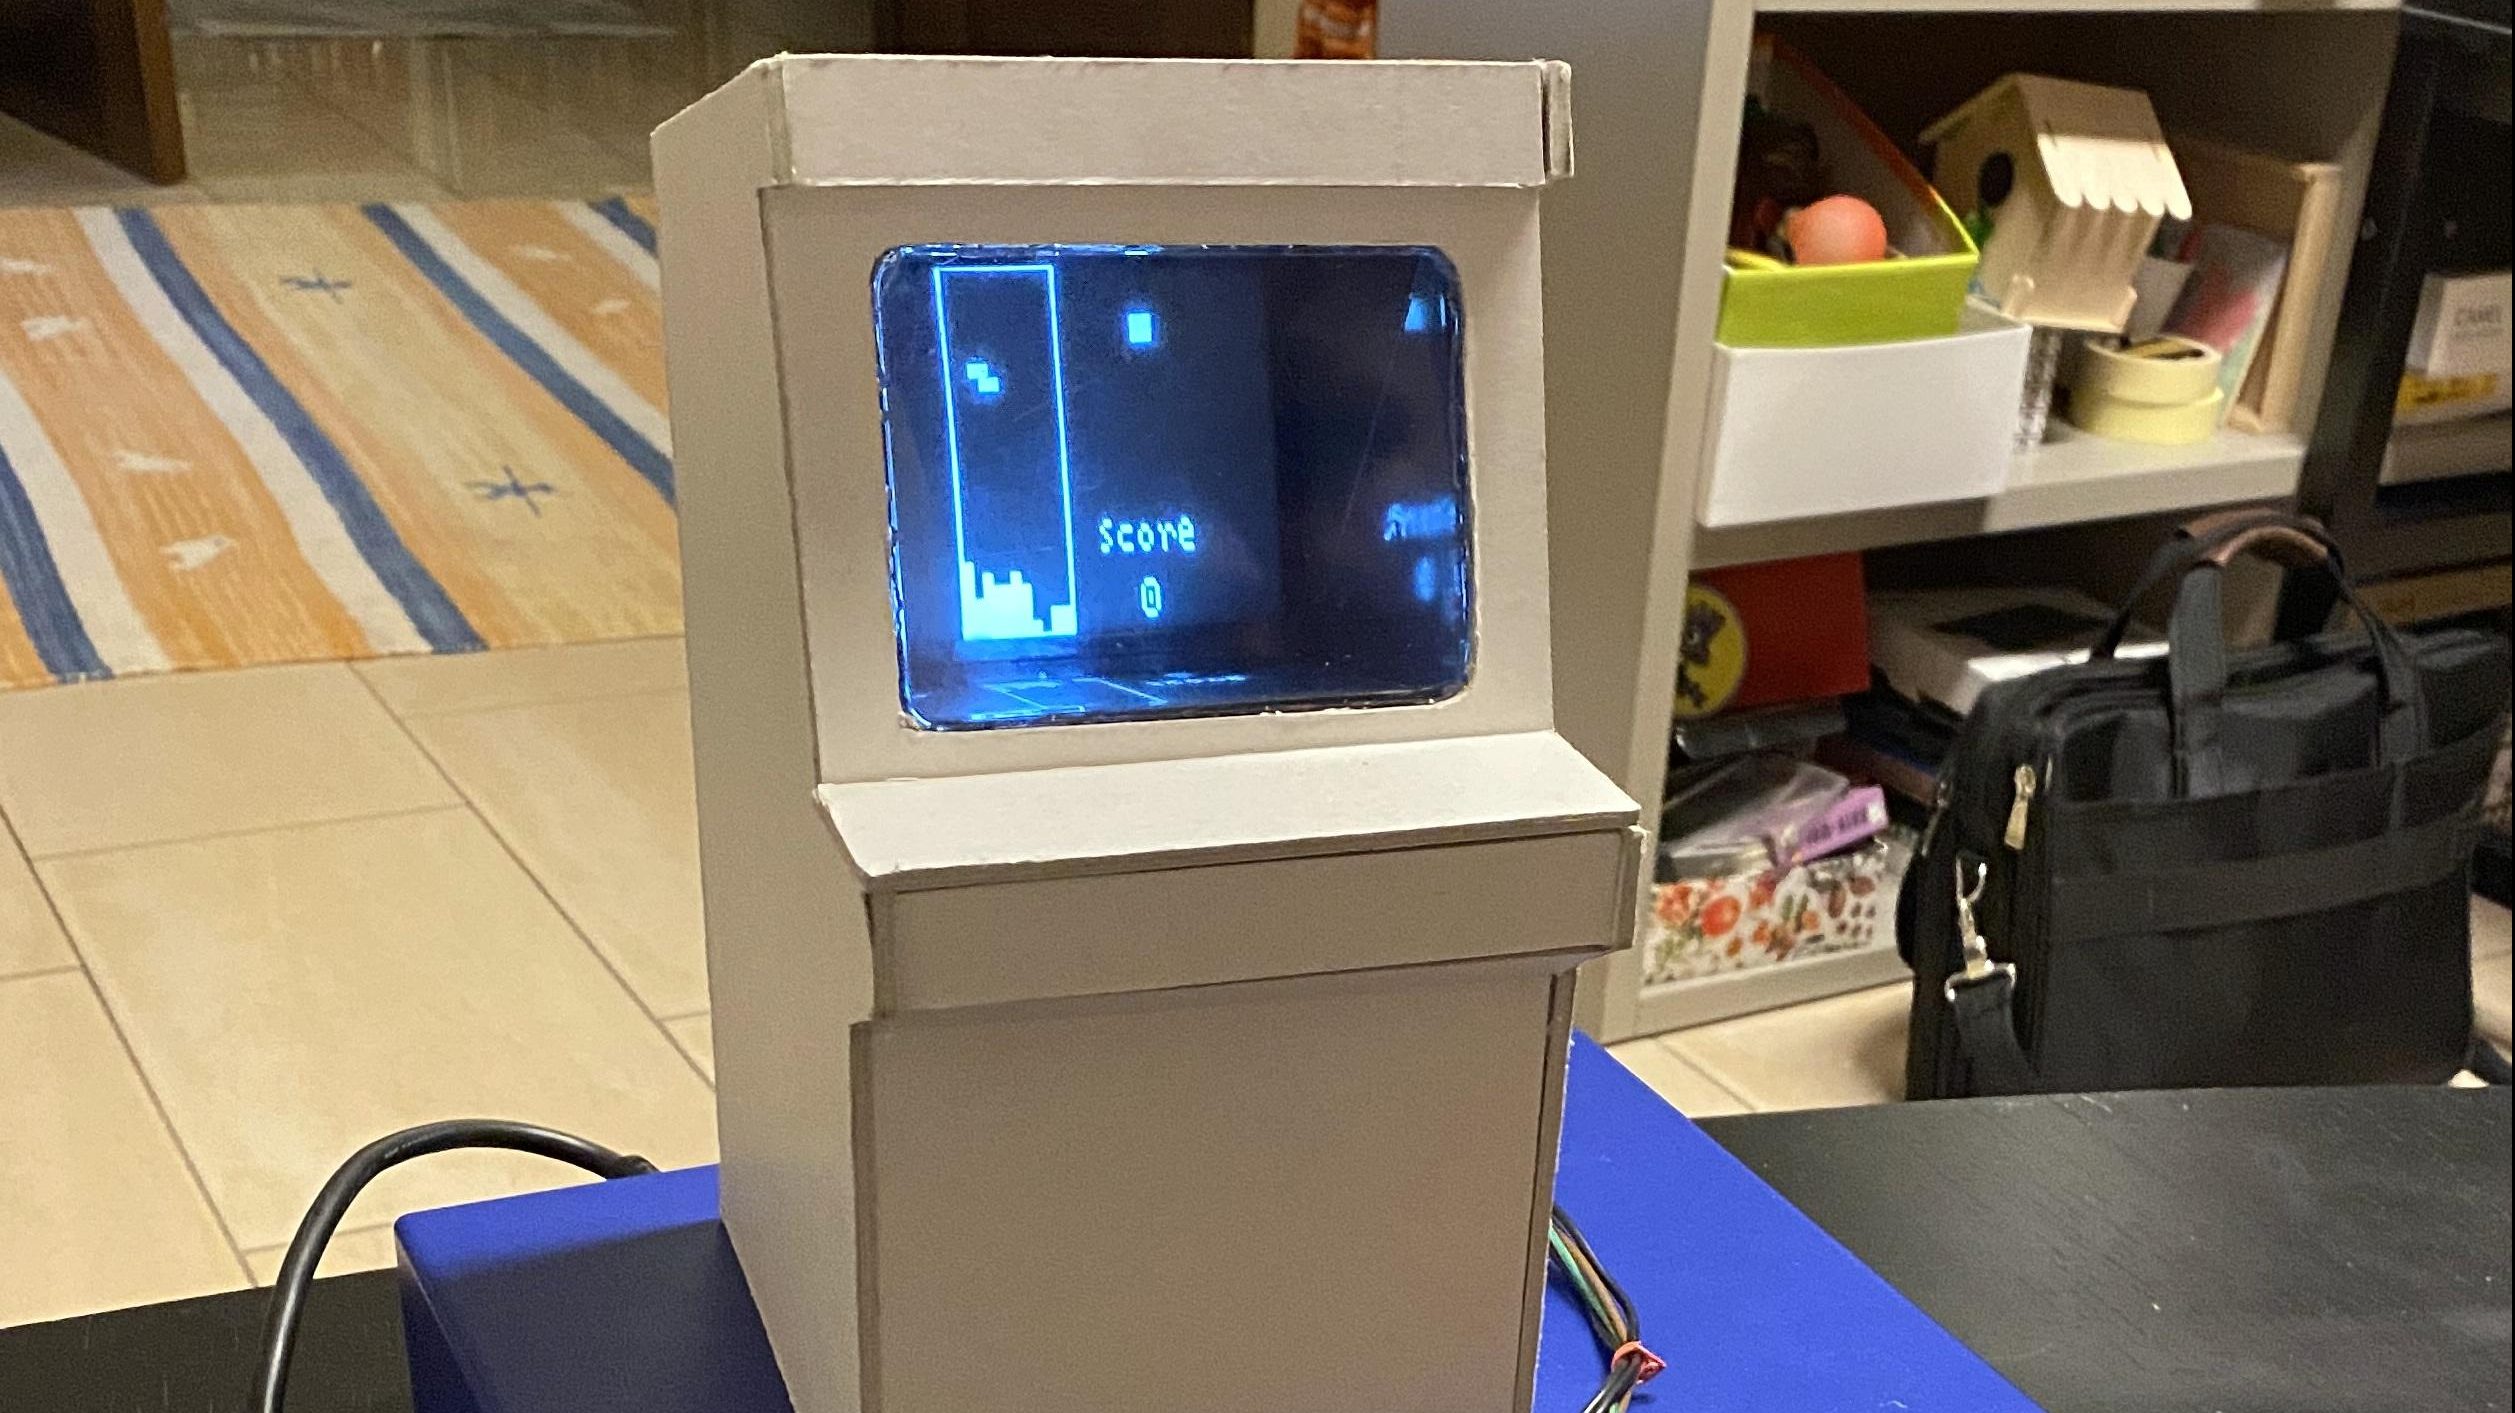
Some projects announce themselves with polished aluminum, laser-cut acrylic, and a parts list that quietly threatens your grocery budget. Others walk in wearing cardboard, hot glue, recycled buttons, and the swagger of a tiny CRT screen that refuses to retire. TVout Library Brings Cardboard Arcade To Life is very much the second kind of projectand that is exactly why it is so charming.
At the center of this retro build is a simple idea: use an Arduino Nano and the TVout library to generate a black-and-white composite video signal, feed that signal into a small salvaged CRT display, and wrap the whole thing in a handmade cardboard arcade cabinet. The result is a mini arcade machine that feels like it fell out of a 1980s repair shop, bounced through a recycling bin, and landed on a maker’s desk ready to blast aliens.
This project matters because it proves that modern maker culture does not always need expensive modules, high-resolution displays, or a single-board computer powerful enough to run a small moon base. Sometimes an 8-bit microcontroller, a few resistors, a pile of reused components, and a clever library are enough to create something memorable. It is electronics as folk art: practical, weird, educational, and just a little bit held together by optimism.
What Is the TVout Library?
The TVout library is an Arduino library designed to generate composite video from AVR-based microcontrollers. In plain English, it lets certain Arduino boards create a video signal that an old television or composite monitor can understand. Instead of using HDMI, VGA, SPI displays, or fancy OLED modules, TVout works with the yellow RCA-style video input that many older screens still have.
The default output is low-resolution, typically around 128 by 96 pixels, and it supports NTSC or PAL video formats depending on the setup. That sounds tiny by modern standards, because it is. Your smartwatch may be quietly laughing. But for retro games, simple graphics, text output, sensor dashboards, and arcade experiments, those chunky pixels are part of the fun.
TVout is interrupt-driven, meaning the microcontroller handles the tight timing required for video output in the background while the sketch draws pixels, lines, text, sprites, and basic shapes. Composite video is picky about timing. A television expects synchronization pulses and image data to arrive at the right moments. If the signal gets sloppy, the picture wobbles, rolls, tears, or disappears entirely, much like a cat when it hears the vacuum.
Why a Cardboard Arcade Works So Well
Cardboard is not glamorous, but it is one of the most underrated prototyping materials in the known universe. It is cheap, easy to cut, surprisingly strong when folded correctly, and forgiving when your first measurement was made with confidence rather than accuracy. For a mini arcade cabinet, cardboard gives builders a fast way to test proportions, button placement, screen angle, and internal layout before committing to wood, acrylic, or 3D printing.
In this build, the cardboard cabinet does more than hold parts. It completes the illusion. A bare Arduino connected to a CRT is interesting. Place that same hardware inside a tiny arcade shell, add buttons, include a front-facing display, and suddenly the project has personality. It stops looking like a science fair experiment and starts looking like a machine that should accept tokens.
The cabinet also reflects a smart design attitude: build with what you have. The project uses recycled and salvaged parts wherever possible, including a small CRT from an old video intercom system and various controls taken from unused devices. That kind of resourcefulness is central to DIY electronics. It keeps costs low, reduces waste, and gives the finished build a story.
The Heart of the Build: Arduino Nano Meets CRT
The Arduino Nano is a natural fit for this type of compact arcade project. It is small, breadboard-friendly, widely available, and based on the kind of AVR microcontroller that the TVout library supports. It does not have a dedicated graphics chip, a large frame buffer, or video hardware in the modern sense. Instead, the library squeezes a usable video signal out of general-purpose pins and strict timing.
On common Arduino Uno and Nano-style configurations, TVout uses separate pins for video and sync signals. These signals are combined through a simple resistor network to create monochrome composite video. That is one of the best parts of the library: the hardware requirements are minimal. A basic setup can be built with a few resistors, an RCA connector or cable, ground, and the correct Arduino pins.
The CRT display gives the project its soul. A low-resolution game on a crisp modern LCD can look cute, but a low-resolution game on a small black-and-white CRT looks authentic. The phosphor glow, slight softness, and analog behavior of the screen make the graphics feel alive. Space Invaders on a salvaged CRT does not look outdated; it looks like it finally found its natural habitat.
How TVout Brings the Arcade to Life
The magic happens when the Arduino sketch turns game logic into pixels, and TVout turns those pixels into a composite signal. For a simple arcade game, the microcontroller must track player position, enemy movement, collisions, projectiles, score, and input from buttons. At the same time, the display must be updated often enough to feel responsive.
In a Space Invaders-style game, the graphics can be stored as small sprite arrays. Each alien, player ship, laser, and bunker can be represented by compact patterns of black and white pixels. That is ideal for an 8-bit microcontroller with limited memory. Instead of pushing full-color textures or large images, the game draws tiny bitmap shapes at specific positions.
The TVout library handles low-level video timing, leaving the builder free to focus on gameplay. That separation is important. Without the library, generating a stable composite video signal would require careful timer configuration, direct port manipulation, and an intimate relationship with synchronization pulses. With TVout, the builder can write something closer to ordinary Arduino code and still get moving graphics on a real television-style screen.
Controls: Buttons Make It Feel Like a Real Machine
A mini arcade cabinet is only as satisfying as its controls. Touchscreens are convenient, but for retro games they are emotionally wrong. Space Invaders wants buttons. It wants clicky input. It wants the player to lean in, mash fire, and blame the hardware when an alien lands a perfect shot.
This cardboard arcade uses physical buttons for movement and firing. That simple decision makes the project feel complete. The controls are not just electrical inputs; they are part of the experience. A left button, a right button, and a fire button immediately tell the player what to do. No manual needed. No tutorial pop-up. No account login. Civilization briefly heals.
From an electronics perspective, buttons are beginner-friendly but still educational. Builders learn about digital input pins, pull-up or pull-down resistors, debouncing, and how real-world mechanical switches can create noisy signals. A polished game needs to read buttons reliably, prevent accidental double-triggering, and keep the controls responsive while the video signal continues to run.
Why This Project Is Great for Learning Electronics
The TVout cardboard arcade is a compact lesson in several important maker skills. First, it teaches video basics. Composite video may be old, but understanding it gives builders a deeper appreciation for timing, synchronization, voltage levels, and analog signals. That knowledge still matters, especially for retro computing, video art, repair work, and embedded systems.
Second, it demonstrates how software and hardware depend on each other. The game code cannot ignore the limits of the microcontroller. The graphics must fit in memory. The animation must respect timing. The inputs must be read without disrupting the display. Every design choice has a cost, which is exactly the kind of lesson that glossy plug-and-play modules often hide.
Third, it rewards practical problem solving. A salvaged CRT might not have obvious labels. The builder may need to identify power requirements, locate the composite input, test wiring carefully, and design a safe enclosure. Cardboard may need reinforcement. Buttons may need better mounting. The mirror angle or screen position may need adjustment. Each small issue becomes a chance to learn.
Important Safety Notes About CRT Displays
CRT displays deserve respect. They can contain dangerous high voltages, even after power has been removed. Anyone working inside a CRT enclosure should understand the risks and use proper safety procedures. If you are not trained, do not open a CRT or attempt internal repairs. For a project like this, the safest approach is to use a display module with an accessible low-voltage input and avoid touching internal high-voltage sections entirely.
This warning is not included to ruin the fun. It is included because keeping all ten fingers and a normally functioning heartbeat is generally considered good project management. Salvaging old electronics is rewarding, but safety should always come before nostalgia.
Why Not Just Use a Raspberry Pi?
A Raspberry Pi could emulate arcade games easily. It could output better graphics, run multiple systems, play sound samples, save high scores, connect to Wi-Fi, and possibly order pizza if properly threatened. But that is not the point of this project.
The charm of the TVout cardboard arcade is that it does more with less. An Arduino Nano is not pretending to be a full computer. It is generating simple video, reading buttons, and running a small game within tight limits. Those constraints make the project more interesting. They force creative choices. They also make the final result feel earned.
Using TVout on an Arduino brings the builder closer to the machine. You can understand the entire system: input, game loop, graphics, video output, power, cabinet, and display. There is very little hidden behind layers of operating system complexity. For students, hobbyists, and retro electronics fans, that transparency is valuable.
Design Details That Make the Build Better
Use matte black interior surfaces
If the cabinet includes a mirror or recessed screen, bright cardboard can reflect light in distracting ways. Painting the interior matte black or lining it with dark material can improve contrast and make the CRT image easier to see.
Reinforce the control panel
Buttons take abuse. Even polite players become tiny gorillas during arcade games. Adding extra cardboard layers, thin plywood, plastic sheet, or scrap panel material under the control area can prevent flexing and keep the buttons mounted securely.
Plan for service access
A cardboard arcade should not be a sealed mystery box. Leave a removable panel or rear access door so you can reach the Arduino, wiring, power connections, and display input. Future you will appreciate this when one button wire decides to retire early.
Keep wiring short and tidy
Composite video signals are analog, so messy wiring can invite noise and instability. Short leads, common ground, secure solder joints, and strain relief help keep the picture stable. The fewer spaghetti loops inside the cabinet, the better.
What Builders Can Customize
The basic concept is flexible. Space Invaders is a natural fit because it uses simple graphics and straightforward controls, but the same platform could support Pong, Breakout, Snake, Tetris-style block games, reaction timers, scrolling text demos, or tiny sensor dashboards. The TVout library can draw pixels, lines, characters, and bitmaps, which gives creative builders plenty of room to experiment.
The cabinet can also evolve. Cardboard is perfect for version one, but a second version could use laser-cut plywood, foam board, acrylic, 3D-printed brackets, or a hybrid design. Builders could add a coin slot as a joke, install a small speaker for beeps, include a volume control, add a power switch, or design custom side art. A tiny cardboard arcade with hand-drawn alien graphics has more personality than many expensive gadgets.
Experience Section: What It Feels Like to Build a TVout Cardboard Arcade
Building a project like this is not just about wiring an Arduino to a display. It feels like negotiating with three different eras of technology at once. The Arduino represents modern hobby electronics: easy to program, well documented, and friendly enough that beginners are not immediately chased away by datasheets. The CRT belongs to an older analog world where signals wiggle, timing matters, and screens glow instead of merely illuminate. The cardboard cabinet comes from the ancient civilization of “I found this box in the garage and it looks useful.” Somehow, these worlds get along.
The first satisfying moment usually comes when the CRT shows anything at all. It might be a test pattern, a line of text, a flickering block, or a slightly unstable image that looks like it is trying to escape. That moment is surprisingly exciting. Modern displays often hide the process behind polished interfaces, but composite video makes you feel the signal. When the screen locks onto the Arduino output, it feels like the machine has agreed to cooperate.
The next lesson is humility. Low-resolution graphics demand discipline. You cannot draw everything. You cannot waste memory. A spaceship may become eight pixels wide because that is all the budget allows. An alien has to look threatening with fewer dots than a modern app icon uses for its loading spinner. Strangely, that limitation makes design more fun. Every pixel has a job. Lazy pixels are fired immediately.
Then comes the cabinet work. Cardboard is fast, but it has opinions. Cut it against the grain and it bends strangely. Use too much hot glue and it develops lumps. Mount a button without reinforcement and the panel flexes like a diving board. But the material also encourages experimentation. If a panel is wrong, cut another one. If the screen angle is awkward, trim the opening. If the cabinet looks too plain, draw side art with a marker. It is prototyping without fear.
The controls are where the project becomes a game rather than a demo. Once the buttons are mounted and the player ship responds, the whole build changes emotionally. It is no longer “an Arduino generating video.” It is a tiny arcade machine. People instinctively press the buttons. They understand the object immediately. That is the power of physical interface design: good controls explain themselves.
The biggest practical lesson is that simple projects are not always easy projects. The circuit may be minimal, but the timing is strict. The cabinet may be cardboard, but alignment still matters. The game may be monochrome, but the code still needs structure. That combination makes the TVout arcade an excellent weekend build for makers who want something deeper than blinking an LED but less expensive than assembling a full retro cabinet.
Most of all, the experience reminds builders that fun does not scale with price. A salvaged screen, a tiny board, and reused buttons can produce more joy than a pristine commercial gadget because the builder understands every compromise. The imperfections become part of the appeal. The slight flicker, the handmade cabinet, the click of the buttons, and the soft glow of the CRT all say the same thing: this was made by a human, probably one with glue on their fingers.
Conclusion: A Tiny Arcade With a Big Maker Spirit
TVout Library Brings Cardboard Arcade To Life is the kind of project that captures why DIY electronics remains so addictive. It combines old video technology, simple microcontroller programming, recycled hardware, and hands-on fabrication into one small machine with a huge amount of character.
It is not the most powerful arcade build. It is not the cleanest. It is definitely not the most luxurious. But it is clever, accessible, educational, and wonderfully personal. The TVout library makes it possible for an Arduino Nano to speak the language of composite video, while the cardboard cabinet turns that signal into an object people want to touch, play, and talk about.
For beginners, the project offers a practical path into Arduino video output, button controls, game logic, and enclosure design. For experienced makers, it is a reminder that constraints can be more inspiring than unlimited resources. And for anyone with a soft spot for retro gaming, it proves that a tiny black-and-white CRT still has plenty of magic left in the tube.
Sometimes the best arcade cabinet is not built from polished panels and premium controls. Sometimes it is built from salvaged parts, a few resistors, a modest microcontroller, and cardboard that has been promoted far beyond its original job description. That is not just a build. That is maker poetry with a fire button.