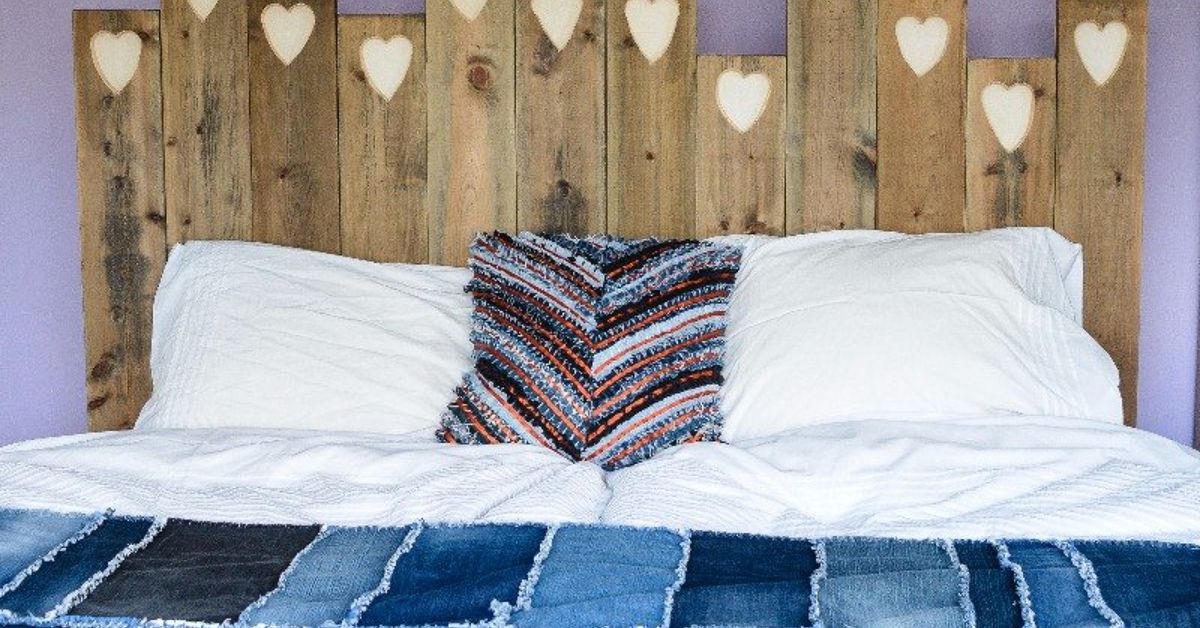
Old wood has a memory. It remembers the barn wall that faced a hundred storms, the cabinet door that survived three kitchen remodels, the fence board that watched the dog escape exactly 47 times, and the forgotten plank in the garage that everyone called “junk” until it became the most charming thing in the bedroom. Turning old wood into a loving headboard is more than a weekend DIY project. It is a small act of rescue, a design upgrade, and a polite refusal to let beautiful material end its life in a landfill.
A reclaimed wood headboard brings warmth, texture, and personality to a bedroom in a way a flat, factory-made piece rarely can. Every knot, nail mark, saw line, and weathered edge tells a story. Better yet, the project can be budget-friendly, customizable, and surprisingly approachable when planned carefully. Whether you are working with barn boards, scrap hardwood flooring, old shutters, an interior door, fence pickets, or salvaged trim, the goal is the same: transform old wood into a headboard that feels personal, sturdy, safe, and full of heart.
This guide walks through the design choices, safety checks, preparation steps, building ideas, finishing options, styling tips, and real-world lessons that help an old wood headboard look intentional instead of “I found this behind the shed and got ambitious.” Ambition is wonderful. Splinters, wobbling boards, and mysterious stains are less wonderful. Let’s build something beautiful without inviting chaos to sleep above the pillows.
Why an Old Wood Headboard Feels So Special
A headboard has a simple job: frame the bed and make the sleeping area feel finished. But when it is made from old wood, it does more than sit there looking pretty. It adds soul. Reclaimed wood can soften a modern room, make a plain white wall feel layered, and introduce natural texture without requiring a full bedroom renovation.
Old wood works especially well because bedrooms need warmth. Smooth drywall, metal bed frames, and mass-produced furniture can sometimes feel a little too polished, like a hotel room that forgot to invite a personality. A reclaimed wood headboard changes that instantly. It creates a focal point with grain, age, depth, and character. The room feels lived-in, but in the good waynot the “laundry mountain has developed its own ecosystem” way.
There is also a sustainability bonus. Reusing wood keeps usable material in circulation and reduces waste from renovation, demolition, and home improvement projects. Old boards can come from local salvage stores, Habitat ReStores, renovation leftovers, online marketplaces, or pieces already sitting in a basement or garage. Instead of buying a brand-new headboard, you can create something custom from material that already exists.
Best Types of Old Wood for a DIY Headboard
Not all old wood is ready for bedroom glory. Some pieces are perfect candidates. Others should be admired from a safe distance and then politely retired.
Reclaimed Barn Wood
Barn wood is a classic choice for a rustic headboard because it often has natural weathering, rich color variation, and a worn surface that cannot be faked easily. It looks great arranged horizontally, vertically, or in a chevron pattern. However, barn wood may contain old nails, insects, moisture damage, or unknown finishes, so careful inspection matters.
Old Doors
An old interior door can become a dramatic headboard with very little structural change. A paneled door placed horizontally behind a queen or king bed can look architectural and timeless. Add trim to the top, patch hardware holes, clean it thoroughly, and secure it properly to the wall or bed frame. Suddenly, that door has gone from “closet reject” to “boutique inn energy.”
Scrap Hardwood Flooring
Leftover hardwood flooring is excellent for a headboard because the pieces are usually milled evenly and often fit together neatly. You can mix tones for a patchwork look or stain everything one color for a more polished finish. Flooring scraps are especially useful for smaller spaces because their thinner profile keeps the headboard from feeling bulky.
Fence Boards and Pallet Wood
Fence boards and pallets can work, but they require extra caution. Outdoor wood may have absorbed moisture, dirt, pesticides, or other contaminants. Pallet wood can be rough and inconsistent. If you use it, choose clean, dry boards from a known source, avoid boards with chemical odors or suspicious stains, and sand and seal them well.
Salvaged Trim, Shutters, and Paneling
Decorative trim, shutters, beadboard, and wall paneling can create a cottage, farmhouse, or vintage-inspired headboard. These materials are often lighter than thick planks, making them easier to mount. They also bring built-in detail, which is helpful if your DIY style is more “creative editor” than “master carpenter.”
Safety First: Old Wood Needs a Background Check
Before old wood becomes a headboard, it needs a little interrogation. Where did it come from? Was it painted before 1978? Does it smell musty? Are there hidden nails? Did anything with six legs move when you picked it up? These questions are not dramatic. They are practical.
Painted antique or salvaged wood may contain lead-based paint, especially if it came from an older home or structure. Avoid sanding unknown old paint indoors. If the wood may contain lead, use proper testing and lead-safe practices, or choose a different material. No headboard is charming enough to justify spreading hazardous dust through a bedroom.
Check every board for embedded metal. Old nails, screws, staples, and wire can damage tools and create unsafe edges. A handheld metal detector is useful, but even a careful visual check helps. Look along both faces and edges of the board, mark suspicious spots, and remove hardware before cutting or sanding.
Also inspect for rot, active insect damage, mold, and deep cracks. A few wormholes can look beautiful; a board that crumbles like a cookie dunked too long in coffee is not a structural material. Choose wood that is dry, solid, and stable.
Planning the Size and Shape
A good headboard should feel balanced with the bed and the wall. Too small, and it looks like it wandered in from a twin bed. Too large, and it may dominate the room like a medieval gate. For most beds, the headboard should be at least as wide as the mattress and often two to six inches wider on each side for a generous look.
Height depends on style. A low headboard creates a relaxed, modern feel. A tall headboard feels dramatic and cozy, especially in rooms with high ceilings. A common approach is to make the headboard visible above the pillows by at least 24 to 36 inches. If you enjoy reading in bed, consider a smoother or sealed surface where your back may touch.
Before cutting anything, use painter’s tape on the wall to outline the planned headboard size. Step back. Squint. Pretend you are a very serious interior designer on a television reveal show. If the proportions look right, measure the taped outline and use those dimensions for your project.
Design Ideas for Transforming Old Wood
Horizontal Plank Headboard
The horizontal plank design is the easiest and most timeless. Boards run from side to side across a plywood backing or support frame. This layout makes the bed look wider and works well in farmhouse, coastal, rustic, industrial, and modern bedrooms. Leave tiny shadow gaps between boards for texture, or butt them closely together for a cleaner look.
Vertical Board Headboard
Vertical boards draw the eye upward and can make a low ceiling feel taller. This style is especially effective with narrow reclaimed planks or old beadboard. Add a cap rail along the top to make the headboard feel finished and to prevent it from looking like a fence accidentally moved indoors.
Chevron or Herringbone Pattern
A chevron or herringbone layout turns scrap wood into a statement piece. It requires more measuring and angled cuts, but the result can look high-end. This pattern works beautifully when old wood has different tones, because the variation highlights the geometry.
Old Door Headboard
Using an old door is one of the simplest ways to create instant architectural character. Place the door horizontally, cut it to fit if needed, patch holes, and add molding for a finished top edge. Paint it for a cottage feel, stain it for warmth, or seal its aged surface if the existing finish is safe and stable.
Patchwork Salvage Headboard
If your old wood pieces are mismatched, embrace it. A patchwork headboard can combine trim scraps, flooring pieces, shutters, and boards into a collage. Keep one element consistentsuch as color family, board thickness, or frame styleso the final piece feels collected rather than chaotic.
How to Prepare Old Wood for a Headboard
Preparation is where the project becomes successful. First, clean the wood with a stiff brush and a mild soap solution. Avoid soaking the boards. Old wood can absorb water and warp. Let everything dry completely before continuing.
Next, remove loose dirt, splinters, and unstable flakes. Sand lightly to smooth rough areas while preserving character. The goal is not to erase every mark. The goal is to make the surface safe enough that pillows, hands, and hair do not come away with souvenirs. Use a fine-grit sanding sponge for edges and corners.
If the boards are uneven in thickness, decide whether that variation is part of the charm or a problem. Slight unevenness adds texture. Extreme unevenness can make assembly difficult and create uncomfortable edges. In that case, use the thickest boards in less-contact areas or mount pieces over a plywood backing to create a stable base.
Finally, lay out the boards on the floor before attaching anything. Move pieces around until the color, grain, and knots feel balanced. Put your most interesting boards where they will be visible above the pillows. Save less exciting boards for lower areas that bedding will cover. Every headboard has a backstage section, and that is where the boring boards belong.
Building a Sturdy Reclaimed Wood Headboard
A reliable old wood headboard usually needs a backing structure. A sheet of smooth plywood works well because it keeps the boards aligned and provides a surface for adhesive and fasteners. A simple frame made from 1x or 2x lumber can also support the design. The best choice depends on the weight of your wood and whether the headboard will attach to the wall or to the bed frame.
For a plank-style design, cut the plywood to the desired size, paint the front a dark neutral color if gaps will show, and arrange the boards on top. Use wood glue or construction adhesive along with nails or screws suitable for the board thickness. If you want a cleaner look, fasten from the back where possible. Add side trim or a top cap to hide rough edges and make the headboard feel complete.
For wall mounting, a French cleat is a strong option because it spreads weight evenly and allows the headboard to hang securely. Another method is screwing through the headboard into wall studs. If attaching to a bed frame, use appropriate bolts and brackets so the piece does not wobble. A headboard should not perform a percussion solo every time someone rolls over.
If the headboard is heavy, get help lifting and positioning it. This is not the moment to prove independence while balancing a wooden rectangle near a lamp, a pet, and your dignity.
Finishing Options: Keep the Patina, Lose the Splinters
The finish determines whether the headboard feels rustic, refined, modern, or vintage. Clear matte polyurethane or water-based sealer preserves the natural look while making the surface easier to clean. Wax can create a soft sheen but may need maintenance. Stain can unify mismatched boards, while whitewash can brighten a dark room and give the wood a relaxed coastal feel.
If the wood has beautiful natural aging, avoid heavy sanding or thick glossy coatings. Too much shine can make reclaimed wood look less authentic, like it is wearing a plastic raincoat indoors. A low-sheen finish usually keeps the charm while adding protection.
For a painted headboard, choose low-VOC paint and allow it to cure fully before installation. Distressed paint can look great, but only distress safe, modern paintnot old unknown paint that could contain lead. If you want an aged look without the risk, paint new or clean reclaimed wood and distress that finish intentionally.
Styling a Bedroom Around an Old Wood Headboard
A reclaimed wood headboard is naturally expressive, so let it lead the room without forcing every other item to shout. Pair it with simple bedding, warm lighting, and textures such as linen, cotton, wool, or woven baskets. White bedding makes weathered wood look fresh. Earth tones make it feel cozy. Black accents create a modern farmhouse look without requiring the room to smell like a candle called “Barn Wedding.”
Balance is key. If the wood is very rustic, add smoother elements like ceramic lamps, crisp sheets, or a clean-lined bench. If the wood is refined and stained, add softness with quilts, pillows, or a textured rug. Plants also look beautiful near reclaimed wood because natural materials tend to enjoy each other’s company, much like people at a dinner party who both hate small talk.
Lighting can make or break the final effect. Wall sconces, warm bedside lamps, or small reading lights highlight the grain and texture. Avoid harsh overhead lighting if you want the headboard to feel romantic and calming instead of “hardware store aisle 12.”
Common Mistakes to Avoid
The first mistake is skipping safety checks. Old wood is wonderful, but unknown paint, hidden nails, pests, and mold are not design features. Inspect first, build second.
The second mistake is over-sanding. Reclaimed wood earns its beauty through age. If you sand it until every scar disappears, you may end up with something that looks like regular lumber having an identity crisis. Smooth the touch points, but preserve the story.
The third mistake is weak mounting. A headboard is near your head, which is exactly where you do not want experimental engineering. Use wall studs, strong brackets, a French cleat, or secure bed-frame hardware. If children live in or visit the home, anchoring is especially important.
The fourth mistake is ignoring scale. Measure the bed, wall, ceiling height, nightstands, and outlets before building. A headboard that blocks switches or crowds windows can turn a charming project into a daily inconvenience.
The fifth mistake is trying to make every board the star. Good design needs quiet places. Mix dramatic boards with calmer ones so the final headboard has rhythm instead of visual shouting.
Real-Life Experiences: What Old Wood Teaches You
The first thing old wood teaches is patience. At the start, the project looks easy. You see a pile of boards and think, “I will clean these, attach them, and become the kind of person who says ‘I made that’ with casual elegance.” Then you discover that one board is warped, another has three nails hiding like tiny metal villains, and the prettiest piece is exactly two inches too short. This is when the project becomes real.
Working with old wood is not like assembling flat-pack furniture. There is no cheerful booklet with tiny cartoon hands and perfect parts labeled A, B, and C. Old wood arrives with personality. Some boards bow. Some crack at the ends. Some have a color you adore on one side and a mystery stain on the other. Instead of forcing every piece to behave, the best approach is to design with the material you actually have. Lay everything out, swap boards around, and let the pattern emerge slowly.
One of the most satisfying experiences is discovering that imperfections can become the best part. A nail hole may line up perfectly near a knot. A weathered gray board may soften a warmer brown plank beside it. A chipped edge may look awkward alone but beautiful once framed. The project becomes less about perfection and more about composition. You are not hiding age; you are arranging it.
Another lesson is that preparation always takes longer than expected. Cleaning, drying, sanding, sorting, testing, trimming, and sealing can feel like a whole project before the building even begins. But those quiet steps are what make the final headboard feel comfortable and safe. Nobody wants to lean back in bed and meet a splinter with their shoulder. Nobody wants bedding snagged on rough edges. A loving headboard should be kind to the room and the people using it.
The emotional reward is bigger than expected, too. A store-bought headboard may look nice, but an old wood headboard carries a story. Maybe the boards came from a family shed, a renovation project, a salvage shop, or a neighbor who was thrilled to get them out of the garage. Once installed, the headboard becomes more than decor. It becomes a reminder that usefulness can return in a new form. Something worn can still be beautiful. Something discarded can become central. That is a pretty good message to wake up next to.
There is also a practical joy in building something custom. You can make the headboard wider than the mattress, taller than standard, darker, lighter, smoother, chunkier, cleaner, or more rustic. You can add a small ledge for art, leave gaps for shadow, or frame the edges for polish. The finished piece fits your wall because it was made for your wall, not for a warehouse shelf and an algorithm that thinks every bedroom is beige.
The best experience comes at the end, when the bed is made, the tools are put away, and the room suddenly feels complete. The old wood no longer looks forgotten. It looks chosen. It looks loved. And every time you walk into the bedroom, there is a small moment of pride. Not loud pride. Just the quiet kind that says, “Yes, that used to be scrap. Now it is the heart of the room.”
Conclusion
Old wood transformed into a loving headboard is the perfect mix of sustainability, creativity, and comfort. It gives discarded material a second life, adds warmth to the bedroom, and creates a custom focal point that cannot be duplicated by a catalog. The best projects begin with careful material selection, honest safety checks, thoughtful proportions, and a finish that protects the wood without erasing its character.
Whether you choose barn boards, an old door, salvaged trim, scrap flooring, or a patchwork of leftover planks, the magic is in honoring the wood’s history while making it useful again. A reclaimed wood headboard does not need to be flawless. In fact, flawless would miss the point. The knots, marks, and weathered edges are what make it warm, personal, and unforgettable.
Note: This article is written as original, publication-ready content based on real U.S. DIY, woodworking, home design, reclaimed-material, and safety best practices. Always test unknown old painted wood, inspect for hidden metal, and secure heavy furniture or headboards properly before use.