Madeleines are already one of the cutest desserts in the pastry world: tiny French sponge cakes with delicate edges, buttery aroma, and that famous little “hump” that makes bakers feel like they’ve successfully joined a very fancy club. But when you bake madeleines shaped like paw prints, the charm level goes from “tea party” to “tiny bakery run by golden retrievers.”
Paw print madeleines are perfect for pet-themed birthdays, baby showers, animal rescue fundraisers, dog-lover gifts, cat-lover brunches, or any day when regular cookies feel too ordinary. The best part? They look impressive, but they are surprisingly simple once you understand the batter, the mold, and the timing.
This guide walks you through how to make paw print madeleines with a tender crumb, golden edges, clear paw-pad details, and a flavor that says, “Yes, I browned the butter, and yes, I deserve applause.” You’ll learn the ingredients, equipment, baking method, decorating ideas, troubleshooting tips, storage advice, and real-world experience notes to help your first batch look adorable instead of “abstract woodland creature.”
What Are Paw Print Madeleines?
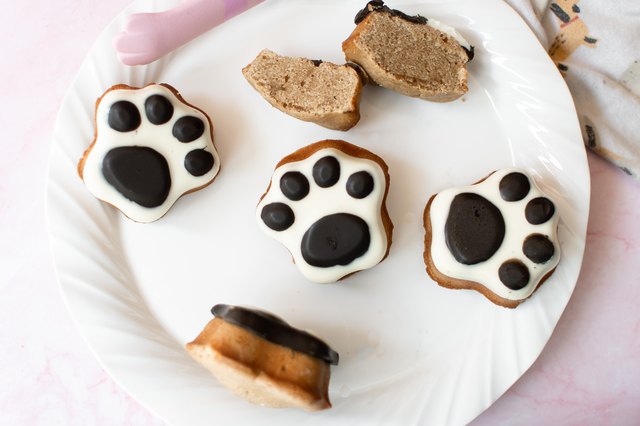
Paw print madeleines are classic madeleine-style cakes baked in a paw-shaped mold instead of the traditional shell-shaped pan. The batter is light, buttery, and sponge-like, usually flavored with vanilla, lemon zest, almond extract, honey, or browned butter. The paw shape comes from a specially designed metal or silicone mold with raised toe beans and a larger pad.
Traditional madeleines are known for three things: a delicate cake texture, lightly crisp edges, and a signature bump on the back. Paw print madeleines may not always produce the same dramatic shell-shaped hump because the mold is different, but the goal is the same: a soft, airy center with a beautifully defined shape.
Why Paw Print Madeleines Are Worth Making
There are plenty of reasons to make madeleines shaped like paw prints. First, they are visually memorable. A tray of round cookies is nice, but a tray of tiny buttery paws? That gets noticed. Second, they are portion-friendly. Each madeleine is small enough to serve with coffee, tea, milk, or a scoop of ice cream. Third, they are easy to customize. You can dip the paw pads in chocolate, dust them with powdered sugar, glaze them with lemon icing, or tint part of the batter for two-tone paws.
They also make excellent edible gifts. Wrap a few in cellophane bags, tie them with ribbon, and suddenly you are the thoughtful friend who bakes things that look like they belong in a boutique pet bakery. Just remember: unless you are using a pet-safe recipe, these are for humans, not pets. Butter, sugar, chocolate, and certain flavorings are not suitable for dogs or cats.
Ingredients for Paw Print Madeleines
This recipe makes about 18 to 24 small paw print madeleines, depending on the size of your mold.
Main Ingredients
- 1 cup all-purpose flour
- 1 teaspoon baking powder
- 1/4 teaspoon fine salt
- 2 large eggs, room temperature
- 2/3 cup granulated sugar
- 1 tablespoon honey
- 1 teaspoon vanilla extract
- 1 teaspoon lemon zest, optional but highly recommended
- 1/2 cup unsalted butter, melted and cooled slightly
- Extra melted butter or baking spray for the mold
- Flour or cocoa powder for dusting the mold
Optional Decorations
- 1/2 cup semisweet, dark, white, or ruby chocolate
- Powdered sugar for dusting
- Lemon glaze made with powdered sugar and lemon juice
- Food coloring for pastel paw pads
- Sprinkles for party-style madeleines
Best Mold for Paw Print Madeleines
The mold is the magic wand in this recipe. A metal paw print madeleine pan usually gives better browning and sharper edges because metal conducts heat more efficiently. Silicone paw molds are flexible and easy to unmold, but they may produce softer edges and lighter color. Both can work beautifully if you adjust your technique.
If you use silicone, place the mold on a sturdy baking sheet before filling it. Silicone is floppy, and nothing ruins a cheerful baking afternoon faster than carrying a filled mold to the oven and watching batter slosh like a tiny cake tsunami. For metal pans, brush every corner with melted butter and dust lightly with flour. For chocolate madeleines, use cocoa powder instead of flour so you don’t get pale dusty spots.
How to Make Madeleines Shaped Like Paw Prints
The key to good madeleines is patience. The batter is simple, but resting it helps hydrate the flour, relax the mixture, and create a better rise. Chilling the prepared mold also helps the cakes set quickly when they hit the oven, preserving those adorable paw details.
Step 1: Prepare the Butter
Melt the butter in a small saucepan or microwave-safe bowl. For extra flavor, brown the butter by cooking it gently over medium heat until golden brown specks appear and it smells nutty. Do not walk away during this step. Butter goes from “gourmet bakery aroma” to “campfire regret” very quickly.
Once melted or browned, let the butter cool for about 10 minutes. It should still be liquid but not hot. Hot butter can deflate the eggs or create a greasy batter.
Step 2: Whisk the Dry Ingredients
In a medium bowl, whisk together the flour, baking powder, and salt. This distributes the leavening evenly and helps prevent clumps. If your flour has been sitting in the pantry for a while, fluff it before measuring or use a kitchen scale for accuracy. Too much flour can make madeleines dense instead of tender.
Step 3: Beat the Eggs and Sugar
In a large bowl, beat the eggs and sugar for 3 to 5 minutes, until the mixture becomes pale, thick, and slightly ribbon-like. You can use a hand mixer, stand mixer, or a strong whisk and a hopeful attitude. The goal is to incorporate air, which helps the madeleines bake up light and fluffy.
Add the honey, vanilla extract, and lemon zest. Honey adds moisture and a gentle floral sweetness, while lemon zest gives the buttery cakes a bright finish. If you prefer a cozy flavor, replace lemon zest with orange zest or a tiny pinch of cinnamon.
Step 4: Fold in the Flour
Add the dry ingredients to the egg mixture in two additions. Fold gently with a spatula until just combined. Avoid aggressive mixing. Madeleine batter likes to be treated like a delicate houseguest, not a stubborn pancake batter.
Step 5: Add the Melted Butter
Slowly drizzle the cooled melted butter into the batter while folding gently. The batter should become glossy and smooth. If it looks slightly loose, that is normal. Cover the bowl and refrigerate the batter for at least 45 minutes, or up to 2 hours. Chilling helps the batter thicken and improves the final texture.
Step 6: Prepare the Paw Print Mold
Brush the paw print mold with melted butter, making sure to coat the toe pads and center pad. Dust lightly with flour, then tap out the excess. For silicone molds, a light coat of baking spray may be enough, but butter and flour often create better detail and release.
Place the prepared mold in the freezer for 10 minutes while the oven preheats. A cold mold helps the batter set faster, which can make the paw print details cleaner.
Step 7: Fill the Paw Shapes
Preheat the oven to 375°F if using a metal pan or 350°F if using silicone. Spoon or pipe batter into each paw cavity, filling each about three-quarters full. A piping bag or zip-top bag with the corner snipped off gives you more control, especially around the small toe pads.
Do not overfill the molds. Madeleine batter rises, and too much batter can blur the paw shape. If the cavities are tiny, start with less than you think you need. You can always add a little more, but you cannot politely ask batter to retreat once it has overflowed.
Step 8: Bake Until Golden
Bake metal-mold paw print madeleines for about 8 to 11 minutes. Silicone molds may need 10 to 13 minutes. The madeleines are done when the edges are lightly golden, the tops spring back when touched, and a toothpick inserted into the center comes out clean.
Avoid opening the oven door too early. Sudden heat loss can interfere with the rise. Start checking near the low end of the baking time and rotate the pan only if your oven has obvious hot spots.
Step 9: Cool and Unmold
Let the madeleines cool in the pan for 2 to 3 minutes. Then gently remove them and transfer to a wire rack. If using silicone, flex the mold carefully from underneath. If using metal, loosen the edges with a small offset spatula if needed.
For the cleanest paw details, place the paw-print side facing up on the rack. Let them cool completely before decorating, unless you are serving them warm and plain, which is always a respectable life choice.
How to Decorate Paw Print Madeleines
Decorating is where paw print madeleines become party-ready. You can keep them simple or make them look like tiny bakery masterpieces.
Chocolate Paw Pads
Melt chocolate in short microwave bursts, stirring every 15 to 20 seconds. Use a small spoon, piping bag, or toothpick to fill the toe pads and center pad with chocolate. Let the chocolate set at room temperature or chill briefly in the refrigerator.
Powdered Sugar Finish
For an elegant look, dust the cooled madeleines with powdered sugar. This works especially well if the paw details are already sharp. The result is soft, classic, and not too sweet.
Lemon Glaze
Mix 1 cup powdered sugar with 1 to 2 tablespoons lemon juice until smooth. Dip the paw side lightly into the glaze or drizzle it over the top. Let the glaze set before stacking or packaging.
Two-Tone Paw Prints
For a playful design, tint a few tablespoons of batter with cocoa powder or food coloring. Pipe the darker batter into the toe pads and center pad first, freeze the mold for 5 minutes, then add the plain batter on top. This creates a built-in paw pattern without extra decoration.
Flavor Variations
Once you master the basic recipe, paw print madeleines are easy to customize. Try almond extract instead of vanilla for a bakery-style aroma. Add orange zest for a sunny citrus version. Mix in a tablespoon of cocoa powder for chocolate paw print madeleines. For a cozy fall batch, add pumpkin spice and dip the paws in white chocolate.
You can also make mocha madeleines by adding instant espresso powder to the batter, or coconut madeleines by replacing a small portion of flour with finely shredded coconut. Keep additions modest, though. Too many mix-ins can weigh down the batter and hide the paw shape.
Common Mistakes and How to Fix Them
The Paw Print Details Disappeared
This usually happens when the mold is overfilled, the batter is too warm, or the mold was not cold enough. Fill cavities only three-quarters full and chill both the batter and prepared mold before baking.
The Madeleines Stuck to the Mold
Use more butter in the grooves and dust lightly with flour. Make sure the madeleines cool for a few minutes before unmolding, but do not let them sit too long in the pan, or condensation can make them stick.
The Texture Is Dense
Dense madeleines often come from overmixing, old baking powder, or eggs that were not beaten long enough. Beat the eggs and sugar until pale and thick, fold gently, and use fresh leavening.
The Edges Are Too Pale
If you are using silicone, pale edges are common because silicone does not brown as strongly as metal. Try baking a minute or two longer, use a metal pan if possible, or finish with a chocolate dip for contrast.
The Madeleines Taste Greasy
The butter may have been too hot, or the batter may not have rested long enough. Let melted butter cool before adding it and chill the batter so the ingredients can come together properly.
Serving Ideas for Paw Print Madeleines
Paw print madeleines are wonderful with coffee, tea, hot chocolate, or cold milk. For parties, arrange them on a platter with berries and chocolate-dipped strawberries. For pet adoption events or animal rescue fundraisers, package them individually with labels that say “Pawsitively Sweet” or “Fresh From the Barkery.” Yes, puns are mandatory here. It is practically baking law.
They also work beautifully as cupcake toppers, edible place cards, lunchbox surprises, or dessert board accents. If you are serving them at a birthday party, make a mix of vanilla, chocolate, and lemon-glazed paws so the platter looks colorful and inviting.
How to Store Paw Print Madeleines
Madeleines are best the day they are baked. Their edges are lightly crisp, the centers are tender, and the butter flavor is at its peak. Store leftovers in an airtight container at room temperature for up to 2 days. If decorated with glaze or chocolate, separate layers with parchment paper.
You can also freeze undecorated madeleines for up to 1 month. Place them in a single layer on a baking sheet until frozen, then transfer to a freezer-safe bag. Thaw at room temperature and refresh briefly in a low oven if desired. Decorate after thawing for the cleanest finish.
Food Safety Notes
Madeleine batter contains raw flour and eggs, so do not taste it before baking. It may smell like buttery happiness, but raw batter is not worth the risk. Wash your hands, utensils, bowls, and counters after handling the batter. Bake the madeleines fully, especially if serving children, older adults, pregnant guests, or anyone with a weakened immune system.
Experience Notes: What I Learned Making Paw Print Madeleines
The first thing you learn when making paw print madeleines is that the mold has opinions. A traditional shell pan is fairly forgiving, but paw print molds have little toe pads, curves, and details that show every shortcut. If you rush the greasing step, the cutest part of the cake may stay behind in the pan like a tiny edible sticker. I found that brushing melted butter into every detail with a pastry brush works better than a quick spray from six inches away. Baking spray is convenient, but butter gives the madeleines a richer flavor and helps define the paw shape.
The second lesson is that piping the batter is worth it. Spooning batter into small paw cavities can work, but it is messy. Batter lands on the edges, the toe pads fill unevenly, and suddenly your paws look like they ran through pudding. Using a piping bag gives you control. You can fill the toe area gently, add batter to the center, and stop before the mold is too full. A zip-top bag works perfectly if you do not own pastry bags. Snip a small corner and pretend you are a professional pastry chef with a slightly chaotic kitchen.
Another useful experience is to bake one test madeleine before committing the whole batch. This sounds fussy, but it saves heartbreak. Different paw print molds vary in depth, width, and material. A silicone mold may need more time than a metal mold, and a deep mold may need less batter than expected. Bake one or two first, check the shape, texture, and browning, then adjust. If the paw details blur, use less batter. If the madeleine looks flat, chill the batter longer. If it sticks, grease more generously.
Chocolate decoration also takes a little patience. The easiest method is to melt chocolate and pipe it into the paw pads after the madeleines cool. If the cakes are warm, the chocolate slides around like it has weekend plans. Let the madeleines cool completely, then decorate. For neat paws, use a toothpick to guide chocolate into the tiny toe pads. It takes an extra minute, but the finished look is much cleaner.
Finally, paw print madeleines are best served with a little personality. They are cute by design, so lean into it. Put them on a platter with a handwritten sign, pack them as gifts for animal-loving friends, or serve them at a brunch where everyone pretends they will eat only one. Spoiler: no one eats only one. The buttery crumb, playful shape, and soft vanilla-lemon flavor make them the kind of dessert people remember. They may not be the fastest cookie-cake hybrid you will ever bake, but they are one of the most cheerful.
Conclusion
Learning how to make madeleines shaped like paw prints is mostly about combining classic French baking technique with a fun, modern mold. Start with room-temperature eggs, beat them well with sugar, fold gently, chill the batter, prepare the mold carefully, and avoid overfilling. Those small choices make the difference between vague blobs and crisp little paws that look almost too cute to eat.
Whether you decorate them with chocolate paw pads, lemon glaze, powdered sugar, or colorful party sprinkles, paw print madeleines bring instant charm to any dessert table. They are buttery, tender, playful, and wonderfully giftable. In other words, they are exactly what happens when French pastry meets “Who’s a good dessert?” energy.