Note: This HTML contains only the <body> section, ready for copying and web publishing.
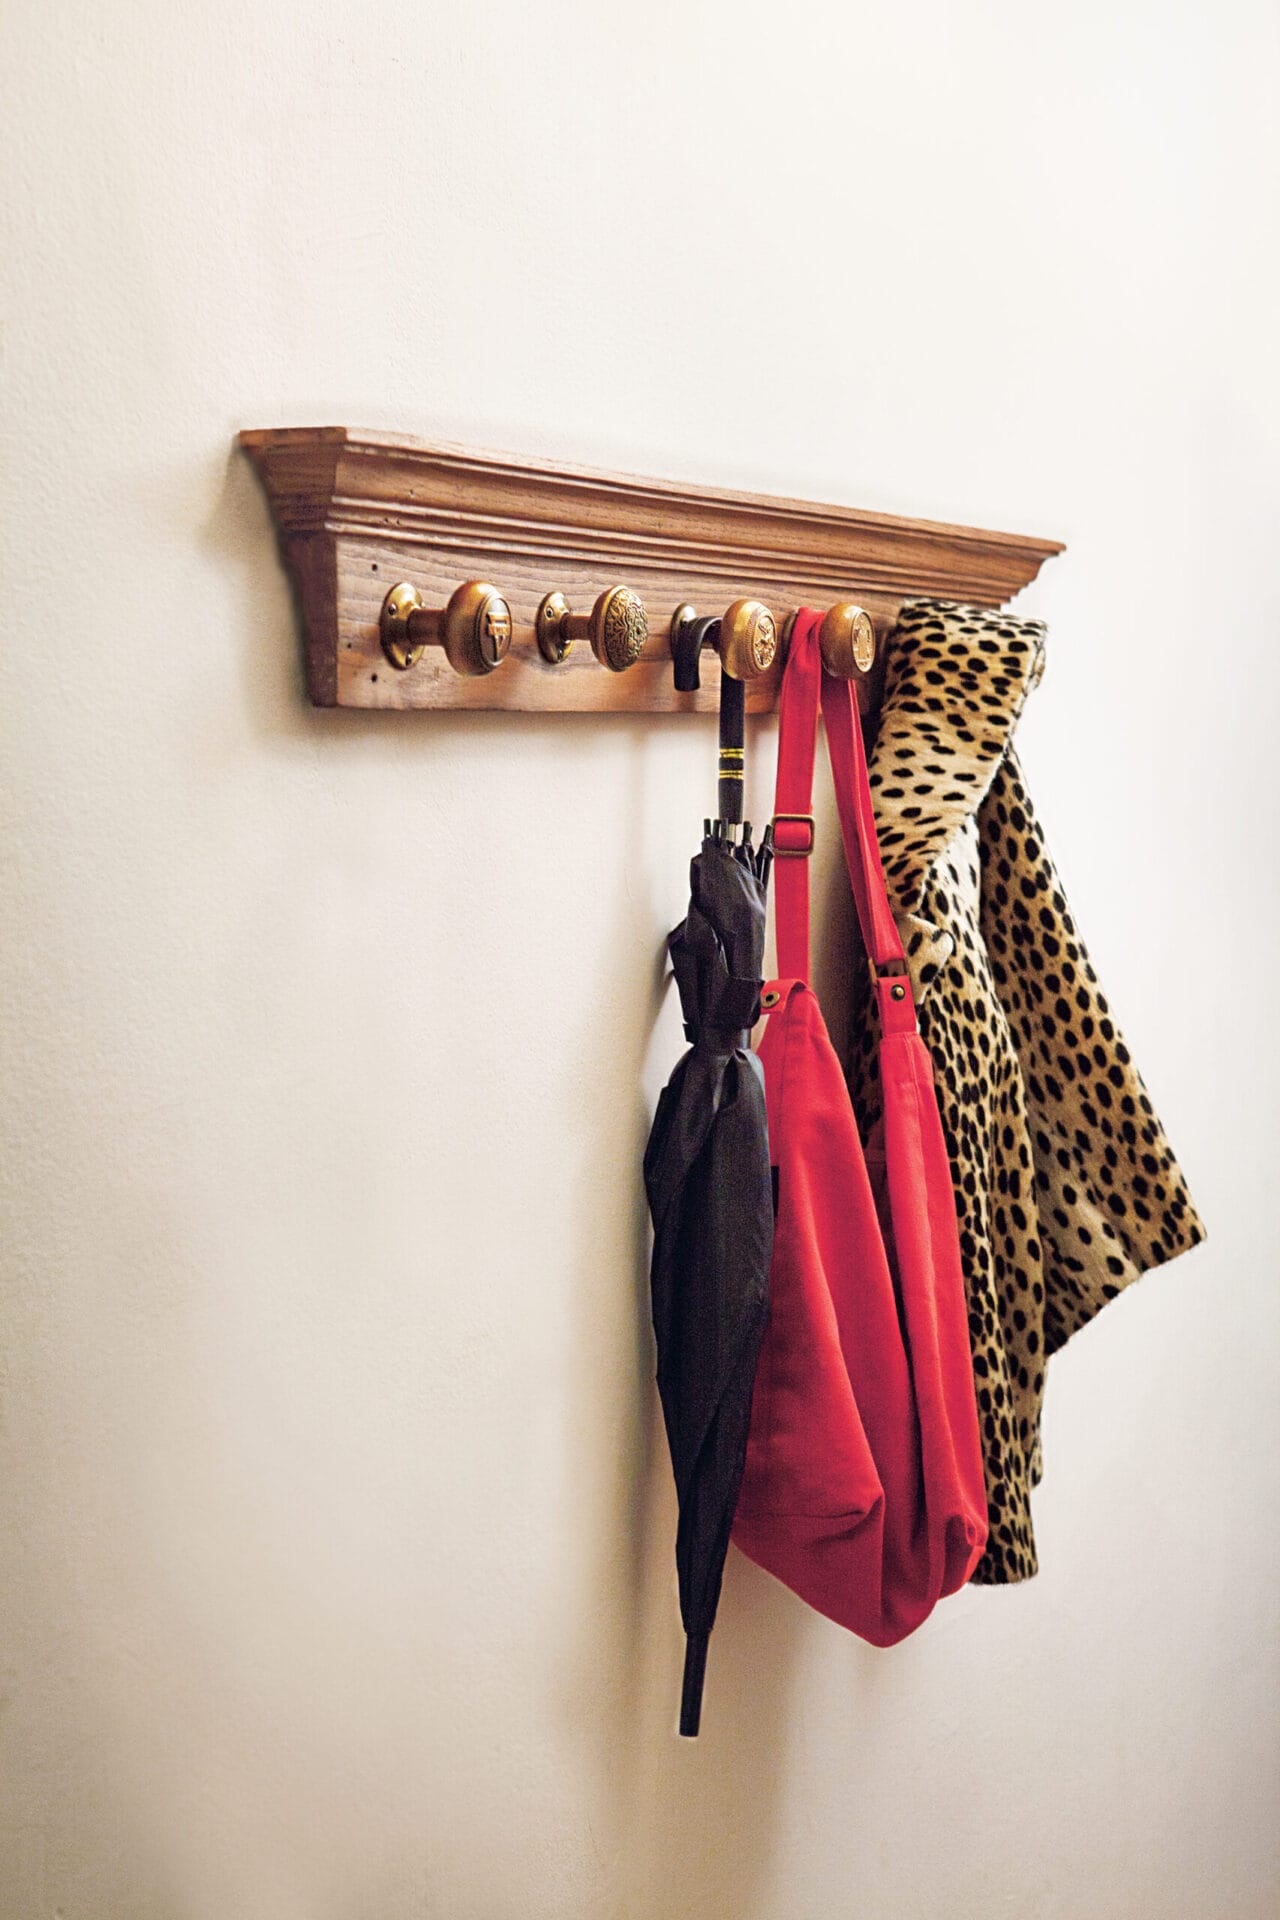
A doorknob coatrack is what happens when old-house charm, practical storage, and a good excuse to visit a thrift store all shake hands. Instead of tossing mismatched vintage knobs into a mystery drawer where single batteries and lost Allen wrenches go to retire, you can turn them into a wall-mounted coat rack that actually earns its keep. It is useful, affordable, and just quirky enough to make guests say, “Wait, are those actual doorknobs?” That is the dream.
This project is beginner-friendly, but it still rewards careful planning. The difference between a coat rack that looks handmade and one that looks like it survived a minor plumbing accident usually comes down to three things: choosing a sturdy backer board, spacing the knobs correctly, and mounting the finished piece securely. A beautiful rack is great, but a beautiful rack that does not crash down when winter coats show up is even better.
In this guide, you will learn how to make a doorknob coatrack from start to finish, including materials, layout ideas, assembly tips, finishing options, and real-world lessons that make the project easier. Whether you want farmhouse style, antique flair, or something that looks like it wandered out of a cool boutique, this DIY can get you there.
Why Make a Doorknob Coatrack?
A standard hook rack does the job, but a doorknob coatrack has personality. It turns salvaged hardware into décor, gives an entryway some texture, and creates instant conversation. It also works in more places than you might expect. You can hang it in an entry hall, mudroom, bedroom, laundry room, office, bathroom, or even a kitchen for aprons and towels.
Another big benefit is flexibility. You can build one from a painted pine board and porcelain knobs for a cottage look, use dark wood and brass knobs for vintage drama, or mix crystal, ceramic, and metal pieces for an eclectic style that says, “Yes, I have taste, and yes, I probably browse flea markets for fun.”
Tools and Materials You Will Need
Basic materials
For most doorknob coatrack projects, you will need a wood backer board, three to six old doorknobs, screws or mounting hardware, sandpaper, primer or stain, paint or protective finish, and wall-mounting hardware. If your knobs do not already have usable threaded stems or mounting plates, you may also need hanger bolts, machine screws, washers, epoxy, or specialty hardware to adapt them.
Recommended tools
A tape measure, pencil, level, drill/driver, drill bits, screwdriver, stud finder, clamps, and saw are the main tools. A countersink bit is helpful, and a tack cloth or vacuum makes cleanup easier before finishing. If you plan to cut salvaged wood or resize the board, a miter saw or circular saw speeds things up, but many home centers will cut boards for you.
Good wood choices
Pine is affordable and easy to work with. Oak is tougher and takes stain beautifully. Poplar is a great pick for painted projects. Reclaimed wood adds character, though it may need extra sanding, cleaning, and a quick inspection to make sure you are not inviting splinters to the party.
Choosing the Right Doorknobs
Not every doorknob wants a second career as a coat hook. Some are perfect. Some are decorative divas. When shopping antique stores, salvage yards, flea markets, or online resale listings, look for knobs that feel solid in the hand and have enough shape to hold coats, bags, or scarves without everything sliding off.
Round knobs work well for lightweight coats, hats, and bags. Oval knobs can provide a little more grip. Crystal and glass knobs look gorgeous but may be better for light to moderate use rather than heavy backpacks. Metal knobs are usually durable, while ceramic knobs bring color and charm. Mixing materials can look great, but keep scale in mind. Tiny knobs on a huge board can look accidental rather than artistic.
Before you buy, inspect each piece for cracks, chips, stripped threads, loose collars, or rust that has gone beyond “pleasantly vintage” and into “possibly cursed.” If the knobs came from old doors, they may include spindles or mounting parts you can reuse, which makes installation easier.
Designing Your Coatrack Before You Drill Anything
This is the step people skip right before they say, “Why does this look weird?” Lay everything out first. That includes the board, the knobs, the spacing, and where the finished rack will live on the wall. It is much easier to erase a pencil mark than to explain a random extra hole to yourself later.
Pick the size of your board
A board that is 24 to 36 inches long works for most homes. A width of 5 to 8 inches gives the knobs enough visual weight without making the rack bulky. If you want a shelf above it, go wider and build a combo piece. If you only need a few hooks for an apartment entryway, keep it narrow and simple.
Space the knobs evenly
Three to five knobs is a sweet spot for most projects. Leave enough room so coats do not pile up into one fabric mountain. Even spacing usually looks best, but a slightly staggered arrangement can feel more custom. If you are using different knob sizes, test several layouts before committing.
Think about height and purpose
If the rack is for adults, mount it high enough for longer coats to hang cleanly. If it is for kids, place it lower so they can actually use it without a climbing expedition. If you want it for purses, dog leashes, or towels, you can be more flexible.
How To Make a Doorknob Coatrack: Step-by-Step
Step 1: Cut and prep the backer board
Cut your board to the desired length. Sand rough edges and surfaces thoroughly. If the board is raw wood, start with a medium grit and work up to a finer grit for a smoother finish. Always sand with the grain if you plan to stain. Wipe away all dust before moving on. Dust is sneaky. It will absolutely try to sabotage your finish.
Step 2: Mark the knob layout
Use a tape measure to find the centerline of the board and mark equal spacing for each knob. Set the knobs in place before drilling and stand back to look at the composition. This tiny pause can save you from a surprisingly emotional moment later.
Step 3: Figure out the mounting method for each knob
This is where vintage charm meets engineering. Some doorknobs have threaded stems or exposed hardware that can pass through the board and tighten from the back. Others need a hanger bolt, a machine screw, or epoxy with a hidden fastener setup. Your goal is simple: each knob must be secure and able to resist twisting when someone grabs a coat in a hurry.
If the knob has a spindle hole but no obvious modern mounting option, you can often adapt it with a threaded insert, a bolt-and-washer system, or epoxy around a suitable threaded rod. Test one knob fully before drilling all the rest. That way, if your “brilliant plan” turns out to be less brilliant than advertised, you only have one hole to fix.
Step 4: Drill pilot holes
Mark each hole carefully and drill pilot holes that match your chosen hardware. Pilot holes help guide screws, reduce splitting in wood, and make installation more controlled. If you are adding screws from the back of the board into knob hardware, countersink where needed so the back sits flatter against the wall.
Step 5: Attach the doorknobs
Install each knob one at a time. Tighten firmly, but do not overdo it. Vintage glass and ceramic hardware can crack if treated like it owes you money. Check alignment from the front as you go. If one knob is crooked, fix it immediately rather than hoping no one will notice. Someone will notice. That someone will be you.
Step 6: Finish the board
You can paint, stain, clear-coat, or distress the wood depending on your style. For painted projects, primer helps create a better base, especially on raw wood or patched surfaces. For stained projects, sanding well matters even more because stain highlights flaws instead of hiding them. Let each coat dry fully, and lightly sand between coats if needed for a cleaner finish.
If your hardware needs a refresh, you can clean and polish metal parts or carefully spray-paint compatible pieces after proper prep. Just avoid coating threads or moving parts that still need to fit together.
Step 7: Mount the coatrack securely
This part matters as much as the design. Use a level and locate wall studs if possible. Fastening into studs is the strongest option, especially if the rack will carry heavy coats, bags, or everyday family traffic. If studs do not line up with your rack size, use appropriate wall anchors rated for the wall type and expected load.
You can mount the rack with screws through the face, keyhole hangers, or a French cleat for a cleaner look and strong support. French cleats are especially useful if the rack is wide or heavy. However you mount it, test the installation before loading it up like a department store in January.
Best Finishing Styles for a Doorknob Coatrack
Farmhouse style
Use a white or soft gray painted board with black, bronze, or porcelain knobs. Light distressing adds age without making it look like the board lost a fight.
Vintage entryway look
Choose a richly stained board and pair it with brass, crystal, or ceramic knobs. This style works especially well in older homes with original trim.
Colorful eclectic style
Use a bold painted board and mix mismatched knobs in different shapes and materials. The trick is to keep one design element consistent, such as color family, sheen, or knob size, so the final result feels collected rather than chaotic.
Modern rustic
Try matte black hardware on a natural wood board with a simple rectangular shape. Clean lines keep it modern while the wood brings warmth.
Mistakes To Avoid
The most common mistake is weak mounting. A coat rack is not wall art pretending to be useful. It needs real support. Another common issue is poor spacing. If knobs are too close together, coats bunch up and the rack becomes decorative clutter with trust issues.
Skipping sanding is another classic error. Rough prep leads to rough results, and stain will happily spotlight every scratch. People also underestimate the challenge of adapting antique hardware. Take time to test your fastening method before final assembly. It is less glamorous than the finishing stage, but much more important.
Where a Doorknob Coatrack Works Best
An entryway is the obvious answer, but this project has range. In a bathroom, it can hold robes and towels. In a bedroom, it can organize tomorrow’s outfit or favorite bags. In a kitchen, it works for aprons and tea towels. In a craft room, it can hold scissors, tote bags, or smocks. In a child’s room, lower-mounted colorful knobs can help keep jackets off the floor, which is basically a miracle.
How Much Does It Cost?
The cost depends on what you already have. If you use salvaged knobs and scrap wood, the project can be very inexpensive. If you buy decorative vintage hardware individually, the knobs may become the biggest cost. That said, even a fancier version is often cheaper than buying a designer wall rack with the same amount of character.
A budget version might use pine, thrifted knobs, basic screws, and paint you already own. A premium version might use hardwood, antique crystal knobs, custom finishes, and hidden mounting hardware. Both can look fantastic if the proportions and installation are solid.
Experience and Lessons Learned From Making a Doorknob Coatrack
The first time I made a doorknob coatrack, I treated it like an easy afternoon craft. You know, one of those projects that whispers, “Relax, I am adorable and low stakes.” It was adorable. It was not low stakes. About halfway through, I learned that vintage doorknobs do not care about your schedule, your optimism, or your desire to finish before dinner.
The biggest lesson was that layout matters more than I expected. On the table, my knobs looked perfectly spaced. On the wall, they looked like they had been assigned seats by a committee that had stopped speaking to each other. I had to go back, remeasure, and mock up the whole thing with painter’s tape before drilling again. Since then, I always lay out every piece first and step back from the board from a few different angles.
I also learned that the hardware is the real project. Sanding and painting the board felt straightforward. Making antique knobs attach securely was where the actual puzzle lived. Some knobs had usable stems. Others looked promising until I realized the inside was worn, stripped, or incompatible with the hardware I had. That experience taught me to test one complete attachment method before preparing the rest of the board. It is a small step that saves a lot of muttering.
Another lesson involved wood choice. I once used a thin board because it looked sleek and lightweight. It also flexed more than I liked once the knobs and coats were added. Now I prefer a sturdier backer board with enough thickness to support the hardware and resist twisting. A coat rack gets tugged on, bumped into, overloaded, and generally treated like a useful household object instead of a precious art piece. Building for real life is always worth it.
Finishing was another area where patience paid off. On one version, I rushed the paint because it looked dry and I wanted to mount it immediately. Technically, it was dry. Emotionally, it was still very much wet. I left fingerprints, smudged an edge, and had to do touch-ups. Ever since, I let finishes cure properly, especially if the rack will see regular use. The final result looks cleaner and lasts longer.
The most satisfying part of the whole project was mounting the finished rack and seeing salvaged pieces become something useful again. Old doorknobs have a kind of built-in story. They feel substantial, personal, and a little mysterious. Turning them into a coatrack keeps that character while giving them a new purpose. It is one of the few DIY projects where practical storage and decorative charm genuinely meet in the middle.
I have also found that guests react differently to a doorknob coatrack than to a normal hook rack. People notice it. They touch it. They ask where it came from. That makes it a great project if you like home décor that feels personal rather than generic. Even when the materials are humble, the finished piece often looks custom because it is built from uncommon parts.
If I were making one today, I would spend extra time choosing knobs with a clear visual relationship. They do not need to match exactly, but they should look like they belong in the same conversation. I would also mount into studs whenever possible and avoid treating drywall anchors as magic. Good mounting is not the flashy part of the build, but it is the difference between a reliable project and a future repair story.
In the end, making a doorknob coatrack taught me that the best DIY projects are not always the fastest ones. They are the ones that mix creativity with function, ask you to solve a few small problems, and leave you with something useful enough to enjoy every day. Plus, every time you hang up a coat on a doorknob that no longer opens anything, it feels just a little bit clever.
Final Thoughts
If you want a DIY project that is equal parts practical and charming, a doorknob coatrack is hard to beat. It gives old hardware a second life, adds style to your walls, and creates storage that feels custom rather than mass-produced. The trick is to treat it like a real functional build, not just a decorative craft. Use solid materials, drill carefully, prep your finish well, and mount it securely.
Do that, and you will end up with a coat rack that looks great, works hard, and has way more personality than anything sitting in a flat-pack box under fluorescent store lighting.