Note: This article is written for web publishing and is based on widely used DIY wreath-making practices, felt-craft techniques, seasonal decorating guidance, and beginner-friendly home craft methods.
Introduction: A Cozy Wreath That Does Not Drop Pine Needles on Your Floor
If you love holiday decorations but do not love vacuuming pine needles until March, a DIY festive felt wreath may become your new seasonal best friend. Felt is soft, colorful, affordable, easy to cut, and surprisingly forgiving. Make a slightly crooked leaf? Congratulations, it now has “handmade charm.” Glue a flower a little off-center? That is not a mistake; that is rustic personality wearing a scarf.
A festive felt wreath is one of the best DIY holiday crafts for beginners because it does not require advanced sewing, expensive tools, or a craft room large enough to qualify as real estate. With a wreath form, felt sheets, scissors, hot glue, ribbon, and a little patience, you can create a cheerful decoration for your front door, mantel, kitchen cabinet, gallery wall, or holiday party backdrop.
This guide explains how to make a DIY festive felt wreath step by step, including how to choose materials, cut felt leaves and flowers, arrange colors, attach decorations securely, and style your wreath for Christmas, winter, fall, birthdays, or any celebration that needs a little handmade happiness. We will also cover practical tips, design ideas, common mistakes, and real crafting experience so your wreath looks intentional instead of like it survived a glitter tornado.
What Is a Festive Felt Wreath?
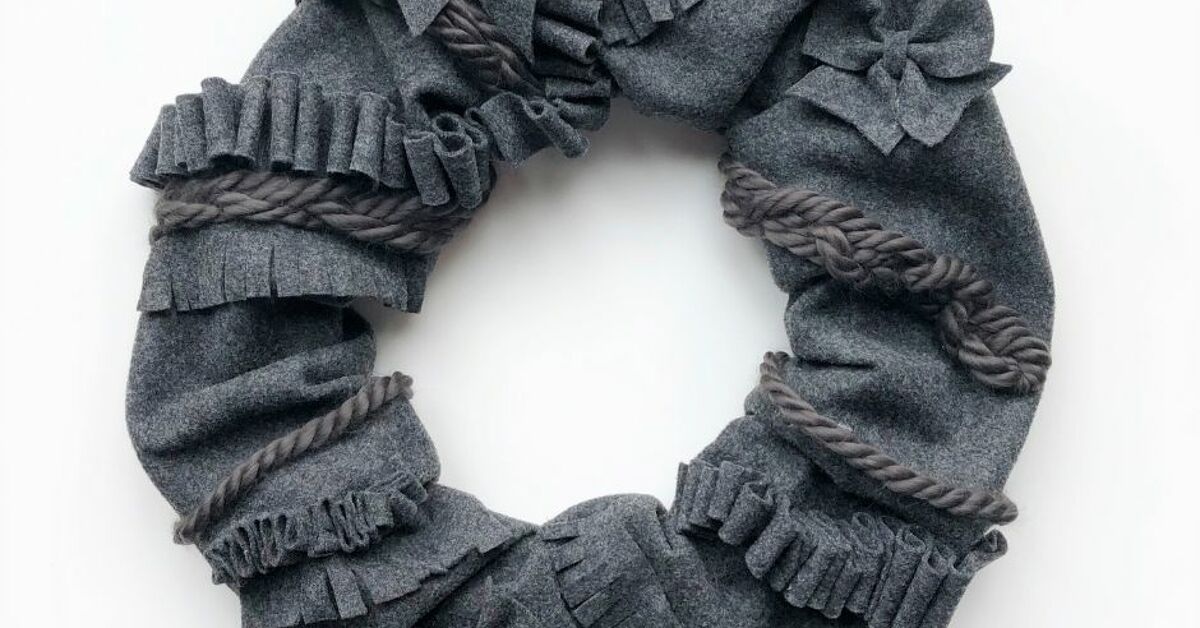
A festive felt wreath is a decorative circular arrangement made with felt shapes attached to a base. The base can be foam, wire, grapevine, cardboard, embroidery hoop, or even a recycled packing insert if you are feeling crafty and slightly rebellious. Felt pieces may be cut into leaves, flowers, circles, berries, bows, stars, ornaments, holly, poinsettias, or simple strips.
Unlike fresh greenery wreaths, felt wreaths are reusable and low-maintenance. They do not dry out, shed needles, attract curious insects, or require misting. They are also lightweight, which makes them easier to hang on doors, windows, walls, cabinets, and interior spaces.
Why Felt Works So Well for DIY Wreaths
Felt is popular in handmade holiday decor because it has structure without being stiff. It cuts cleanly, layers beautifully, and comes in a huge variety of colors. Craft felt is usually budget-friendly and available in sheets, while wool-blend felt has a richer texture and a more polished finish. Acrylic felt is perfect for casual projects, kids’ crafts, and budget decorating. Wool felt or wool-blend felt is better when you want a wreath that looks boutique-quality.
Another advantage is that felt does not fray like many woven fabrics. That means you can cut leaves, petals, scallops, and geometric shapes without hemming the edges. For crafters who hear the word “hemming” and immediately need a snack break, this is excellent news.
Materials You Need
Basic Supplies
- One wreath form, 12 to 18 inches wide
- Felt sheets in festive colors
- Sharp fabric scissors or detail scissors
- Hot glue gun and glue sticks
- Ribbon for hanging or wrapping
- Pencil, chalk pencil, or disappearing fabric marker
- Cardstock for templates
- Floral wire or straight pins, optional
- Pom-poms, bells, beads, buttons, or faux berries, optional
Best Felt Colors for a Festive Wreath
For a classic Christmas felt wreath, use evergreen, pine, cranberry, burgundy, ivory, gold, and deep red. For a winter wreath, try white, cream, gray, icy blue, navy, and silver. For a modern holiday look, choose blush pink, emerald green, champagne, copper, and soft sage. If you want a playful candy-colored wreath, use red, mint, pink, lime, turquoise, and white. Basically, if your color palette makes you smile, it is working.
Choosing the Right Wreath Form
A foam wreath form is the easiest option because it is lightweight and provides a wide surface for gluing felt pieces. A wire wreath form is great for a more open, airy look, especially if you want to attach felt leaves with floral wire. A grapevine wreath adds rustic texture and works beautifully with felt flowers, poinsettias, and berries. A cardboard base is the most budget-friendly option and works well for indoor wreaths.
If this is your first DIY felt wreath, choose a 14-inch or 16-inch foam wreath form. It is large enough to look full but not so large that you will be cutting felt leaves until your scissors file for retirement.
Step-by-Step: How to Make a DIY Festive Felt Wreath
Step 1: Decide on Your Wreath Style
Before cutting anything, decide what type of festive felt wreath you want. A leaf wreath looks elegant and full. A felt flower wreath feels cheerful and handmade. A ruffle wreath looks plush and dramatic. A felt strip wreath is easy and great for using scraps. A poinsettia wreath is perfect for Christmas. A mini felt wreath can be used as an ornament, gift topper, or cabinet decoration.
For this tutorial, we will make a full festive leaf-and-flower wreath with optional berries and ribbon. It is beginner-friendly, attractive, and flexible enough for different holidays.
Step 2: Create Simple Templates
Use cardstock to draw a few basic shapes: a leaf, a small oval, a holly leaf, a teardrop petal, and a circle. Templates help your wreath look consistent without needing every piece to be identical. Handmade wreaths look best when the shapes are related, not robotic. Nature does not use copy and paste, and neither do we.
For a 16-inch wreath, prepare approximately 80 to 120 felt leaves, depending on how full you want the finished piece. Cut more than you think you need. Running out of leaves near the finish line is emotionally dramatic in a way no wreath should be.
Step 3: Cut the Felt Shapes
Trace your templates onto felt using a pencil or fabric marker. Cut slowly with sharp scissors to avoid jagged edges. If you are making leaves, cut several sizes so your wreath has movement and depth. For flowers, cut circles or petal shapes. For berries, use small felt circles, mini pom-poms, or wooden beads.
A helpful trick is to fold felt slightly before cutting symmetrical leaves. You can also stack two sheets of felt and cut two shapes at once, but do not stack too many layers. Felt can shift, and suddenly your holly leaf looks like a confused fish.
Step 4: Add Dimension to the Leaves
Flat felt shapes can look cute, but shaped felt pieces look more professional. To give each leaf dimension, place a small dot of hot glue at the bottom tip of the leaf, pinch the base together, and hold it for a few seconds. This creates a cupped shape that catches light and adds texture.
You can also cut a tiny notch at the bottom of each leaf before pinching. Overlap the notched edges with glue to form a natural curve. This technique works especially well for holly leaves, poinsettia petals, and large greenery pieces.
Step 5: Wrap the Wreath Form
Wrap your wreath form with ribbon, yarn, burlap, or strips of felt. This covers the base and prevents gaps from showing through later. Secure the starting end with hot glue on the back of the wreath, wrap tightly, and glue the final end in place. Choose a color that blends with your felt pieces, such as green for a leafy wreath or red for a Christmas wreath.
This step is technically optional, but it makes the finished wreath look cleaner. It also gives your felt pieces a better surface to grip.
Step 6: Arrange Before You Glue
Lay your wreath form flat and place the felt leaves around the base without glue. Start with larger leaves, then fill in with smaller pieces. Rotate the direction slightly as you go so the wreath does not look too stiff. Most wreaths look best when the leaves flow in one general direction, like a gentle swirl.
Use odd-numbered clusters for flowers and embellishments. Three felt poinsettias, five berry clusters, or seven small stars usually look more natural than perfectly even pairs. Symmetry is nice, but too much symmetry can make a wreath look like it is applying for a corporate job.
Step 7: Glue the First Layer
Begin gluing larger leaves around the wreath form. Work in small sections and overlap each piece slightly. Place glue near the base of each leaf rather than covering the entire back. This keeps the tips loose and dimensional.
Be careful with hot glue. Use a low-temperature glue gun if possible, especially with thin felt. Keep a small bowl of ice water nearby in case of minor burns, and avoid pressing glue with bare fingers. A pencil, wooden skewer, or silicone finger protector can help hold pieces in place without turning your fingertips into seasonal toast.
Step 8: Add the Second Layer
Once the first layer is secure, add a second layer of leaves to cover gaps. Angle these pieces slightly toward the center and outer edge of the wreath. This creates fullness and prevents the wreath from looking flat. Mix colors as you go, placing darker shades underneath and lighter or brighter shades on top.
If you are using red, white, and green felt, avoid placing colors in a strict repeating pattern unless you want a candy-cane effect. Instead, create small color families: a group of greens, a pop of red, a few ivory leaves, then another red accent. This makes the wreath feel designed rather than assembled by a holiday spreadsheet.
Step 9: Make Felt Flowers or Poinsettias
To make a simple felt flower, cut five to seven teardrop petals. Pinch and glue the base of each petal, then glue them in a circle on a small felt backing. Add a button, bead, pom-pom, or rolled felt center. For a poinsettia, use longer pointed petals in red, burgundy, pink, or white. Layer larger petals on the bottom and smaller petals on top.
Place flowers in clusters rather than spacing them evenly around the wreath. A larger flower cluster near the lower left or lower right side creates a designer-style focal point. Add smaller flowers or berries diagonally across the wreath for balance.
Step 10: Add Festive Details
Now comes the fun part: embellishments. Add mini pom-poms as berries, small bells for sound, felt stars for sparkle, velvet ribbon for softness, or wooden beads for a farmhouse look. If you want a Christmas felt wreath, add holly leaves and red berries. For winter, add white felt leaves, silver cord, and snowflake shapes. For fall, use mustard, rust, olive, plum, and cream felt.
The key is restraint. A festive wreath should look joyful, not like every craft drawer in America sneezed on it. Add details slowly, step back, and stop before the wreath starts asking for its own zip code.
Step 11: Attach a Hanging Ribbon
Cut a length of ribbon, loop it around the top of the wreath, and tie a knot or bow. You can also glue or wire the ribbon to the back. If the wreath will hang on a door, make sure the ribbon is strong enough to support the weight. For a clean look, attach a small felt loop to the back and hang it from a wreath hook.
Step 12: Fluff and Finish
After the glue has cooled, gently lift and shape the felt leaves. Trim any visible glue strings. Check the wreath from different angles and fill any bare spots. If the back looks messy, glue a circle or strip of felt over the rough areas. This is not required, but it feels delightfully professional.
DIY Festive Felt Wreath Design Ideas
Classic Christmas Felt Wreath
Use green felt leaves, red poinsettias, white berries, and a plaid ribbon. This style looks beautiful on a front door, above a fireplace, or on kitchen cabinets. Add small jingle bells if you want a nostalgic holiday feel.
Modern Neutral Felt Wreath
Choose cream, beige, taupe, olive, and soft gold felt. Add a velvet ribbon in champagne or dusty green. This design works well in modern farmhouse, Scandinavian, and minimalist homes.
Bright Candy-Colored Wreath
Use pink, mint, red, turquoise, lime, and white felt. Add pom-poms and striped ribbon. This wreath is playful and perfect for kids’ rooms, classroom doors, holiday parties, or anyone who believes Christmas should look like dessert.
Winter Snowflake Felt Wreath
Use white, gray, blue, and silver felt. Cut snowflakes, stars, and icy leaves. Add pearl beads or silver thread for subtle shine. This wreath can stay up after Christmas because it feels seasonal rather than strictly holiday-specific.
Where to Display Your Felt Wreath
Felt wreaths are best displayed indoors or in protected areas. Felt can absorb moisture, fade in harsh sunlight, and lose shape in heavy rain or snow. If you want to hang your wreath on an exterior door, place it behind a storm door or under a covered porch.
Great display spots include the mantel, entryway wall, bedroom door, kitchen cabinet, bookshelf, interior window, dining room mirror, or gallery wall. Mini felt wreaths also make adorable chair-back decorations, gift toppers, or handmade ornaments.
Common Mistakes to Avoid
Using Dull Scissors
Dull scissors create fuzzy, uneven felt edges. Use sharp fabric scissors and reserve them for craft materials. If your scissors are chewing instead of cutting, they are not scissors anymore; they are tiny metal stress machines.
Using Too Much Glue
Hot glue is helpful, but too much glue can create lumps and visible strings. Use small dots or thin lines. Press gently and allow each section to cool before moving on.
Skipping the Layout Stage
Gluing without planning can lead to awkward spacing and color clumps. Always arrange your pieces first. Take a quick phone photo of the layout so you can remember where everything goes.
Forgetting the Back of the Wreath
The back does not need to be perfect, but it should be secure. Make sure ribbon loops, wire, and heavy embellishments are firmly attached. A wreath falling off the door is festive only if your theme is “holiday jump scare.”
How to Store a Felt Wreath
Store your felt wreath in a wreath box, shallow plastic bin, or clean cardboard box. Avoid crushing it under heavier decorations. Wrap it loosely in tissue paper to protect the felt from dust. Keep it in a dry place away from direct sunlight and moisture.
If leaves flatten during storage, gently reshape them with your fingers. You can also use a handheld steamer carefully from a distance, but do not soak the felt. Let the wreath dry completely before displaying it again.
Budget-Friendly Tips
A DIY festive felt wreath can be very affordable. Use craft felt sheets instead of premium wool felt if you are decorating on a budget. Recycle cardboard into a wreath base. Use leftover ribbon from gift wrapping. Turn felt scraps into berries, stars, mini bows, or flower centers. Shop seasonal colors after holidays when craft supplies are often discounted.
You can also make a smaller wreath if you want a faster project. A mini wreath uses fewer materials and still looks charming on cabinet doors, shelves, or wrapped gifts.
Experience Notes: What I Learned Making a DIY Festive Felt Wreath
The first thing you learn when making a DIY festive felt wreath is that felt looks innocent, but it multiplies on your table like holiday confetti. One minute you have ten leaves; the next minute your workspace looks like a tiny forest had a dramatic haircut. That is not a problem. In fact, it is part of the charm. Cutting more pieces than you think you need gives you freedom to layer, adjust, and fill gaps without stopping halfway through the project.
In my experience, the best felt wreaths are built slowly. It is tempting to glue everything down immediately because the project starts to look exciting once the colors are arranged. However, taking a few minutes to test the layout makes a huge difference. I like placing the largest leaves first, then adding medium leaves, then finishing with tiny accent pieces. This approach creates depth and prevents the wreath from looking flat. It also helps you avoid the classic beginner problem: one side looks lush and beautiful while the other side looks like it missed the meeting.
Color planning matters more than most people expect. A red-and-green wreath can look classic, but if the colors are too bright and evenly spaced, it may feel a little cartoonish. Mixing several shades of green with deeper reds, ivory, burgundy, or soft gold creates a richer look. For a modern festive felt wreath, muted colors often appear more expensive than super-bright ones. Sage, cranberry, cream, and champagne felt can make a handmade wreath look like something from a boutique holiday market.
Another lesson: texture saves everything. Even if you use simple leaf shapes, pinching the base of each leaf makes the wreath feel more dimensional. Adding small pom-poms, bells, beads, or layered flowers gives the eye something to enjoy up close. That said, editing is important. I have learned to add embellishments in rounds. Add a few berries, step back, add a bow, step back, then decide whether the wreath needs more. The moment you think, “Maybe just twelve more pom-poms,” pause and drink water.
Hot glue is both your best friend and the villain of this story. It holds felt beautifully, but it also leaves strings that appear out of nowhere. After finishing the wreath, let the glue cool completely, then pull away glue threads by hand. A hair dryer on a low setting can help loosen fine strings, but use it carefully so you do not disturb delicate pieces.
Finally, handmade wreaths are more enjoyable when you allow them to be handmade. A perfect store-bought wreath is nice, but a DIY festive felt wreath carries personality. Maybe one leaf is slightly larger, one flower leans a bit, or one berry cluster is doing its own thing. That is not failure. That is proof that a real person made it. And honestly, during the holidays, a little personality is much better than perfection.
Conclusion
Learning how to make a DIY festive felt wreath is a simple, creative way to decorate your home with warmth and personality. With felt sheets, a wreath form, hot glue, ribbon, and a clear design plan, you can create a reusable holiday wreath that looks charming, colorful, and completely custom. Whether you prefer classic Christmas colors, soft winter neutrals, playful candy tones, or elegant poinsettias, felt gives you endless room to experiment.
The most important steps are choosing the right base, cutting enough felt shapes, layering pieces for fullness, adding dimension, and finishing with thoughtful accents. Keep your design balanced, protect the wreath from moisture, and store it carefully so you can enjoy it year after year. Best of all, this project does not require expert skills. It only requires patience, creativity, and the willingness to get one or two glue strings stuck to your sleeve. That is basically the official uniform of holiday crafting.