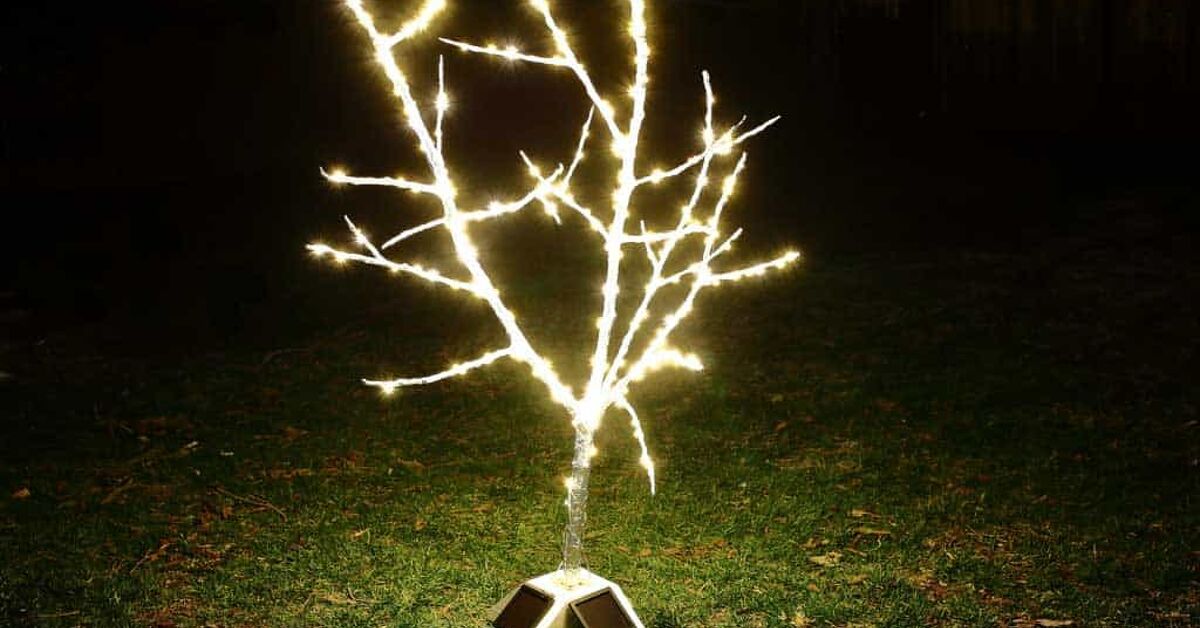
A DIY fairy light tree is what happens when a few ordinary branches meet a string of tiny LEDs and suddenly decide they belong in an expensive home décor catalog. The project is simple, affordable, highly customizable, and surprisingly dramatic once the lights go down.
You can build a glowing branch tree for a bedroom, living room, wedding table, holiday display, covered porch, or cozy reading corner. Better still, you do not need electrical skills, woodworking talent, or a garage containing 47 tools whose purposes remain mysterious. The safest and easiest version uses ready-made LED fairy lights wrapped around clean, dry branches secured inside a sturdy container.
This guide explains how to make a DIY fairy light tree with string lights from beginning to end, including branch selection, base construction, lighting techniques, styling ideas, common mistakes, and safety considerations.
Research basis: CPSC, UL Solutions, NFPA, Lowe’s, The Home Depot, This Old House, ENERGY STAR, U.S. Department of Energy, Martha Stewart, Better Homes & Gardens, The Spruce, HGTV, Popular Mechanics, University of Minnesota Extension and Architectural Digest.
Why Make a Fairy Light Tree?
Fairy lights are unusually good at creating atmosphere because the bulbs are small enough to become part of the decoration rather than dominating it. Wrapped around branches, they produce points of light at different heights and angles, giving the finished tree much more depth than a flat strand hung on a wall.
The project is also flexible. A three-foot branch arrangement can become a tabletop centerpiece, while a five- or six-foot version can act as an alternative Christmas tree or permanent accent lamp.
LED fairy lights are particularly useful for this type of craft. Modern LEDs are compact, efficient, durable, and available in warm white, cool white, multicolor, dimmable, battery-powered, USB-powered, solar, and plug-in versions. ENERGY STAR notes that LED technology can use dramatically less energy than traditional incandescent lighting, making LEDs a sensible choice when a decorative display may remain illuminated for several hours at a time.
Materials You Will Need
Basic supplies
- Three to seven dry tree branches
- One or more strands of LED fairy lights
- A heavy vase, planter, bucket, basket, or decorative container
- Clean gravel, stones, sand, floral foam, or another stable filler
- Floral wire, reusable ties, or thin zip ties
- Pruning shears
- Soft brush or cloth
- Gloves
- Optional spray paint or craft paint
- Optional clear matte sealer
- Optional moss, pinecones, ribbon, ornaments, or artificial greenery
For indoor projects, battery-operated micro-LED lights are especially convenient because there is no visible cable stretching toward an outlet. If you prefer plug-in lights, plan the tree’s position before construction so the power cord can reach an outlet without crossing a walkway.
Step 1: Decide How Large Your Light Tree Should Be
Start with location, not branches. A common DIY mistake is building an enormous masterpiece on the garage floor and only afterward discovering that it fits in the living room about as gracefully as a giraffe in an elevator.
For a tabletop fairy light tree, branches around 18 to 36 inches tall are usually manageable. For floor décor, roughly four to six feet can create a substantial silhouette without taking over the room.
Measure both the available height and width. Remember that irregular branches often occupy considerably more horizontal space than they appear to while lying on the ground.
Step 2: Find Good Branches
Look for naturally fallen, dry branches with interesting forks and smaller twigs. A combination of one strong central branch and several lighter branches usually creates the most convincing tree shape.
Avoid rotten wood, obviously insect-damaged pieces, moldy branches, or wood that is still wet and green. If you collect branches outdoors, inspect them carefully before bringing them inside. University extension guidance for bringing plant material indoors emphasizes checking for pests and keeping plant material clean; the same common-sense principle is useful when turning outdoor branches into indoor decorations.
What if you cannot collect real branches?
No problem. Decorative artificial branches, bamboo stakes, narrow wooden dowels, or florist branches can create the same basic structure. Artificial materials are also useful when you want a perfectly symmetrical tree rather than the wonderfully chaotic geometry provided free by Mother Nature.
Step 3: Clean and Dry the Branches
Brush away loose bark, dirt, cobwebs, and debris outdoors. Wipe the branches clean and allow them to dry completely before assembling the tree.
If you plan to paint or seal natural wood, make sure it is thoroughly dry first. The Spruce has similarly recommended cleaning and optionally sealing foraged branches used in indoor decorative projects.
Do not wrap electrical lights around damp wood. Even when working with low-power LEDs, dry materials and undamaged lighting equipment make for a much better project.
Step 4: Trim and Arrange Your Tree Shape
Set the branches loosely inside your container before adding any filler. Rotate them until the arrangement looks balanced from the direction in which people will normally see it.
Try combining:
- One tall branch for the central trunk
- Two or three medium branches angled outward
- Smaller twiggy pieces for visual fullness
A perfectly symmetrical arrangement can look artificial. Slight differences in height and direction create a more natural silhouette and give the fairy lights more places to sparkle.
Once you like the arrangement, trim awkward tips with pruning shears. Do not remove every strange bend. Strange bends are basically the branch’s résumé.
Step 5: Secure the Branches in a Heavy Base
Stability matters more than almost any decorative detail. A tall arrangement creates leverage, so a lightweight container can tip surprisingly easily.
Place the branches inside the container and surround them with clean stones or gravel. For a smaller tree, dense floral foam covered with stones can work. Larger trees benefit from a heavier planter and more substantial ballast.
Martha Stewart’s illuminated branch-tree decorating guidance similarly recommends weighting a vase with stones when branches are heavy.
Shake the arrangement gently. If it wobbles excessively, add weight or use a wider container. This is especially important in homes with children, cats, large dogs, robotic vacuums, or adults who insist they can walk through a dark room without turning on a light.
Step 6: Test Your Fairy Lights Before Installing Them
Uncoil the lights carefully and turn them on before wrapping anything.
Inspect the entire strand for damaged insulation, broken connectors, loose components, or other obvious defects. CPSC and NFPA safety guidance recommends replacing damaged decorative lighting rather than attempting to continue using worn or broken strings.
If the lights have several effectssteady, twinkle, fade, wave, or the mysterious mode apparently designed for miniature nightclubstest those as well.
Step 7: Wrap the Main Branches First
Start near the bottom of the arrangement, ideally close to wherever the battery pack or power cord will be hidden.
Wrap the wire loosely around the main branch, spacing the LEDs evenly as you move upward. When you reach a fork, send the strand along one branch and then back toward the junction before continuing along another branch.
This branch-by-branch technique distributes light through the structure rather than leaving all the illumination around the outside.
The Home Depot recommends a similar trunk-to-tip-and-back approach when placing lights on conventional trees because it gives branches more complete coverage.
Do not wrap too tightly
You want the wire secure, not strangled around the branch. Loose wrapping is easier to reposition and puts less stress on delicate fairy-light wiring.
Where necessary, secure the light strand with small reusable ties or florist wire. Do not use sharp fasteners that could puncture the electrical insulation. NFPA advises using clips rather than nails when hanging decorative lights, and This Old House likewise warns against fasteners that can damage cord insulation.
Step 8: Work Outward Onto Smaller Twigs
After illuminating the main structure, use the remaining strand on smaller branches.
Avoid putting a bulb on every single twig. Leaving occasional darker sections creates contrast and makes the illuminated sections appear brighter. The goal is an enchanted tree, not a branch undergoing an airport security scan.
Step back every few minutes and switch the lights on. From a distance, gaps and overly bright clusters become much easier to spot.
Step 9: Hide the Battery Pack or Power Cord
For battery-powered fairy lights, place the battery box behind the container, beneath decorative moss, or in another accessible but discreet location. Do not permanently bury it under materials if doing so makes battery replacement difficult.
Better Homes & Gardens recommends battery-operated fairy lights for indoor displays where concealing a traditional electrical cord would otherwise be awkward.
If your lights plug into an outlet, route the cable along the rear of the display. Keep cords out of pathways and away from rugs, doors, heaters, fireplaces, or places where furniture can crush them.
Step 10: Decorate the Base
Now hide the less glamorous engineering beneath something attractive.
Cover visible stones or foam with:
- Preserved or artificial moss
- Pinecones
- Wood slices
- Decorative pebbles
- Artificial snow
- Fabric
- Seasonal ornaments
A woven basket placed around a plain planter can instantly turn an inexpensive utility container into something that looks intentional.
Creative Fairy Light Tree Styles
Minimalist Scandinavian tree
Use bare natural branches, warm-white micro LEDs, and a matte white or stone-colored pot. Keep decorations minimal. The irregular branches provide enough visual interest on their own.
White winter tree
Paint the branches matte white and wrap them in warm-white lights. Add a few clear or silver ornaments. This version works well as Christmas décor but remains neutral enough to survive into January without screaming, “Someone forgot to put Christmas away.”
Romantic wedding tree
Combine warm lights with pale artificial blossoms. Lightweight paper tags can display table numbers, photographs, messages, or guest wishes.
Autumn fairy tree
Add miniature pumpkins, artificial amber leaves, pinecones, or copper-colored ribbon.
Halloween enchanted tree
Use black branches, warm lights, miniature bats, paper ravens, or tiny hanging ghosts. Martha Stewart has demonstrated how an illuminated branch arrangement can work as Halloween décor and then transition into later seasonal decorating simply by changing the accessories.
How Many Fairy Lights Do You Need?
There is no universal formula because branch density matters more than height alone. A sparse five-foot branch arrangement might need less lighting than a dense three-foot one.
Instead, measure the approximate path the lights will follow. Lowe’s, The Home Depot, and This Old House all emphasize measuring planned lighting runs before installation rather than guessing.
For a small tabletop tree, one modest micro-light strand may be sufficient. A tall floor tree can require several longer strands depending on how densely you wrap the branches.
If using connectable plug-in lights, follow the manufacturer’s stated maximum number of connected strands. Do not assume that because another set can physically plug into the end, the universe is inviting you to keep adding lights indefinitely.
Warm White vs. Cool White Fairy Lights
Warm-white LEDs generally create the softest and coziest effect. They pair especially well with natural wood, bedrooms, living rooms, weddings, and holiday décor.
Cool-white lights create a brighter, icier appearance and work nicely with white-painted branches, silver decorations, modern interiors, and winter-themed displays.
Multicolor lights make sense for children’s spaces, parties, or playful holiday trees. Smart fairy lights can offer adjustable brightness, timers, colors, and lighting patterns.
HGTV and other U.S. home-design sources regularly use string lighting specifically to build atmosphere, while Better Homes & Gardens highlights its ability to add warmth and coziness to indoor spaces.
Can You Put a DIY Fairy Light Tree Outside?
Yes, but only if every lighting component is appropriate for outdoor conditions.
Do not assume an indoor fairy-light strand becomes outdoor-safe simply because the branches look enthusiastic about moving to the patio.
UL Solutions distinguishes between decorative light strings intended for indoor use and those evaluated for indoor/outdoor applications, while retailers such as Lowe’s and The Home Depot similarly instruct homeowners to select outdoor-rated equipment for exterior installations.
For outdoor versions:
- Choose lights specifically rated for outdoor use.
- Use an outdoor-safe power arrangement.
- Keep electrical connections protected according to manufacturer instructions.
- Make the base significantly heavier to resist wind.
- Use weather-resistant ties and hardware.
- Avoid locations near overhead utility lines.
For exposed outdoor installations, professional electrical guidance also favors properly protected outlets and equipment designed for wet or damp environments rather than adapting indoor products.
Fairy Light Tree Safety Tips
A DIY light tree should be decorative, not adventurous. Follow these basic precautions:
- Use intact, commercially manufactured light strings.
- Never cut, splice, or modify the light wiring unless the product is specifically designed for that purpose.
- Use indoor lights only indoors.
- Keep the tree away from candles, fireplaces, heaters, and other heat sources.
- Do not pierce wires with staples, nails, or sharp fasteners.
- Follow the manufacturer’s limits for connecting multiple strings.
- Switch decorative lighting off before leaving home or going to bed unless the manufacturer specifically provides a safe automated operating method.
- Keep battery compartments accessible and inspect them periodically.
CPSC identifies inadequate wire size, strain relief, and overcurrent protection as important safety concerns in decorative lighting, while NFPA recommends replacing strings with damaged cords or loose connections and turning decorative lights off before leaving home or sleeping.
Common DIY Fairy Light Tree Mistakes
Using too many branches
More branches do not automatically create a better tree. Overcrowding can turn delicate illuminated sculpture into glowing shrubbery.
Using too little weight in the container
This is one of the easiest mistakes to fix. If the tree can be tipped with a gentle nudge, add ballast.
Starting with the lights before arranging branches
Finalize the tree’s basic structure first. Otherwise, every branch adjustment becomes a miniature wrestling match with copper wire.
Wrapping every branch equally
Real trees have depth. Concentrating slightly more light around the center and major forks creates a fuller visual effect.
Skipping the nighttime test
Your arrangement may look evenly wrapped in daylight yet reveal dark holes after sunset. Turn off the room lights and inspect the tree before declaring victory.
Practical Experience: What You Learn While Building a Fairy Light Tree
The most useful lesson from projects like this is that the fairy lights are actually the easy part. The branch arrangement determines whether the finished piece looks elegant or like someone illuminated yard waste.
At first, it is tempting to choose the straightest, cleanest branches available. In practice, slightly twisted branches usually produce a more interesting tree. Forks give the LEDs natural places to travel, while crooked sections create depth and shadows. A branch that looks ugly by itself can become the star of the arrangement once tiny lights trace its shape.
Another practical lesson is to arrange everything before painting. Once branches are trimmed, positioned, and viewed from several angles, you may discover that one branch is unnecessary or another needs to be shortened. Painting everything beforehand means spending time beautifully finishing pieces that eventually end up back in the yard.
Lighting density also deserves experimentation. The first instinct is often to wrap each branch with identical spacing. That produces a neat result, but sometimes a slightly irregular distribution looks better. A cluster of lights around an interesting fork creates a focal point, while a darker outer twig prevents the whole arrangement from becoming visually flat.
The base is where many first attempts become unexpectedly educational. Tall branches have more leverage than they appear to have. A container that feels heavy while empty may still be too light once a four-foot branch leans several inches away from its center. Adding extra stones makes a dramatic difference. A wider planter can be even more effective.
Hiding the battery box is another tiny challenge nobody thinks about while admiring inspiration photographs. Decorative moss is useful, but the battery compartment must remain reachable. Otherwise, changing batteries turns into an archaeological excavation.
It also helps to photograph the tree while the room is dark. A phone camera exaggerates bright spots and dark gaps, making uneven lighting easier to identify. You may notice a bare section that seemed perfectly fine to the eye. A few minutes of repositioning usually fixes it.
Perhaps the nicest part of the project is how easily it changes personality. Remove winter ornaments and the same warm-white branch tree becomes everyday living-room lighting. Add paper hearts for Valentine’s Day, blossoms for spring, tiny pumpkins for fall, or stars for December. The underlying project does not need to be rebuilt every season.
And unlike many DIY projects, this one has a pleasantly forgiving finish line. Branches are supposed to be irregular. Light spacing does not need to be measured with laboratory precision. If one side bends differently from the other, congratulations: you have accidentally achieved the “organic look” designers charge extra for.
Final Thoughts
Learning how to make a DIY fairy light tree with string lights is less about complicated crafting and more about combining three simple ideas: an interesting branch structure, a stable base, and carefully placed LED lights.
Start with dry, clean branches. Build the silhouette before adding lights. Test every light strand first, wrap major branches from the center outward, hide the power source neatly, and use decorations sparingly enough that the glow remains the star of the project.
The result can function as a romantic accent light, an alternative Christmas tree, a wedding decoration, a seasonal centerpiece, or simply the most glamorous pile of sticks your household has ever owned.
Note: Always follow the instructions supplied with your specific string lights and electrical accessories. For outdoor installations, use products specifically rated for outdoor conditions.