Cabinet hinges have one job: open, close, repeat, and never start drama. Unfortunately, the tiny metal heroes holding up your kitchen doors can loosen, sag, squeak, strip their screws, or snap at the exact moment you are reaching for coffee filters. The good news? Most broken cabinet hinge problems are not a full kitchen renovation waiting to happen. With a screwdriver, a few toothpicks, wood glue, replacement screws, and a little patience, you can fix many cabinet hinge issues in less time than it takes to explain why the door is hanging like a tired eyelid.
This guide explains how to fix broken cabinet hinges with six quick solutions for the most common problems: loose screws, stripped screw holes, misaligned doors, damaged hinge cups, rusty or squeaky hinges, and completely broken hardware. Whether you have traditional surface-mounted hinges or modern concealed European-style cabinet hinges, the repair usually starts with diagnosis, not panic.
Before you grab the drill like a superhero with a power tool, inspect the hinge area carefully. Is the hinge itself cracked? Are the screws spinning without tightening? Is the cabinet door sagging, rubbing, or refusing to close? Different symptoms point to different repairs. Below, you will find practical fixes that work for kitchen cabinets, bathroom vanities, laundry room storage, and built-ins.
Quick Safety and Tool Checklist Before You Start
Cabinet doors are heavier than they look, especially solid wood doors or tall pantry doors. If you are removing a door, support it with one hand, ask someone to help, or place a folded towel underneath to protect the floor and cabinet finish. Work slowly so you do not tear out more wood around the hinge.
Tools and supplies you may need
- Phillips or Pozidriv screwdriver, depending on your hinge screws
- Drill and small drill bits
- Wood glue
- Toothpicks, wooden matches, or small dowels
- Replacement screws, preferably slightly longer or wider when appropriate
- Epoxy wood filler or wood putty for larger damage
- Replacement cabinet hinges
- Measuring tape or ruler
- Pencil for marking screw holes
- Lubricant for squeaky hinges
The best cabinet hinge repair is the one that fixes the actual failure. Tightening a screw will not solve a cracked hinge arm. Replacing a hinge will not help if the screw holes in the cabinet box are chewed up. Take two minutes to diagnose the problem, and you can save yourself from doing the same repair twice.
Solution 1: Tighten Loose Cabinet Hinge Screws
The simplest fix for a broken cabinet hinge is also the most overlooked: tighten the screws. Cabinet doors move constantly, and vibration from daily opening and closing can slowly loosen screws. Once the screws loosen, the door may sag, sit crooked, scrape against a neighboring door, or fail to close evenly.
How to do it
- Open the cabinet door and support it with one hand.
- Check the screws on the door side of the hinge and the cabinet frame side.
- Use the correct screwdriver and turn each screw clockwise until snug.
- Do not overtighten. If the screw keeps spinning, the hole is stripped and needs Solution 2.
- Close the door and check the gap around the cabinet front.
This quick repair works best when the screw still bites into solid wood or cabinet material. If the screw tightens firmly, you may be done. If it turns forever like it is auditioning for a ceiling fan, the screw hole has lost its grip.
Pro tip
Use a hand screwdriver for final tightening instead of a drill. A drill can easily overdrive cabinet screws, especially in particleboard or MDF cabinets. Hand tightening gives you better control and reduces the chance of stripping the hole.
Solution 2: Fix Stripped Screw Holes with Toothpicks or Dowels
Stripped screw holes are one of the most common cabinet hinge problems. The hinge is usually fine, but the screw has nothing left to grab. This often happens on older cabinets, particleboard cabinet boxes, or doors that have been adjusted too many times. Fortunately, you can rebuild the hole with wood glue and small pieces of wood.
Best for
This method is ideal for small to medium stripped holes in wood cabinet doors, face frames, and some plywood cabinet boxes. It is a fast, inexpensive fix that can restore the screw’s grip without replacing the hinge.
How to do it
- Remove the loose screw from the hinge.
- Dip toothpicks, wooden matchsticks, or a small dowel in wood glue.
- Push the wood pieces into the stripped hole until the hole is packed firmly.
- Break or trim the excess flush with the surface.
- Let the glue dry according to the glue label.
- Drill a small pilot hole to prevent splitting.
- Reinstall the hinge screw.
The idea is simple: you are giving the screw fresh wood fibers to bite into. For a stronger repair, use a hardwood dowel instead of toothpicks. Drill the damaged hole slightly larger, glue in the dowel, let it dry, trim it flush, and drill a new pilot hole. This method takes longer, but it is much stronger for heavy cabinet doors.
Common mistake to avoid
Do not fill the hole with glue only. Dried glue alone is not a reliable anchor for a hinge screw. The screw needs solid material, not just a shiny plug of hope.
Solution 3: Adjust Concealed Hinges to Fix Sagging or Crooked Doors
Modern concealed cabinet hinges, often called European hinges, are wonderfully adjustable. They can usually move the door side to side, up and down, and in or out from the cabinet box. That means a cabinet door that looks “broken” may simply be out of alignment.
If your cabinet door is not cracked, the hinge is not bent, and the screws are secure, try adjusting the hinge before replacing anything. This is especially useful for doors with uneven gaps, doors that rub against each other, or doors that sit too far forward.
How concealed hinge adjustment works
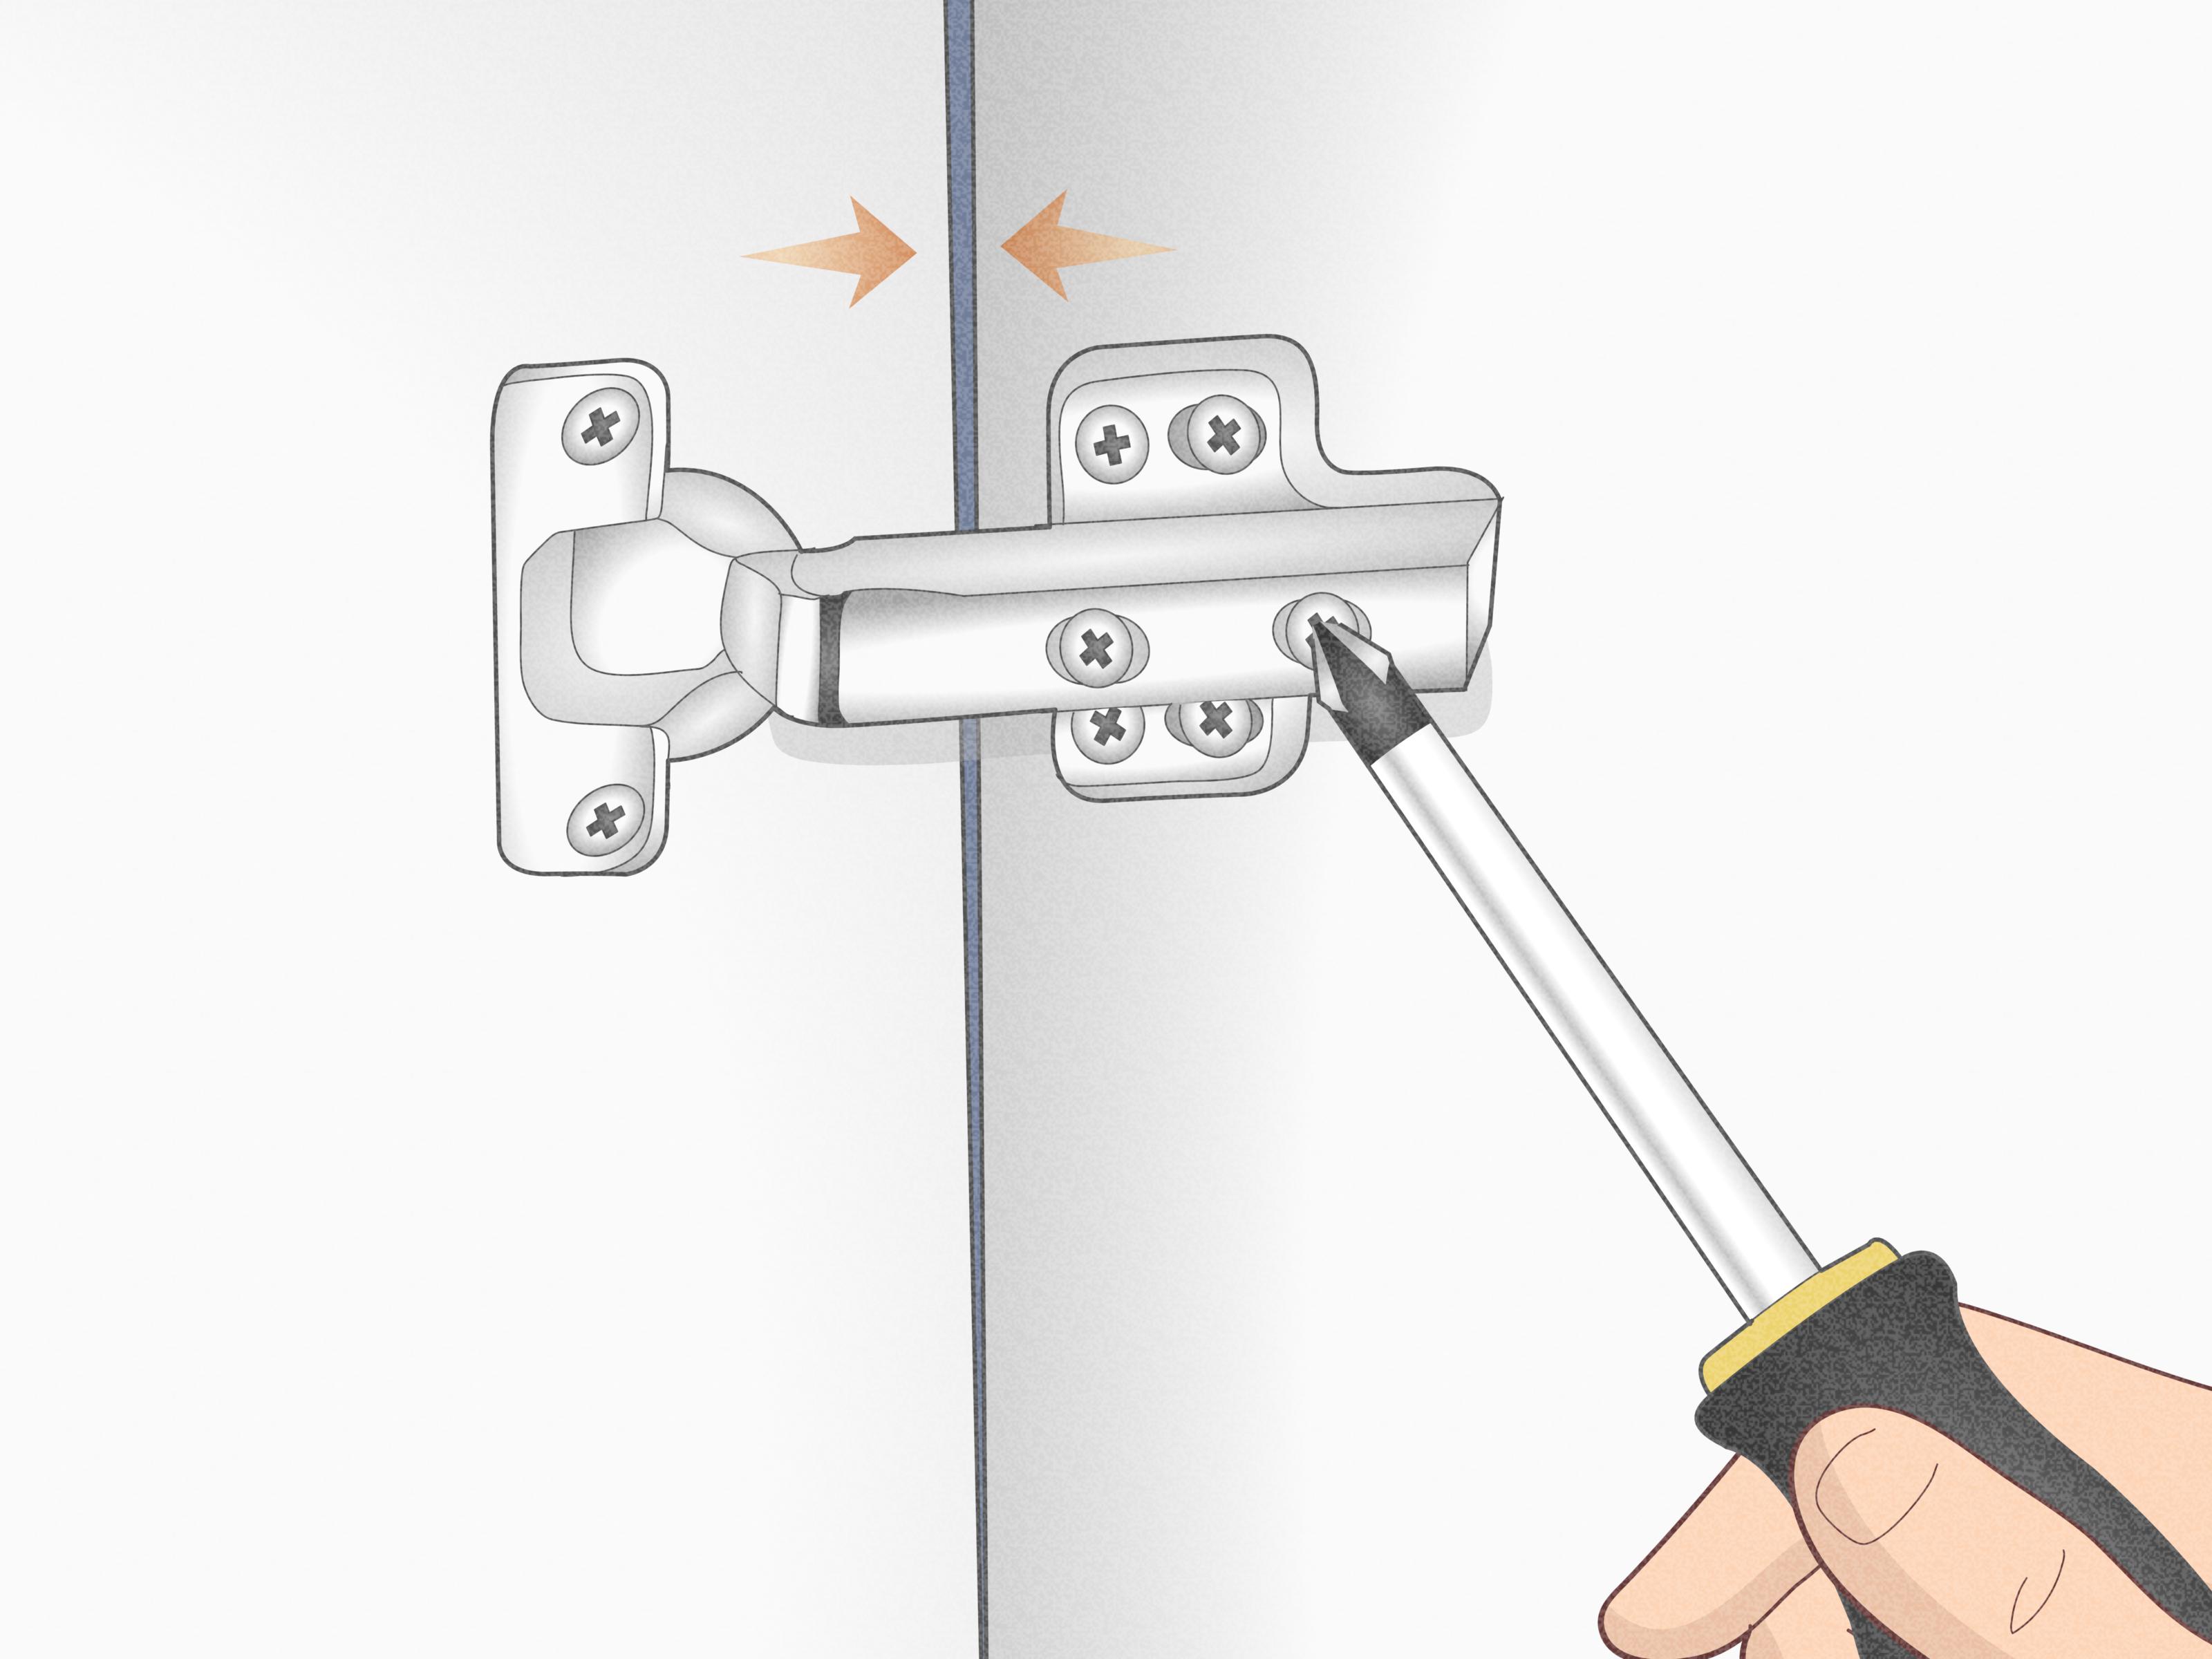
Most concealed hinges have adjustment screws on the hinge arm or mounting plate. Depending on the hinge design, one screw may move the door left or right, another may move it closer to or farther from the cabinet, and the mounting plate screws may allow height adjustment. Turn screws in small increments, then close the door to check the result.
Step-by-step adjustment
- Open the cabinet door and locate the adjustment screws on the hinge.
- Use a screwdriver, not a drill, for better control.
- Turn the side-to-side adjustment screw a quarter turn at a time.
- If the door is too high or low, loosen the mounting screws slightly, shift the door, and retighten.
- If the door sticks out or sits too deep, adjust the depth screw if your hinge has one.
- Repeat on the top and bottom hinges until the reveal, or gap, looks even.
Patience matters here. Cabinet hinge adjustment is less like fixing a bike chain and more like tuning a tiny metal orchestra. A quarter turn can make a noticeable difference. If you turn every screw wildly, the door may end up looking worse than when you started.
When adjustment is not enough
If the hinge arm is bent, the cup is cracked, or the mounting plate has pulled away from the cabinet, adjustment will not solve the problem. Move to a repair plate, filler repair, or full hinge replacement.
Solution 4: Use a Cabinet Hinge Repair Plate for Damaged Door Material
Sometimes the cabinet door itself is damaged around the hinge cup or screw holes. This is common with particleboard, MDF, and heavily used kitchen doors. The hinge screws may have torn out a chunk of material, leaving a crater where a screw hole used to be. Very rude behavior from a cabinet door, but fixable.
A cabinet hinge repair plate is a flat metal plate designed to reinforce the damaged area. It spreads the load across a wider section of the door and gives the hinge fresh mounting points. These plates are especially helpful for concealed hinges when the hinge cup area is still usable but the screw holes are destroyed.
How to install a hinge repair plate
- Remove the cabinet door and lay it flat on a protected surface.
- Unscrew the damaged hinge from the door.
- Place the repair plate over the damaged area according to the plate design.
- Mark the new screw holes with a pencil.
- Drill small pilot holes if recommended.
- Attach the plate securely to the door.
- Reattach the hinge to the plate.
- Rehang the door and adjust alignment.
This solution is faster than rebuilding a large damaged area with filler, and it can be surprisingly sturdy. It is also a good option when you want a clean, practical repair inside the cabinet where appearance is less important than strength.
When to choose this solution
Use a hinge repair plate when screw holes are badly enlarged, the door material is crumbly, or the hinge keeps pulling loose after basic screw-hole repair. If the door is cracked through the stile or the hinge cup has completely broken out, the door may need more serious repair or replacement.
Solution 5: Repair Larger Damage with Epoxy Wood Filler
For bigger hinge damage, toothpicks may not be enough. If the screw hole has become a ragged opening or the cabinet material has broken away, epoxy wood filler can rebuild the area. Epoxy repairs are strong, sandable, and useful for damaged wood, MDF, and particleboard when used correctly.
How to use epoxy filler for hinge repair
- Remove the hinge and clean out loose dust, chips, and weak material.
- Mix or knead the epoxy wood filler according to the product instructions.
- Press the filler firmly into the damaged area.
- Shape it slightly proud of the surface so it can be sanded flush later.
- Let it cure fully. Do not rush this step.
- Sand the repair smooth.
- Mark the hinge location and drill fresh pilot holes.
- Reinstall the hinge screws carefully.
Epoxy is a good choice when you need more strength than ordinary wood filler can provide. Standard lightweight filler may work for cosmetic dents, but hinge screws need real holding power. If the repaired area will carry a heavy door, choose a product designed for structural or hardware-related wood repair.
Specific example
Imagine a bathroom vanity door where steam and daily use have weakened the hinge area. The top hinge screw pulls out, and the hole is too wide for a toothpick repair. In that case, remove the hinge, dig out the crumbly material, rebuild the area with epoxy wood filler, let it cure completely, drill a pilot hole, and reinstall the screw. The result is much stronger than simply driving in a bigger screw and hoping the cabinet forgives you.
Solution 6: Replace Broken or Rusty Cabinet Hinges
Sometimes the hinge has reached retirement age. If it is cracked, bent, rusted, missing a spring, or grinding no matter what you do, replacement is the best fix. Cabinet hinges are not all the same, so the most important part of this solution is buying the correct replacement.
What to check before buying new hinges
- Hinge type: concealed, semi-concealed, surface-mounted, inset, overlay, or face-frame hinge
- Overlay size: how much the door covers the cabinet frame
- Opening angle: common options include 90, 105, 110, 135, and 165 degrees
- Cabinet construction: face-frame or frameless
- Soft-close feature: optional, but useful for reducing slamming
- Screw hole position: matching holes makes installation easier
If possible, remove one old hinge and take it with you when shopping. Matching the hinge physically is often easier than decoding hinge terminology online while standing in your kitchen with one cabinet door on the floor.
How to replace a cabinet hinge
- Support the cabinet door.
- Remove the screws from the cabinet side of the hinge.
- Remove the screws from the door side.
- Compare the old and new hinges.
- Install the new hinge on the door first.
- Hold the door in position and attach the hinge to the cabinet frame or mounting plate.
- Adjust the door until the gaps are even.
When replacing concealed hinges, make sure the hinge cup fits the existing hole in the back of the cabinet door. Many concealed hinges use a large round cup, and the diameter and depth need to match. If the new hinge does not fit the old cup hole, you may need a different hinge style or a repair plate.
How to Fix Squeaky Cabinet Hinges
A squeaky cabinet hinge is not usually broken, but it can make your kitchen sound like a haunted pantry. Squeaks often come from friction, dust, worn finish, or light corrosion. Start by tightening the screws and checking alignment. If the hinge is rubbing because the door is crooked, lubrication alone will only hide the problem temporarily.
Quick squeak repair
- Open and close the door to locate the noisy hinge.
- Wipe away dust and grime with a cloth.
- Apply a small amount of household lubricant to the moving parts.
- Open and close the door several times to work it in.
- Wipe away excess lubricant so it does not attract dirt.
If the hinge is rusty, stiff, or visibly damaged, replace it. Lubricant can quiet a hinge, but it cannot restore metal that has corroded or bent out of shape.
How to Remove a Stripped Cabinet Hinge Screw
Sometimes the screw hole is fine, but the screw head is stripped. This means your screwdriver cannot grip the head properly. Before using a screw extractor, try a few gentle methods.
Try these first
- Use the correct bit size and press firmly.
- Place a rubber band between the screwdriver and screw head for extra grip.
- Use locking pliers if the screw head sticks out enough.
- Tap the screwdriver lightly into the screw head to seat it.
If those methods fail, a screw extractor can remove the damaged screw. Use it carefully and follow the extractor instructions. Once the screw is out, replace it with a new screw of the correct size and drive type. Do not reuse a stripped screw unless you enjoy future frustration as a hobby.
How to Prevent Cabinet Hinges from Breaking Again
After repairing cabinet hinges, a little prevention goes a long way. Cabinet doors fail faster when they are slammed, overloaded with hanging organizers, or allowed to sag for months. Soft-close hinges can reduce impact. Correct adjustment keeps the door from rubbing. Proper screws help hinges stay tight.
Simple prevention tips
- Do not hang heavy towels, bags, or organizers on cabinet doors unless the door is designed for it.
- Tighten loose hinge screws as soon as you notice wobbling.
- Adjust crooked doors before they scrape and stress the hinges.
- Use pilot holes when reinstalling screws.
- Replace mismatched screws with proper cabinet hardware screws.
- Keep hinges clean and dry, especially in bathrooms and under-sink cabinets.
Small hinge problems tend to become bigger hinge problems when ignored. A loose screw today can become a torn-out cabinet stile next month. Cabinet doors are not dramatic by nature, but they do escalate.
When Should You Replace the Cabinet Door Instead?
Most hinge issues are repairable, but the door itself may be beyond a quick fix if it is cracked, swollen from water damage, delaminating, or broken around the hinge cup. If the door material crumbles when you touch it, repairs may not hold for long. In that case, replacing the door or having a cabinet professional rebuild the area may be smarter.
Water damage is especially tricky. Under-sink cabinets and bathroom vanities often absorb moisture, which weakens particleboard and MDF. If the hinge keeps pulling out after repair, inspect for swelling or softness. Hardware can only perform well when attached to solid material.
Real-World Experiences: What Actually Works When Cabinet Hinges Fail
One of the most useful lessons from fixing cabinet hinges is that the visible problem is not always the real problem. A sagging cabinet door may look like a bad hinge, but the true cause is often a stripped screw hole on the upper hinge. The upper hinge carries more of the door’s weight, so it is usually the first place to inspect. If the top screw is loose, fix that before touching every adjustment screw on the hinge.
In older kitchens, the fastest successful repair is often the toothpick-and-glue method. It sounds almost too simple, like something your uncle invented while holding a sandwich, but it works well for small stripped holes. The key is packing the hole tightly and allowing the glue to dry. If you reinstall the screw while the glue is wet, the repair may feel firm at first but loosen later. Waiting is not glamorous, but neither is picking a cabinet door off the floor.
For heavier doors, hardwood dowels are more reliable than toothpicks. A dowel repair takes more effort because you have to drill the damaged hole cleanly, glue in the dowel, trim it, and drill a pilot hole. But the result is stronger and better suited for pantry doors, tall cabinet doors, or solid wood doors. If the cabinet is used every day, the extra time is worth it.
Concealed hinges are another area where experience helps. Many people assume a crooked door means the hinge is broken, but modern concealed hinges are designed for adjustment. The challenge is knowing when to stop. Turn one screw slightly, close the door, check the gap, and repeat. Do not spin every screw at once. That turns a five-minute alignment job into a kitchen puzzle game nobody asked to play.
Repair plates are underrated. They may not be beautiful, but they are hidden inside the cabinet door most of the time. When cabinet material is damaged around the hinge screws, a repair plate can save a door that would otherwise need replacement. This is especially useful for rental properties, budget kitchen repairs, laundry cabinets, and quick weekend fixes where function matters more than perfection.
Epoxy filler is excellent for larger damage, but it rewards careful preparation. Clean out loose material first. If you pack epoxy over dust and crumbling particleboard, the repair bonds to the weak layer instead of the solid cabinet material. Also, drilling a pilot hole after the epoxy cures is important. Driving a screw directly into hardened filler can crack the repair or send the screw off-center.
Finally, replacement hinges are not always interchangeable. Two hinges can look nearly identical and still differ in overlay, cup depth, screw pattern, or opening angle. When in doubt, remove the old hinge and match it as closely as possible. If you are upgrading to soft-close hinges, replace hinges in pairs on the same door so the movement feels balanced. A door with one old hinge and one new soft-close hinge can act weird, and cabinets already have enough personality.
Conclusion
Learning how to fix broken cabinet hinges is one of those home repair skills that pays off quickly. A loose cabinet door can make an entire kitchen feel worn out, but the repair may be as simple as tightening screws, filling stripped holes, adjusting concealed hinges, installing a repair plate, rebuilding damaged material with epoxy, or replacing worn hardware. Start with the smallest reasonable fix, test the door, and move to a stronger solution only when needed.
The big takeaway is simple: do not ignore a loose hinge. Cabinet hinges rarely fix themselves, and a small wobble can turn into torn-out screw holes or damaged doors. With the right repair method, your cabinet doors can swing smoothly, close evenly, and stop looking like they lost an argument with gravity.