Learning how to bunny hop on a bike is one of those cycling skills that looks like magic until you understand the recipe. Then it becomes less “wizard on wheels” and more “timing, body position, and a little practice in a parking lot while pretending nobody is watching.” Whether you ride a mountain bike, BMX bike, gravel bike, or commuter bike, the bunny hop can help you lift both wheels over obstacles without relying on a ramp.
A clean bunny hop is useful for clearing roots, potholes, curbs, trail debris, small logs, and awkward little bumps that appear right when your confidence is starting to enjoy itself. More importantly, it teaches bike handling, balance, weight transfer, and control. Those skills make you a smoother, safer, and more capable rider even when you are not hopping over anything.
The key is this: a proper bunny hop is not simply pulling up on the handlebars and hoping your bike follows out of emotional loyalty. It is a coordinated movement that starts with a front wheel lift, continues with an upward body extension, and finishes with a rear wheel lift and controlled landing. Once the sequence clicks, the move feels less like forcing the bike into the air and more like guiding it through an arc.
What Is a Bunny Hop?
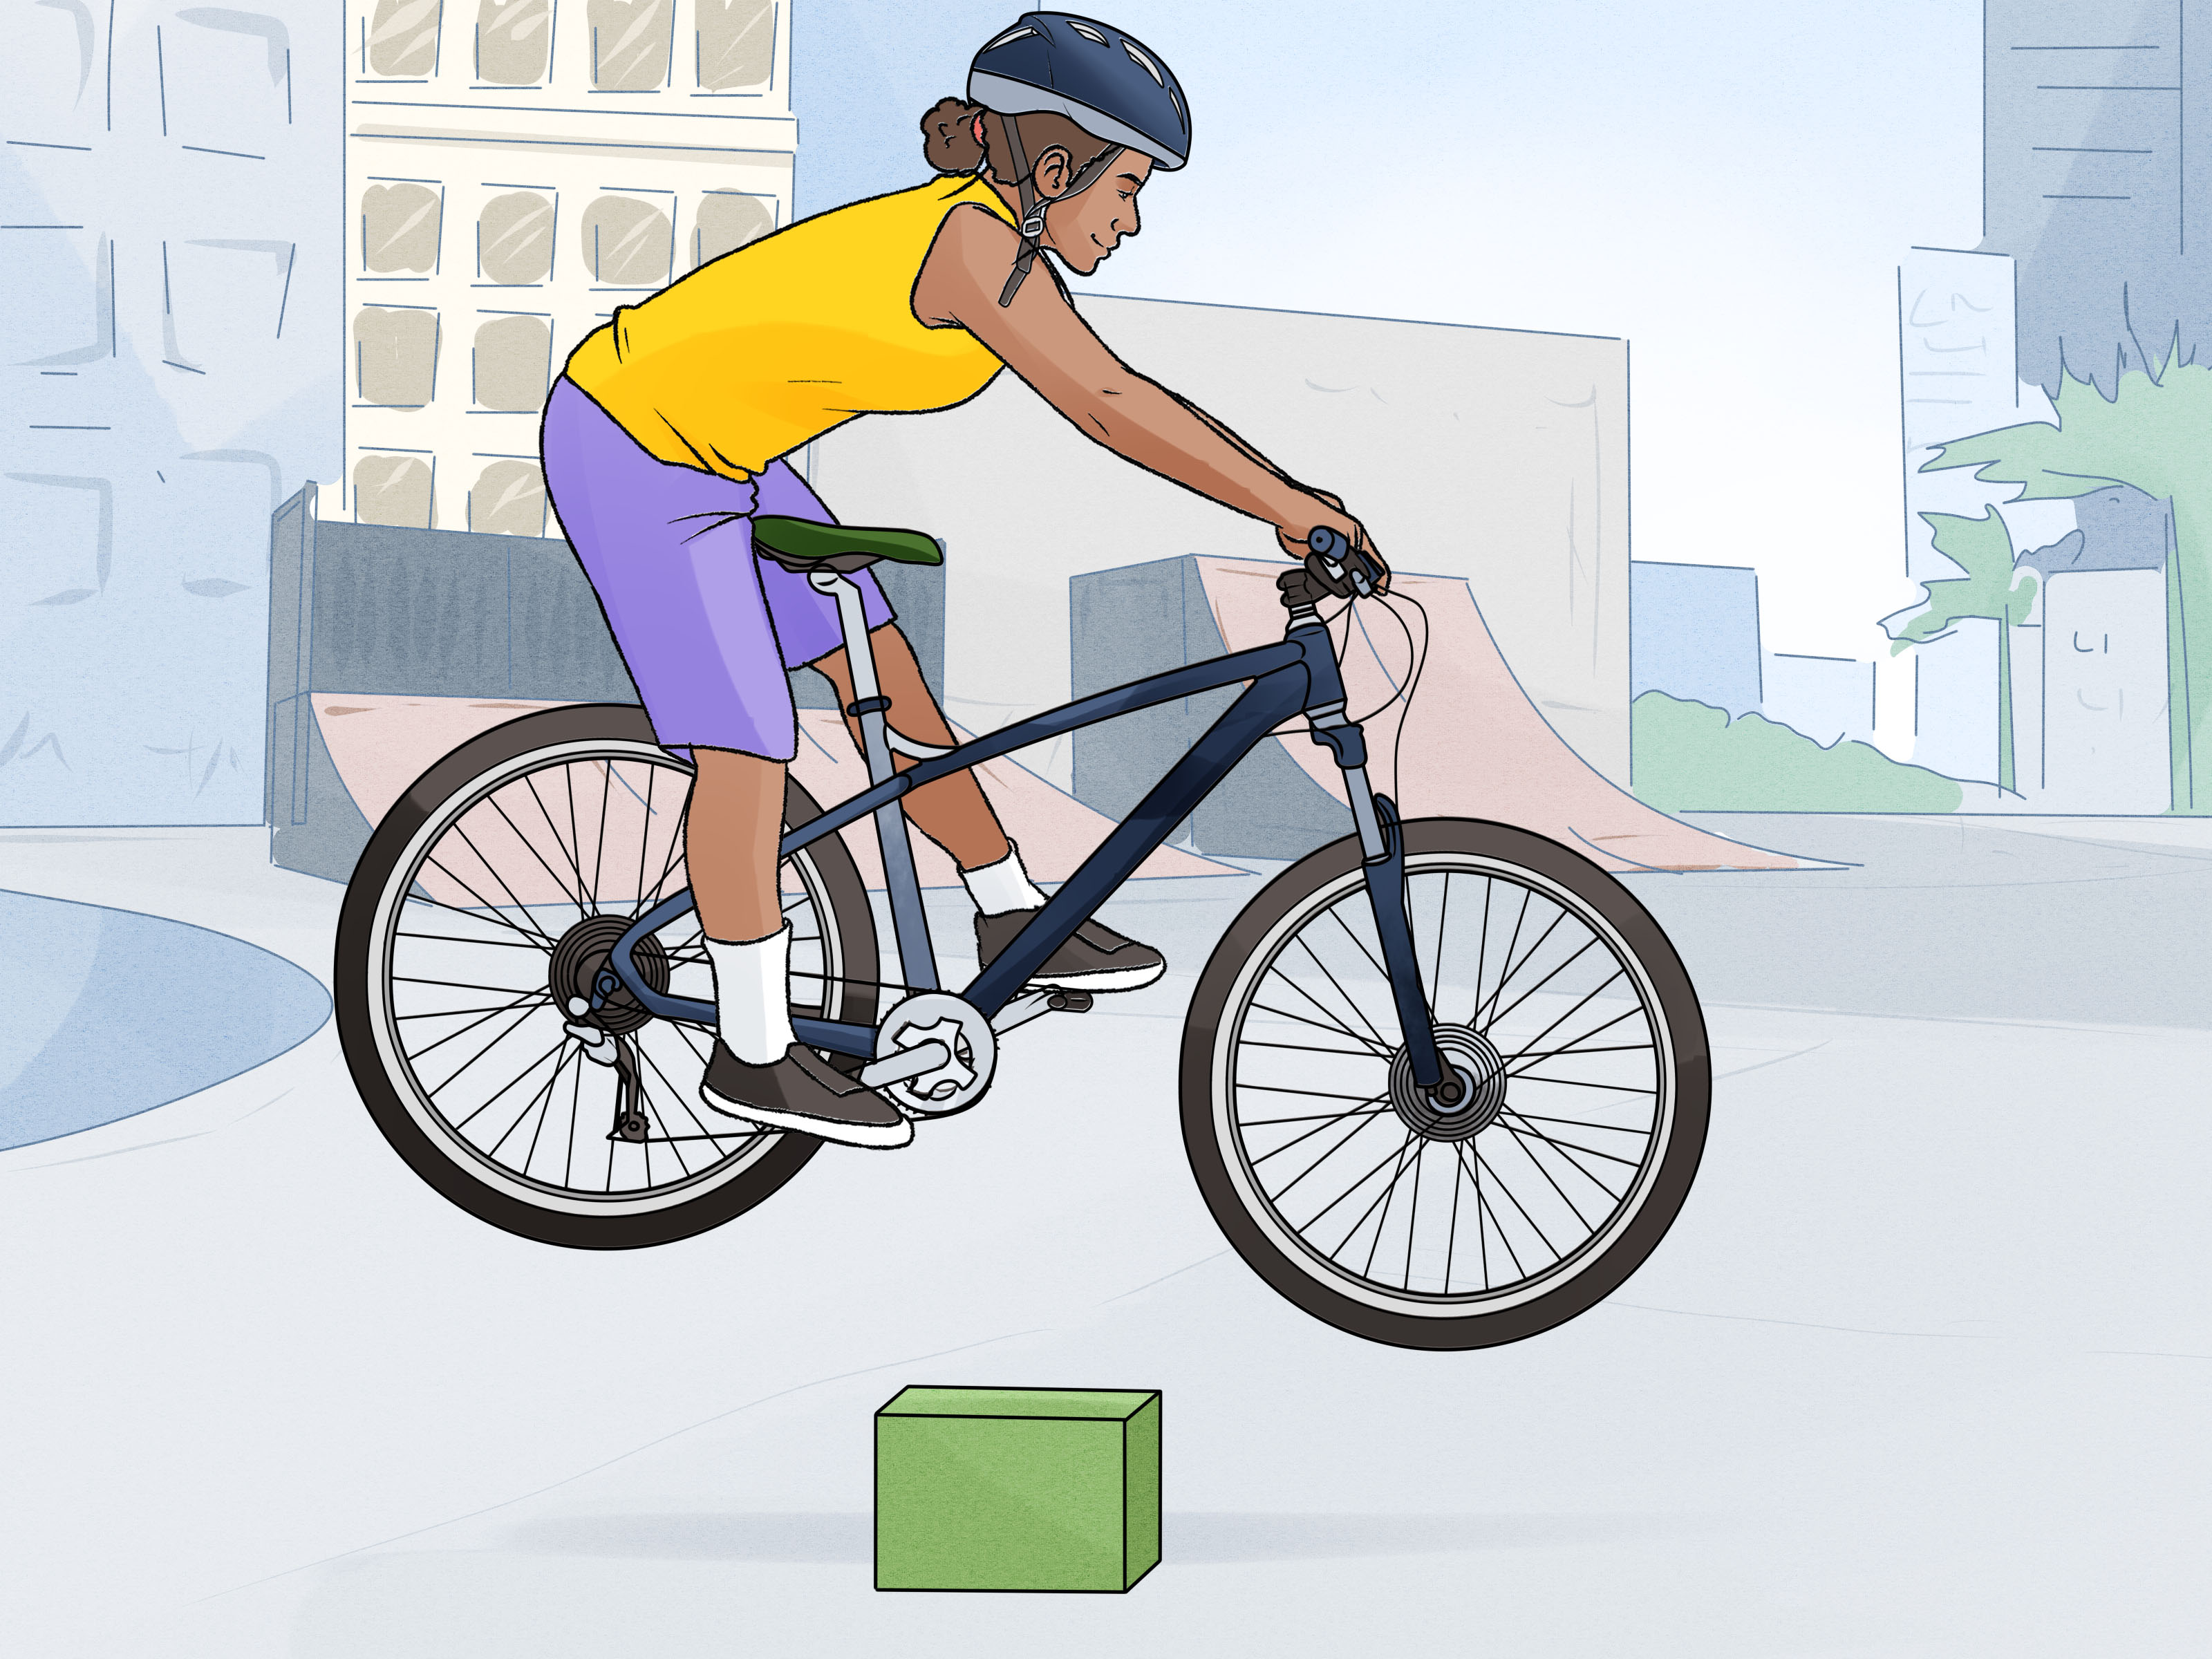
A bunny hop is a bike handling technique where the rider lifts the front wheel first, then the rear wheel, allowing the entire bike to clear an obstacle. In mountain biking and BMX, it is a foundational skill. In road, gravel, and urban riding, it can be a practical move for avoiding hazards when there is no time or space to steer around them.
There are two common versions. The first is the “English bunny hop,” where both wheels rise at nearly the same time. It is often easier for beginners but usually offers less height and control. The second is the “American bunny hop,” where the front wheel comes up first, followed by the rear wheel. This version is more powerful and more useful for real obstacles because it lets the bike travel in a smooth arc.
This guide focuses on the American-style bunny hop because it gives riders better timing, better height, and better control. It also teaches the same movement pattern used in manuals, jumps, log hops, and technical trail riding.
Why Learning to Bunny Hop Is Worth It
At first glance, bunny hopping looks like a party trick. And yes, it is fun. You may become that person who sees a painted line on the pavement and thinks, “I could hop that.” But the skill has real value.
On a mountain bike, a bunny hop helps you clear roots, rocks, water bars, trail ruts, and small logs without smashing your wheels into them. On a BMX bike, it is the doorway to many street and park tricks. On a gravel or road bike, a small controlled hop can help you avoid potholes, raised pavement edges, and surprise debris. Even if you never plan to launch over trail features, learning to unweight the bike makes you a more relaxed and responsive rider.
Bunny hopping also improves coordination. You learn how to load and unload the bike, move your hips, stay centered over the bottom bracket, use your feet actively, and land without stiffening up like a lawn chair in a thunderstorm.
Before You Start: Safety and Setup
Wear the Right Protection
Before practicing bunny hops, wear a properly fitted bike helmet. A helmet should sit level on your head, feel snug without being painful, and have straps that are adjusted according to the manufacturer’s instructions. Gloves, knee pads, and elbow pads are also smart, especially if you are practicing on pavement or learning on a mountain bike.
Do not practice in traffic. Choose a smooth, open, low-risk area such as an empty parking lot, a quiet basketball court, a flat driveway, or a grassy field. Grass is more forgiving when you fall, but pavement gives better rolling speed and feedback. Beginners may prefer short sessions on grass first, then move to pavement once the basic motion feels less mysterious.
Check Your Bike
A loose headset, soft tire, slipping chain, or weak brake can turn practice into an unwanted physics lesson. Before you begin, make sure the wheels are secure, tires are properly inflated, brakes work well, handlebars are tight, pedals spin normally, and the chain runs smoothly. If something rattles like a jar of coins in a washing machine, fix it before practicing.
Use Flat Pedals If Possible
Flat pedals are best for learning bunny hops because they force proper technique. Clipless pedals can make it tempting to pull the bike up with your feet instead of learning real weight transfer. That shortcut may work for tiny hops, but it limits control and can create bad habits. With flat pedals, you must learn to move the bike with body position, pressure, and timing.
Lower Your Saddle
A slightly lower saddle gives you room to move. Bunny hopping requires bending your knees, dropping your chest, shifting your hips, and pulling the bike underneath you. If your saddle is high, it can block the movement and make you feel trapped over the bike. For mountain bikes and BMX bikes, drop the saddle low enough that it does not interfere with the hop.
The Basic Bunny Hop Technique
Step 1: Start in the Ready Position
Roll at a slow jogging pace on flat ground. Stand out of the saddle with your pedals level, knees and elbows slightly bent, head up, and eyes looking ahead. Your weight should feel centered over the bike, not hanging off the back and not collapsed over the bars.
Think of this as your athletic position. If someone gently bumped your shoulder, you would not immediately tip over. Your body should feel loose, springy, and ready to move.
Step 2: Compress the Bike
To begin the bunny hop, push your body down into the bike. Bend your elbows and knees, lower your chest slightly, and let your hips drop. This compression loads your body like a spring. You are not trying to smash the bike into the ground; you are creating stored energy that you will release upward.
Many beginners skip this step and go straight to pulling on the bars. That usually produces a tiny front wheel lift and a disappointed facial expression. Compress first. The hop starts before the wheels leave the ground.
Step 3: Lift the Front Wheel
After compressing, shift your hips back and extend your arms forward. The front wheel should rise as your weight moves behind the bottom bracket. This is similar to the beginning of a manual, not a pedal-powered wheelie. You are not yanking the bars toward your chest. Instead, you are pushing the bike forward while your hips move back.
Keep your eyes forward. Do not stare at the front tire like it owes you money. Looking down makes your body collapse and limits the hop. The front wheel only needs to come up high enough to clear the obstacle. For practice, start with a painted line, a crack in the pavement, or a small stick.
Step 4: Stand Tall and Explode Upward
Once the front wheel rises, stand tall quickly. Imagine someone attached a string to your chest and pulled it toward the sky. Your legs extend, your hips come forward, and your upper body rises. This movement helps the bike continue upward instead of simply lifting the front wheel and dropping it back down.
This is where timing matters. If you stand too early, the front wheel barely lifts. If you wait too long, the front wheel peaks and falls before the rear wheel has a chance to join the party. You want the upward movement to happen as the front wheel is still climbing.
Step 5: Scoop the Rear Wheel
At the top of the front wheel lift, push the handlebars forward and slightly down while bringing your knees up. At the same time, angle your feet so they stay connected to the pedals. Riders often describe this as “scooping” or “clawing” the pedals. You are not lifting the bike with brute force; you are guiding the rear end upward as your body becomes light.
With flat pedals, the foot movement matters. Drop your heels during the compression, then point your toes slightly downward as you rise and pull your knees upward. The pressure between your shoes and pedals helps the rear wheel follow. If your feet fly off, you may be too stiff, too early, or trying to jump without enough bike-body connection.
Step 6: Level the Bike in the Air
Once both wheels are off the ground, push the bars forward to level the bike. Your knees should be bent, and the bike should feel tucked beneath you. Do not panic and freeze. A bunny hop is not complete when the wheels leave the ground; it is complete when you land smoothly and ride away with your dignity mostly intact.
Step 7: Land Smoothly
Land with bent elbows and knees. Let your arms and legs absorb the impact. Ideally, both wheels land close together, or the rear wheel touches down slightly first depending on the obstacle. Stay centered and keep rolling forward.
A stiff landing can bounce you off line. A relaxed landing keeps the bike stable. Think “quiet bike.” If your landing sounds like someone dropped a toolbox, soften your body and reduce the height until your timing improves.
Beginner Bunny Hop Drills
Drill 1: Front Wheel Lift
Practice lifting only the front wheel over a line on the ground. Roll slowly, compress, shift your hips back, and let the front wheel rise. Focus on using your body weight rather than pulling with your arms. Repeat until the motion feels smooth and predictable.
Drill 2: Rear Wheel Lift
Next, practice lifting only the rear wheel. Roll slowly, stand centered, push your weight slightly forward, point your toes down, and scoop the pedals as you bend your knees. Keep the front wheel low. This drill teaches foot pressure and rear-end control.
Drill 3: The Delayed Hop
Now combine the two movements slowly. Lift the front wheel first, then lift the rear wheel a moment later. Do not worry about height. The goal is sequence: front, then rear. Once the order feels natural, reduce the delay until the motion becomes one flowing hop.
Drill 4: Hop Over a Line
Use chalk, tape, or a crack in the pavement. Try to clear the line with both wheels. A line is perfect because it cannot grab your wheel if you miss. It also will not judge you, which is more than we can say for your riding friends.
Drill 5: Add a Small Object
Once you can clear a line consistently, add a small stick, foam roller, piece of cardboard, or low plastic bottle. Avoid anything hard or sharp at first. Gradually increase the height only after your timing is clean. The fastest way to learn is not to make the obstacle scary; it is to make repetition easy.
Common Bunny Hop Mistakes
Pulling Up With Only Your Arms
This is the classic beginner mistake. Pulling on the bars may lift the front wheel a little, but it does not create a real hop. Use your hips, legs, and body weight. The arms guide the bike; they do not do all the work.
Skipping the Compression
No compression means no spring. If your hop feels weak, check whether you are actually loading the bike before trying to lift it. A good bunny hop starts with a deliberate downward movement.
Standing Too Late
If the front wheel rises and drops before the rear wheel lifts, your timing is late. Begin standing tall while the front wheel is still coming up. The hop should feel like one continuous wave.
Not Using Your Feet
The rear wheel will not magically float because you asked nicely. Keep pressure through the pedals, angle your feet, and pull your knees upward. Your feet help the bike follow your body.
Looking Down
Your bike tends to follow your eyes. Look ahead, not straight down at the obstacle. Staring at the obstacle often causes stiff arms, poor balance, and awkward landings.
How High Should You Bunny Hop?
For practical riding, you do not need a giant hop. Clearing a two-inch curb edge, a small root, or a shallow pothole is already useful. Many riders get more value from a controlled six-inch bunny hop than from a wild two-foot hop that lands sideways and scares nearby squirrels.
Height comes from technique, not aggression. As your timing improves, the hop naturally gets higher. First aim for consistency. Then increase speed slightly, lift the front wheel higher, tuck the rear wheel more actively, and level the bike in the air.
Can You Bunny Hop on Any Bike?
You can bunny hop many types of bikes, but some are easier than others. BMX bikes and dirt jumpers are built for this kind of movement. Mountain bikes are also excellent, especially with flat pedals, wide bars, and a low saddle. Gravel bikes and road bikes can bunny hop too, but the technique usually requires more precision because the tires are narrower, the bars are different, and the riding position is less forgiving.
Heavy commuter bikes, cargo bikes, and e-bikes are much harder to hop and may not be appropriate for beginners. Always consider the bike’s weight, geometry, tires, and your riding environment. The goal is control, not proving that your grocery bike can briefly become an aircraft.
Practice Plan: Learn the Bunny Hop in Small Sessions
Practice in short sessions of 10 to 20 minutes. Bunny hops use explosive movement, and tired practice often becomes sloppy practice. Start with front wheel lifts, then rear wheel lifts, then delayed hops, then low obstacles. Give yourself time. Some riders feel progress in one afternoon; others need several weeks before the movement feels natural.
A simple weekly plan looks like this: spend day one on front wheel lifts, day two on rear wheel lifts, day three combining both movements, day four resting or riding normally, and day five practicing over a line or small object. Repeat the cycle while gradually increasing height.
Film yourself from the side if possible. Video reveals what your body is actually doing, which may be very different from what your brain claims is happening. You might think you are shifting your hips far back, only to discover you are barely moving. The camera is honest, occasionally rude, and extremely helpful.
Real-World Uses for a Bunny Hop
On the trail, a bunny hop helps you clear roots, rocks, small logs, drainage bars, and rough edges without losing speed. In urban riding, it can help you lift over potholes, road seams, and curb cuts. In cyclocross, skilled riders use bunny hops to clear barriers without dismounting. In BMX, the bunny hop is the foundation for manuals, grinds, spins, and other tricks.
However, not every obstacle should be hopped. Sometimes the smarter move is to slow down, steer around, unweight the bike, or dismount. Good bike handling is not about hopping everything; it is about choosing the right technique for the situation.
Experience Notes: What Learning to Bunny Hop Really Feels Like
The first thing most riders notice when learning how to bunny hop on a bike is that the movement feels backwards. You expect to pull up, because the bike needs to go up. Simple, right? Unfortunately, bikes enjoy making beginners look dramatic. The real motion starts by pushing down, moving back, then springing upward. It feels strange until your body understands that the bike is not being lifted like a suitcase. It is being unweighted, guided, and timed.
A common early experience is the “front wheel hero, rear wheel zero” phase. The front wheel pops up nicely, and for a split second you feel like a professional rider in a slow-motion commercial. Then the rear wheel stays glued to the ground, rolling over the obstacle with the enthusiasm of a shopping cart. This is normal. It usually means the rider has learned the first half of the movement but has not added the foot scoop, knee tuck, and forward bar push yet.
Another memorable stage is the accidental stomp landing. You finally get both wheels off the ground, but the landing is loud, stiff, and emotionally educational. This usually happens when the rider jumps upward but forgets to stay relaxed in the air. The fix is to bend the arms and knees before landing, let the bike come back to the ground naturally, and avoid locking the body like a statue with handlebars.
Practicing over harmless objects helps confidence. A chalk line is great. A flat piece of cardboard is better than a real log at first. A plastic water bottle with most of the air squeezed out can work well because it gives feedback without punishing mistakes. The goal is to remove fear so the brain can focus on timing. If the obstacle looks scary, the body gets stiff. If the body gets stiff, the hop gets worse. Then the obstacle wins, and nobody wants to be defeated by cardboard.
One of the best breakthroughs comes when riders stop asking, “How do I lift the bike?” and start asking, “How do I move my body so the bike follows?” That mindset changes everything. The bunny hop becomes less about strength and more about rhythm. Compress, lift the front, stand tall, scoop the rear, level out, land soft. When those pieces connect, even a small hop feels smooth and satisfying.
Progress also tends to arrive unevenly. One day the hop feels terrible. The next day it suddenly works twice in a row. Then it disappears again, because cycling skills apparently enjoy playing hide-and-seek. Stay patient. Short, regular practice beats one exhausting session. Your nervous system needs repetition, not panic. After a while, your timing improves, your feet stay planted, your landings get quieter, and small obstacles no longer feel like tiny wooden monsters placed on the trail to ruin your afternoon.
The real reward is not just hopping higher. It is feeling more connected to the bike. You begin to sense when the tires are heavy, when the bike is light, when your hips are too far forward, and when your timing is late. That awareness carries into cornering, jumping, pumping, descending, and everyday riding. The bunny hop may start as a trick, but it becomes a language between rider and bike. Learn the language, and suddenly the trail has a lot more possibilities.
Conclusion
Learning how to bunny hop on a bike takes patience, timing, and a willingness to look slightly awkward during practice. Start with the basics: wear a helmet, choose a safe area, lower your saddle, use flat pedals if possible, and work on the movement in pieces. Practice the front wheel lift, rear wheel lift, compression, upward extension, scoop, and soft landing separately before combining them into one smooth motion.
Do not chase height too soon. A small, controlled bunny hop is far more useful than a big, messy one. Focus on rhythm, body position, and clean landings. With consistent practice, you will gain a skill that makes trail riding smoother, urban riding more controlled, and every small obstacle look a little less intimidating. And yes, once you finally clear that first stick, you are allowed to feel wildly proud. The stick had it coming.