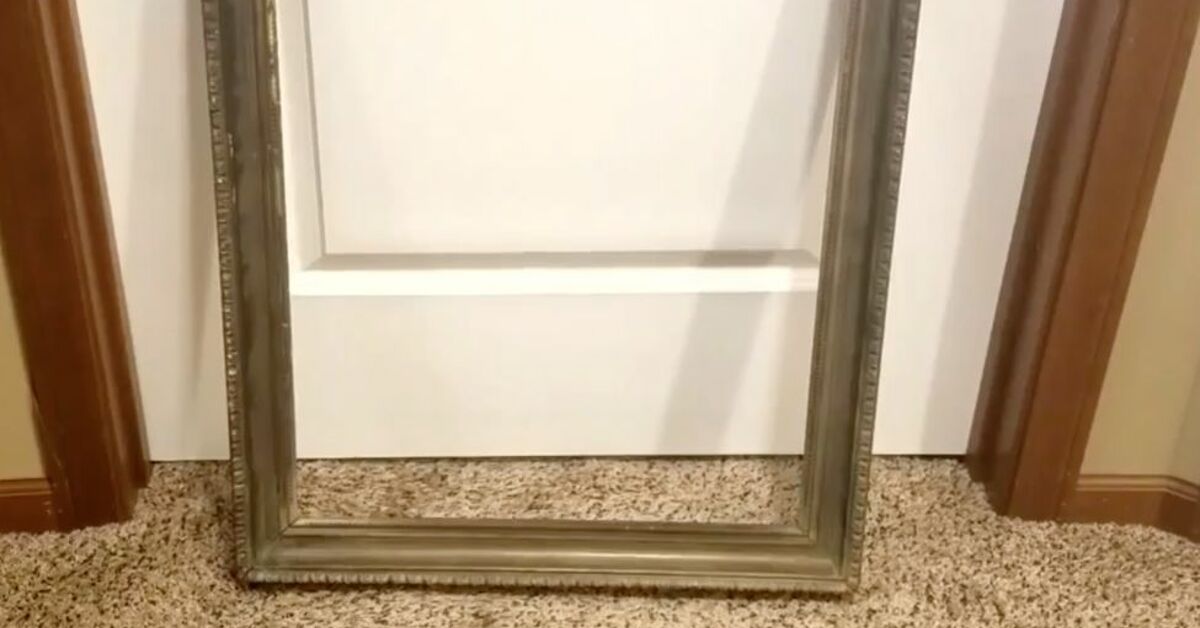
Some old frames deserve a second act. Maybe yours once held a family photo, a landscape print, or a mysterious “live, laugh, love” sign from a yard sale that you swore was temporary. Instead of letting that frame collect dust in the closet, you can turn it into a charming DIY shadow box shelfa small display shelf with depth, personality, and just enough attitude to make your wall look curated instead of “I found this in a drawer.”
This project is perfect for displaying small keepsakes, mini plants, travel souvenirs, collectibles, tiny books, shells, vintage keys, perfume bottles, craft supplies, or anything else that looks too special to hide in a junk drawer. Better yet, building a shadow box shelf with an old frame is affordable, beginner-friendly, and customizable. You do not need a full workshop. You need basic tools, careful measuring, a little patience, and the emotional strength to sand wood without checking your phone every 14 seconds.
In this guide, you will learn how to build a shadow box shelf from an old picture frame, how to measure the shelf box, what wood to use, how to assemble it, how to finish it beautifully, and how to hang it securely. By the end, your old frame will become useful wall decor instead of that lonely rectangle haunting the garage.
What Is a Shadow Box Shelf?
A shadow box shelf is a shallow box mounted to the wall, usually with a decorative frame on the front. Unlike a regular picture frame, it has depth, which allows you to display three-dimensional objects. Unlike a basic shelf, it has a framed edge, which makes the display feel intentional and polished.
Think of it as the stylish cousin of the floating shelf. It says, “I store things,” but also, “I went to art school for one semester.” A shadow box shelf can be rustic, modern, vintage, farmhouse, coastal, industrial, or sleek depending on your frame, paint, stain, and interior backing.
Why Use an Old Frame?
Using an old frame gives the project instant character. New lumber can look clean, but an old frame often has detail, texture, curves, carved corners, or a patina that would be expensive to recreate. It also keeps usable material out of the trash, which makes this DIY project budget-friendly and environmentally smarter.
An old frame also solves one design problem right away: the front face. Instead of building a decorative front from scratch, you already have one. Your job is to build a sturdy wooden box behind it, attach the frame to the front, add shelves if desired, and finish the whole piece so it looks like it was always meant to exist.
Best Frames for This DIY Project
Not every frame is a perfect candidate. A sturdy wood frame is ideal because it can handle screws, glue, and light shelf weight better than thin plastic or flimsy composite frames. Look for a frame with a wide enough front edge to cover the shelf box behind it. Deep frames, vintage frames, thrift-store frames, and old mirror frames work especially well.
Good frame options include:
- Old wooden picture frames
- Small vintage mirror frames
- Thrifted art frames with damaged prints
- Wide gallery frames
- Ornate frames with carved details
- Simple modern frames for a cleaner look
Avoid frames that are cracked, badly warped, extremely thin, or made from brittle plastic. If the frame twists when you gently press the corners, it may not be strong enough for a shelf. Save that one for a flat art project instead.
Tools and Materials You Will Need
Before you begin, gather your supplies. Nothing ruins DIY momentum like realizing your wood glue is empty and your measuring tape has somehow joined the witness protection program.
Materials:
- One old wooden frame
- 1×3 or 1×4 pine boards for the box sides
- Thin plywood, hardboard, or beadboard for the back panel
- Wood glue
- Brad nails, finish nails, or small wood screws
- Wood filler
- Sandpaper in medium and fine grit
- Paint, stain, or clear sealer
- D-ring hangers, keyhole hangers, French cleat, or sturdy wall hardware
- Drywall anchors if you cannot mount into studs
Tools:
- Tape measure
- Pencil
- Square or combination square
- Miter saw, circular saw, jigsaw, or handsaw
- Drill or driver
- Clamps
- Hammer or brad nailer
- Stud finder
- Level
- Paintbrush or foam roller
If you are new to saws or power tools, ask an experienced adult for help, wear eye protection, and clamp your material before cutting. DIY should end with a cute shelf, not a dramatic trip to urgent care.
Step 1: Remove the Glass, Art, and Backing
Start by taking apart the old frame. Remove the backing board, artwork, mat, glass, staples, and any old hanging wire. Be careful with glass, especially if the frame is older. Set it aside safely or recycle it according to your local rules.
For a shadow box shelf, you usually do not need the glass. Open shelving is more practical because you can place and remove objects easily. However, if you want a dust-protected display case, you can keep the glass or replace it with acrylic. Just remember that a front cover changes how you access the objects inside.
Step 2: Measure the Inside of the Frame
Lay the frame face down on a flat surface. Measure the inner opening from side to side and top to bottom. This tells you how large the shadow box backing and interior space will be. Then measure the outer dimensions of the frame to understand how much the frame will overlap the wooden box behind it.
The easiest method is to build a wooden box that sits behind the frame and is slightly smaller than the frame’s outside edge. That way, the front frame hides the raw edges of the box. If your frame has a rabbetthe recessed lip where glass or art used to sityou may be able to nest the box into that lip for a cleaner fit.
Step 3: Decide the Shelf Depth
For most shadow box shelves, a depth of 3 to 4 inches works well. A 1×3 board gives you a shallow display, while a 1×4 board provides more room for small jars, figurines, candles without lighting them, mini plants, and keepsakes.
Do not go too deep unless you plan to use stronger wall hardware. The deeper the box, the farther the weight projects from the wall. That can put extra stress on the hangers, especially once you add objects inside. For a simple old-frame shelf, light and shallow is usually the winning formula.
Step 4: Cut the Box Pieces
Cut four boards to create a rectangular box: two side pieces, one top piece, and one bottom piece. The exact measurements depend on whether the top and bottom boards sit between the side boards or overlap them.
A simple beginner-friendly layout is to make the left and right side boards the full height of the box. Then cut the top and bottom boards to fit between them. This creates clean outside dimensions and is easier to measure. Dry-fit the pieces behind the frame before gluing anything. If the frame covers the box edges nicely, you are in business.
Example measurement:
If your frame opening is 12 inches wide and 16 inches tall, and you are using 1×4 boards, you might build a box close to that size, then attach the frame to the front. If your boards are 3/4 inch thick, cut the side pieces at 16 inches and the top and bottom pieces at 10 1/2 inches so they fit between the sides. Always measure your actual frame instead of trusting a label, because old frames love surprises.
Step 5: Sand Before Assembly
Sanding before assembly is easier than trying to smooth inside corners later. Sand the cut boards with medium-grit sandpaper first, then follow with fine-grit paper for a smoother finish. Break the sharp edges slightly so they feel comfortable to touch.
If your old frame has chipped paint, rough corners, or mystery grime from 1998, clean it gently and sand only where needed. For vintage frames, do not sand away all the character. A few worn edges can make the finished shelf look collected, not manufactured.
Step 6: Assemble the Wooden Box
Apply wood glue to the joints where the boards meet. Clamp the pieces together and check that the box is square. Use a combination square or measure diagonally from corner to corner. If both diagonal measurements match, the box is square. If not, adjust the clamps until the measurements are equal.
Secure the joints with brad nails, finish nails, or small screws. Wood glue provides a strong bond when the surfaces fit well, while nails or screws hold everything in position while the glue cures. Wipe away excess glue before it dries, because dried glue can resist stain and create blotchy spots.
Let the glue cure according to the product directions. This is a great time to clean your workspace, admire your progress, or stare at the project from different angles like a museum critic with sawdust on your shirt.
Step 7: Add the Back Panel
A back panel gives the shadow box shelf strength and keeps the box from racking out of square. Cut thin plywood, hardboard, beadboard, or even a smooth project panel to fit the back of the box. Dry-fit it first, then attach it with wood glue and small nails or staples.
The back panel is also a design opportunity. Paint it a contrasting color, cover it with wallpaper, line it with fabric, use peel-and-stick tile, add cork, or install beadboard for a cottage-style look. If your frame is ornate, a simple painted back may keep the project from looking too busy. If the frame is plain, the backing can bring the drama.
Step 8: Add Interior Shelves or Dividers
You can keep the box open or add small shelves inside. For a shadow box shelf, one or two interior shelves are usually enough. Too many dividers can make the piece look crowded unless you are creating a cubby display for tiny collections.
Measure the inside width of the box and cut shelf pieces to fit. Sand them, dry-fit them, and mark their locations with a pencil. Use a level or square so the shelves do not lean. Attach them with wood glue and brad nails from the outside of the box. If you want hidden fasteners, pocket holes or small pin nails can help, but basic brad nails work for light-duty displays.
Display ideas for interior shelves:
- One shelf across the center for two display zones
- Two staggered shelves for a playful look
- Vertical dividers for small collectible cubbies
- A bottom ledge only for a minimalist display
- Hooks underneath for keys or jewelry
Step 9: Attach the Old Frame to the Box
Place the frame face down on a soft towel to protect the front. Position the wooden box on the back of the frame. Make sure it is centered and aligned. The frame should overlap the box evenly, or at least look intentional from the front.
Use wood glue where the box contacts the frame. Then secure the frame with small screws, brad nails, or metal corner brackets from the back. Be careful not to use fasteners that are too long, or they may poke through the front. That is the kind of surprise nobody appreciates.
If your frame is delicate, avoid driving nails directly into fragile decorative trim. Instead, attach the box to the sturdier inner lip or use small brackets. Check the front after attachment to make sure nothing shifted.
Step 10: Fill Gaps and Sand Again
Use wood filler to cover nail holes, seams, and small gaps. Once dry, sand the filled areas smooth. If you want a rustic look, you do not need to make every seam invisible. If you want a clean modern finish, spend extra time here. Paint highlights every bump, so sanding is where the final look quietly wins or loses.
Step 11: Paint, Stain, or Seal the Shelf
Now comes the personality. Paint the entire shelf one color for a cohesive built-in look. Stain the box and leave the old frame distressed for a vintage style. Paint the frame black and the inside white for a gallery-inspired display. Use soft green, navy, warm beige, or charcoal for a trendy but timeless finish.
For paint, apply a primer if the frame is glossy, stained, or previously painted. Then apply two light coats rather than one heavy coat. For stain, test on scrap wood first because pine can absorb unevenly. A clear sealer is helpful if the shelf will be in a kitchen, bathroom, or entryway where it may collect dust or fingerprints.
Step 12: Install Hanging Hardware
Because this project is part shelf and part wall decor, hanging hardware matters. Lightweight shadow box shelves can use D-ring hangers or keyhole hangers. Heavier shelves are better with a French cleat, which spreads the load and helps the shelf sit securely against the wall.
Whenever possible, mount into wall studs. Use a stud finder, mark the stud locations, drill pilot holes, and drive screws into solid framing. If studs do not line up with your shelf placement, use appropriate drywall anchors rated for more weight than your finished shelf and display items combined.
Do not overload the shelf. This is a display piece, not a place to store dumbbells, bowling balls, or your emotional baggage. Keep objects light and balanced.
Step 13: Style Your Shadow Box Shelf
Styling is where your DIY shadow box shelf becomes more than a wooden rectangle. Start with one anchor piece, such as a small vase, framed photo, candle holder, or souvenir. Add smaller items around it. Vary heights and textures so the arrangement feels natural.
Try grouping items in odd numbers, leaving some empty space, and mixing materials like wood, ceramic, glass, metal, and greenery. If everything is the same size, the shelf can look flat. If everything is fighting for attention, it can look like a tiny flea market exploded. Balance is your friend.
Creative Design Ideas
Vintage Keepsake Display
Use an ornate gold or dark wood frame, line the back with linen fabric, and display old letters, small family heirlooms, antique keys, or travel mementos. This style works beautifully in hallways, bedrooms, and reading nooks.
Modern Minimalist Shelf
Choose a simple black, white, or natural wood frame. Paint the box the same color as the wall for a built-in effect. Display only two or three objects. Minimalism is not empty; it is selective. Also, it is much easier to dust.
Kids’ Treasure Shelf
Turn a colorful old frame into a display for small toys, medals, art supplies, tiny animals, or favorite rocks. Add small cubbies to keep items organized. Mount it at a safe height and avoid heavy objects.
Bathroom Mini Storage
Use a sealed finish and add small shelves for perfume bottles, cotton jars, rolled washcloths, or skincare items. Keep it away from direct water and use moisture-resistant paint or sealer.
Entryway Catch-All
Add hooks along the bottom for keys and a small shelf for sunglasses or mail. This turns your old frame into functional wall storage while still looking decorative.
Common Mistakes to Avoid
Using a Weak Frame
If the frame is flimsy, the whole shelf may feel unstable. Choose a solid frame or reinforce it before attaching the box.
Skipping the Back Panel
The back panel helps keep the box square and sturdy. Without it, the shelf may twist over time.
Forgetting to Check for Square
A crooked box attached to a rectangular frame is very noticeable. Measure diagonally and adjust before the glue dries.
Using the Wrong Wall Hardware
Small picture hangers may not be enough for a shelf that holds objects. Use sturdy hardware and mount into studs when possible.
Overloading the Shelf
This shelf is best for lightweight display items. Heavy items require stronger construction and mounting hardware.
Estimated Cost and Time
If you already have an old frame and scrap wood, this project can be very inexpensive. Many DIYers can build it for the cost of glue, nails, paint, and hanging hardware. If you buy everything new, expect the price to vary depending on the frame size, lumber, finish, and hardware.
Most beginners can complete the build in a weekend. Cutting and assembly may take a few hours, while painting, staining, and drying time can stretch the project over a day or two. The actual work is not difficult; the waiting is what tests your character.
of Real-World DIY Experience and Practical Lessons
Building a shadow box shelf with an old frame is one of those projects that looks simpleand mostly isbut the small details make a big difference. The first lesson is that old frames are rarely perfectly square. They may look straight when hanging on a wall, but once you put them on a workbench and start measuring, they reveal their little secrets. One corner may be slightly open, one side may be bowed, or the inner lip may be uneven. This is normal. Before cutting your box pieces, place the frame on a flat surface and check it carefully. If the frame rocks, shim it or repair loose joints before moving forward.
The second lesson is to dry-fit everything. Dry-fitting is the DIY version of reading the room. Put the box pieces together without glue, set the frame on top, and look at the project from the front and side. Does the box disappear behind the frame? Is the depth right? Are the shelves where you want them? Once glue enters the chat, changes become much more annoying.
Another helpful experience is to paint or stain interior pieces before final assembly if the shelves create tight corners. It is possible to paint inside a finished shadow box, but it can feel like decorating a mailbox with a toothbrush. Pre-finishing the back panel and shelves saves time and gives cleaner results. Just avoid painting surfaces that need strong glue contact, or lightly sand those spots before gluing.
Clamping also matters more than beginners expect. A box can shift while you nail it, especially if the boards are slightly warped. Use clamps to hold the corners and check the diagonals before fastening. If the diagonals match, the box is square. If they do not, gently push or clamp the longer diagonal until the shape improves. This one step can make your finished shelf look professional instead of “handmade in a hurry during a caffeine event.”
When attaching the frame, protect the front surface. A towel, blanket, or foam pad prevents scratches while the frame is face down. If the frame has ornate details, do not press too hard with clamps because decorative trim can dent or crack. Use light pressure and add scrap wood blocks between the clamp and the frame if needed.
For hanging, always think about the final loaded weight. The empty shelf may feel light, but small objects add up quickly. A few ceramic pieces, glass bottles, and books can turn a dainty wall display into a gravity experiment. Use reliable hardware, mount into studs when possible, and choose anchors carefully when studs are unavailable. After hanging, give the shelf a gentle test before styling it.
Finally, do not aim for factory perfection. The charm of this project comes from turning something old into something useful. A small nick in the frame, a slightly distressed edge, or a visible brushstroke can make the shelf feel warm and personal. The goal is not to erase the frame’s history. The goal is to give it a better job.
Conclusion
Building a DIY shadow box shelf with an old frame is a smart way to combine storage, display, and upcycled decor. With a sturdy frame, simple lumber, a back panel, basic joinery, and secure wall hardware, you can create a custom piece that looks far more expensive than it is. The process is approachable for beginners but still satisfying for experienced DIYers because every design choice changes the final personality of the shelf.
Whether you use it for keepsakes, plants, collectibles, bathroom storage, entryway organization, or tiny treasures that deserve better than a drawer, this old-frame shadow box shelf brings charm and function to your wall. Plus, you get the quiet joy of pointing at it when guests visit and saying, “I made that.” Try not to say it too many times. Three is tasteful. Seven is a home tour.