Note: This guide is written for planning, estimating, and understanding hip roof measurements. Roofing work can be dangerous, especially on steep or high roofs. Use ground-based measurements, building plans, attic access, drone or satellite reports, or a licensed roofing professional whenever possible.
Measuring a hip roof sounds simple until you look up and realize your roof has more angles than a geometry final. Unlike a basic gable roof with two broad sides, a hip roof slopes on all four sides. That makes it attractive, wind-resistant, and wonderfully good at making homeowners ask, “Wait… which part do I measure first?”
The good news: measuring for hip roofing does not require wizardry, advanced calculus, or a secret handshake from the roofing guild. You mainly need a clear sketch, accurate dimensions, the roof pitch, and a practical way to convert square footage into roofing squares, shingles, underlayment, hip and ridge caps, and waste allowance.
In this guide, you will learn easy ways to measure for hip roofing in 10 steps, including how to break the roof into shapes, calculate roof area, adjust for slope, estimate shingles, and avoid the classic “I bought too little material and now the roof looks like a patchwork quilt” problem.
What Is a Hip Roof?
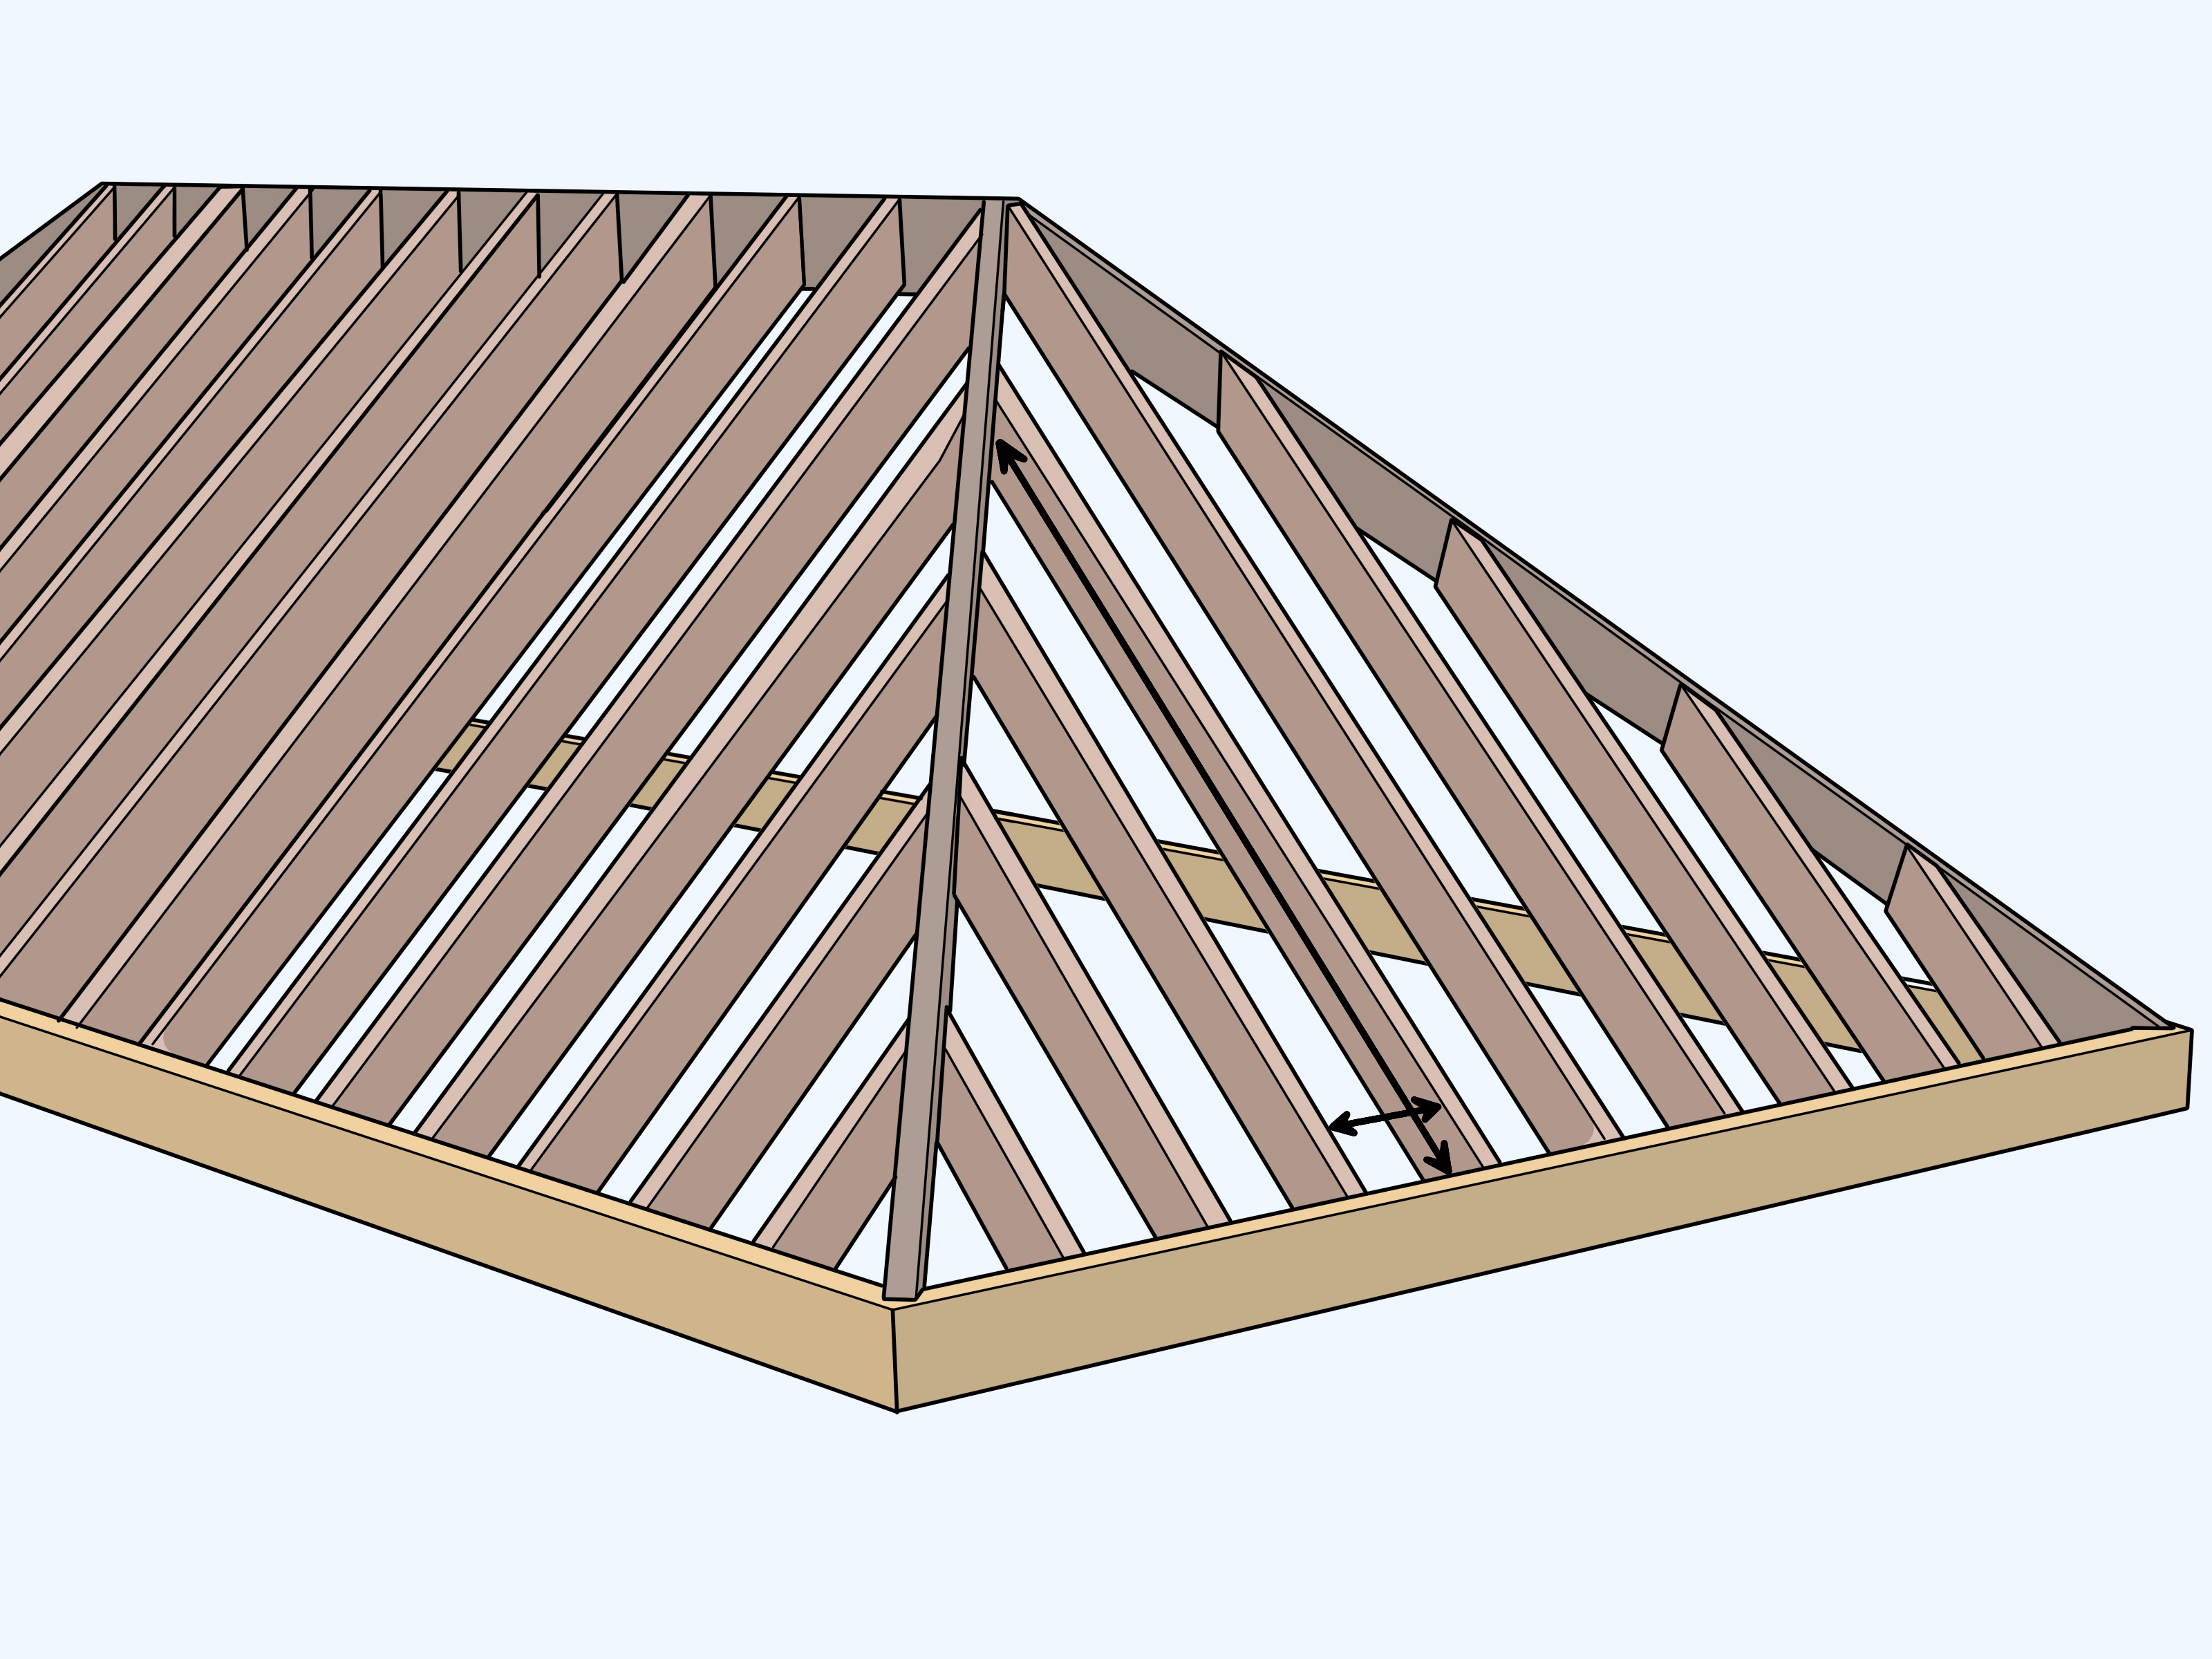
A hip roof is a roof style where all sides slope downward toward the exterior walls. Instead of vertical gable ends, the roof has sloped planes meeting at hips, ridges, and sometimes valleys. A simple rectangular hip roof usually has two trapezoid-shaped roof planes and two triangular roof planes. More complex homes may add dormers, intersecting wings, porches, valleys, and smaller hip sections.
That is why measuring a hip roof is different from measuring a plain rectangle. You are not only calculating surface area; you are also accounting for extra cuts, cap shingles along hip lines, starter shingles along eaves and rakes, underlayment, flashing, drip edge, and waste from trimming shingles around angles.
Tools You May Need
- Tape measure or laser distance measurer
- Notebook, graph paper, or a roof sketch app
- Pencil and calculator
- Level and measuring stick for pitch checks
- Camera or phone for reference photos
- Building plans, property drawings, or satellite roof report if available
- Manufacturer specifications for shingle coverage
If you can measure from the ground, attic, eaves, blueprints, or a professional roof report, do that first. Climbing onto a roof just to chase a measurement is rarely worth the risk. Roofs are not gym floors with shingles; they are sloped surfaces affected by dust, moss, heat, wind, moisture, and gravitythe undefeated champion of bad decisions.
Easy Ways to Measure for Hip Roofing: 10 Steps
1. Start With a Simple Roof Sketch
Before measuring anything, draw the roof from above. It does not need to look like an architectural masterpiece. A clean boxy sketch is enough. Mark the main ridge, hip lines, eaves, valleys, dormers, porches, chimneys, skylights, and any separate roof sections.
Label each roof plane with a letter: A, B, C, D, and so on. This keeps the job organized. When you later calculate square footage, you can write the area of each plane beside the sketch and add everything together. Without a sketch, measurements tend to wander off into the land of “I think that side was 18 feet… or was it 28?”
2. Identify the Roof Planes
A basic hip roof usually has four roof planes. On a rectangular home, the long sides are often trapezoids and the short ends are triangles. On a square home, the roof may have four triangular planes meeting at a central point or short ridge.
For each plane, identify the shape you are measuring. Most hip roof sections can be treated as rectangles, triangles, or trapezoids. Complex roofs should be divided into smaller simple shapes. This is one of the most important measuring tricks: do not try to calculate a complicated roof all at once. Break it down like a pizza, only less delicious and more expensive.
3. Measure the Building Footprint
Measure the length and width of the building at the exterior walls. If the roof has overhangs, include the eave overhang in your roof dimensions because shingles cover the roof deck, not just the heated living space below it.
For example, if a house is 40 feet long and 30 feet wide, but the roof overhangs 1 foot on each side, the roof footprint may be closer to 42 feet by 32 feet. That difference matters. A few inches here and there can become several bundles of shingles once the full roof is calculated.
If the house has an L-shape, attached garage, porch, or addition, measure each rectangle separately. Add the sections together later. This method is cleaner and reduces mistakes.
4. Measure or Estimate the Roof Pitch
Roof pitch describes how steep the roof is. It is commonly written as rise over run, such as 4/12, 6/12, or 8/12. A 6/12 pitch means the roof rises 6 inches vertically for every 12 inches horizontally.
Pitch matters because a sloped roof has more surface area than its flat footprint. A flat 1,000-square-foot footprint is not a 1,000-square-foot roof once you tilt the planes upward. The steeper the roof, the more roofing material you need.
Common pitch multipliers include:
- 4/12 pitch: about 1.054
- 6/12 pitch: about 1.118
- 8/12 pitch: about 1.202
- 10/12 pitch: about 1.302
- 12/12 pitch: about 1.414
To use a pitch multiplier, multiply the flat roof footprint area by the pitch factor. For a uniform hip roof, this gives a strong estimate of the sloped roof surface. For mixed pitches, calculate each roof section separately.
5. Break the Hip Roof Into Simple Shapes
Once you know the footprint and pitch, divide the roof into manageable shapes. Use these formulas:
- Rectangle: length × width
- Triangle: base × height ÷ 2
- Trapezoid: (long base + short base) ÷ 2 × height
For a simple hip roof, the total flat footprint method is often faster. However, shape-by-shape measuring is better for roofs with dormers, intersecting hips, valleys, additions, and uneven overhangs. The more chopped-up the roof is, the more useful your sketch becomes.
6. Calculate the Flat Area First
Before adjusting for pitch, calculate the flat area of each section. Suppose your main roof footprint is 42 feet long and 32 feet wide, including overhangs. The flat area is:
42 × 32 = 1,344 square feet
If there is a porch roof measuring 10 feet by 8 feet, add:
10 × 8 = 80 square feet
The total flat area becomes:
1,344 + 80 = 1,424 square feet
This number is not your final roofing material amount yet. It is the flat projection of the roof. Now you adjust for slope.
7. Apply the Roof Pitch Factor
Let’s say the roof has a 6/12 pitch. The pitch factor is about 1.118. Multiply the flat area by that number:
1,424 × 1.118 = 1,592 square feet
This gives the approximate sloped roof area before waste. If the roof has multiple pitchesmaybe the main roof is 6/12 and the porch is 4/12calculate those areas separately with the correct multiplier for each section.
This step is where many estimates go wrong. People measure the home’s footprint and forget the pitch. The roof quietly laughs from above while the shingle order comes up short.
8. Convert Square Footage Into Roofing Squares
Roofers commonly measure roofs in “squares.” One roofing square equals 100 square feet of roof surface. To convert square footage into roofing squares, divide by 100.
Using the example above:
1,592 ÷ 100 = 15.92 roofing squares
Round this to 16 squares before adding waste. If you are estimating asphalt shingles, many standard shingle products use about three bundles per square, but always check the manufacturer’s coverage because bundle coverage can vary by product type, brand, shingle size, and exposure.
9. Measure Hips, Ridges, Eaves, and Flashing Areas
Hip roofs require more than field shingles. You also need to measure linear feet for roof accessories. These include hip and ridge cap shingles, starter strip shingles, drip edge, underlayment, ice and water barrier where required, and flashing around penetrations.
Measure the total length of:
- Hip lines
- Ridge lines
- Eaves
- Rakes, if present
- Valleys
- Wall intersections
- Chimneys, skylights, and vents
Hip and ridge caps are especially important on hip roofs because every outside sloping corner needs cap coverage. A roof with several hips may use more cap shingles than a simple gable roof of similar area.
10. Add Waste and Double-Check the Estimate
Waste is the extra material needed for cuts, overlaps, mistakes, starter courses, valleys, hips, and layout adjustments. For many asphalt shingle roofs, a waste allowance of 10% to 15% is common. Simple roofs may be closer to the lower end, while complex hip roofs with dormers, valleys, and lots of cuts may need more.
Using our example:
1,592 square feet × 1.12 waste factor = 1,783 square feet
Convert to roofing squares:
1,783 ÷ 100 = 17.83 squares
Round up to 18 squares. If the shingles require three bundles per square, estimate:
18 × 3 = 54 bundles
Again, confirm coverage with the specific shingle product. Premium, architectural, designer, tile, metal, and specialty roofing products may calculate differently.
Example: Measuring a Simple Hip Roof
Imagine a one-story home with a rectangular hip roof. The roof footprint, including overhangs, measures 44 feet long by 34 feet wide. The roof pitch is 6/12.
- Flat area: 44 × 34 = 1,496 square feet
- Pitch factor for 6/12: 1.118
- Sloped roof area: 1,496 × 1.118 = 1,672 square feet
- Roofing squares before waste: 1,672 ÷ 100 = 16.72 squares
- Add 12% waste: 1,672 × 1.12 = 1,873 square feet
- Final roofing squares: 1,873 ÷ 100 = 18.73 squares
- Rounded material estimate: 19 squares
If using shingles that cover one square with three bundles, the estimate would be about 57 bundles. You would still measure hip and ridge length separately for cap shingles and confirm underlayment, starter, drip edge, and flashing quantities.
Common Hip Roof Measuring Mistakes
Forgetting the Overhang
The roof usually extends beyond the exterior wall. Measuring only the house walls can leave out the eaves. On a small roof, this might not seem dramatic. On a whole home, those missing inches can become real money and real material shortages.
Using Interior Square Footage
Your home’s living area is not the same as your roof area. A 1,800-square-foot house may have a roof that is much larger once you include garage space, overhangs, pitch, porches, and roof complexity.
Ignoring Hip and Ridge Caps
Hip roofs have more outside angles than many gable roofs. Those angles need cap shingles or compatible ridge materials. Do not assume the field shingle count automatically includes enough cap material.
Skipping Waste
Hip roofs create angled cuts. Angled cuts create leftovers. Leftovers create waste. Waste creates the reason every good estimate includes a buffer.
Mixing Measurement Units
Keep everything in feet when calculating square footage. If you measure 6 inches, convert it to 0.5 feet. Mixing inches and feet in one formula is a fast way to produce numbers that look official but behave like nonsense.
When to Use a Professional Roof Measurement
A professional roof measurement is worth considering if the roof is steep, high, damaged, wet, covered in moss, or unusually complex. It is also helpful if you are ordering expensive materials where a small mistake can cost a lot.
Many roofing contractors use satellite, drone, or aerial measurement reports. These can provide roof area, pitch, ridge length, hip length, valley length, waste estimates, and diagrams. For homeowners, a professional report can be a useful way to compare contractor quotes and understand why one estimate is higher than another.
How Hip Roof Measurements Affect Material Costs
Hip roofing measurements affect more than shingle count. They also influence underlayment, drip edge, ice and water barrier, ventilation, starter strips, ridge caps, flashing, fasteners, labor, disposal, and delivery. A roof with a modest square footage but many hips and cuts may cost more than a larger, simpler roof.
Pitch also changes the project. A steeper roof may require more labor, additional safety planning, and more careful staging. Even if the material area only increases by a certain percentage, the installation difficulty can increase more than expected.
Field-Tested Experiences: What Measuring a Hip Roof Teaches You
The first experience most people have with measuring a hip roof is humbling. From the driveway, the roof looks neat and symmetrical. On paper, it suddenly becomes a collection of triangles, trapezoids, ridges, hips, porch returns, and little sections that appear out of nowhere like they were added by a mischievous architect after lunch.
One practical lesson is to take more photos than you think you need. A quick picture from each side of the house helps you remember how the planes connect. When you are back at the table with your sketch, photos can answer questions like, “Does that porch roof tie into the main roof?” or “Is that a hip line or just a shadow?” Roof shadows are surprisingly talented at impersonating structural details.
Another experience-based tip is to measure the ground footprint twice. If your first length measurement says 41 feet 8 inches and your second says 42 feet, pause before choosing your favorite number. Check where you placed the tape, whether you included the overhang, and whether the wall is interrupted by a bay, chimney chase, garage return, or porch. Small differences are normal, but unexplained differences should be solved before you order material.
It also helps to separate “roof area” from “roofing package.” Many beginners calculate the square footage correctly, then forget the accessories. A roof is not just shingles. Hip and ridge caps, starter strips, underlayment, drip edge, flashing, nails, vents, sealants, and disposal all belong in the planning conversation. The roof may be one system, but the shopping list is a small parade.
People also learn quickly that waste is not laziness; it is reality. Hip roofs require angled cuts at the corners, and those cuts create pieces that may not fit anywhere else. Trying to estimate a hip roof with zero waste is like packing for vacation with exactly one sock per foot and no backup plan. Technically bold, practically doomed.
Finally, the best measuring experience comes from knowing when not to climb. A careful ground-based estimate, supported by building plans or a professional roof report, is often safer and more accurate than walking around a steep roof with a tape measure and too much confidence. Confidence is useful. Gravity is more experienced.
For homeowners, measuring a hip roof is most valuable because it makes contractor quotes easier to understand. You can compare roofing squares, waste factors, cap material, and accessory line items with a clearer eye. You do not need to become a roofer overnight. You simply need enough knowledge to ask smart questions, spot missing details, and avoid being surprised when the final estimate includes more than “some shingles and a ladder.”
Conclusion
Measuring for hip roofing becomes much easier when you follow a structured process. Start with a sketch, identify each roof plane, measure the footprint, account for overhangs, determine pitch, calculate square footage, convert the result into roofing squares, measure hips and ridges separately, and add a realistic waste factor.
A hip roof may look complicated, but the secret is simple: break it into smaller parts. Once each section has a number, the whole roof becomes less mysterious and much easier to estimate. Whether you are planning a roof replacement, comparing contractor bids, or trying to understand how many shingles your project may require, accurate measurement is the first step toward a smoother, less stressful roofing project.