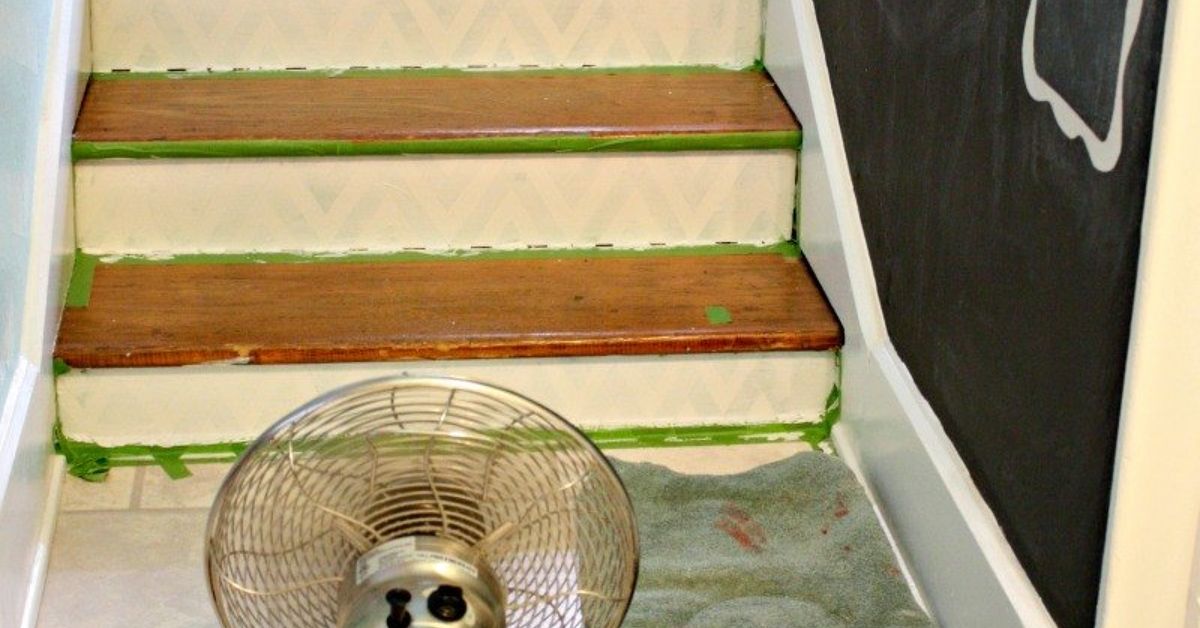
A staircase may be designed to move people between floors, but that does not mean it has to look like a beige transportation device. With careful preparation, durable paint, and a heroic amount of painter’s tape, ordinary wooden stairs can become one of the most memorable features in your home.
DIY chevron painted stairs combine practical home improvement with graphic design. The repeating V-shaped pattern creates movement, makes a narrow stairway feel more energetic, and gives you plenty of freedom to experiment with color. Better still, the design can usually be added without replacing the treads, rebuilding the railing, or explaining a mysterious four-figure invoice to your household.
The project is approachable for a patient beginner, but it is not a “slap on some paint before lunch” makeover. Stairs receive constant foot traffic, dirt, pet claws, dropped laundry baskets, and the occasional child traveling downward in a manner not approved by engineers. Good surface preparation and the correct coating matter just as much as neat pattern placement.
Why Choose a Chevron Pattern for Painted Stairs?
Chevron consists of angled lines that meet to form repeated peaks and valleys. Unlike ordinary horizontal stripes, the pattern visually lifts the eye upward, making it especially effective on stair risers. It brings rhythm to a staircase without requiring complicated stencils or advanced drawing skills.
The pattern can also be adjusted to suit nearly any decorating style. Wide black-and-white chevrons feel bold and contemporary. Soft gray and cream create a quieter farmhouse look. Navy and white suggest a coastal interior, while terracotta and warm beige can complement Southwestern or Mediterranean décor.
Painted patterns are frequently recommended as an affordable way to turn stairs and floors into decorative focal points. However, professional painting guidance consistently emphasizes cleaning, sanding, priming, and using coatings designed for floors or other high-wear surfaces.
Should You Paint the Risers, Treads, or Both?
Riser-Only Chevron Designs
For most homes, painting the chevron pattern on the vertical risers is the best combination of style, durability, and safety. Risers receive less direct wear than treads, so the detailed pattern is less likely to become scratched or faded. They are also easier to tape because you can work on one relatively flat rectangle at a time.
A riser-only design lets you retain natural wood or a solid, slip-resistant finish on the treads. This creates a useful visual break and keeps the walking surface from becoming too busy. It is particularly sensible in homes with children, older adults, or pets.
Chevron-Painted Treads
Painting the treads can produce a dramatic result, but every coating must be suitable for foot traffic. Standard interior wall paint is not designed to resist repeated shoes, claws, scuffs, and cleaning. Choose a porch-and-floor enamel or another manufacturer-approved floor coating, and consider a compatible slip-resistant product.
If you place the pattern on the treads, avoid creating a finish that is excessively glossy or slick. Stair safety guidance recommends well-lit steps, secure handrails, uncluttered paths, and slip-resistant walking surfaces.
A Coordinated Combination
Another option is to paint the chevron pattern on the risers while applying one solid color to the treads, stringers, and trim. For example, crisp white chevrons over charcoal risers pair well with charcoal treads and white stringers. The repetition feels intentional without turning the staircase into an optical illusion that challenges everyone carrying a basket of towels.
Tools and Materials
Gather everything before beginning. Running to the hardware store while half the staircase is wet is an excellent way to discover how much you dislike climbing through a window.
- Degreasing cleaner suitable for the existing stair finish
- Clean cloths, sponges, and a bucket
- Wood filler or paintable repair compound
- Fine- and medium-grit sanding sponges or sandpaper
- HEPA-equipped vacuum when appropriate
- Tack cloth or slightly damp microfiber cloth
- Bonding primer compatible with the existing surface
- Durable floor enamel for treads
- High-quality trim, cabinet, or floor paint for risers
- One or two accent colors for the chevron pattern
- High-quality painter’s tape
- Tape measure, ruler, level, and pencil
- Speed square, angle guide, or cardboard template
- Small angled paintbrush
- Four-inch foam or microfiber mini roller
- Paint tray and liners
- Drop cloths and masking paper
- Optional compatible anti-slip additive or clear coating
- Gloves, eye protection, and a suitable dust mask or respirator
Manufacturer guidance commonly recommends floor-and-patio enamel for stair treads because it is formulated for traffic and abrasion. Risers and stringers may be painted with a durable trim or cabinet coating when the product instructions permit it.
Plan the Design Before Opening the Paint
Choose the Color Palette
Limit the project to two or three colors unless you intentionally want a playful, maximalist staircase. One color should connect with the surrounding walls, flooring, railing, or nearby furniture. The second can provide contrast, while an optional third shade can add small details.
Test large color samples in the stairwell during the morning, afternoon, and evening. Staircases often receive uneven light, and a color that appears calm near a sunny window may look dramatically darker at the bottom of the flight.
Decide on the Chevron Scale
Large chevrons are easier to tape and usually look cleaner from a distance. Small zigzags require more measurements, more tape, and more opportunities for a line to wander off on its own adventure.
For a standard riser, two or three prominent peaks generally create a strong graphic effect. Measure the width and height of every riser before finalizing the repeat. Older staircases are not always perfectly uniform, even when they look innocent from across the room.
Create a Paper Mockup
Photograph the staircase straight on and sketch the proposed design over the image. You can also cut paper to the size of one riser and draw the pattern at full scale. Tape the mockup in place, step back, and inspect it from the bottom, top, and adjoining hallway.
This simple test can reveal that the original pattern is too small, too steep, or too energetic. It is much cheaper to dislike a paper prototype than twelve freshly painted risers.
Inspect and Repair the Staircase
Remove loose carpet staples, adhesive, protruding nails, peeling paint, and debris. Check for cracked risers, loose treads, damaged nosing, or movement between components. Painting does not repair structural problems; it merely gives them a stylish outfit.
Fix squeaks and loose parts before refinishing. Fill small holes and dents with a repair material appropriate for the surface. Allow repairs to dry fully, then sand them level.
Important Lead-Paint Precaution
If the home was built before 1978, do not aggressively sand or scrape old coatings without first addressing the possibility of lead-based paint. The U.S. Environmental Protection Agency warns that renovation and painting work in older homes can create hazardous lead dust. Lead-safe practices may include containing the work area, minimizing dust, using wet-sanding methods, and cleaning with HEPA-filtered equipment. Consider professional testing or an EPA Lead-Safe Certified contractor when appropriate.
Prepare the Stairs for Paint
Step 1: Clean Thoroughly
Vacuum every tread, corner, and joint. Wash the surfaces with an appropriate cleaner to remove dirt, grease, wax, and residue. Handrails and the first several steps may be surprisingly grimy because hands, shoes, and pets repeatedly touch them.
Rinse if required by the cleaner and let the stairs dry completely. Painting over cleaning residue can cause adhesion problems.
Step 2: Sand for Adhesion
Lightly sand sound painted surfaces to dull the sheen and provide grip for the primer. Feather the edges of chipped paint so the transitions feel smooth. Bare or badly damaged wood may require more extensive preparation.
Vacuum carefully after sanding and wipe away the final dust. Even a small amount of dust can create bumps, weak adhesion, and fuzzy tape lines. Surface preparation is repeatedly identified as a critical factor in preventing peeling, cracking, and premature coating failure.
Step 3: Apply Primer
Use a primer that is compatible with both the existing finish and the new paint. A bonding primer is especially useful over glossy coatings or surfaces with uncertain adhesion. Stain-blocking primer may be needed where knots, discoloration, or old stains could bleed through.
Apply primer with a brush in corners and along edges, then use a mini roller on larger areas. Keep coats thin and smooth. Let the primer dry according to its label, lightly sand if recommended, and remove all dust before painting.
Apply the Base Color
Paint the entire riser or tread in the lighter or more dominant color. A uniform base gives the taped design a clean background and makes small layout corrections less noticeable.
Use the angled brush where the riser meets the tread, stringer, and trim. Roll the central area with light pressure. Two thin coats usually look smoother and cure more reliably than one thick coat, but follow the product instructions for coverage and recoating.
If the staircase must remain usable, paint alternating treads first. After they are sufficiently cured for the permitted level of traffic, paint the remaining treads. Mark the usable steps clearly. This method is inconvenient, but less inconvenient than becoming temporarily trapped on the wrong floor with only a phone charger and no snacks.
How to Lay Out the Chevron Pattern
Mark a Centerline
Measure the width of the first riser and mark its center at the top and bottom. Draw a faint vertical centerline using a level. This line becomes the anchor for the first peak or valley.
Do not assume every riser has the same center. Measure each one individually, especially in older homes.
Build a Reusable Template
For a 45-degree chevron, the horizontal run and vertical rise of each angled segment are equal. A segment that travels four inches horizontally will also move four inches vertically. You may change the angle, but every section must remain consistent.
Create one master guide from sturdy cardboard, thin plastic, or poster board. Mark the peak, valley, and outer endpoints. Test the template on several risers before committing to tape.
Transfer the Pattern
Position the template against the riser and make small pencil marks at the important points. Continue across the width, checking with a ruler and level. Then connect the points with painter’s tape.
Decide whether the visible painted shape will fall inside or outside the taped area. Mark the sections to be painted with small pieces of tape so you do not accidentally fill the wrong triangles. This sounds unnecessary until you have stared at a zigzag for twenty minutes and forgotten which parts are supposed to be navy.
Check the Entire Flight
Before painting, stand at the bottom and inspect every riser. The peaks should appear centered and the angles should feel consistent. Minor variations in riser dimensions may require small adjustments at the outer edges. Prioritize visual alignment down the center rather than forcing identical edge fragments on imperfect stairs.
Painter’s tape is well suited to large geometric designs such as chevrons, but crisp results still depend on careful placement and good adhesion along every edge.
Paint the Chevron Accent Color
- Press down the tape. Run a clean plastic putty knife, old gift card, or fingertip firmly along every edge.
- Seal the edges. Brush a very thin coat of the base color over the tape edges. Any paint that seeps underneath will match the background, helping seal tiny gaps.
- Apply the accent paint. Use a nearly dry mini roller or small brush. Roll away from the tape edge instead of pushing paint underneath it.
- Build coverage gradually. Apply thin coats and respect the manufacturer’s recoat time.
- Remove the tape carefully. Follow the tape and paint manufacturers’ instructions. Pull the tape back over itself at a low angle rather than yanking it straight outward.
- Correct small flaws. Use a fine artist’s brush and the base color to sharpen imperfect corners.
Do not flood the pattern with paint. Heavy coats are more likely to form ridges against the tape, seep underneath it, or tear when the tape is removed.
Protect the Finish Without Creating a Slip Hazard
Some floor paints are designed to perform without a separate clear topcoat. Adding an incompatible sealer can change adhesion, sheen, color, or drying behavior. Read the product instructions before combining coatings.
Where additional traction is needed, use a compatible anti-slip floor coating or additive approved for the painted surface. Test it on a sample board first. Textured coatings improve grip but may slightly soften the visual sharpness of a fine pattern and can collect dirt more readily than a smooth surface. Products specifically formulated for stairs and floors are available from several major coating manufacturers.
Keep handrails secure throughout the project, maintain good lighting, and avoid leaving tools or loose tape on usable steps.
Dry Time Is Not the Same as Cure Time
Paint may feel dry to a fingertip before it is ready for shoes, pets, rugs, or normal household traffic. Follow the label’s instructions for recoating, light use, and full cure. Temperature, humidity, ventilation, coating thickness, and the existing surface can all affect the schedule.
Restrict traffic for as long as practical. Clean socks are usually kinder to a young finish than hard-soled shoes, but only after the manufacturer permits foot traffic. Do not place adhesive stair pads or runners over newly painted surfaces until the coating has cured sufficiently. Floor-paint guidance specifically stresses allowing adequate drying and curing before returning surfaces to use.
Chevron Stair Color and Style Ideas
Classic Black and White
Use white risers with broad black chevrons and black treads. The contrast suits contemporary, transitional, and modern farmhouse interiors. Keep surrounding accessories simple so the staircase remains the main event.
Soft Greige and Warm White
A low-contrast combination creates pattern without visual shouting. It works well near natural oak floors, woven baskets, linen fabrics, and warm metal finishes.
Navy and Cream
This palette feels polished and slightly nautical without requiring decorative anchors or a sign that says “Beach House.” Pair it with medium-tone wood treads and brass or black hardware.
Graduated Colors
Keep the chevron shape consistent while changing the accent color from one riser to the next. Begin with a deep shade at the bottom and move toward lighter versions at the top. The result blends geometric pattern with an ombré effect.
One Statement Section
Paint chevrons only on the first three risers, on the landing, or along the central portion of a wide staircase. This delivers personality with less measuring and creates a more restrained focal point.
Common Mistakes to Avoid
- Skipping the cleaning stage: Sanding dirt and grease into the surface does not count as preparation.
- Using ordinary wall paint on treads: It may scuff or wear quickly under foot traffic.
- Choosing tiny chevrons: Small repeats multiply measuring errors and can look crowded.
- Assuming every step is identical: Measure each riser before transferring the pattern.
- Using damaged or low-quality tape: Wrinkled edges encourage paint bleed.
- Rolling too much paint over the tape: Thin coats produce cleaner lines.
- Removing tape carelessly: Fast pulling can lift fresh paint or tear the edge.
- Walking on paint too soon: Dry-looking paint may still be soft underneath.
- Ignoring traction: A beautiful staircase should not double as an indoor ski slope.
Maintenance and Touch-Ups
Vacuum painted stairs regularly to remove grit that can scratch the finish. Clean with a soft cloth or mop and a mild product approved by the paint manufacturer. Avoid abrasive pads and harsh chemicals unless the coating instructions specifically allow them.
Save a small amount of each paint color in tightly sealed, labeled containers. Write the brand, product line, color name, sheen, and completion date on each label. When a chip appears, clean the area, lightly sand loose edges if necessary, and apply a small touch-up with an artist’s brush.
High-traffic treads will eventually show wear, particularly along the front nosing and center path. A maintenance coat is not evidence that the project failed. It is evidence that people have been using the stairs for their radical intended purpose.
What the Project Really Feels Like: Practical Experience From a Chevron Stair Makeover
The most surprising part of a chevron stair project is how little time is spent applying paint compared with the time devoted to cleaning, measuring, adjusting, and staring suspiciously at pieces of tape. On a realistic weekend makeover, the first day may end without a single visible chevron. That can feel unproductive, but the repaired, sanded, primed surface is what separates a durable finish from a pattern that begins peeling before the victory photos are posted.
A common early lesson is that staircases are rarely as symmetrical as they appear. In one typical project scenario, the lower risers may be slightly wider than the upper ones, while a stringer leans inward by a fraction of an inch. A rigid pattern based only on the first step gradually drifts off-center. The practical solution is to establish a centerline on every riser and let the partial shapes at the sides absorb small variations. Viewed from the bottom, the central peaks remain aligned and the irregular edges nearly disappear.
Color testing also produces surprises. A dark charcoal accent may look sophisticated on a sample card but nearly black inside a shadowy stairwell. Meanwhile, a warm white that seems neutral in the store can appear yellow next to cool gray walls. Painting large samples directly on poster board and moving them to different steps is more useful than comparing tiny chips under retail lighting. The staircase should be checked during daylight and after the overhead fixtures are switched on.
Taping is where patience earns its paycheck. The first riser often takes the longest because the pattern dimensions are still being refined. After creating a reusable template and marking the painted sections, the remaining risers become faster. Still, it is wise to complete two or three, then step back. When your face is twelve inches from the surface, a crooked line can look perfectly reasonable. From the hallway, it may suddenly resemble an electrocardiogram.
The edge-sealing technique is one of the most valuable practical discoveries. Brushing a thin layer of base paint over the tape edges feels like an unnecessary extra step, especially when enthusiasm is high and dinner is approaching. Yet it prevents much of the accent color from bleeding into small gaps. When the tape comes away, the cleaner lines dramatically reduce touch-up work.
Another useful experience is learning when to stop correcting. Hand-painted geometric designs do not need machine-cut perfection. A tiny irregularity that is obvious from six inches away will be invisible during normal use. Excessive touch-ups can make matters worse by building ridges, changing the sheen, or creating brush marks. Correct flaws that interrupt the overall pattern, then allow the staircase to retain a small amount of handmade character.
Household logistics matter as much as painting technique. Everyone should know which steps can be used, when the staircase is closed, and where pets will be kept. Alternating-tread painting can maintain access, but it requires clear markers and careful movement. Trying to remember which steps are wet while carrying groceries is not an advanced DIY challenge anyone needs.
The final lesson arrives during curing. The pattern may look complete, yet the finish still needs protection. Delaying normal traffic is frustrating, but premature use can leave dents, scuffs, or textured footprints. Once the coating has properly cured, the transformation feels much larger than the cost of the materials. The staircase stops being an overlooked passage and becomes a graphic feature visible from multiple roomsproof that painter’s tape, mathematics, and mild stubbornness can occasionally cooperate.
Conclusion
DIY chevron painted stairs offer a high-impact makeover without requiring a full staircase replacement. The most successful projects begin with honest surface inspection, careful repairs, appropriate primer, durable paint, and a pattern planned around the actual dimensions of each step.
Keep the walking surfaces safe, follow coating instructions, and give the paint enough time to cure. Most importantly, accept that the measuring stage will take longer than expected. Chevron patterns are stylish, energetic, and surprisingly forgiving from a normal viewing distancebut they still insist that you respect the ruler.