There is something oddly magical about beach sand. One minute it is stuck between your toes, inside your sandals, and somehow in your car cup holder. The next minute, it can become the star ingredient in a beautiful coastal centerpiece. DIY beach sand vases are easy, affordable, customizable, and perfect for anyone who wants that relaxed “I live near the ocean” feelingeven if the closest beach is three states away and your current view is a laundry basket.
Beach sand vases combine glass containers, natural sand, shells, sea glass, rope, candles, flowers, or greenery to create home decor that feels fresh, breezy, and personal. They work as wedding centerpieces, summer mantel decorations, bathroom accents, patio table pieces, vacation memory jars, or thoughtful handmade gifts. Best of all, you do not need a professional craft studio. A clean vase, a little sand, a steady hand, and a willingness to vacuum later are enough to get started.
This guide explains how to make DIY beach sand vases, how to clean and prepare sand, which vase styles work best, how to layer sand beautifully, how to decorate with shells and sea glass, and how to avoid common beginner mistakes. We will also cover design ideas, safety tips, styling tricks, and real-world crafting experience so your finished vase looks intentionalnot like your beach bag exploded on the dining table.
What Are DIY Beach Sand Vases?
DIY beach sand vases are decorative glass or ceramic containers filled, coated, or accented with sand to create a coastal-inspired look. Some designs use sand as a vase filler around candles or flowers. Others involve gluing sand to the outside of a vase for a textured, natural finish. You can also create layered sand art inside clear bottles, memory vases with vacation keepsakes, or elegant hurricane candle holders with shells tucked around the base.
The appeal is simple: beach sand instantly adds texture, warmth, and nostalgia. It reminds people of vacations, boardwalk walks, seashell hunts, and that one family member who insists on bringing home “just a little” sand in a plastic bottle. When used well, sand decor feels calm and organic. When overdone, it can lean into souvenir-shop territory. The secret is balance: clean lines, thoughtful colors, and just enough beach detail to say “coastal charm,” not “pirate-themed buffet.”
Why Beach Sand Vases Are Worth Making
They Are Budget-Friendly
One of the biggest advantages of DIY sand vase decor is cost. You can repurpose old glass jars, thrift-store vases, candle holders, wine bottles, mason jars, or clear bowls. Decorative craft sand is easy to find at craft stores, and natural sand can be used if collected legally and cleaned properly. Add shells, twine, ribbon, driftwood pieces, faux stems, or LED candles, and you have custom coastal decor for far less than many store-bought centerpieces.
They Preserve Vacation Memories
A beach sand vase can become a personal keepsake. Sand from a favorite beach, small shells, a tiny label with the location and date, a photo tucked into the glass, or a tag tied with jute can turn a simple vase into a memory jar. It is a lovely way to remember a honeymoon, family vacation, beach proposal, anniversary trip, or peaceful solo getaway.
They Fit Many Decor Styles
DIY beach sand vases are not limited to nautical rooms full of anchors and navy stripes. They can suit modern coastal, farmhouse, boho, minimalist, tropical, cottage, or beach wedding decor. Use white sand and clear glass for a clean look, tan sand and rope for rustic charm, black sand for drama, or pastel-colored sand for a playful party centerpiece.
Materials You Will Need
Before starting, gather your supplies. Having everything ready prevents the classic craft-project disaster where one glue-covered hand is holding a vase while the other hand is searching for scissors in a drawer full of mystery batteries.
Basic Supplies
- Clear glass vase, mason jar, hurricane candle holder, wine bottle, or apothecary jar
- Clean, dry beach sand or decorative craft sand
- Small shells, sea glass, pebbles, coral-style accents, or sand dollars
- Jute rope, raffia, ribbon, or cotton cord
- Funnel or folded paper for pouring sand
- Paintbrush or foam brush
- Craft glue, decoupage medium, or strong clear-drying adhesive
- Clear acrylic sealer for sand-coated projects
- LED candles, votive holders, faux flowers, dried grasses, or fresh flowers in a water-safe inner vase
Optional Extras
- Acrylic paint or spray paint for a modern finish
- Stencils for initials, dates, or beach names
- Small photo prints for memory vases
- Wooden tags or kraft labels
- Painter’s tape for clean borders
- Disposable tray or newspaper for catching spilled sand
- Protective gloves and a dust mask when handling dry, dusty sand
How to Prepare Beach Sand for Crafts
If you are using real beach sand, preparation matters. Beach sand can contain salt, tiny shell pieces, organic matter, moisture, and debris. That does not mean it is bad; it means it needs a spa day before moving into your living room.
Step 1: Check Local Rules
Some beaches, parks, protected shorelines, and conservation areas restrict removing sand, shells, coral, or natural materials. Always check posted signs and local regulations. If collecting is not allowed, buy natural craft sand instead. Your vase should bring peace, not a surprise fine.
Step 2: Sift the Sand
Pour the sand through a fine mesh strainer or colander to remove rocks, twigs, seaweed, and large shell fragments. Save attractive shell pieces for decoration if they are clean and intact.
Step 3: Rinse Thoroughly
Place the sand in a bucket and rinse it with clean water. Stir it gently, let heavier grains settle, and pour off cloudy water. Repeat until the water looks much clearer. This helps remove salt, silt, and organic residue.
Step 4: Dry Completely
Spread rinsed sand in a thin layer on a baking sheet, tray, or shallow container. Let it dry in the sun, or dry it indoors in a warm, ventilated area. The sand must be completely dry before layering, gluing, or sealing. Damp sand can clump, fog glass, grow musty, or make your vase smell like low tide’s less charming cousin.
Step 5: Handle Dust Carefully
Sand may contain fine particles. Avoid dumping dry sand from a height or stirring it aggressively. Work in a ventilated area, keep children from breathing dust, and consider a simple dust mask if the sand is very powdery. Do not grind, crush, or mechanically abrade sand for craft use.
Project 1: Classic Layered Beach Sand Vase
This is the easiest version and a great beginner project. It uses a clear glass vase filled with layers of sand, shells, and coastal accents.
Instructions
- Clean the glass vase with mild soap and water, then dry it completely.
- Place the vase on a tray to catch spills.
- Use a funnel to pour in the first layer of sand, about one to two inches deep.
- Gently tilt the vase while adding the next layer if you want diagonal lines.
- Add shells, sea glass, or tiny pebbles against the visible glass.
- Continue layering until the vase is about one-third to halfway full.
- Insert dried grasses, faux stems, or a smaller inner vase for fresh flowers.
- Tie jute rope or ribbon around the neck for a finished coastal look.
For a cleaner design, stick with two or three colors: natural tan sand, white shells, and clear or blue sea glass. Too many colors can make the vase look busy. Think “serene beach cottage,” not “confetti cannon at a seafood festival.”
Project 2: Sand-Coated Textured Vase
A sand-coated vase has texture on the outside, giving it a handmade ceramic-like appearance. This works especially well on old glass vases that are scratched, cloudy, or not attractive enough to display plain.
Instructions
- Wash and dry the vase thoroughly.
- Apply painter’s tape if you want a clean rim or geometric design.
- Brush a thin, even coat of craft glue or decoupage medium onto a small section of the vase.
- Sprinkle dry sand over the glue while holding the vase above a tray.
- Tap gently to remove excess sand.
- Repeat section by section until the vase is covered.
- Let it dry completely according to the adhesive directions.
- Add a second coat if you want thicker texture.
- Finish with clear acrylic sealer to reduce shedding.
For a modern look, spray paint the dried sand-coated vase in matte white, soft beige, stone gray, or ocean blue. The texture remains visible, but the color becomes more polished. This is a smart trick when the natural sand color is uneven or darker than expected.
Project 3: Beach Memory Vase
A beach memory vase is part decor, part scrapbook, and part emotional ambush. One glance and suddenly you are remembering sunscreen, boardwalk fries, and the sound of waves at sunset.
How to Make It
- Choose a clear jar or vase with a lid if possible.
- Add a layer of cleaned beach sand from the trip.
- Place small shells, sea glass, ticket stubs, tiny printed photos, or a rolled note inside.
- Add a paper tag with the beach name and date.
- Tie the neck with jute, raffia, or cotton ribbon.
- Display it on a shelf, entry table, nightstand, or bookcase.
If using photos, keep them away from damp sand. You can laminate small prints or place them inside a tiny clear sleeve. For a more elegant version, use only one shell, one label, and a small amount of sand. Minimalism is powerful. Also, it is easier to dust.
Project 4: Beach Sand Candle Vase
Sand and candlelight are a classic combination because sand stabilizes the candle and diffuses the look beautifully. This design is perfect for patios, summer dinner tables, beach parties, bathrooms, or mantel displays.
Instructions
- Use a wide glass hurricane vase or candle holder.
- Add two to three inches of dry sand.
- Press a votive holder, tealight holder, or LED candle into the center.
- Arrange shells or sea glass around the candle, leaving space around any real flame.
- Keep decorations below the flame line and away from heat.
For safety, LED candles are the easiest option. If you use real candles, place them in their own glass holders and never leave them unattended. Sand can help stabilize a candle, but it does not magically turn fire into a polite houseguest.
Project 5: Beach Sand Flower Vase
You can use sand as a decorative filler for flower arrangements, but fresh flowers need water. The best solution is the double-vase method: place a smaller water-filled vase inside a larger clear vase, then pour sand, shells, or sea glass into the gap between the two containers.
How to Use the Double-Vase Method
- Choose a large clear vase and a smaller vase that fits inside it.
- Place the smaller vase in the center.
- Pour sand into the outer gap, keeping it outside the water vase.
- Add shells or sea glass around the visible edge.
- Fill the inner vase with water and flowers.
This method keeps sand dry, prevents cloudy water, and makes cleanup easier. It also lets you change the flowers without rebuilding the entire display. Try white hydrangeas, blue delphiniums, eucalyptus, pampas grass, dried palm leaves, or simple greenery for a breezy coastal arrangement.
Design Ideas for DIY Beach Sand Vases
Minimal Coastal
Use clear glass, white sand, one large shell, and a single dried stem. This look is calm, modern, and easy to style in bedrooms, bathrooms, and entryways.
Rustic Beach House
Use tan sand, jute rope, driftwood pieces, and weathered shells. Add a kraft paper tag for a handmade look. This style works well with farmhouse furniture, wicker baskets, and whitewashed wood.
Elegant Wedding Centerpiece
Use tall cylinder vases, fine white sand, floating candles, pearls, and soft florals. Keep the palette limited to white, ivory, champagne, and pale blue for a polished beach wedding design.
Colorful Sand Art Vase
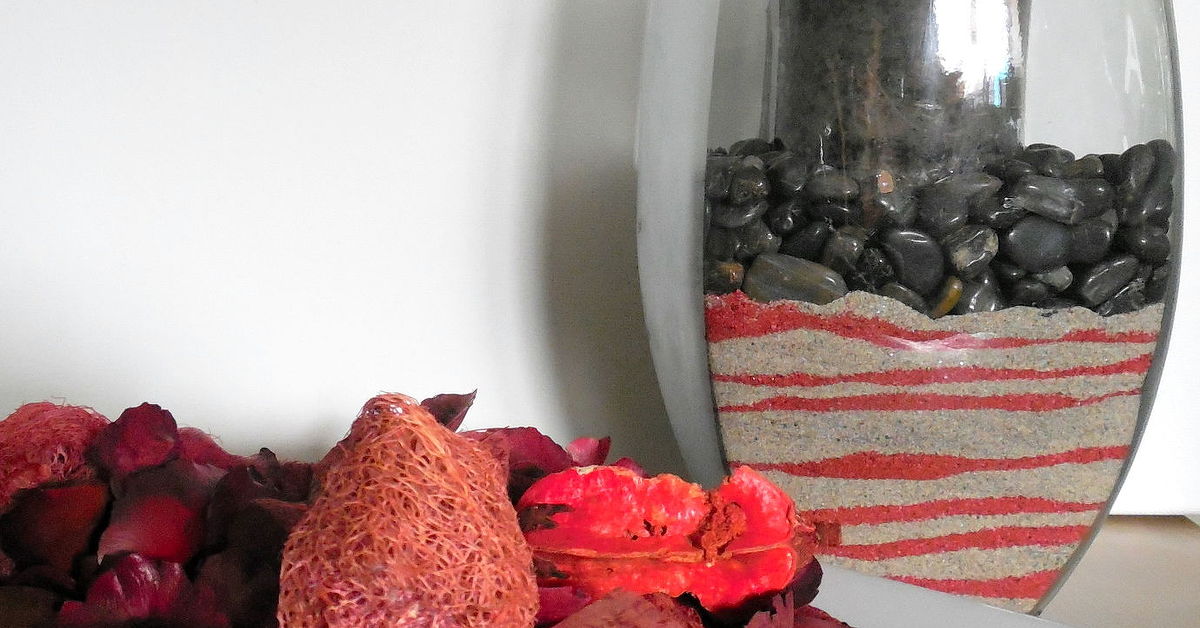
Use colored craft sand in layered bands. Pour slowly with a funnel and rotate the vase slightly between layers. This style is excellent for kids’ crafts, summer parties, or playful shelf decor.
Black Sand Drama
Pair black sand with clear glass, white shells, and one sculptural stem. The contrast feels modern and striking. It is a great choice for contemporary coastal homes that avoid the usual pastel beach palette.
Common Mistakes to Avoid
Using Wet Sand
Wet sand clumps and can create condensation inside glass. Always dry sand completely before use.
Overfilling the Vase
A vase packed to the rim with sand and shells can look heavy. Leave breathing room, especially if adding flowers or candles.
Mixing Too Many Themes
Shells, starfish, rope, anchors, glitter, pearls, driftwood, blue glass, and tiny plastic dolphins do not all need to attend the same party. Choose a clear style and edit your materials.
Skipping the Inner Vase for Fresh Flowers
Fresh flowers should not sit directly in sand unless you are creating a temporary display with floral tubes or another water source. Use the double-vase method for cleaner, longer-lasting arrangements.
Forgetting to Seal Sand-Coated Vases
If you glue sand to the outside of a vase, seal it after drying. Otherwise, it may shed grains every time someone touches it, which is charming for about four seconds.
How to Style Beach Sand Vases Around the Home
DIY beach sand vases look best when grouped with other natural textures. Pair them with linen, woven baskets, rattan trays, wood bowls, cotton throws, ceramic lamps, or soft blue and beige accents. A single sand vase on a bathroom counter can make the room feel spa-like. Three varied-height vases on a mantel can create a relaxed summer focal point. A memory vase on a bookshelf adds personality without taking over the space.
For dining tables, keep arrangements low enough for conversation. Nobody wants to discuss grilled shrimp through a forest of pampas grass. For entry tables, use taller vases to create visual height. For nightstands, keep the design simple and dust-friendly. For outdoor patios, choose heavier containers that will not tip easily in wind.
Cleaning and Maintenance Tips
Dust the outside of glass vases with a soft cloth. For sand-filled vases, avoid shaking unless you want your carefully layered design to become abstract art. If sand spills, use a handheld vacuum or a slightly damp paper towel. For sand-coated vases, wipe gently rather than scrubbing. Keep memory vases away from high humidity, direct rain, and curious pets who believe every decorative object is a personal challenge.
of Real-Life Experience With DIY Beach Sand Vases
The first thing you learn when making DIY beach sand vases is that sand has a personality. It looks calm and innocent in a bag, but the moment you pour it, it behaves like it has somewhere urgent to be. That is why the tray is not optional. The tray is your best friend, your safety net, and the only reason your dining table will not look like a tiny indoor dune system.
In practice, the most successful beach sand vases are usually the simplest ones. A clear cylinder vase with two inches of pale sand, a few shells placed carefully against the glass, and one LED candle often looks more expensive than a complicated arrangement with ten different materials. Beginners tend to add too much because every shell seems special. The trick is to choose the best pieces and let them shine. A single beautiful shell can do more than twenty average ones piled like a seafood buffet.
Another lesson is that sand color changes indoors. Sand that looks bright and creamy under beach sunlight may appear gray, beige, or even slightly dull under indoor lighting. Before filling a large vase, test a small amount in the actual room where the vase will sit. If the color feels muddy, mix in a small amount of white decorative sand or use shells and sea glass to brighten the display. Good lighting can make a simple vase glow; bad lighting can make it look like a jar of construction material. Same sand, different drama.
Cleaning beach sand is also more important than people expect. Unwashed sand can carry salt and tiny organic bits that smell unpleasant over time. Rinsing and drying may feel boring, but it makes the final project cleaner and more durable. Spread the sand thinly while drying. Thick piles stay damp in the middle, and damp sand inside a closed vase is basically an invitation for musty smells to move in and sign a lease.
For fresh flowers, the double-vase method is the real hero. It keeps the sand pretty and dry while giving flowers the water they need. It also makes the arrangement reusable. After the flowers fade, you can remove the inner vase, wash it, and keep the sand display intact. This is especially helpful for events like weddings, showers, and summer parties where you need several centerpieces and do not want to rebuild each one from scratch.
Sand-coated vases are fun, but patience matters. Thin glue layers work better than thick ones. A heavy coat may slide, clump, or create uneven patches. Work in sections, let each coat dry, and seal the final surface. Once painted, a sand-coated vase can look surprisingly high-end, almost like textured stoneware. The best part is that you can rescue old vases that would otherwise be donated, hidden, or used only when all better vases are already occupied.
The best DIY beach sand vase is not necessarily the most perfect one. It is the one that captures a feeling: a vacation, a shoreline, a wedding, a family trip, or the calm of coastal decor. Handmade pieces have tiny imperfections, and that is part of their charm. After all, beaches are not perfectly arranged either, and everyone still wants to go there.
Conclusion
DIY beach sand vases are simple, beautiful, and endlessly customizable. Whether you want a coastal centerpiece, a beach wedding decoration, a memory jar, a candle holder, or a textured handmade vase, sand offers an affordable way to bring natural seaside charm into your home. The key is preparation: clean and dry the sand, choose the right vase, keep your color palette focused, and avoid overcrowding the design.
For beginners, start with a clear glass vase, natural sand, a few shells, and a candle or dried stems. Once you are comfortable, try layered sand art, sand-coated finishes, double-vase flower arrangements, or personalized vacation keepsakes. With a little patience and a controlled relationship with glitter, your finished vase can look stylish, meaningful, and far more expensive than it really is.
Note: This article was created from synthesized craft, coastal decor, floral arrangement, and material safety guidance, rewritten in original American English for web publication.