If you’ve ever looked at a sad desk lunch and thought, “This could use more crunch… and fewer crumbs,” meet the bell pepper sandwich. It’s a breadless sandwich where a crisp, sweet bell pepper plays the role of the “bun.” The result is bright, refreshing, surprisingly filling, and honestly kind of funlike your lunch decided to put on a crisp green jacket and head out into the world.
This article gives you a reliable, classic bell pepper sandwich recipe (plus smart variations), explains why it works, and shares practical tips so you don’t end up with a slippery, drippy situation that eats your napkin for dessert.
What Is a Bell Pepper Sandwich?
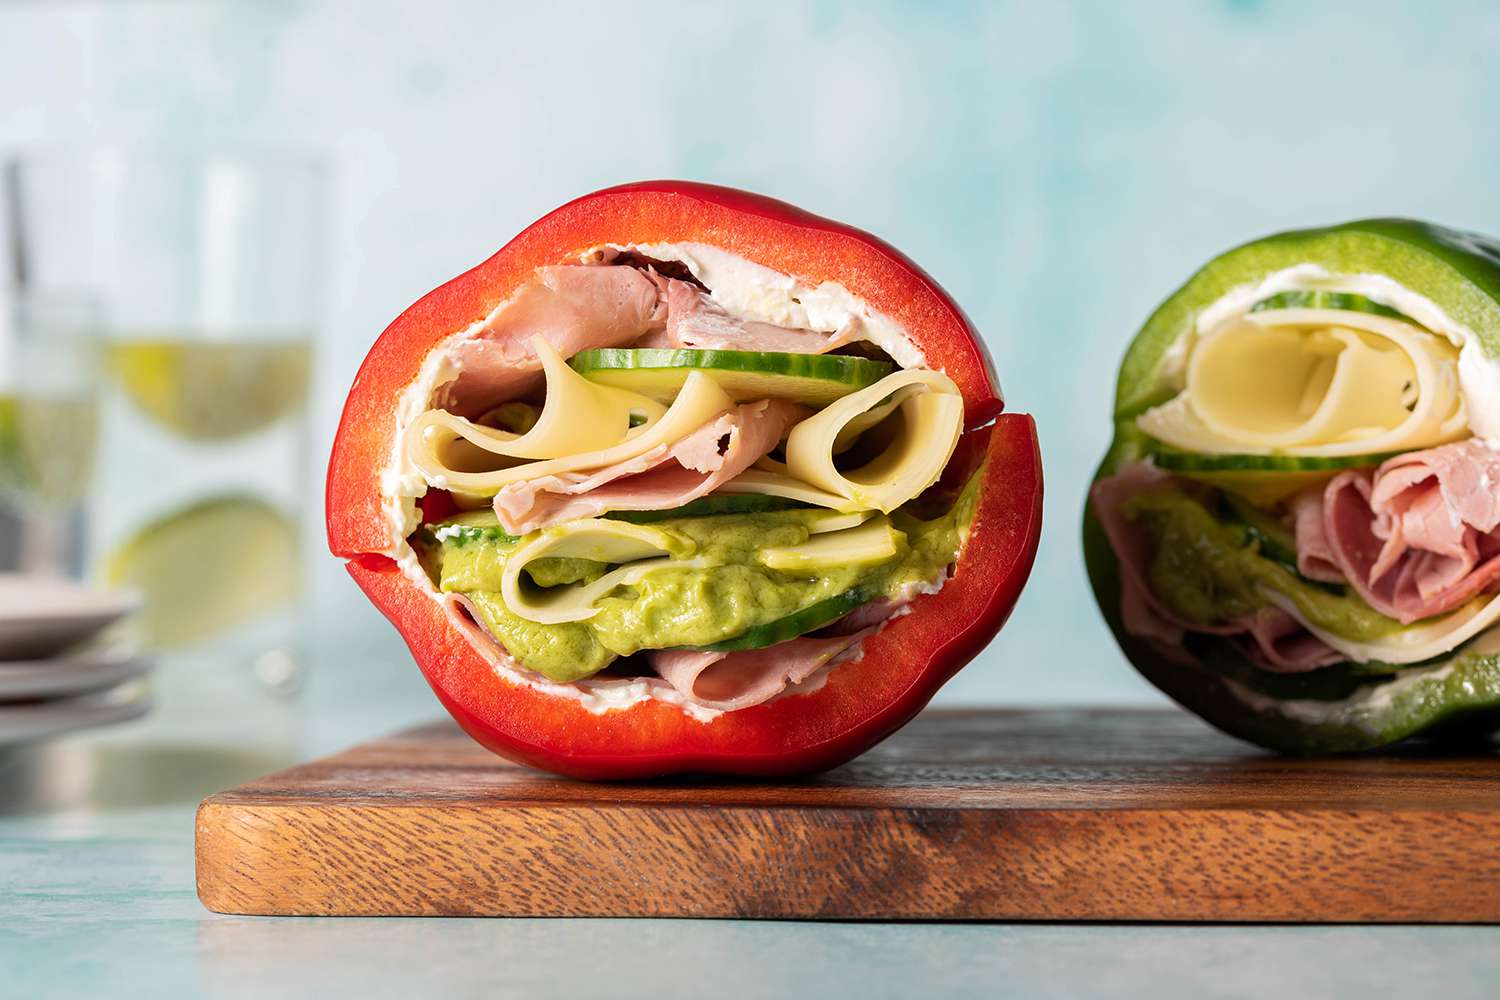
A bell pepper sandwich swaps bread for a halved bell pepper. You slice a large pepper lengthwise, remove the seeds and white ribs, spread on something creamy (think cream cheese, hummus, or avocado), layer fillings (deli meat, cheese, veggies), then close it up like a handheld “pepper panini”without needing a panini press.
It’s popular for low-carb lunches, gluten-free eating (as long as your fillings are gluten-free), and anyone who loves a fresh, crunchy bite. It’s also extremely customizable, which is code for: you can clean out your fridge with dignity.
Why This “Breadless” Sandwich Actually Works
1) Texture that holds up
A good sandwich needs structure. Thick-walled bell peppers (especially red, orange, and yellow) are sturdy enough to hold fillings, yet crisp enough to snap when you bite. That crunch is the whole pointlike the sound of “I made a good decision” in stereo.
2) Naturally flavorful “bun”
Bread is neutral; bell peppers are not. A sweet red pepper brings its own personalitybright, slightly fruity, and fresh. Green peppers are more assertive and slightly bitter, which some people love… and some people would like to file a formal complaint about.
3) Light but satisfying
Bell peppers are high in water and fiber, so they add volume without heaviness. Plus, when your “bun” is a vegetable, you’ve already made progress before you even add the fillings. (It’s like getting credit for homework while you’re still opening your notebook.)
Ingredients
The best bell pepper sandwich recipe is built like a formula: crunchy pepper + creamy spread + savory protein + texture boosters. Here’s the classic version first, then you can remix it.
Classic Turkey & Cream Cheese Bell Pepper Sandwich (2 servings)
- 1 large bell pepper (red, orange, or yellow for sweetness; green if you like a bolder bite)
- 3–4 tablespoons cream cheese (plain or flavored)
- 4–6 ounces deli turkey (or roasted turkey slices)
- 2 slices cheese (cheddar, provolone, Swiss, or pepper jack)
- 1/2 avocado, sliced (optional but recommended for creamy richness)
- 2–4 tomato slices (or a handful of halved cherry tomatoes)
- Handful of cucumber slices or baby spinach
- Optional add-ons: cooked bacon, everything bagel seasoning, Dijon or stone-ground mustard, sliced red onion, sprouts
- Salt & pepper, to taste
Step-by-Step: The Best Bell Pepper Sandwich Recipe
Step 1: Choose the right pepper (your “bread” matters)
Look for a large pepper with smooth skin and a firm, heavy feelthose tend to be thicker-walled and crunchier. A wider pepper gives you more surface area for fillings and is easier to close.
Step 2: Slice it like a sandwich bun
- Wash and dry the pepper well.
- Slice lengthwise from stem to bottom, cutting it into two “boats.”
- Remove seeds and the white ribs (they’re edible, but removing them makes more room and improves texture).
- Pro move: If the halves wobble, trim a paper-thin slice off the rounded outer side to create a flatter “resting” surface.
Step 3: Add a spread that acts like glue
Spread cream cheese on the inside of both pepper halves. This does two things: it adds flavor and helps keep fillings from sliding around like they’re late for an appointment. If cream cheese isn’t your thing, try hummus, mashed avocado, pesto, or Greek yogurt-based spreads.
Step 4: Layer strategically (this is sandwich engineering)
- Lay turkey slices on one side (folding them adds volume and prevents flat, sad layers).
- Add cheeseplacing it against the spread helps “anchor” it.
- Layer crunchy veg (cucumber, spinach) next, then tomato last.
- If using avocado, tuck slices where they won’t slide outusually near the middle.
- Season lightly with salt and pepper. Add mustard or seasoning if you want more zing.
Step 5: Close, press, and cut
Close the pepper halves like a sandwich. Gently press to compact. Use a sharp knife (a serrated knife can help) to cut crosswise into halvesthis makes it easier to eat and shows off the layers. Congratulations: your “sandwich bun” just came from the produce drawer.
Flavor Variations (So You Never Get Bored)
1) Italian Deli Bell Pepper Sandwich
Spread: herbed cream cheese or pesto. Fillings: salami + ham + provolone, shredded romaine, banana peppers, a drizzle of olive oil, and cracked pepper. It tastes like a deli sandwich decided to go on a wellness retreat.
2) Veggie Hummus Crunch Sandwich
Spread: hummus (classic, roasted red pepper, or garlic). Fillings: shredded carrots, cucumber, spinach, sprouts, and feta. Add everything bagel seasoning for maximum “why is this so good?” energy.
3) Tuna Salad “Pepper Melt” Vibe (No Stove Needed)
Spread: a thin layer of mayo or Greek-yogurt tuna salad. Add a slice of cheddar on top of the tuna and eat as-is. If you want it warm and melty, you can briefly broil the open-faced halves, then close it up. (Watch closelybroilers have the attention span of a goldfish.)
4) Breakfast Bell Pepper Sandwich
Spread: cream cheese or mashed avocado. Fillings: cooked egg (fried or scrambled), sliced turkey or ham, and pepper jack. Add hot sauce if you believe breakfast should have opinions.
5) Panini-Style (Cooked) Bell Pepper Sandwich
If you want melty cheese, you can press the assembled pepper sandwich in a panini press or skillet. The pepper softens slightly but still keeps a pleasant bite. Use medium heat and don’t overcookaim for warm and melty, not limp and regretful.
Pro Tips to Keep It Crunchy (and Not a Soggy Mess)
- Dry the pepper well after washing. Moisture is the enemy of crispness.
- Use a thick spread (cream cheese, hummus) to “seal” the surface and keep juicy fillings in check.
- Pat watery fillings dry (tomatoes, cucumbers) or place them in the middle, not directly against the pepper wall.
- Fold deli meat instead of laying it flat. It grips better and gives you a heartier bite.
- Choose the right size: a big pepper is easier to fill and hold. Mini peppers are cute but can be messy.
Meal Prep, Storage, and Food Safety
Bell pepper sandwiches are best freshly assembled. For meal prep, keep components separate and build right before eating. This preserves crunch and keeps your sandwich from turning into a salad with commitment issues.
Smart prep plan
- Slice and core peppers up to 2–3 days ahead, store in an airtight container with a paper towel to absorb moisture.
- Keep spreads separate (small container), and stash fillings in their own containers.
- Assemble just before eatingtakes 2–3 minutes and tastes dramatically better.
How long do ingredients last?
- Cut bell peppers: typically a few days in the fridge, and they stay best when stored dry and sealed.
- Deli meat and leftovers: follow package guidance and standard cold-storage timelines; when in doubt, don’t push it.
Bottom line: keep everything cold, keep it clean, and if something smells “off,” don’t let optimism be your seasoning.
Serving Ideas (Make It a Real Lunch)
A bell pepper sandwich can be a full meal, but pairing makes it feel intentional:
- Side of fruit (berries, grapes, orange slices)
- Greek yogurt or cottage cheese
- Pickles or olives for salty contrast
- A handful of nuts (if not avoiding them) or roasted chickpeas for crunch
- Soup pairing: tomato soup, chicken noodle, or a light veggie soup (bread not required, but allowed)
FAQ
Is a bell pepper sandwich keto?
It can be keto-friendly depending on fillings. Bell peppers contain carbs, but many people keep it low-carb by choosing high-protein fillings and minimal sugary sauces. If you track macros, build accordingly.
Which bell pepper color is best?
Red, orange, and yellow are sweeter and usually more crowd-pleasing. Green is more vegetal and slightly bitter. The “best” is whichever one you’ll actually eat happily.
Can I make this dairy-free?
Yesuse hummus, mashed avocado, dairy-free cream cheese, or a bean spread. Swap cheese for extra avocado or a dairy-free slice.
How do I stop it from falling apart?
Use a thick spread on both sides, don’t overstuff, and cut it in half so it’s easier to grip. If needed, wrap it tightly in parchment paper. Sandwiches behave better when they feel supported. (Same, honestly.)
Kitchen Notes & “Real-Life” Experiences (So Yours Turns Out Great)
The first time someone makes a bell pepper sandwich, the most common reaction is surprisespecifically, surprise at how sandwich-like it feels. You expect “vegetable snack,” but you get “lunch with structure.” That said, the learning curve is real, and it usually shows up in three places: pepper choice, moisture management, and filling strategy.
Pepper choice is the hidden MVP. A smaller, thin-walled pepper looks fine in the store and then immediately collapses under the emotional weight of turkey and cheese. People who “didn’t love it” often used a pepper that was too small, too soft, or already a little wrinkly. When you switch to a large, firm pepper with thick walls, everything changes: it holds its shape, stays crisp longer, and feels more like a handheld sandwich instead of a wobbly salad canoe.
Moisture is the sneaky villain. Tomatoes, cucumbers, pickles, even freshly washed lettuce can leak water. If you build the sandwich like you would with breadwet ingredients right against the “bun”you’ll notice the pepper getting slick and the fillings sliding. A simple fix is to treat your spread like a moisture barrier. A thicker layer of cream cheese or hummus creates a grippy surface and slows down sogginess. Another real-world trick: pat tomato slices dry with a paper towel and keep the juiciest ingredients closer to the center, with deli meat or cheese acting like “bookends” against the pepper walls.
Overstuffing is the most relatable mistake. The pepper halves look roomy, and suddenly you’re stacking five layers of turkey, two slices of cheese, half an avocado, tomatoes, cucumbers, spinach, onions, sprouts, and some heroic optimism. The sandwich closes… technically… but the first bite triggers an ingredient avalanche. In practice, two to three “main” fillings plus one crunchy veggie is the sweet spot. If you want more volume, make two smaller sandwiches instead of one overpacked one. Your hands will thank you, and your shirt will stop living in fear.
For meal prep, people often try assembling it the night before. The next day, the flavor is still good, but the pepper loses some snap, especially if watery ingredients were inside. The better experience is prepping “components” (pepper halves, spread, fillings) and assembling right before eating. It takes just a minute or two and keeps the pepper bright and crispexactly what makes this recipe worth doing in the first place.
Finally, there’s the unexpected win: once you get comfortable, you start treating the bell pepper sandwich like a blank canvas. Some days it’s deli-style and savory; other days it’s veggie-heavy and tangy; sometimes it’s breakfast. That flexibility is why the recipe sticks. It’s not just “a trend”it’s a practical, crunchy, build-your-own lunch that can match your mood, your fridge, and your schedule.