Note: This original article is based on widely used American baking, cake-decorating, and food-safety practices from reputable culinary and consumer guidance sources. Source links are intentionally omitted for clean web publishing.
A Dino Cake That Looks Impressive Without Requiring a Paleontology Degree
A DIY 3D dinosaur birthday cake sounds like the kind of project that requires a pastry diploma, an engineering license, and possibly a tiny hard hat. Good news: it does not. With a sturdy cake, a smart cutting plan, buttercream, a few candy decorations, and a little patience, you can create a roaring centerpiece that makes kids gasp and adults quietly ask, “Wait, you made that?”
The best part is that a homemade dinosaur cake does not need to be perfect. Dinosaurs were giant reptiles, not polished wedding cakes. A slightly bumpy back? Texture. A leaning tail? Motion. A frosting smudge? Prehistoric charm. This guide shows you how to make a DIY 3D dinosaur birthday cake that is fun, realistic enough to impress, and forgiving enough for real-life kitchens where someone is usually asking for snacks every seven minutes.
This tutorial uses easy-to-find ingredients and common cake tools. You can make the dinosaur from sheet cake pieces, stacked round cakes, or a shaped dinosaur cake pan. The method below focuses on a carved 3D dinosaur cake because it gives the best “wow” effect while staying friendly for beginners.
What Kind of Dinosaur Cake Should You Make?
Before you preheat the oven, decide what kind of dinosaur you want. A long-necked sauropod, like a brontosaurus-inspired cake, is cute and gentle. A stegosaurus is perfect because the plates along the back are easy to make with candy, cookies, fondant, or chocolate triangles. A T. rex looks dramatic, but the upright body and tiny arms can be tricky unless you use supports.
For most home bakers, a low, side-facing stegosaurus or friendly T. rex-style dinosaur is the smartest choice. The cake sits securely on a board, the body is carved from a rectangle or stacked round cakes, and the decorations do most of the storytelling. Kids recognize it immediately, and you do not have to build a cake that defies gravity like a buttercream skyscraper.
Best Beginner Design
Choose a dinosaur with a horizontal body, a tail resting on the cake board, and a head supported by cake scraps or rice cereal treats. This keeps the structure stable and reduces the chance of a dramatic birthday-party collapse. Nobody wants the dinosaur extinction event to happen before the candles.
Ingredients for a DIY 3D Dinosaur Birthday Cake
You can use a boxed cake mix or a homemade recipe. For carving, choose a cake that is moist but not too soft. Vanilla, chocolate, yellow cake, funfetti, and pound cake all work well. Very delicate sponge cakes are harder to carve because they crumble under pressure.
For the Cake
- Two 9-inch round cakes or one 9-by-13-inch sheet cake
- 1 batch of buttercream frosting, or 3 to 4 cups prepared frosting
- Extra frosting for attaching pieces
- Gel food coloring in green, blue, brown, orange, or your preferred dinosaur color
- Optional: rice cereal treats for the head, tail, legs, or spikes
For Decorating
- Candy melts, chocolate wafers, or fondant for spikes
- Chocolate chips, candy eyes, or mini candies for eyes
- Small candies for spots, scales, claws, and toes
- Crushed cookies for edible dirt
- Green-tinted coconut, piped buttercream grass, or candy rocks for the cake board
- Birthday candles or a small topper
Tools You Will Need
- Large cake board or serving tray
- Serrated knife
- Offset spatula
- Piping bags and round or star piping tips
- Toothpicks or drinking straws for light support
- Parchment paper
- Small bowls for mixing frosting colors
- Bench scraper or butter knife for smoothing
Step 1: Bake a Sturdy Cake
Start with a cake that can handle shaping. If you use a boxed mix, consider adding one extra egg or replacing part of the water with milk for a firmer crumb. If you bake from scratch, a classic birthday cake, chocolate cake, or pound cake-style recipe is a safe choice.
Grease the pans well, line the bottoms with parchment paper if possible, and let the cake cool completely before carving. Warm cake is soft, fragile, and emotionally unstable. It will crumble if you look at it with ambition.
Once the cake is cool, wrap it tightly and chill it for at least 30 to 60 minutes. Chilled cake is easier to cut, shape, and move. If you have time, bake the cake one day ahead and refrigerate it overnight. This simple step makes the whole decorating process calmer.
Step 2: Plan the Dinosaur Shape Before Cutting
Do not start carving immediately. First, sketch a simple dinosaur outline on paper. Think of the cake in parts: body, head, tail, legs, and spikes. The body should be the largest piece. The tail can curve along the board. The head can be made from a smaller cake piece or shaped rice cereal treats.
If you are using two round cakes, cut one cake in half and stand the halves together with frosting between them to create a tall body arch. Use the second round cake for the head, legs, and tail. This classic cut-up cake method is popular because it creates height without complicated support.
If you are using a sheet cake, cut a large oval or rounded rectangle for the body. Use remaining pieces for a tail, four legs, and a head. Arrange everything on the cake board before frosting. This dry fit helps you see whether your dinosaur looks like a dinosaur or, in early stages, a suspicious green potato.
Step 3: Assemble the Dinosaur Body
Place the main body piece on a sturdy cake board. Add a little frosting underneath to keep it from sliding. Attach the tail, legs, and head with buttercream. For extra security, insert short pieces of drinking straw or toothpicks where pieces meet, especially at the neck and tail. Make sure to warn guests about any non-edible supports before serving.
For a more sculpted 3D look, trim the top edges of the body into a gentle curve. Round the sides slightly with a serrated knife. Carve slowly and remove small amounts at a time. Cake carving is like haircutting: you can always cut more, but you cannot magically reattach a giant chunk without pretending it was part of the plan.
Save all cake scraps. Mix them with frosting to create a soft cake clay that can patch gaps, build cheeks, thicken legs, or smooth awkward seams. This trick is especially helpful for shaping the dinosaur’s snout and shoulders.
Step 4: Apply a Crumb Coat
A crumb coat is a thin first layer of frosting that traps loose crumbs before the final coat. It is one of the most important steps in making a clean 3D dinosaur birthday cake. Spread a thin layer of frosting over the entire dinosaur, including the tail, legs, and head. Do not worry if crumbs show through. That is the job of this layer.
After crumb coating, chill the cake for 20 to 30 minutes, or until the frosting feels firm. This helps lock the shape in place and prevents crumbs from mixing into the final frosting. Skipping the crumb coat is possible, but your dinosaur may look like it rolled through a sandbox. Cute? Maybe. Intentional? Not always.
Step 5: Add the Final Frosting Layer
Tint your buttercream with gel food coloring. Gel colors are better than watery liquid colors because they create bold shades without thinning the frosting. Green is classic, but blue, purple, orange, or gray dinosaurs are also fun. Birthday dinosaurs do not have to follow fossil records. If the child wants a rainbow T. rex, the child is correct.
Spread a thicker layer of frosting over the chilled crumb coat. Smooth it with an offset spatula, or create texture by tapping the frosting lightly with the back of a spoon. A textured finish is easier than a perfectly smooth one and gives the dinosaur a scaly, playful look.
For extra dimension, use a darker frosting shade along the back and a lighter shade on the belly. Blend gently with a spatula. This simple color contrast makes the cake look more professional without adding much work.
Step 6: Make Spikes, Plates, and Scales
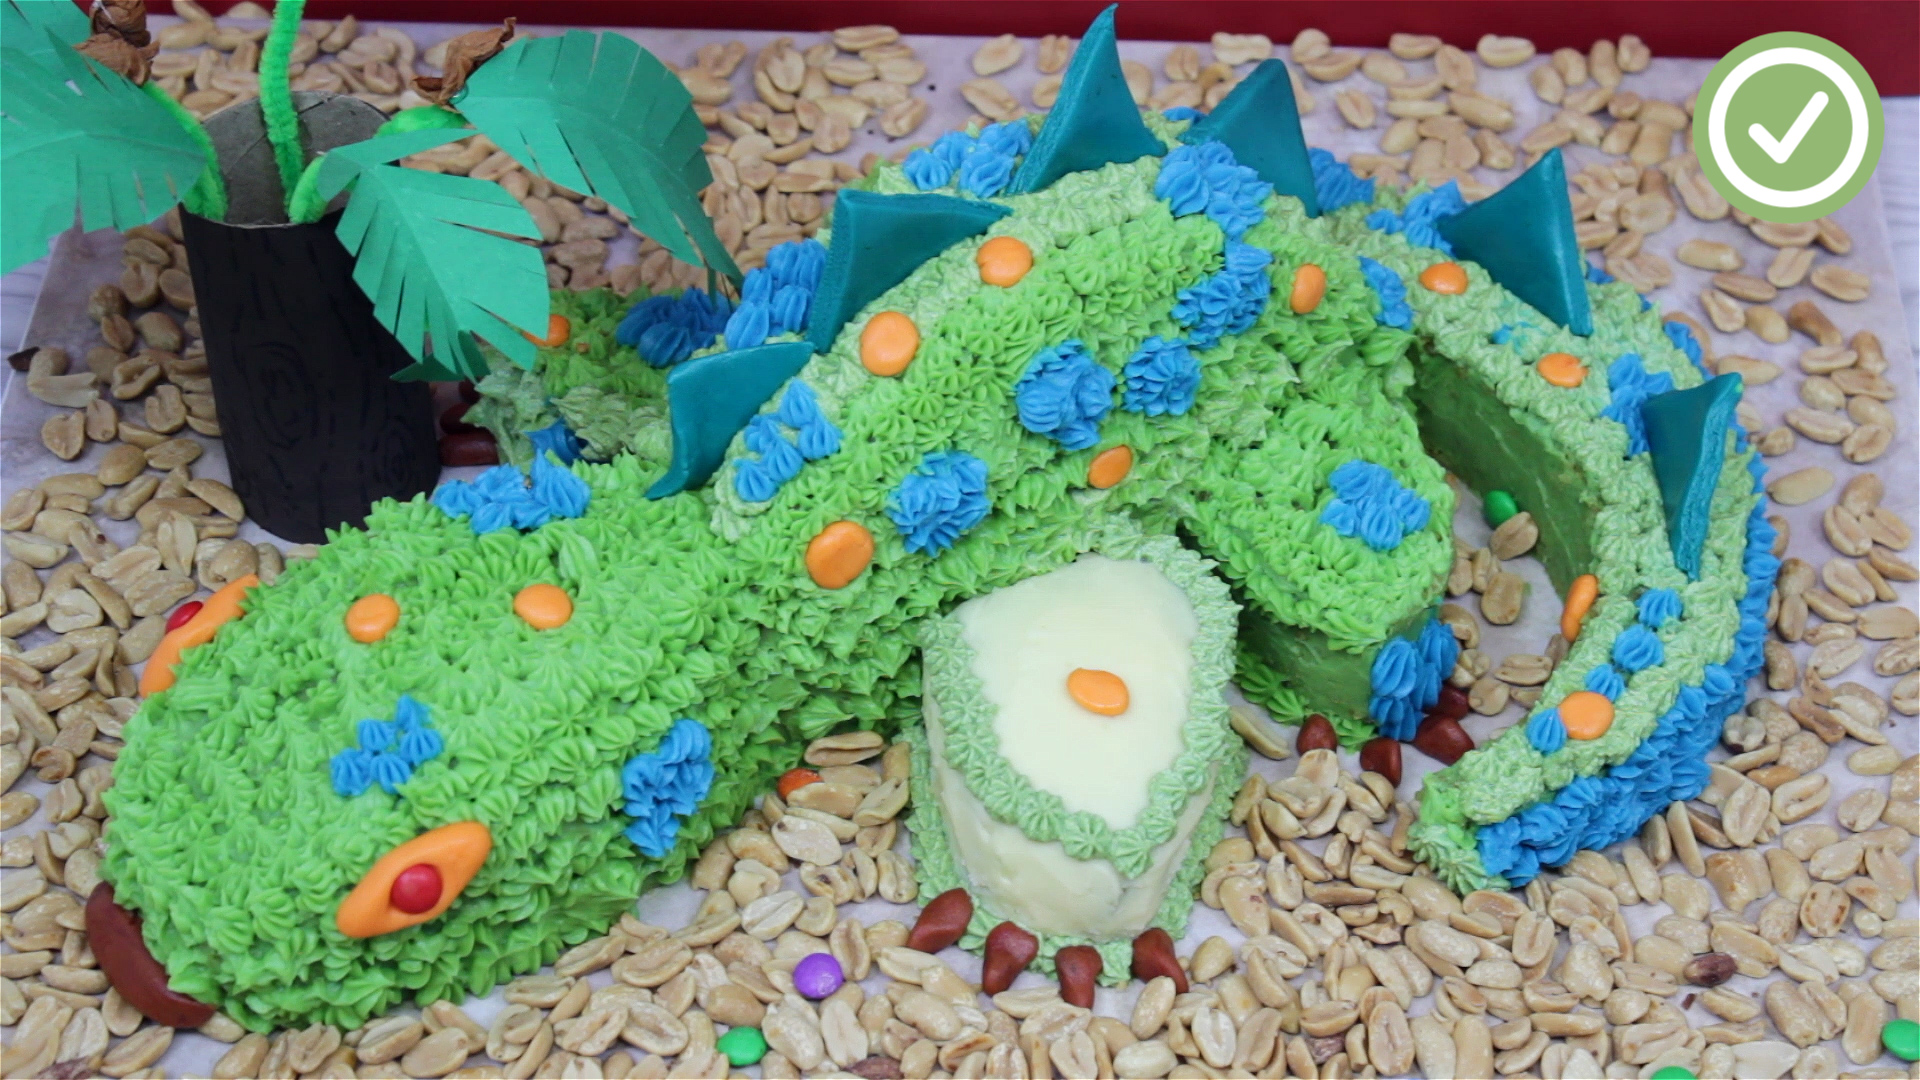
Spikes are the fastest way to make a cake scream “dinosaur” instead of “green mystery loaf.” You can make them from fondant triangles, candy melts, chocolate pieces, wafer cookies, fruit leather, or even triangle-shaped gummy candies.
For a stegosaurus-style cake, place larger plates along the back from head to tail. For a T. rex-inspired cake, add smaller spikes along the spine and tail. Press each decoration gently into the frosting. If the cake is very soft, chill it briefly before adding heavier pieces.
To create scales, pipe small dots of buttercream across the body using a round tip. You can also press mini candies into the frosting for colorful spots. Use chocolate chips for claws and candy eyes for the face. A small curved line of black frosting makes a friendly smile; a jagged line of white icing makes tiny teeth. Choose wisely, depending on whether you want “adorable herbivore” or “cupcake predator.”
Step 7: Build a Prehistoric Scene
The cake board is part of the design. A plain board works, but a decorated board makes the dinosaur feel like it belongs in a tiny edible Jurassic world. Spread a thin layer of green frosting around the dinosaur for grass. Add crushed chocolate cookies for dirt or rocks. Use graham cracker crumbs for sand. Place candy rocks, toy palm trees, or fondant leaves around the base.
If you use plastic dinosaur toys as decorations, wash them thoroughly before placing them near the cake. Keep small toys away from toddlers and remove all non-edible decorations before slicing. The cake should be exciting, not a choking-hazard obstacle course.
Step 8: Add the Birthday Details
Personalize the cake with the birthday child’s name, age, or favorite dinosaur. Pipe “Roar-some Birthday,” “Three-Rex,” “Dino-Mite Party,” or “Stomp, Chomp, Hooray!” on the board. These phrases are cheerful, searchable, and delightfully silly.
Place candles on the board instead of directly on a narrow tail or head. This keeps the cake stable and avoids melting delicate frosting details. If you want height, use a small paper topper or a number candle behind the dinosaur.
Common Mistakes to Avoid
Using Cake That Is Too Soft
Soft cake tastes wonderful, but it can collapse when carved. Chill the cake first, and choose a sturdy recipe for best results.
Skipping the Cake Board
A 3D cake needs support. Use a thick cake board, tray, or flat platter. Thin paper plates are not invited to this prehistoric party.
Adding Too Much Food Coloring
Use gel color gradually. A little goes a long way, especially with deep green, blue, or black. Too much coloring can affect frosting texture and flavor.
Decorating in a Hot Kitchen
Buttercream softens in warmth. If your kitchen is hot, chill the cake between steps. Work in short sessions and keep the frosting cool but spreadable.
Forgetting Food Safety
If your cake contains perishable fillings, cream cheese frosting, custard, whipped cream, or fresh fruit, keep it refrigerated and avoid leaving it at room temperature for extended periods. A basic buttercream cake is more party-table friendly, but it still tastes best when stored properly.
Easy Flavor Ideas for a Dinosaur Birthday Cake
The outside may get all the applause, but the inside matters too. A dinosaur birthday cake can be simple and still delicious. Chocolate cake with vanilla buttercream is a dependable crowd-pleaser. Vanilla cake with strawberry filling feels bright and cheerful. Funfetti cake adds instant party energy because sprinkles are basically edible confetti.
For a dirt-and-dino theme, use chocolate cake, chocolate buttercream, crushed cookies, and gummy worms around the base. For a jungle theme, try vanilla cake with green buttercream, coconut grass, and candy rocks. For a fossil theme, use tan frosting, cookie crumb “sand,” and white chocolate bones.
How to Make the Cake Ahead of Time
You can bake the cake layers one or two days in advance. Wrap them tightly and refrigerate. You can also freeze cake layers for longer storage if they are well wrapped. Buttercream can be made ahead and refrigerated, then brought to room temperature and re-whipped before decorating.
The best schedule is simple: bake the cake the day before, carve and crumb coat it that evening, then decorate it the morning of the party. This gives the cake time to firm up and saves you from trying to pipe dinosaur scales while guests are arriving and someone is asking where the balloons went.
Beginner-Friendly Decorating Variations
The Candy Spike Dinosaur
Use chocolate candies, wafer cookies, or triangle-shaped fondant for spikes. Add candy eyes and sprinkle spots. This version is fast, colorful, and great for younger kids.
The Buttercream Scale Dinosaur
Pipe small overlapping dots or stars over the body. This hides imperfections and creates a textured look. It takes more time but is very forgiving.
The Fossil Dig Dinosaur Cake
Decorate the cake board with crushed cookies and add white chocolate bones or fossil shapes. This theme works beautifully for kids who love science and excavation kits.
The Rainbow Dino Cake
Divide frosting into several colors and pipe scales in rows. This is perfect for a cheerful party theme and does not require realistic dinosaur colors. Real dinosaurs may have had colorful features anyway, so your rainbow frosting might be more scientifically open-minded than you think.
Serving and Storage Tips
Use a sharp knife to slice the cake, starting with the tail and smaller pieces before cutting the main body. Remove toothpicks, straws, toppers, toys, or any non-edible decorations before serving. If the cake has been chilled, let it sit at room temperature for a short time before cutting so the frosting softens slightly.
Store leftover cake in an airtight container. If it uses standard buttercream and no perishable filling, it can usually sit at cool room temperature for a limited time, but refrigeration helps keep decorated shapes firm. Cakes with cream cheese frosting, whipped cream, custard, or fresh fruit should be refrigerated.
Extra Experience: What I Learned Making a DIY 3D Dinosaur Birthday Cake
The first lesson of making a DIY 3D dinosaur birthday cake is that confidence arrives after the crumb coat. Before that, the cake may look rough. It may look lumpy. It may look like something discovered in the back of the freezer. Do not panic. Almost every carved cake goes through an awkward stage. The crumb coat is where the shape begins to make sense, and the final frosting is where the dinosaur earns its roar.
One helpful experience is to build the cake lower than you imagine. Tall cakes are impressive, but low, sturdy cakes are much easier to transport, decorate, and slice. A dinosaur body that rests close to the board can still look 3D, especially when the tail, legs, spikes, and face are clearly shaped. Stability matters more than height when children are circling the dessert table like tiny raptors.
Another practical tip is to use decorations strategically. You do not need flawless carving if you place spikes along the back, add candy eyes, pipe a smile, and create feet with chocolate chips or small candies. These details tell the viewer what they are seeing. The brain fills in the rest. This is why a few triangles on a green cake can suddenly transform it from “frosted hill” into “stegosaurus with excellent posture.”
Chilling is also a secret weapon. Chill before carving, chill after assembling, chill after the crumb coat, and chill again if the frosting gets too soft. The refrigerator is not just storage; it is your calm little assistant. When the cake feels too delicate, a short chill can make it easier to handle. Just avoid freezing the final decorated cake for too long if it has delicate candy pieces that may sweat as they thaw.
Working with kids can be fun if you give them safe decorating jobs. Let them place candy rocks, sprinkle cookie dirt, or choose the dinosaur’s eye color. Keep the structural work for an adult, especially if toothpicks, knives, or supports are involved. Children love contributing, and they are usually much more forgiving than adults. A child will look at a slightly crooked dinosaur and say, “He’s running!” That is the spirit every home baker needs.
Finally, remember that the cake is part of a memory, not a museum exhibit. The birthday child will remember the roar, the candles, the funny frosting face, and the fact that someone cared enough to make a dinosaur out of cake. That is the real magic. A bakery-perfect cake is lovely, but a homemade dinosaur cake has personality. It has crumbs. It has comedy. It has a tail that may or may not be anatomically correct. And when everyone gathers around to sing, it becomes exactly what it was meant to be: a sweet, silly, unforgettable birthday centerpiece.
Conclusion
Making a DIY 3D dinosaur birthday cake is much easier when you break the project into simple steps: bake a sturdy cake, chill it, carve the basic shape, crumb coat, frost, decorate, and build a fun prehistoric scene. You do not need professional tools or perfect sculpting skills. You need a plan, a steady cake board, enough frosting, and the willingness to let your dinosaur have a little personality.
Whether you create a green stegosaurus, a chocolate T. rex, or a rainbow “Three-Rex” for a toddler birthday, the result will feel special because it is homemade. And honestly, any cake that makes people smile before they even taste it has already won the party.