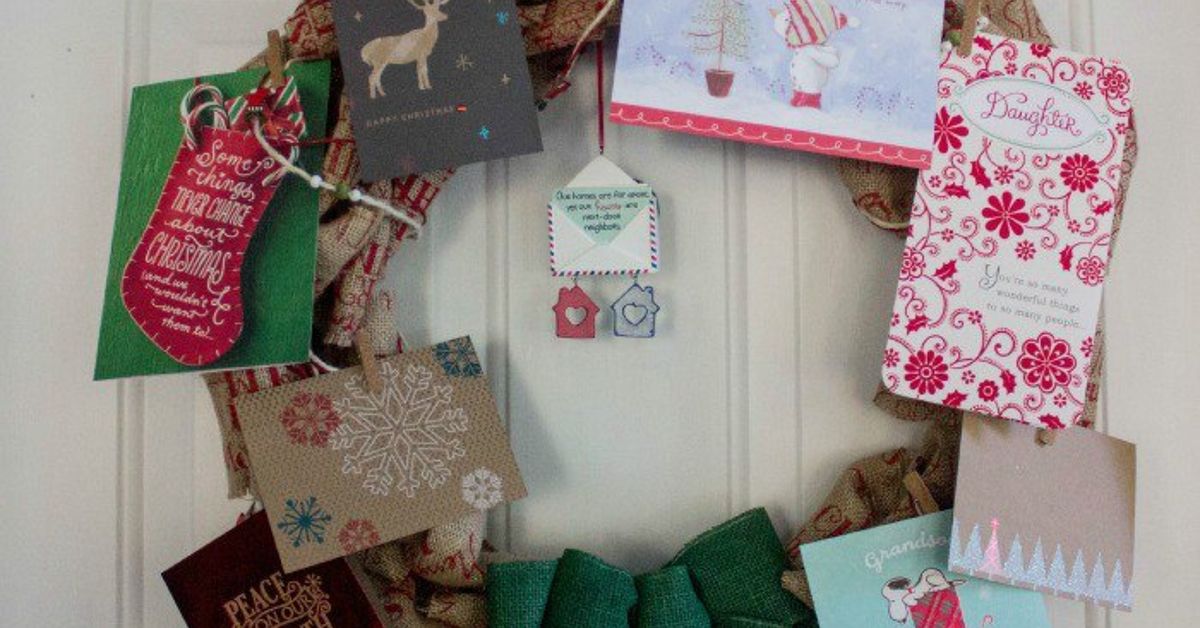
Holiday cards are tiny paper hugs. They arrive with smiling kids, goofy pets, glittery snowmen, and that one cousin who somehow manages to take a perfect family photo every single year. The problem? After three days, those cheerful envelopes start forming a festive landslide on the kitchen counter. That is where an easy burlap wreath Christmas card holder swoops in like Santa with a hot glue gun.
This project turns a simple wreath form, burlap ribbon, clothespins, and a few Christmas accents into a rustic holiday card display that looks charming, costs very little, and actually solves a December decorating problem. Instead of taping cards to the wall or balancing them on the mantel like a risky game of holiday Jenga, you can clip them around a cozy wreath and let your mail become part of the decor.
Best of all, this DIY Christmas card holder is beginner-friendly. You do not need a sewing machine, a woodworking bench, or a craft room that looks like a television studio. A table, a few supplies, and about an hour are enough. Add Christmas music, cocoa, and maybe a cookie for emotional support, and you have yourself a very merry afternoon project.
Why a Burlap Wreath Makes the Perfect Christmas Card Holder
Burlap has that relaxed farmhouse look that works beautifully with Christmas decor. It feels cozy without trying too hard. Pair it with red ribbon, buffalo check, evergreen sprigs, pinecones, bells, or mini ornaments, and suddenly it becomes holiday-ready.
A wreath shape is also practical. It gives you a circular frame for arranging cards evenly, and it can hang on a wall, pantry door, interior door, entryway hook, or above a console table. Unlike a garland card display, a wreath stays compact. Unlike a basket of cards, it keeps every greeting visible. Unlike taping cards to your cabinets, it does not leave mystery sticky marks that you discover in March.
Supplies You Will Need
You can customize this burlap wreath Christmas card holder based on your style, but the basic materials are simple and easy to find at craft stores, dollar stores, big-box retailers, or even in your leftover holiday bin.
Basic Materials
- One wire wreath frame, foam wreath form, or grapevine wreath base
- Burlap ribbon, preferably 5 to 6 inches wide
- Mini or standard wooden clothespins
- Hot glue gun and glue sticks
- Floral wire, pipe cleaners, or zip ties
- Ribbon for hanging
- Scissors
- Christmas embellishments such as pinecones, faux berries, greenery, bells, bows, or ornaments
Optional Add-Ons
- Spray paint or acrylic paint for the clothespins
- Glitter paint for a little sparkle
- Small letter tiles or a wooden sign that says “Merry Mail”
- Battery-operated fairy lights
- Command hook or over-the-door wreath hanger
For a fuller wreath, choose a wire wreath frame and loop the burlap through the sections. For a sleeker, easier version, wrap burlap around a foam wreath form and glue it in place. Both styles work. The best choice depends on whether you want fluffy rustic texture or a clean wrapped look.
How to Make an Easy Burlap Wreath Christmas Card Holder
This step-by-step tutorial uses a wire wreath frame because it creates a full, textured wreath. However, you can follow the same decorating and card-holding steps with a foam or grapevine base.
Step 1: Prepare Your Workspace
Burlap sheds. It is not dramatic about it, but it does leave little fibers behind like a craft project with a secret glitter habit. Cover your table with newspaper, parchment paper, or an old tablecloth. Plug in your hot glue gun and keep a small bowl nearby for clothespins and embellishments.
Before you start, decide where the wreath will hang. This helps you choose the right size. A 12-inch wreath is great for small spaces, while a 14- to 18-inch wreath gives you more room for Christmas cards.
Step 2: Attach the Burlap to the Wreath Frame
Secure the end of the burlap ribbon to the wire frame using floral wire, a pipe cleaner, or a zip tie. Start on the back of the frame so the attachment is hidden. If you are using a foam wreath, add a line of hot glue and press the burlap into place.
For a wire frame, push a loop of burlap up through one section of the frame. Then push another loop through the next section. Continue around the wreath, making puffy loops as you go. Keep the loops fairly even, but do not stress over perfection. Rustic decor is forgiving. In fact, rustic decor practically invented the phrase, “That looks intentional.”
Step 3: Fluff and Shape the Burlap
Once the wreath is covered, gently pull and adjust the burlap loops until the frame is hidden. If any areas look thin, bunch the ribbon closer together. Trim loose threads with scissors. Do not pull long burlap strings too aggressively, or you may accidentally create a fringe situation you did not ask for.
Step 4: Add Clothespins for the Christmas Cards
Clothespins are the secret ingredient that turns a pretty wreath into a practical Christmas card holder. You can use mini clothespins for a delicate look or regular clothespins for stronger grip. If your family receives thick photo cards, standard clothespins are usually the better choice.
Place the clothespins around the wreath before gluing them. Space them evenly, leaving enough room so cards can overlap slightly without hiding everything. A medium wreath usually holds 12 to 20 visible cards, depending on card size and spacing.
When you like the layout, glue each clothespin to the burlap or attach it with floral wire. Position the pin so the opening faces outward. That way, you can clip cards easily as they arrive. For extra strength, add glue to the back of the clothespin but avoid the metal hinge.
Step 5: Decorate the Wreath
Now comes the fun part. Add a large bow at the top, bottom, or side of the wreath. Tuck in faux evergreen stems, red berries, small pinecones, or tiny ornaments. A small wooden sign in the center can add personality. Try phrases like “Merry Mail,” “Joy,” “Holiday Greetings,” or “Cards from the Nice List.”
Keep the decorations balanced but not crowded. Remember, the Christmas cards are part of the final design. If you cover every inch with ornaments, there may be no room left for Aunt Linda’s annual newsletter, and she worked very hard on that two-page update.
Step 6: Add a Hanging Ribbon
Loop a sturdy ribbon through the top of the wreath and tie it securely. For a farmhouse look, use red ticking stripe, plaid, black-and-white buffalo check, or natural jute. For a classic Christmas style, choose velvet red, satin green, or gold ribbon.
Hang the wreath on a hook, nail, over-the-door hanger, or removable wall hook. If you are hanging it on a door that opens and closes often, make sure the cards are clipped tightly so your holiday greetings do not take flight every time someone grabs a snack.
Design Ideas for Different Christmas Styles
Farmhouse Christmas
Use natural burlap, black-and-white buffalo check ribbon, small pinecones, white berries, and wooden clothespins. This style looks warm, simple, and cozy. It pairs well with neutral stockings, galvanized metal accents, and evergreen garlands.
Classic Red and Green
Choose red ribbon, green faux pine, red berries, and gold bells. Paint the clothespins red or green for a polished look. This version feels cheerful, traditional, and instantly recognizable as Christmas decor.
Rustic Woodland
Add faux cedar, mini pinecones, cinnamon sticks, dried orange slices, and jute twine. This wreath looks beautiful in a cabin-style home, a cozy kitchen, or a living room with natural textures.
Modern Neutral
Stick with cream burlap, white ribbon, wood beads, matte black accents, and simple greenery. This design is clean but still festive. It is perfect for people who love Christmas decor but do not want their home to look like a candy cane exploded.
Kid-Friendly Colorful Version
Paint the clothespins in bright colors and add pom-poms, felt ornaments, candy cane ribbon, or mini stockings. Let kids help clip new cards to the wreath. It becomes a family tradition and gives them an official holiday job besides asking when presents can be opened.
Smart Tips for Displaying Christmas Cards
To keep your wreath looking neat, place larger cards around the outside edge and smaller cards toward the center. If cards are heavy, use two clothespins for support. Photo cards look best when clipped at the top center, while folded cards can be clipped on one side so they still open.
Rotate cards throughout the season if your mailbox gets busy. Put newer cards in front and move older ones behind. You can also add a second ribbon hanging below the wreath for overflow cards. This keeps the display attractive instead of turning it into a festive paper porcupine.
If you want to save cards after Christmas, keep a small envelope or storage box nearby. At the end of the season, remove the cards, bundle them by year, and label them. Some families punch a hole in the corner of each card and hold the year’s collection together with a binder ring.
Common Mistakes to Avoid
Using Too Few Clothespins
It is better to add more clips than you think you need. Even if you do not use every one, the wreath will be ready as cards arrive. Empty clothespins still look cute, especially if they are painted or decorated.
Overloading One Side
Heavy embellishments can make the wreath hang crooked. Before gluing everything permanently, hold the wreath up and check the balance. If one side dips, move a bow or ornament cluster to even it out.
Forgetting About Door Movement
A wreath on a frequently used door needs stronger clips and fewer dangling pieces. If your door gets a workout, hang the card holder on a wall instead. Your cards will thank you for not being involved in daily door drama.
Using Weak Glue
Hot glue works well for lightweight decorations, but heavier items may need floral wire. When in doubt, wire it first and add glue second. This is especially helpful for bows, bells, and larger greenery picks.
How to Store Your Burlap Wreath Card Holder
After the holidays, remove all cards and inspect the wreath for loose clips or decorations. Re-glue anything that needs attention before storing it. Place the wreath in a wreath storage bag, a shallow plastic bin, or a cardboard box. Avoid crushing the burlap loops, because flattened burlap is not the festive look we are going for.
Store the wreath in a cool, dry place. Burlap is a natural-looking material that can absorb odors or moisture, so keep it away from damp basements if possible. Add tissue paper around delicate decorations, and your wreath should be ready to return next Christmas.
Budget-Friendly Ways to Customize the Project
One reason this DIY burlap wreath Christmas card holder is so popular is that it can be as affordable or fancy as you want. Use leftover ribbon from wrapped gifts. Repurpose ornaments that lost their hooks. Clip greenery from an old garland. Paint clothespins instead of buying decorative clips. A wreath like this does not need expensive supplies to look beautiful.
You can also make it personal. Add a family monogram, tiny framed photo, wooden name sign, or a small tag with the year. If you give this wreath as a gift, include a pack of clothespins and a few blank holiday cards. It makes a thoughtful handmade present for newlyweds, grandparents, teachers, neighbors, or anyone whose refrigerator is already running out of card space.
of Real-Life Experience: What This Project Feels Like to Make and Use
Making an easy burlap wreath Christmas card holder feels like the kind of holiday project that forgives real life. You do not need the house perfectly clean, the tree fully decorated, or a professional craft setup. In fact, this is a great project for that strange pocket of December when you want to feel festive but do not have the energy to reorganize the attic or bake twelve dozen cookies. You can sit down with a wreath form, a roll of burlap, and a pile of clothespins, and within a short time, you have something useful and genuinely charming.
The first thing you notice is texture. Burlap has a rough, homey feel that instantly makes a wreath look cozy. It may shed a little, and yes, you may find a stray fiber on your sweater later, but that is part of the rustic bargain. As the burlap loops fill out, the wreath starts to look more expensive than it is. That is one of the most satisfying parts of the project. A few basic supplies slowly turn into something you would happily hang in your entryway.
Adding the clothespins is where the project becomes personal. You begin imagining the cards that will arrive: the glossy family portraits, the handwritten notes, the funny pet cards, the elegant foil designs, and the occasional card from someone you have not heard from in years. The wreath becomes more than decoration. It becomes a place for people. Every clipped card adds another little story to the circle.
In daily use, the wreath is surprisingly convenient. When a new card arrives, you do not have to decide where to put it. You just clip it on. Guests notice it, too. A Christmas card holder wreath naturally invites people to stop and look. They point out familiar faces, laugh at cute photos, and ask where you got it. Saying “I made it” is a small but wonderful holiday victory.
The best placement is usually somewhere visible but protected. An interior wall near the entry, a hallway, a kitchen command center, or a spot beside the tree works beautifully. A front door can work, but if the door swings often, cards may shift. A wall display keeps everything tidy and lets the wreath become part of the room’s Christmas personality.
Another pleasant surprise is how reusable it is. After Christmas, you can remove the cards and store the wreath with the rest of your holiday decor. The next year, it comes back ready for another round of merry mail. You can even refresh it with a new bow or different ornaments if your holiday style changes. One year it can be farmhouse plaid; the next year it can be red velvet and gold bells. The basic wreath stays the same, but the personality can evolve.
This project is also a great reminder that Christmas decorating does not have to be complicated to feel meaningful. Sometimes the best decorations are the ones that make room for connection. A burlap wreath Christmas card holder does exactly that. It gathers the faces, handwriting, humor, and love that arrive in your mailbox and turns them into a warm piece of holiday decor. That is a pretty good return on a roll of burlap and a few clothespins.
Conclusion
An easy burlap wreath Christmas card holder is the perfect mix of rustic decor and holiday practicality. It gives Christmas cards a beautiful place to shine, keeps your counters clear, and adds handmade warmth to your home. With burlap ribbon, a wreath form, clothespins, and a few festive accents, you can create a display that is simple, affordable, reusable, and full of personality.
Whether your style is farmhouse, classic, woodland, modern, or colorful and kid-friendly, this DIY Christmas card holder can be customized to fit your home. It is easy enough for beginners, fun enough for a family craft night, and useful enough to become part of your yearly holiday routine. Your cards deserve better than a pile on the counter. Give them a wreath, a spotlight, and maybe a tiny bow for good measure.
Note: For the safest and neatest results, use caution with hot glue, supervise children during crafting, and hang the finished wreath indoors or in a protected area where cards will stay dry and secure.