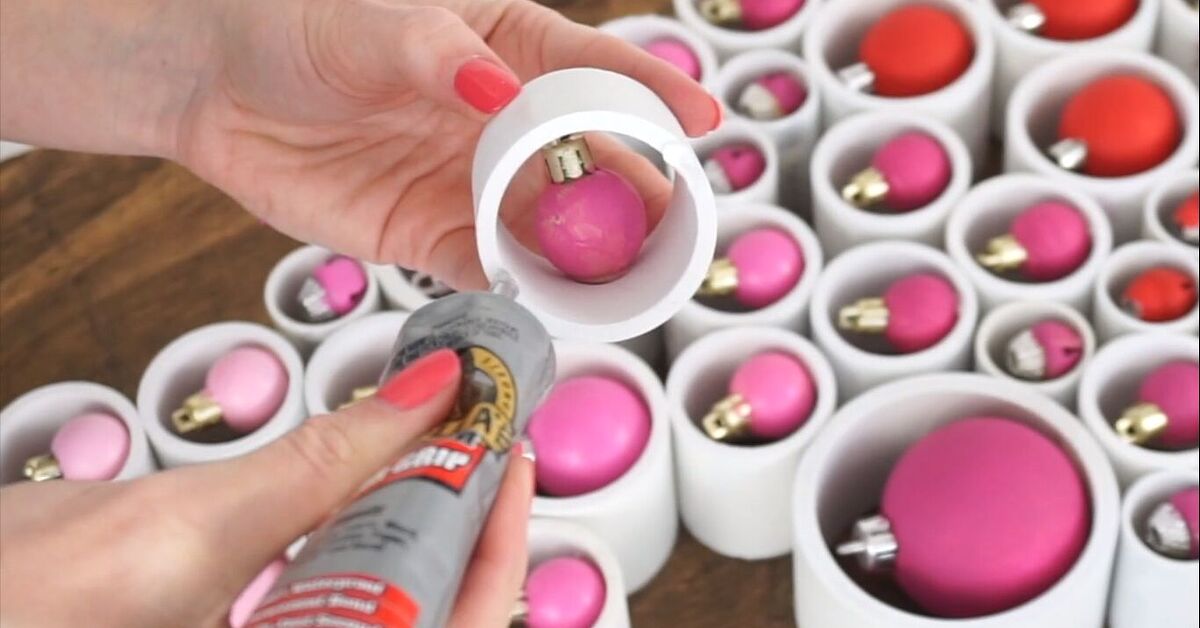
If your holiday decorating style sits somewhere between “classic Christmas magic” and “I own a saw and I’m not afraid to use it,” a PVC pipe Christmas tree may be your new favorite project. It is modern, budget-friendly, space-saving, reusable, and wonderfully customizable. Best of all, it gives you a festive excuse to wander the plumbing aisle with the confidence of someone who absolutely knows why they are buying six feet of pipe for Santa season.
A PVC pipe Christmas tree can be made in several ways, but the most popular version is a wall-mounted or tabletop tree built from short rings of PVC pipe arranged in a triangle shape. Each pipe opening becomes a tiny cubby for ornaments, mini gifts, pinecones, bells, LED tea lights, bottle-brush trees, candy canes, or whatever holiday treasures are currently trying to escape your decoration bin. You can keep it clean and Scandinavian with white pipe and neutral ornaments, go full North Pole with red, green, and gold, or make it a playful family memory display.
This guide walks you through how to make a PVC pipe Christmas tree for your holiday decor, including materials, cutting tips, layout ideas, safety advice, decorating inspiration, and practical lessons from real DIY-style experience. The result is a Christmas tree alternative that looks intentional, not like your garage sneezed.
Why Make a PVC Pipe Christmas Tree?
A PVC Christmas tree is not trying to replace the smell of fresh pine or the nostalgia of hanging ornaments on branches. It is doing something different. It offers a graphic, modern look that works especially well in apartments, small homes, craft rooms, entryways, kids’ rooms, offices, porches, and mantel displays.
PVC pipe is lightweight, easy to cut, widely available at home improvement stores, and sold in different diameters. That variety is what makes this project so visually interesting. When you combine 1-inch, 2-inch, 3-inch, and 4-inch pipe sections, the tree gets texture and depth. It becomes part wall art, part ornament organizer, and part conversation starter.
Another benefit is durability. Unlike fresh greenery, PVC does not dry out, shed needles, or silently judge you for forgetting to water it. Once the holiday season is over, you can store the tree and use it again next year. If you build it on a sturdy backing board, you can simply wrap it, slide it behind a closet door, and bring it back when your playlist starts leaning heavily toward sleigh bells.
Choose Your PVC Christmas Tree Style
Before buying materials, decide which style fits your space and skill level. There are three easy options.
1. Wall-Mounted PVC Pipe Tree
This is the most decorative and polished version. Short PVC pipe rings are glued to a plywood or wood backer in the shape of a Christmas tree. The openings face forward, creating little shelves for ornaments. It is ideal for indoor holiday decor, small spaces, and anyone who wants a tree that doubles as art.
2. Freestanding PVC Frame Tree
This version uses longer PVC pipes and fittings to create a triangular tree frame. You can wrap it with garland, string lights, ribbon, or tinsel. It works well for porches, yards, balconies, and casual displays. If used outdoors, the tree must be weighted or anchored so wind does not turn it into a festive javelin.
3. Tabletop PVC Mini Tree
A smaller version of the wall-mounted tree can sit on a console table, kitchen counter, desk, or mantel. It uses fewer pipe pieces, costs less, and is a great weekend craft. This is also the friendliest option if you are new to cutting PVC.
For this tutorial, we will focus on the wall-mounted PVC pipe Christmas tree because it is attractive, practical, and easy to personalize. You can scale the measurements up or down depending on your wall, window, or tabletop space.
Materials and Tools You Will Need
Gathering materials before you start will save you from the classic DIY holiday tradition of making four separate trips to the store while muttering, “I definitely had wood glue somewhere.”
Materials
- Assorted PVC pipe in 1-inch, 1.5-inch, 2-inch, 3-inch, and 4-inch diameters
- Plywood, MDF, or a wood board for backing
- Construction adhesive, PVC cement, or strong craft adhesive suitable for plastic and wood
- Spray primer made for plastic
- Spray paint or acrylic paint in your preferred color
- Fine-grit sandpaper or sanding block
- Pencil and measuring tape
- Painter’s tape
- Mini ornaments, bows, bells, pinecones, faux greenery, or battery-operated LED lights
- Picture-hanging hardware, wall anchors, or a stand, depending on display style
Tools
- Ratcheting PVC cutter, handsaw, miter saw, or circular saw with the proper blade
- Clamp or vise to hold pipe securely while cutting
- Deburring tool or utility knife
- Safety glasses
- Dust mask
- Work gloves
- Drop cloth or cardboard for painting
For a medium wall tree, plan for a backing board around 24 inches wide by 36 inches tall. You may need approximately 25 to 40 short PVC rings, depending on pipe diameter and how tightly you arrange them. A smaller tabletop tree may use 12 to 20 rings. A large statement tree may need 50 or more.
Step-by-Step Guide: How to Make a PVC Pipe Christmas Tree
Step 1: Plan the Size and Shape
Start by choosing where your PVC pipe Christmas tree will go. Measure the wall, mantel, window area, tabletop, or porch space. Then decide the tree’s finished height and width. A simple triangle works best: wide at the bottom, narrow at the top, with optional space for a trunk and star.
Lay your backing board flat on a work surface. Use a pencil to mark the top center of the tree, the bottom left and right corners, and the trunk area if you want one. Connect these points with painter’s tape to create a triangle outline. This gives you a visual guide while arranging the pipe pieces.
Do not worry if the outline looks plain at this stage. Every great Christmas project begins by looking mildly suspicious.
Step 2: Cut the PVC Pipe Into Rings
Cut the PVC pipe into short sections, usually between 2 and 4 inches deep. Two-inch-deep pieces create a shallow, modern wall tree. Three- or four-inch pieces make deeper cubbies that hold larger ornaments more securely.
For a clean look, keep the pipe sections the same depth. For a more dimensional look, vary the depths slightly. This creates shadows and makes the tree feel more sculptural. Mark the pipe with a pencil before cutting, and secure it in a clamp or miter box so it does not roll.
A ratcheting PVC cutter is excellent for smaller pipe because it makes quick, neat cuts. A miter saw is faster for larger pipe but creates more plastic shavings, so wear eye protection and a dust mask. A handsaw also works if you are patient and willing to let your arm know it has been chosen for character development.
Step 3: Smooth the Edges
After cutting, each PVC ring will likely have rough edges or tiny burrs. Smooth them with sandpaper, a deburring tool, or a utility knife. This step matters because clean edges look more professional and are safer to handle.
Wipe each pipe piece with a dry cloth to remove dust. If the pipe has ink markings, lightly sand them or place those sections toward the back. Primer and paint can cover many marks, but dark manufacturer stamps sometimes like to make surprise appearances after painting.
Step 4: Arrange the Pipe Pieces
Place your pipe rings inside the taped triangle on the backing board. Start with the larger pieces near the bottom and work upward with smaller pieces. This creates a natural tree shape and gives bigger ornaments room to shine.
Mix pipe sizes rather than grouping all matching diameters together. A balanced arrangement might include a few large circles at the base, medium circles through the center, and smaller circles toward the top. Rotate pieces until the layout feels full but not crowded.
Leave a little breathing room between some pieces if you like a modern design. Push them closer together if you want a fuller, honeycomb-style tree. Step back every few minutes and look at the whole shape. This is the easiest time to adjust the design, before adhesive enters the chat and becomes emotionally permanent.
Step 5: Add a Trunk or Star
For the trunk, use a short section of larger PVC pipe, a rectangular piece of wood, or several small pipe rings stacked vertically. For the top, you can add a wooden star, a metallic ornament, a bow, or a small painted PVC ring.
If you prefer a minimalist look, skip both the trunk and star. The triangle silhouette will still read clearly as a Christmas tree, especially once ornaments and lights are added.
Step 6: Glue the Pipe Pieces in Place
Once you like the layout, take a quick photo with your phone. Then lift each pipe piece one at a time, apply adhesive to the back edge, and press it onto the board. Follow the adhesive label for open time, ventilation, curing, and cleanup.
Construction adhesive is a good choice when attaching PVC to wood because it fills small gaps and creates a strong bond. PVC cement is designed to fuse PVC to PVC, so it works well where pipe sections touch each other, but it may not be ideal as the only adhesive for attaching pipe to a wooden backing. Many DIYers use a combination: construction adhesive for the board and PVC cement where plastic pieces meet.
Use clamps or weighted objects to hold pieces in place if needed. Let the tree cure fully according to the adhesive directions. Rushing this step can lead to pipe pieces sliding around like they are auditioning for a holiday slapstick special.
Step 7: Prime and Paint
Once the adhesive has cured, move the tree to a well-ventilated area. Place it on a drop cloth or large piece of cardboard. Apply a primer made for plastic, then paint in thin, even coats.
White is crisp and classic. Green makes the piece feel more traditional. Matte black is dramatic and modern. Gold or silver can look glamorous for a mantel display. You can also paint the inside of each pipe a different color for a playful, ornament-box effect.
Let each coat dry before applying the next. Several light coats usually look better than one heavy coat. Heavy paint can drip, pool inside the pipe rings, and create a finish that says “holiday decor” and “science fair volcano” at the same time.
Step 8: Decorate the PVC Pipe Tree
Now comes the fun part. Fill each PVC opening with small ornaments, bells, wrapped mini boxes, pinecones, tiny nutcrackers, faux berries, dried orange slices, candy canes, ribbon curls, or miniature figurines. You can create a color theme or make every cubby different.
For a cozy look, add battery-operated LED fairy lights around the tree or tuck small LED tea lights into selected openings. Avoid open flames. PVC and candles are not friends, neighbors, or casual acquaintances.
If you want a family-centered tree, use the pipe openings to display small photos, handwritten notes, tiny keepsakes, or ornaments collected over the years. This turns the tree into a memory wall for the season.
Step 9: Hang or Display Safely
If your tree is wall-mounted, attach sturdy hanging hardware to the back. Use wall anchors if you are not drilling into studs. For renters, a smaller lightweight version may work with heavy-duty removable hanging strips, but always check the weight rating.
For tabletop display, add a small easel back, attach a stand, or lean the tree securely against a wall. If you plan to display it outdoors, use exterior-rated paint, weather-safe decorations, and outdoor-rated lights. Keep electrical connections off wet ground, use outdoor extension cords, and turn lights off before leaving home or going to bed.
Decorating Ideas for Different Holiday Styles
Modern Minimalist
Paint the PVC tree matte white or soft beige. Use wood beads, linen bows, brass bells, and neutral ornaments. Keep the cubbies sparse so the circular shape of the pipe remains visible.
Classic Christmas
Choose green paint for the tree, add a red trunk or gold star, and fill the openings with red, gold, and plaid ornaments. Add faux pine sprigs between a few pipes for texture.
Kids’ Christmas Tree
Paint the tree bright green or candy-cane red and white. Fill the openings with mini toys, felt ornaments, tiny stuffed animals, and wrapped treats. Use shatterproof decorations only.
Rustic Farmhouse
Use white paint with a lightly distressed finish. Decorate with pinecones, burlap ribbon, mini wooden houses, cinnamon sticks, and buffalo-check bows. Add warm white fairy lights for a soft glow.
Glam Holiday Display
Paint the tree metallic gold, champagne, or pearl white. Fill the rings with glass-look plastic ornaments, velvet bows, glitter stars, and crystal-style garlands. Place it above a console table with candles nearby, but not inside or touching the PVC tree.
Common Mistakes to Avoid
Using Pipe Pieces That Are Too Shallow
If the PVC rings are too shallow, ornaments may fall out easily. A depth of 2 inches is fine for a wall-art look, but 3 to 4 inches is better if you want the openings to hold decorations.
Skipping the Dry Layout
Do not start gluing before arranging the full tree. PVC rings can look balanced individually but awkward as a group. A dry layout lets you adjust spacing, size distribution, and the overall silhouette.
Forgetting to Sand the Edges
Rough cut edges make the tree look unfinished. Sanding is not glamorous, but it is the difference between “handmade decor” and “plumbing leftovers with ambition.”
Overloading the Tree
Heavy ornaments can pull on the pipe pieces or make the display unstable. Use lightweight decorations, especially if the tree is hanging on a wall.
Using Indoor Lights Outdoors
If the tree will be displayed outside, use lights and extension cords labeled for outdoor use. Keep plugs dry, avoid overloading outlets, and inspect cords before decorating.
Budget-Friendly Tips
This project can be surprisingly affordable if you plan carefully. Check your garage first for leftover PVC from old repairs or projects. Ask local hardware stores whether they sell shorter pipe sections or scrap pieces. Mix a few larger pipes with smaller ones instead of buying several full lengths in every diameter.
You can also save money by using leftover plywood, cabinet backing, pallet wood, or a thrifted frame as your base. Spray paint from previous projects can work if it is compatible with plastic. For decorations, raid your ornament box for pieces that lost their hooks, mini figurines, old ribbon, gift tags, and small holiday odds and ends.
A PVC pipe Christmas tree is also a smart way to display awkward ornaments that do not hang well on a traditional tree. Round, heavy, flat, or fragile keepsakes can sit inside the pipe openings instead of dangling from branches.
Experience-Based Tips: What You Learn While Making a PVC Pipe Christmas Tree
The first thing you learn when making a PVC pipe Christmas tree is that layout matters more than perfection. A single pipe ring cut a little unevenly will probably disappear in the overall design, especially after painting and decorating. But poor spacing is noticeable. The best approach is to arrange everything before gluing, walk away for a few minutes, then come back with fresh eyes. That short break often reveals whether the tree is leaning visually to one side or whether too many large circles have gathered at the bottom like relatives near the dessert table.
You also learn that PVC dust gets everywhere. Cutting pipe is not difficult, but the shavings cling to clothes, workbenches, and floors. Setting up a cutting station outside or in a garage makes cleanup much easier. A cardboard box under the saw can catch many of the shavings. Wearing safety glasses and a dust mask is not overkill; it is common sense, especially if you are cutting many pieces.
Another practical lesson is that paint transforms the project. Before paint, the tree may look like a pile of pipe slices trying to become art. After primer and a smooth coat of paint, it suddenly looks intentional and store-worthy. White paint gives the cleanest modern result, but dark green feels more traditional. Metallic paint can be beautiful, though it tends to highlight rough edges, so sanding becomes even more important.
Adhesive patience is also essential. The temptation to decorate immediately is strong, particularly when the tree finally looks finished. Resist it. Give the glue time to cure fully. If a pipe piece pops loose after decorating, you will have to remove ornaments, re-glue, and pretend you are not annoyed. Letting the adhesive set properly saves time later.
Decorating the cubbies is where personality enters the project. Smaller ornaments work best, but a mix of textures keeps the display interesting. A few shiny ornaments, a few matte pieces, something natural like pinecones, and something soft like ribbon create a balanced look. Battery-operated lights add warmth without complicated wiring. If the tree is for children, shatterproof ornaments are the obvious choice. If it is for a dining room or entryway, a more edited color palette will look polished.
Finally, this project teaches you that holiday decor does not need to be expensive to feel special. A PVC pipe Christmas tree is humble at the hardware-store stage, but it becomes charming because of the choices you make: the colors, the ornaments, the memories tucked into each circle. It is a reminder that creativity often starts with ordinary materials. Sometimes the most cheerful Christmas decoration is not the one you buy in a box, but the one you build while making a little mess, laughing at your crooked first cut, and discovering that plumbing supplies can, in fact, have holiday spirit.
Conclusion
Learning how to make a PVC pipe Christmas tree for your holiday decor is a fun way to combine crafting, home improvement, and festive styling in one satisfying project. Whether you create a large wall-mounted statement piece, a compact tabletop tree, or a simple freestanding frame wrapped in lights, PVC gives you a flexible foundation for a decoration that is durable, reusable, and easy to customize.
The key steps are simple: plan your size, cut the pipe evenly, smooth the edges, arrange the rings in a tree shape, glue everything securely, paint it beautifully, and decorate with lightweight seasonal accents. With a little patience and a lot of holiday imagination, plain PVC pipe can become a fresh Christmas display that looks modern, personal, and delightfully unexpected.
Note: Always follow the safety directions on tools, paints, adhesives, lights, and extension cords. Use protective gear when cutting PVC, work in a ventilated area when painting or applying adhesives, and choose outdoor-rated electrical products for outdoor displays.