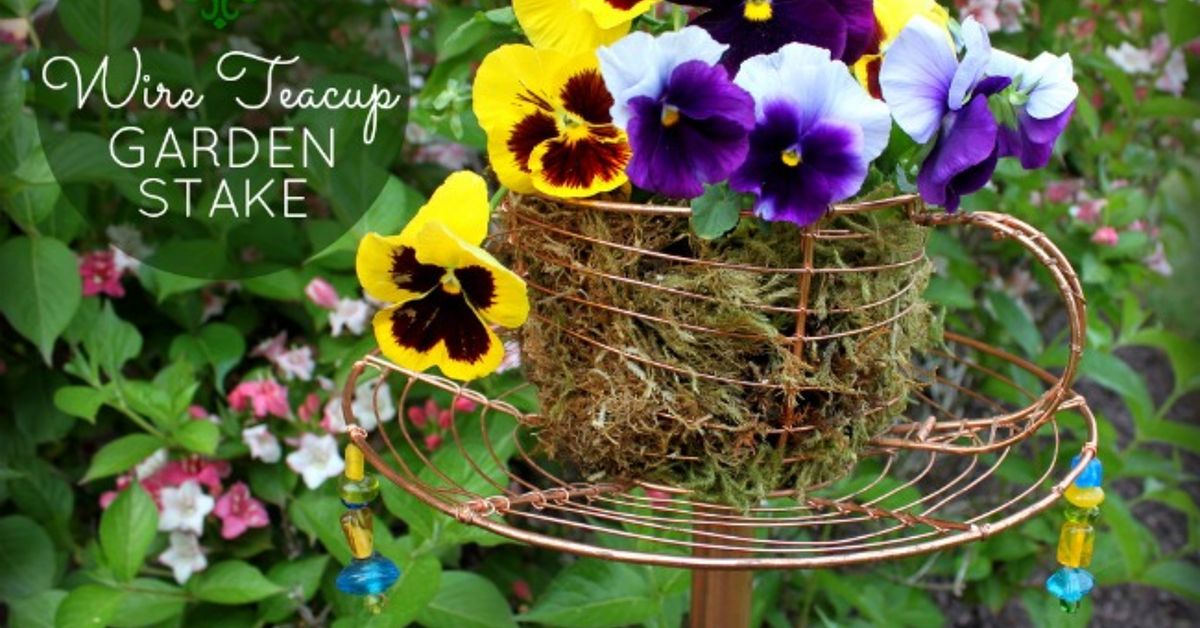
A wire teacup garden stake is what happens when a thrift-store curiosity gets promoted from kitchen clutter to garden royalty. Part planter, part sculpture, and entirely charming, this easy DIY garden decoration adds height, color, and personality without demanding a contractor, a power-tool collection, or an alarming number of trips to the hardware store.
The classic design combines an oversized wire teacup, a copper pipe, an end cap, moss, potting mix, and compact flowers. Once assembled, the cup appears to float above a flower bed like afternoon tea hosted by garden fairies. Best of all, the idea is flexible. A wire cup can become a tiny planter, while a ceramic teacup and saucer can serve as decorative garden art or, with appropriate maintenance, a small bird feeder.
This guide explains how to make a durable wire teacup garden stake, choose suitable plants, avoid drainage problems, and customize the finished project for different garden styles.
Why a Wire Teacup Garden Stake Works So Well
Gardens benefit from changes in height. Flower beds naturally spread horizontally, so a decorative object raised on a stake creates a focal point above the foliage. The familiar teacup shape also provides an amusing contrast with the surrounding plants. It is formal china without the formalityand nobody will complain if a pansy puts its leaves on the table.
The project also gives unwanted objects a second life. Wire baskets, metal cups, mismatched saucers, copper scraps, beads, and old jewelry can all become useful materials. Because the design is compact, it works in large landscapes, cottage gardens, raised beds, patio containers, and small urban yards.
Decorative and Practical Possibilities
A teacup garden stake can be adapted for several purposes:
- A miniature planter for pansies, violas, sedum, or compact herbs
- A colorful accent among low-growing ground covers
- A marker near a garden entrance or pathway
- A seasonal display filled with moss, pinecones, or artificial flowers
- A small bird-feeding station when designed for easy cleaning
- A handmade gift for a gardener, tea lover, or enthusiastic collector of delightfully unnecessary objects
Decide how the cup will be used before assembling it. A living plant requires drainage, growing medium, and enough root space. A decorative arrangement can be made without drainage and will usually need less maintenance.
Materials and Tools
The exact dimensions depend on the wire teacup you find, but the following supplies work for most versions.
Essential Materials
- One oversized wire teacup or teacup-shaped metal basket
- One copper pipe, approximately 3 feet long
- One copper end cap sized to fit the pipe
- Two-part outdoor epoxy suitable for bonding metal
- Fine- or medium-grit sandpaper
- Sheet moss, coconut fiber, or another breathable basket liner
- Lightweight container potting mix
- One or two compact plants
- Masking or painter’s tape
Optional Decorative Supplies
- Glass beads or weather-resistant acrylic beads
- Copper beading wire
- Old keys, charms, bells, or pieces of costume jewelry
- Exterior-rated clear sealer
- Artificial flowers for a no-maintenance display
- A removable plastic liner with drainage holes
Useful Tools
- Work gloves
- Safety glasses
- Wire cutters
- Needle-nose pliers
- A disposable mixing surface and applicator for epoxy
- A rubber mallet or scrap block of wood for installing the pipe
How to Make a Wire Teacup Garden Stake
Step 1: Inspect and Clean the Teacup
Examine the wire cup for broken welds, sharp ends, loose handles, or heavy rust. Minor surface discoloration may contribute to the vintage appearance, but structural corrosion should not be ignored. Tighten loose wire with pliers and file or bend sharp ends away from areas that will be handled.
Wash the cup to remove dust, grease, and thrift-store mysteries. Dry it completely. Adhesive performs best on clean surfaces, and moisture trapped under a bonded joint can weaken the result.
Step 2: Prepare the Copper End Cap
Test the end cap on the copper pipe before gluing anything. The fit should be secure without requiring heroic force. Lightly sand the outside surface of the cap where it will touch the wire cup. Roughening a shiny metal surface gives the epoxy more texture to grip.
Also clean the intended attachment point on the bottom of the teacup. If the wire design leaves only a narrow contact area, choose the broadest and most balanced location. The cup should sit centered over the pipe rather than leaning like it has already sampled the cooking sherry.
Step 3: Bond the Cap to the Wire Cup
Mix the two-part epoxy according to the manufacturer’s directions. Wear gloves, protect the work surface, and provide adequate ventilation. Products vary in working time, temperature limits, water resistance, and full curing time, so the instructions on the package take priority over a generic timetable.
Apply enough epoxy to create firm contact between the copper cap and the bottom of the wire cup, but avoid building a large visible mound. Position the cap with its open end facing downward. Use masking tape to hold everything in alignment while the adhesive sets.
Leave the assembly undisturbed for the full recommended curing period. Overnight is common, but some products require 24 hours or longer to reach maximum strength. “It feels dry” and “it is ready to support a planted metal basket outdoors” are not always the same milestone.
Step 4: Add Beads and Decorative Details
After the adhesive has cured, thread beads onto copper beading wire and wrap them around the cup’s rim, handle, or open framework. Twist the wire ends securely with pliers, then tuck them inward so they cannot scratch hands or catch clothing.
Use restraint unless maximal whimsy is the goal. Three to seven bead accents can echo nearby flower colors without making the stake resemble a chandelier that escaped through an open window. For a rustic look, skip the beads and allow the copper and aged wire to provide the visual texture.
Step 5: Line the Wire Cup
Press damp sheet moss or coconut fiber against the inside of the wire frame. The liner must contain the potting mix while still allowing excess water to escape. Overlap thin areas and check the bottom carefully, since that is where loose soil will attempt its dramatic exit.
A removable nursery-pot liner is another practical option. It simplifies replanting and lets you take the plant out for watering or winter storage. Add drainage holes if the liner does not already have them. Do not rely on a layer of gravel to correct a container without drainage; horticultural guidance consistently favors actual drainage openings and an airy potting mix.
Step 6: Add Potting Mix and Plants
Use a lightweight commercial potting mix rather than dense garden soil. Container mixes are designed to hold moisture while maintaining air around the roots. Garden soil can compact inside a small cup, drain slowly, and add unnecessary weight to the stake.
Fill the lined cup partially, place the plant at the same depth at which it was growing, and add mix around the roots. Leave a little space below the rim so water does not immediately carry soil over the sides.
Pansies and violas are classic choices for cool weather. Sedum, small annuals, and compact trailing plants can work in warmer seasons. Match the plant to the available sunlight and the limited root volume. A tomato may technically begin life in a teacup, but it will soon file a formal complaint.
Step 7: Install the Copper Stake
Select a location where the cup can be seen without obstructing a walkway. Push the copper pipe 6 to 10 inches into firm soil, depending on its length, the weight of the planter, and local wind conditions. Use a rubber mallet or place a block of scrap wood over the pipe before tapping it. Striking copper directly with a steel hammer can deform the opening.
Check the pipe with a level from two directions. Slide the attached copper cap over the pipe only after the support feels stable. A removable top makes seasonal maintenance much easier and prevents twisting pressure from being transferred to the epoxy joint.
Choosing the Best Plants
The small planting area is the main limitation of a wire teacup garden stake. Select plants with modest root systems and growth habits that remain proportional to the container.
Good Cool-Season Choices
- Pansies
- Violas
- Sweet alyssum
- Dwarf dianthus
- Compact ornamental kale seedlings
Good Warm-Season Choices
- Wax begonias for partial shade
- Small coleus varieties
- Lobelia in mild summer climates
- Compact sedum
- Portulaca for sunny, relatively dry locations
- Miniature thyme where growing conditions are suitable
Small containers dry faster than garden beds, particularly in sun or wind. Check the potting mix frequently by touching the surface. Water when it begins to feel dry, applying enough moisture to wet the root zone while allowing the excess to drain. During hot weather, inspection may be necessary every day.
Design Variations for Different Gardens
Cottage-Garden Style
Choose a cup with curved wirework, soft patina, floral beads, and a loose arrangement of pansies or alyssum. Place it among lavender, salvia, daisies, or roses. The result should feel collected over time rather than delivered as a matching patio set.
Modern Minimalist Style
Use a simple black wire cup, an unadorned copper pipe, and one sculptural succulent. Limit the color palette and avoid dangling embellishments. A clean silhouette lets the unusual teacup shape provide all the humor the design needs.
Fairy-Garden Style
Add a tiny spoon, miniature sign, or a few jewel-toned beads. Moss can spill slightly over the rim, creating the appearance of a teacup reclaimed by a very organized woodland. Keep small detachable decorations away from young children and pets.
Seasonal Display
Replace live plants with removable decorations when temperatures become unsuitable. Spring flowers can give way to summer succulents, autumn leaves, and winter greenery. In freezing climates, store delicate ceramic components and vulnerable planted cups indoors. Water trapped in non-draining containers may freeze, expand, and damage both the container and plant roots.
Can It Be Used as a Bird Feeder?
A teacup stake can hold a modest amount of birdseed, but a decorative planter is not automatically a safe feeder. If you make a feeding version, the cup should be removable, washable, and able to drain after rain. Wet seed can spoil or develop mold, while accumulated droppings can help spread disease.
Offer only a small quantity of seed and replace anything damp or contaminated. Clean the feeder approximately every two weeks and more frequently during wet weather, heavy use, or local disease activity. Follow current advice from wildlife authorities in your region. If the cup is permanently glued into a shape that cannot be scrubbed and dried properly, keep it as garden art instead. The birds will survive the disappointment.
Maintenance and Troubleshooting
The Cup Leans to One Side
First check whether the pipe is vertical. If it is, the end cap may have been bonded off-center. A slightly uneven plant can be balanced by repositioning the root ball, but a badly misaligned attachment should be repaired rather than loaded with more soil.
The Epoxy Joint Comes Loose
Remove old adhesive carefully, clean both surfaces, and sand the contact areas. Rebond them with an exterior-rated product compatible with the exact metals involved. Give the adhesive its complete curing time before returning the cup outdoors.
The Plant Wilts Constantly
The small container may be drying too quickly. Move the stake away from intense afternoon sun, use a plant with better heat tolerance, or insert a slightly larger removable liner. Do not solve every wilt by flooding the cup; saturated roots can look unhealthy too.
The Moss Liner Falls Apart
Natural liners eventually decompose. Replace the moss or support it with coconut fiber, fine metal mesh, or a fitted nursery pot. Inspect the supporting wire at the same time for corrosion and sharp edges.
Why This Upcycled Garden Project Is Worth Making
A wire teacup garden stake is inexpensive, approachable, and easy to personalize. It brings vertical interest into a planting bed while turning an overlooked object into functional garden art. Unlike a major landscaping project, it can be completed over a weekend and changed whenever the seasonor the gardener’s mooddemands something new.
The most successful version balances creativity with practical construction: a stable pipe, a properly cured bond, genuine drainage, lightweight potting mix, and a plant suited to a tiny container. Get those details right, and the finished stake will look playful rather than precarious.
What Building a Wire Teacup Garden Stake Is Really Like
The most entertaining part of this project often happens before construction begins. Finding the wire cup can turn an ordinary thrift-store visit into a low-stakes treasure hunt. The ideal object may be sitting beside a bent fruit basket, an unidentified kitchen rack, and something made of brass that appears to have lost its original purpose during the Carter administration. That uncertainty is part of the appeal. You are not restoring an antique to museum specifications; you are recognizing a useful shape and giving it a new assignment.
Dry-fitting the parts is the first lesson worth remembering. A copper cap that looks centered from one angle can be noticeably crooked after the cup is placed upright. Setting the cup upside down on a padded work surface and marking the center makes alignment easier. Tape is surprisingly important here. Without it, a perfectly positioned cap can drift while the epoxy cures, apparently motivated by a private desire to become abstract art.
The next surprise is how little soil the finished cup actually holds. Moss consumes some interior space, and a plant’s nursery root ball can be larger than expected. Compact pansies usually settle in after the lower portion of the root ball is gently loosened, but forcing a large plant into the cup produces a top-heavy arrangement. Starting with a small transplant creates better proportions and puts less stress on the glued joint.
Watering also requires adjustment. The open wire frame provides excellent drainage, yet wind reaches the liner from nearly every direction. On a cool spring morning, the soil may remain moist for hours. During a hot, breezy afternoon, the same planter can dry much faster than nearby in-ground flowers. The practical habit is to check the mix with a finger rather than water according to a rigid schedule.
Placement changes the visual effect more than expected. Set too low, the cup disappears behind foliage. Set too high in an exposed location, it can look lonely and become vulnerable to wind. The best position is usually just above neighboring plants, where the teacup appears to emerge from the bed. Repeating one of its colors elsewherepurple pansies near purple salvia, for examplehelps the whimsical object feel connected to the overall garden.
Copper develops character outdoors. A bright new pipe may initially look more polished than the weathered wire cup, but its surface gradually changes with exposure. Some gardeners enjoy that evolving patina; others prefer to protect the original shine with an appropriate clear exterior coating. Either choice works, although a naturally aged finish generally suits an upcycled garden decoration beautifully.
The finished project tends to attract comments because visitors understand the object immediately but do not expect to see it floating over a flower bed. It is recognizable, surprising, and just impractical enough to be joyful. That combination is the real experience of making a wire teacup garden stake: a few ordinary supplies become a tiny garden landmark with far more personality than their price tags suggested.