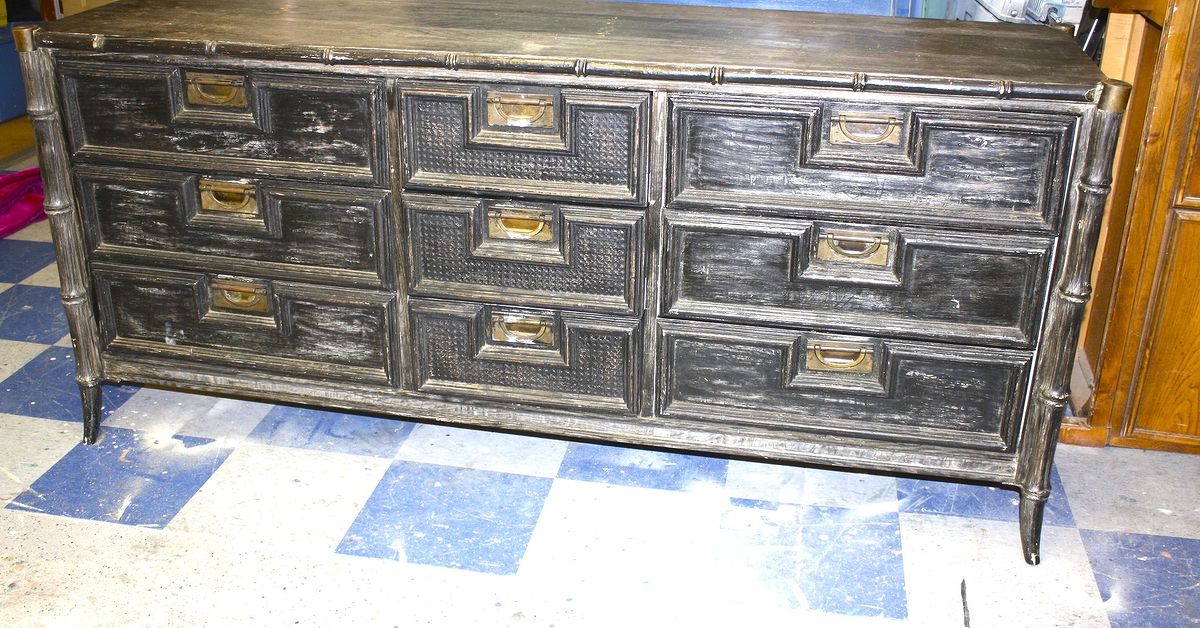
Some furniture makeovers begin with a charming flea-market find, a cup of coffee, and a pleasant Saturday afternoon. Others begin with chipped veneer, scratched finishes, mysterious construction materials, and a moment when you seriously consider introducing the dresser to a sledgehammer.
A vintage Stanley dresser can fall squarely into the second category.
Stanley Furniture has been producing furniture since 1924, and many older Stanley pieces have sturdy frames, handsome proportions, useful storage, and details worth preserving. But “well made” does not necessarily mean “solid hardwood everywhere.” Depending on the collection and era, a dresser may combine hardwood, veneer, engineered wood, particleboard, or other materials. That little discovery can turn a straightforward refinishing project into a DIY plot twist worthy of dramatic background music.
The good news? A horrendous Stanley dresser makeover can still end beautifully. The trick is to stop forcing the furniture to become what you imagined and start designing around what is actually underneath the finish.
Why Old Stanley Dressers Are Worth a Second Look
Before declaring an old dresser hopeless, consider its bones. Stanley Furniture began in Virginia in the 1920s and developed a reputation for bedroom and dining furniture with substantial construction and recognizable traditional and midcentury designs. Vintage Stanley dressers frequently appear on secondhand marketplaces because they were made in large enough numbers to survive decades of moves, decorating trends, teenagers, and questionable polishing products.
That durability makes them excellent candidates for furniture flipping or personal DIY projects. Even when the finish looks dated, the drawer layout, proportions, feet, molding, or original hardware may be considerably more interesting than what you will find on inexpensive new furniture.
The catch is that you need to investigate before grabbing the orbital sander like an enthusiastic lumberjack.
The Horrendous Discovery: It Is Not All Solid Wood
One of the most frustrating moments in a dresser makeover happens after sanding through a damaged veneer and discovering engineered material beneath it. Vintage Stanley makeover projects documented by experienced DIYers show exactly why this can happen: an attractive wood veneer may cover particleboard or another substrate in selected areas.
This matters because veneer and particleboard need different treatment than thick solid wood. Solid wood gives you considerably more freedom to sand aggressively. Veneer does not. Sand through a thin veneer layer and there is no magical walnut forest underneath waiting to congratulate you.
Particleboard creates another problem. Once exposed, it can absorb water, swell, become fuzzy, or crumble around damaged edges. Slapping water-based paint directly onto raw particleboard can make the surface worse instead of better.
How to Identify What You Are Working With
Before stripping the whole dresser, inspect several inconspicuous areas:
- Look at the back edges of the top and side panels.
- Check chipped corners for visible layers.
- Inspect unfinished areas inside the cabinet.
- Look underneath the dresser.
- Examine drawer sides, bottoms, and backs separately.
- Search for seams indicating veneer over a substrate.
Do not assume that because the drawer sides are beautiful hardwood, the dresser sides are too. Furniture manufacturers often use different materials in different structural locations.
A five-minute inspection can save five hours of sanding and approximately seventeen creative swear words.
Step 1: Decide What Actually Needs to Be Saved
A common mistake in furniture refinishing is treating every surface the same. Instead, divide the dresser into zones.
A good Stanley dresser makeover might preserve an attractive wood top, paint damaged sides, retain original drawer fronts, and add decorative trim to areas where the veneer cannot be restored economically.
This hybrid approach often looks more intentional than attempting to stain everything. If patches, filler, particleboard, or mismatched veneer are visible, transparent stain will politely highlight every flaw you hoped nobody would notice.
Ask These Questions First
- Is the existing veneer thick enough to sand safely?
- Are large sections missing or bubbling?
- Is the top attractive enough to keep natural?
- Will repaired areas accept stain evenly?
- Would paint create a cleaner overall design?
- Can molding or another architectural feature disguise damage?
The goal is not to prove how much suffering you can endure with sandpaper. The goal is to produce a dresser that looks great and remains functional.
Step 2: Remove the Hardware and Clean Everything
Take off pulls, knobs, handles, and removable decorative pieces before sanding or painting. Put screws and hardware in labeled bags unless you enjoy spending your Sunday crawling around a garage looking for one tiny brass screw.
Then clean the dresser thoroughly. Old bedroom furniture can accumulate furniture polish, hand oils, dust, wax, cleaning residue, and substances whose origins are best left unexplored.
Use a cleaner appropriate for the existing finish and allow the dresser to dry completely. Proper cleaning is important because sanding a greasy surface can simply grind contaminants deeper into it.
Step 3: Sand Strategically, Not Aggressively
Furniture preparation guidance from major paint and home-improvement specialists consistently emphasizes cleaning, repairing, sanding, dust removal, and appropriate priming as the foundation of a durable finish.
For painted surfaces that are structurally sound, you usually do not need to sand the dresser into another geological era. The goal may simply be to dull the existing glossy finish and provide mechanical adhesion for primer.
If you intend to stain exposed wood, however, the previous coating generally needs to be removed much more thoroughly so that stain can penetrate consistently.
A Practical Sanding Approach
Use coarser paper only where genuinely necessary. Progress toward finer grits as the surface improves. Flat surfaces can often be handled with an orbital sander, while curves, molding, corners, and veneer edges deserve careful hand sanding.
Most importantly, slow down near veneer. Once you sand through it, the project instantly acquires a new design direction whether you wanted one or not.
A Safety Note About Old Painted Furniture
If a dresser has unknown older layers of paint, avoid casually creating clouds of dust. EPA lead-safety guidance for older painted surfaces emphasizes minimizing dust, containing the work area, using appropriate protective equipment, and employing HEPA-equipped dust collection when lead may be present. Testing an unknown old coating before aggressive sanding is a sensible precaution.
Step 4: Repair the Damage Before Making It Pretty
Paint does not repair furniture. It simply makes broken furniture a different color.
Check the dresser for loose joints, damaged veneer, swollen substrate, cracks, missing corners, sticking drawers, and unstable feet before touching the decorative finish.
Loose Veneer
If the veneer remains intact but has lifted, adhesive and clamping may save it. Work carefully because old veneer can become brittle.
Missing Veneer
Small missing areas can sometimes be patched. Large damaged sections may be better painted or incorporated into a new decorative treatment rather than painstakingly recreated.
Exposed Particleboard
Allow swollen areas to dry completely. Carefully remove loose fibers without continuing to destroy the substrate. Seal porous exposed areas with a compatible sealing or bonding primer before applying a water-based decorative coating.
Drawer Problems
Repair drawer slides, stops, and joints while everything is disassembled. A gorgeous dresser with a drawer that requires two hands, one knee, and divine intervention to open is not a successful makeover.
Step 5: Use Design to Solve the Ugly Parts
This is where an unpleasant restoration problem can become the best part of the makeover.
When damaged or partially removed veneer makes a natural finish unrealistic, decorative molding can disguise the compromised surface while giving the dresser an intentional architectural style. Fluted or reeded treatments are especially effective because they introduce texture without looking like a desperate patch job.
Instead of thinking, “How do I hide this disaster?” think, “What detail would make this dresser look as though the redesign was planned from the beginning?”
The Fluted Dresser Makeover Strategy
Thin wood strips, half-round molding, pole-wrap-style material, or carefully spaced trim can create vertical fluting across drawer fronts, sides, or accent panels.
For a clean result:
- Measure the treatment area carefully.
- Lay out the spacing before applying adhesive.
- Cut several test pieces.
- Dry-fit an entire section.
- Attach the molding consistently.
- Fill obvious gaps where appropriate.
- Sand lightly.
- Prime before painting.
Repetition creates visual order. That is why fluting can make a troublesome old dresser suddenly look custom rather than rescued.
Step 6: Prime According to the Surface
Primer selection is not glamorous, but neither is watching your beautiful finish peel off six weeks later.
Bare wood, factory finishes, repaired areas, raw engineered material, and stain-prone woods may require different primer characteristics. Bonding primers are useful on slick surfaces, while stain-blocking primers can prevent discoloration from migrating through a lighter paint color.
If your dresser contains multiple materials, test the primer in an inconspicuous location first. Once dry, scratch the test area lightly to check adhesion before committing to the entire piece.
Step 7: Paint in Thin, Controlled Coats
The temptation to cover everything in one luxurious coat should be resisted. Thick paint takes longer to dry, can sag around molding, softens details, and is more likely to produce an amateur-looking surface.
Two or more thin coats generally create a cleaner result.
A small foam or microfiber roller works well on broad flat sections, while a high-quality synthetic brush can reach corners and detailed molding. Spraying can create an exceptionally smooth finish when you have the correct equipment, ventilation, protective gear, and a suitable work area.
Choosing a Color for a Stanley Dresser
Dark blue, charcoal, deep green, warm black, taupe, and muted earthy tones work particularly well with many vintage Stanley silhouettes. A stained wood top paired with a painted base creates contrast and preserves some of the original furniture character.
For midcentury forms, restrained colors usually let the geometry remain the star. For traditional Stanley pieces, deeper colors can make ornate molding feel sophisticated rather than dated.
Step 8: Do Not Underestimate the Hardware
Hardware is jewelry for furniture, except furniture does not complain when you tell it those earrings are from 1987.
Before replacing original Stanley hardware, clean one piece and see what you actually have. Decades of oxidation and grime can disguise surprisingly attractive brass or metal.
If the original pulls complement the new design, polishing or repainting them may preserve the dresser’s identity. If they clash badly with the redesign, new hardware can dramatically modernize the piece.
Check the Hole Spacing Before Shopping
Measure the distance between screw holes from center to center. Matching the existing spacing means you can swap pulls without filling and redrilling every drawer front.
If you are changing from two-hole handles to single knobs, plan the repair work before painting rather than discovering the issue while holding a brand-new $18 brass pull in one hand.
Step 9: Protect the Finish
A dresser gets touched constantly. Drawers open and close, keys land on top, lamps slide around, and somebody will eventually place a glass of water exactly where you hoped they would not.
Choose the protective finish according to the paint system and expected use. Some furniture paints are formulated to cure into a durable surface without a separate clear coat. Others benefit from a compatible water-based or oil-based protective finish.
When using a clear topcoat, thin applications typically produce better results than one heavy layer. Allow each coat to dry according to the manufacturer’s instructions, and lightly sand between coats when the product specifically recommends it.
Do not confuse “dry to the touch” with “fully cured.” A finish may feel dry quickly while remaining vulnerable to dents, blocking, scratches, or objects sticking to it for days.
Step 10: Reassemble and Check the Dresser for Safety
Once the finish has cured sufficiently, reinstall the drawers and hardware. Check that the dresser sits level and that drawers operate properly.
There is also one decidedly unglamorous finishing step: consider anchoring the dresser to the wall, especially in homes with children. The U.S. Consumer Product Safety Commission continues to warn about injuries and deaths caused by furniture tip-overs and recommends securing top-heavy furniture using appropriate anti-tip hardware.
A dresser makeover should result in furniture that is prettier, not furniture that becomes a stylish catapult.
What Makes This Stanley Dresser Makeover Work?
The best part of a difficult furniture transformation is rarely the paint color. It is the decision-making.
A failed restoration usually happens when the DIYer becomes emotionally committed to the original plan. Perhaps the plan was to expose natural walnut everywhere. Then the veneer disappears, particleboard appears, and the sensible strategy changes.
A strong makeover adapts.
Preserve attractive wood where it makes sense. Paint damaged sections that cannot be stained convincingly. Introduce fluted molding when it improves both texture and concealment. Reuse good original hardware. Repair function before decoration. Choose products based on the actual substrate rather than whatever happened to look impressive in a 30-second video.
That combination turns an ugly dresser into a genuinely custom piece.
Common Mistakes to Avoid
Assuming Vintage Means Solid Wood
Vintage furniture can contain excellent materials and craftsmanship while still using veneer or engineered substrates. Inspect first.
Sanding Veneer Like a Hardwood Floor
Veneer is thin. Aggressive sanding can destroy it quickly.
Painting Over Grease and Furniture Polish
Clean before sanding and painting. Surface contamination can cause adhesion problems.
Skipping Primer on Difficult Surfaces
Slick factory finishes, exposed particleboard, repaired areas, and stain-prone woods often deserve primer.
Using Thick Paint Coats
Several controlled coats typically look smoother and retain more detail.
Reassembling Too Soon
Fresh paint can feel dry long before it has developed its final hardness. Give the finish time to cure.
Real-World Experience: What a Horrendous Dresser Makeover Teaches You
The first lesson from tackling a Stanley dresser like this is that furniture refinishing rewards curiosity more than confidence. You can watch twenty tutorials and still encounter something completely unexpected the moment the sandpaper touches the side panel.
That happened with many vintage furniture projects where a surface looked like promising wood until sanding revealed veneer and, underneath it, particleboard. Your first reaction may be disappointment. Your second reaction may involve checking the price of replacement dressers online. Neither reaction needs to determine the final result.
Experience teaches you to stop after the first unpleasant discovery. Do not immediately sand the remaining three sides because “maybe those are different.” Investigate. Look underneath. Examine the drawer cavity. Study exposed edges. Figure out the furniture’s construction before continuing.
The next lesson is that preparation takes much longer than painting. Online makeover photos naturally emphasize the satisfying part: ugly dresser on Monday, magnificent dresser on Tuesday. Real projects include cleaning, disassembly, filling dents, waiting for repairs to dry, sanding filler, finding another dent, sanding that dent, vacuuming dust, discovering you forgot a corner, and questioning every life decision that led you into the garage.
That tedious work is also what makes the finished piece convincing.
Another useful lesson is to treat damage as a design prompt. A ruined side panel does not necessarily need an invisible repair. Sometimes making the repair decorative produces a better result. Fluted trim, contrasting paint, an intentionally stained top, or updated hardware can make the furniture more interesting than a perfectly restored version would have been.
There is also value in knowing when to stop. DIY refinishing can become obsessive. You notice a tiny brush mark. You sand it. Then the surrounding finish looks different. You repaint it. A speck of dust lands in the new coat. Three hours later, you are performing furniture microsurgery on a flaw nobody else will ever see.
A handmade furniture makeover should look polished, but it does not need to impersonate a factory robot. Small imperfections are acceptable when the overall finish is attractive, durable, and intentional.
Finally, a difficult Stanley dresser project makes you much better at shopping for your next piece. You start inspecting veneer edges. You test drawers. You look underneath. You recognize swollen particleboard. You check for odors, damaged joints, missing hardware, deep water stains, and complicated repairs before loading 180 pounds of furniture into the vehicle.
That experience may be worth more than the dresser itself.
And when the makeover is finished, the satisfaction is different from simply buying new furniture. You know why the side panel has fluting. You remember the afternoon the veneer betrayed you. You know which drawer required three adjustments. You remember polishing hardware that originally looked like it had survived an archaeological excavation.
The finished dresser becomes a record of problems solved.
That is why a horrendous Stanley dresser makeover can ultimately be more rewarding than an easy project. A flawless dresser only asks for a new color. A difficult dresser forces you to understand materials, revise the design, practice patience, and occasionally invent entirely new vocabulary while holding a sanding block.
Final Thoughts
The Horrendous Stanley Dresser Makeover is a perfect reminder that good furniture flipping is not about covering an old piece with trendy paint. It is about understanding what you have and choosing a transformation that respects both its strengths and its limitations.
Inspect the construction before sanding. Protect fragile veneer. Seal engineered wood appropriately. Repair structural problems first. Let paint solve surfaces that stain cannot. Use molding creatively when damage creates an opportunity. Upgrade or restore hardware thoughtfully. And give every coating enough time to cure.
The dresser that nearly made you reach for the sledgehammer may eventually become the piece everyone asks about.
Note: This article synthesizes documented Stanley dresser makeover experiences with refinishing and safety guidance from Stanley Furniture, the U.S. EPA, the U.S. Consumer Product Safety Commission, Sherwin-Williams, This Old House, Lowe’s, Better Homes & Gardens, Popular Mechanics, General Finishes, The Washington Post, Cuckoo4Design, Evolution of Style, Pretty Distressed, and A Ray of Sunlight. Product compatibility and furniture construction vary, so always test finishes in an inconspicuous area and follow the manufacturer’s current instructions.