Note: This original tutorial is written for web publication and synthesizes proven craft, framing, photo-editing, and traditional silhouette-making techniques into one beginner-friendly guide.
Introduction: The Little Black Shape That Steals the Room
A silhouette art picture is proof that you do not need a fine-art degree, a studio with skylights, or a mysterious French scarf to make something beautiful. Sometimes, all you need is a side-profile photo, black paper, a sharp pair of scissors, and enough patience not to accidentally give your child three noses.
Silhouette art has been loved for centuries because it is simple, dramatic, and surprisingly emotional. A tiny black profile can capture a child’s button nose, a pet’s floppy ears, a wedding pose, or a family memory with almost no detail at all. That is the magic: silhouette wall art says more by showing less.
This Silhouette Art Picture Tutorial walks you through several ways to create your own DIY silhouette portrait, from the classic cut-paper method to a modern photo-editing approach. You will learn how to choose the right picture, trace clean edges, cut smooth curves, mount your artwork, frame it, and fix common mistakes before they become the kind of “abstract expressionism” nobody asked for.
What Is Silhouette Art?
Silhouette art is a picture made from the outline of a subject, usually filled in as one solid color. Traditional silhouette portraits often show a person’s side profile in black against a white or light background. Modern versions can feature pets, botanicals, landscapes, family scenes, wedding portraits, children, homes, or even objects like bicycles and guitars.
The style works because the human eye loves shape. Even without eyes, hair texture, clothing details, or color, we can recognize a person by the slope of a forehead, the curve of a chin, or the angle of a ponytail. A good silhouette picture feels personal without being busy. It is clean, classic, and very forgiving if your drawing skills currently live somewhere between “stick figure” and “potato with legs.”
Materials You Will Need
Before you begin your DIY silhouette art project, gather your supplies. You can make this project with basic craft materials, or you can upgrade it with digital tools if you prefer a cleaner, printable finish.
Basic Craft Supplies
- Side-profile photo of your subject
- Printer paper
- Black cardstock or matte black paper
- White cardstock, watercolor paper, or colored background paper
- Pencil
- Sharp scissors
- Craft knife for small details
- Cutting mat
- Glue stick, spray adhesive, or acid-free craft glue
- Picture frame
- Optional: ruler, tweezers, bone folder, and tracing paper
Digital Option Supplies
- Smartphone or camera
- Free or paid editing software such as Canva, Photoshop, Lightroom, or a similar app
- Printer
- Matte photo paper or cardstock
- Frame or floating glass frame
If you are making silhouette art with kids, choose safety scissors and handle the craft knife yourself. Small curves around eyelashes, pet fur, or hair wisps are adorable, but not worth turning craft night into a tiny emergency room drama.
Step 1: Choose the Right Photo
The photo is the foundation of your silhouette art picture. A poor photo makes tracing harder, while a strong photo practically does half the work for you.
For a Human Portrait
Ask your subject to stand or sit sideways in front of a plain wall. Natural daylight works beautifully because it creates a clear outline without harsh shadows. The person should look straight ahead, not up, down, or toward the camera. Keep the mouth relaxed and closed unless you want the final silhouette to look like someone is mid-sneeze.
For children, take several photos quickly. Kids have a remarkable ability to move exactly when you say, “Hold still.” Try photographing them while they are watching a cartoon, looking out a window, or listening to a story. For babies, a sleeping profile can be charming and much easier to capture.
For a Pet Silhouette
Pet silhouettes are funny, sweet, and slightly chaoticjust like pets. Photograph your dog, cat, rabbit, or other animal from the side. Treats help. So does making a strange noise just far enough away that your pet turns its head without launching across the room like a furry missile.
Focus on the most recognizable details: a dog’s ear shape, a cat’s whisker line, a curled tail, or a proud little snout. You do not need every hair. In fact, too many tiny edges can make the finished silhouette look messy.
Step 2: Print and Resize the Image
Print your photo in the size you want the finished silhouette to be. For a standard 8×10 frame, a portrait that is 5 to 7 inches tall usually looks balanced. For a small gallery wall, try several silhouettes in matching sizes. For a dramatic statement piece, enlarge the profile and place it in a larger mat or frame.
If you are working digitally, adjust the contrast first so the outline is easy to see. You can convert the image to black and white, brighten the background, and darken the subject. This makes tracing much easier, especially around the nose, lips, chin, and hairline.
Step 3: Trace the Outline
Place tracing paper over the printed photo and carefully trace the outer edge of the subject. Do not trace every interior detail. Silhouette art depends on the outline, not the eyelashes, freckles, or the mystery cowlick that refuses to obey modern science.
Details Worth Keeping
- The bridge and tip of the nose
- The curve of the lips
- The shape of the chin and neck
- Distinctive hair shape
- Eyeglasses, if they define the profile
- Pet ears, tails, and snouts
Details to Simplify
- Loose flyaway hairs
- Busy clothing folds
- Small jewelry details
- Complicated background objects
- Messy fur edges
A clean silhouette is usually stronger than an overly detailed one. Think of it like editing a sentence: remove the clutter so the shape can speak clearly.
Step 4: Transfer the Shape to Black Paper
After tracing the outline, cut out the paper template. Flip it over before tracing it onto black cardstock. This step matters because pencil marks can stay on the back of the silhouette instead of showing on the front. It also keeps the final portrait facing the same direction as your original photo.
Use a light pencil line and trace slowly. If your subject has small details, such as a ponytail ribbon or a dog’s floppy ear, support the paper with your fingers so it does not shift. Black cardstock is ideal because it holds its shape, looks polished, and does not wrinkle as easily as thin construction paper.
Step 5: Cut the Silhouette
Now comes the slightly nerve-racking but oddly satisfying part: cutting. Use sharp scissors for the outer shape and a craft knife for tight spaces. Turn the paper as you cut instead of twisting your hand into a pretzel. Slow, smooth movements create cleaner curves.
Cutting Tips for a Professional Look
- Cut just outside the pencil line, then trim closer if needed.
- Use small snips around the nose and lips.
- For inside spaces, use a craft knife on a cutting mat.
- Do not panic over tiny mistakes; most vanish once mounted.
- Keep the scissors moving in long, confident curves where possible.
If a small piece tears, do not throw everything dramatically into the trash. You can usually fix it with a tiny dot of glue, a trimmed edge, or a fresh template. Crafting rewards calm people, but it also has mercy on the rest of us.
Step 6: Mount the Silhouette
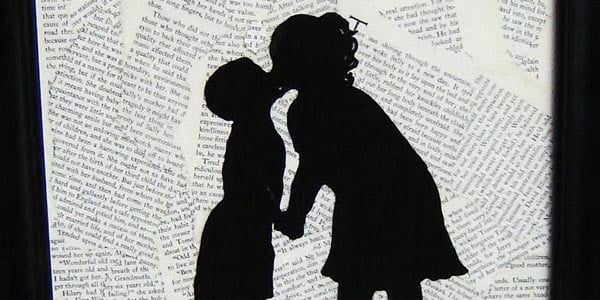
Choose a background that gives strong contrast. White cardstock is the classic choice, but cream, blush, pale blue, soft gray, kraft paper, or watercolor wash backgrounds can look beautiful. For a modern look, try white silhouette on black paper or gold silhouette on navy paper.
Position the silhouette before gluing. A centered profile is safe and timeless, but you can also place the face slightly off-center for a more editorial look. Leave breathing room around the head and shoulders. Crowding the frame makes the artwork feel cramped, like it is trying to escape.
Use acid-free glue if you want the piece to last. Apply adhesive lightly and evenly. Too much glue can ripple the paper. If using spray adhesive, work in a ventilated area and protect surrounding surfaces unless you want your table to become permanently “crafty.”
Step 7: Frame Your Silhouette Art Picture
The frame changes the whole mood of your silhouette picture. A thin black frame feels clean and modern. A gold frame gives it vintage charm. A natural wood frame makes it warm and casual. A floating glass frame can make the silhouette feel airy and contemporary.
For a family wall, you can use matching frames for a neat grid or mixed frames for a collected-over-time look. If you mix frames, keep one element consistent, such as color family, mat size, or artwork scale. That way the gallery wall feels intentional instead of “I found all these in a closet and hoped for the best.”
Digital Silhouette Art Picture Tutorial
If you prefer a crisp printable silhouette, the digital method is your friend. It is especially useful for people who want clean edges, repeatable designs, or the ability to resize the artwork for different frames.
Simple Digital Workflow
- Upload your side-profile photo into your editing app.
- Remove or brighten the background.
- Increase contrast so the subject stands out clearly.
- Use a brush, selection tool, or background remover to isolate the profile.
- Fill the profile shape with solid black.
- Clean the edges with an eraser or smoothing tool.
- Place the silhouette on a white or colored background.
- Download the final design as a high-resolution file.
- Print on matte paper or cardstock.
The digital method is fast, but do not skip edge cleanup. Automated background removers are helpful, but they sometimes nibble off hair, soften noses, or leave strange bits around the neck. Zoom in and refine the outline manually. The difference between “custom portrait” and “haunted sticker” is often five minutes of cleanup.
Creative Silhouette Art Ideas
Once you understand the basic process, silhouette art becomes wildly flexible. You can use it for home decor, gifts, party decorations, nursery art, wedding keepsakes, memorial pieces, and seasonal crafts.
Family Profile Gallery
Create one silhouette for each family member and frame them in matching sizes. Arrange them by age, height, or birth order. Add names and dates underneath for a keepsake that feels polished but personal.
Pet Portrait Silhouette
A pet silhouette is a wonderful gift for animal lovers. Try placing the pet’s name in small lettering below the image. For extra charm, use a colored background that matches the pet’s collar, favorite blanket, or general level of royal attitude.
Wedding or Anniversary Silhouette
Turn a couple’s profile into elegant wall art. Two faces looking toward each other can symbolize connection, while a single silhouette from a wedding photo can become a timeless anniversary gift.
Botanical Silhouette Picture
Leaves, flowers, branches, and herbs make beautiful silhouettes. Ferns, eucalyptus, lavender, roses, and wildflowers all have recognizable outlines. This is a great option if you want wall art that feels natural but not overly sweet.
Seasonal Silhouette Art
Try bats, cats, pumpkins, reindeer, trees, snowflakes, birds, or haunted houses for seasonal decorating. Silhouettes work especially well for Halloween because black shapes already have a spooky little personality.
Common Mistakes and How to Fix Them
The Silhouette Looks Unrecognizable
The photo probably was not a true side profile. Try again with the subject facing directly sideways. The nose, lips, forehead, and chin need to be clearly visible.
The Edges Look Ragged
Use sharper scissors, a fresh craft blade, or thicker paper. You can also smooth uneven areas by trimming very small amounts at a time.
The Paper Wrinkled After Gluing
You may have used too much glue. Try a glue stick, spray adhesive, or double-sided archival tape. Apply adhesive lightly and press the silhouette under a clean book while it dries.
The Artwork Looks Too Plain
Add a mat, use textured paper, try a colored background, or place the silhouette in a more interesting frame. Simple art often needs thoughtful presentation.
How to Make Your Silhouette Art Look Expensive
The secret to expensive-looking silhouette art is restraint. Use good paper, clean cuts, generous spacing, and a frame that suits the room. Avoid overly glossy paper unless you want a more modern printed look. Matte finishes usually feel more refined.
Scale also matters. A small silhouette in a large mat can look elegant and gallery-like. A large silhouette printed on textured paper can feel bold and contemporary. For a nursery or hallway, a set of three or four silhouettes creates rhythm and charm without overwhelming the wall.
Experience Notes: What Making Silhouette Art Teaches You
Making a silhouette art picture sounds simple, and technically it is. But the experience has a way of teaching you tiny lessons about looking closely. The first time you trace a profile, you notice details you usually miss: the little lift at the end of a nose, the soft dip above a lip, the stubborn curve of a cowlick, or the heroic shape of a dog’s ear. Suddenly, an ordinary photo becomes a map of personality.
One of the best things about this project is that it does not demand perfection. In fact, perfect can look oddly lifeless. A handmade silhouette should have a little warmth. A slightly uneven cut around the hairline or a tiny wobble near the shoulder can make the piece feel human. That is part of the charm. You are not manufacturing a logo; you are preserving a moment.
The project is also wonderfully budget-friendly. You can create a meaningful piece of wall art with paper, glue, and a thrifted frame. This makes it a great choice for handmade gifts. A grandparent may appreciate a child’s silhouette more than another store-bought candle, even if the candle claims to smell like “cozy moonlight.” A pet owner may tear up over a simple black profile of a beloved dog. A couple may love a wedding silhouette because it feels classic without being cheesy.
Another useful lesson is that framing matters more than most beginners expect. The same silhouette can look homemade in a flimsy plastic frame and boutique-worthy in a deep wood frame with a clean mat. Before deciding the artwork is not good enough, try changing the frame or background. Cream paper can soften the look. Black and white can make it crisp. A vintage gold frame can turn it into something that feels like it came from an old family hallway.
Silhouette art is also a great group activity, but it helps to prepare templates ahead of time. If you are crafting with children, let them choose background colors, decorate frames, or help glue the final shape. If they do the cutting, choose simple shapes like animals, leaves, or pumpkins. Detailed face profiles can frustrate younger kids, and nobody wants a craft table mutiny.
For digital makers, the experience is different but equally satisfying. Editing a photo into a silhouette teaches you how powerful contrast can be. You learn to simplify, remove visual noise, and focus on the strongest outline. This skill carries over into design, photography, branding, and even social media graphics. A clean shape reads quickly, which is why silhouettes are so effective as icons, logos, posters, and wall art.
The most important experience tip is to make more than one version. Try one black-on-white portrait, one colored background, and one oversized print. Compare them before framing. Silhouette art is quick enough that you can experiment without wasting a weekend. And if one attempt goes wrong, congratulationsyou have made a practice piece, which is much more elegant than calling it a disaster.
Conclusion: Simple Shape, Big Sentiment
A silhouette art picture is one of the easiest DIY projects that still feels personal, polished, and gift-worthy. Whether you cut it by hand or design it digitally, the process comes down to a few essential choices: start with a strong side-profile photo, simplify the outline, cut or edit cleanly, mount with care, and frame it beautifully.
The best part is that silhouette art never really goes out of style. It can look vintage, modern, playful, romantic, or dramatic depending on your materials and presentation. It works in nurseries, living rooms, hallways, offices, bedrooms, and gallery walls. It can honor a loved one, celebrate a pet, mark a wedding, or simply fill a blank wall with something more meaningful than another generic print of a fern wearing emotional support beige.
If you are new to crafting, start with one small portrait. If you are confident, create a full family collection or a themed silhouette wall. Either way, this tutorial gives you the steps to turn a simple outline into a piece of art that feels personal, timeless, and proudly handmade.