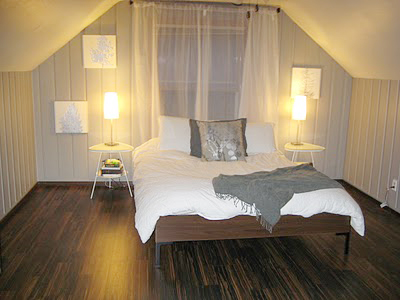
Painting over knotty pine paneling can t space without tearing walls apart or donating half your paycheck to drywall contractors. The secret is not simply “apply white paint and hope for the best.” Knotty pine has a personality. It has knots, resin, grooves, warm orange undertones, and a deep-rooted belief that it belongs in a 1970s rec room next to a mounted fish.
The good news is that pine paneling can look remarkably polished when it is prepared correctly. A successful master bedroom redo starts with cleaning, sanding, stain-blocking primer, and a design plan that makes the painted paneling look intentional rather than accidental. This guide walks through the full process, from inspecting old wall paneling to choosing colors, painting around knots, updating trim, and finishing the bedroom so it feels like a retreat instead of a time capsule.
Can You Paint Knotty Pine Paneling?
Yes, you can paint knotty pine paneling, and it is often far more affordable than removing it. Whether the room has solid pine tongue-and-groove boards, veneer paneling, or thin faux-wood sheets, paint can dramatically change the mood of the space.
However, knotty pine requires more preparation than a standard drywall wall. Pine knots may release resin or tannins over time, creating yellow-brown stains that can bleed through ordinary paint. If you skip proper primer, those cheerful little knots may reappear after all your hard work, like unwanted guests who brought snacks but refuse to leave.
The goal is to create a clean, durable painted surface while preserving the architectural texture of the paneling. Painted knotty pine can look cottage-inspired, Scandinavian, coastal, farmhouse, traditional, or even modern, depending on the color palette and surrounding furniture.
Before You Start: Identify the Type of Paneling
Solid Wood Knotty Pine
Solid knotty pine boards are common in older homes, cabins, and mid-century bedrooms. These boards usually have visible knots, tongue-and-groove seams, and a natural wood grain. They need stain-blocking primer because the knots and resin can discolor a painted finish.
Wood Veneer Paneling
Veneer paneling has a thin layer of wood over a manufactured backing. It may look like solid wood but can feel smoother and more uniform. Veneer can still be painted, but light sanding is important because aggressive sanding may damage the thin wood surface.
Laminate or Faux-Wood Paneling
Some wall panels are coated with a glossy printed surface rather than real wood. These need a high-adhesion bonding primer. Without it, paint may scratch, peel, or bubble faster than a cheap phone case in July.
Supplies for Painting Over Knotty Pine Paneling
- Drop cloths or canvas floor coverings
- Painter’s tape
- Degreaser or TSP substitute
- Bucket, sponge, microfiber cloths, and clean water
- 150- to 220-grit sanding sponges or sandpaper
- Vacuum with a brush attachment
- Paintable caulk
- Wood filler for nail holes, dents, and damaged areas
- Stain-blocking primer for knots and wood tannins
- Bonding primer if the surface is glossy or laminate
- Quality angled brush
- Mini roller for grooves and trim areas
- 3/8-inch nap roller for most wall paneling
- Interior wall paint in your preferred sheen
For a master bedroom, a washable eggshell or satin finish is usually a smart choice. Flat paint hides imperfections well, but it can be harder to clean. Satin has a soft glow and holds up well on textured paneling, though it may reveal sloppy prep work. In other words, satin paint is supportive, but it does not lie.
Step 1: Empty the Room and Protect Everything
Move furniture out whenever possible. If a large bed frame or dresser must stay in the room, place it in the center and cover it completely with plastic sheeting or drop cloths. Remove outlet covers, switch plates, curtain hardware, artwork, and wall-mounted accessories.
Protect the floor with canvas drop cloths. Plastic drop cloths are useful under furniture, but they can be slippery underfoot. Nobody wants a master bedroom renovation to end with a surprise ice-skating routine.
Step 2: Clean the Paneling Thoroughly
Old pine paneling can hold years of dust, furniture polish, smoke residue, skin oils, and mystery grime. Paint does not bond well to dirt, wax, or greasy residue, so cleaning is not optional.
Wash the walls with a degreaser or TSP substitute according to the product instructions. Pay extra attention to areas near light switches, headboards, windows, and corners. Rinse with clean water if required, then allow the paneling to dry completely.
Inspect the walls for moisture stains, mildew, soft wood, or loose boards. Painting over a moisture problem only gives the problem a fresh outfit. Repair leaks, address mold, and allow the wall to dry before priming.
Step 3: Sand for Adhesion, Not for a Lumberyard Makeover
You do not need to sand all the way down to bare wood. The purpose of sanding is to dull the glossy finish and give primer something to grip. Use a sanding sponge or 180- to 220-grit sandpaper and work steadily across the paneling.
Focus on shiny varnished areas, rough spots, peeling finish, and visible drips from older paint jobs. Avoid pressing too hard on veneer panels. If the room has deep grooves, run the sanding sponge gently along the edges and raised sections.
After sanding, vacuum the walls carefully. Follow with a slightly damp microfiber cloth or tack cloth to remove fine dust. Primer applied over sanding dust is basically paint trying to build a house on beach sand.
Step 4: Fill Holes and Caulk Select Gaps
Fill nail holes, dents, and small cracks with wood filler. Once dry, sand those patches smooth. Use paintable acrylic caulk around trim, at outside corners, and in obvious gaps where the paneling meets baseboards or window trim.
Do not automatically fill every panel groove. The seams between tongue-and-groove boards are part of the character of knotty pine. Leaving them visible creates texture and dimension after painting. Filling every groove can make the wall look uneven unless you are prepared for a much larger skim-coating project.
When Should You Fill the Grooves?
Fill or minimize grooves only if you want a smoother, drywall-like appearance and are willing to do additional labor. This may involve caulk, joint compound, sanding, priming, and repeat applications. For most bedroom makeovers, embracing the panel lines is easier, less expensive, and more visually interesting.
Step 5: Prime the Knots and Paneling Correctly
This is the step that determines whether your painted pine paneling looks fresh for years or starts showing yellow knot stains before you finish choosing throw pillows.
For real knotty pine, use a stain-blocking primer designed to seal knots, tannins, and resin bleed. Shellac-based and oil-based stain-blocking primers are often the strongest choices for stubborn knots and smoke stains. Water-based stain-blocking primers can work well for lighter stains and may offer easier cleanup, but heavily resinous knots sometimes need a more powerful sealer.
A practical approach is to spot-prime every knot first, then prime the entire wall. If the paneling is very orange, dark, smoky, or heavily stained, apply two primer coats across the full surface.
Brush First, Then Roll
Use an angled brush to push primer into grooves, around knots, and along trim. Follow with a roller on the flat panel faces. This method gives better coverage than trying to force a roller into every recessed line. Work in manageable sections and maintain a wet edge to reduce lap marks.
Allow primer to dry according to the label. If the surface feels rough after priming, lightly sand with a fine sanding sponge, then remove dust before painting.
Step 6: Choose a Paint Color for a Master Bedroom Redo
The right paint color can make painted knotty pine paneling feel like a deliberate design feature. Before choosing a color, look at the natural light, ceiling height, flooring, bedding, and furniture you plan to keep.
Soft White for a Bright, Timeless Bedroom
Warm white, creamy white, and soft ivory shades brighten a dark bedroom while keeping the paneling texture visible. Avoid ultra-blue whites if the room has warm floors or beige carpet, unless you are going for a crisp modern contrast.
Muted Green for a Calm, Nature-Inspired Look
Sage green, muted olive, and gray-green tones pair beautifully with pine texture. These shades work especially well with linen bedding, black metal accents, oak furniture, and woven rugs.
Warm Greige for a Flexible Neutral Background
Greige offers more warmth than cool gray and more depth than plain beige. It is a useful choice for homeowners who want a modern bedroom without making it feel like a dentist’s waiting room.
Deep Blue or Charcoal for a Cozy Retreat
Dark paneling can create a moody, hotel-style bedroom. Navy, deep slate, charcoal, and forest green work best in rooms with adequate lighting, bright bedding, and enough contrast in the trim or furniture.
Step 7: Paint the Paneling With Two Finish Coats
Once the primer is fully dry, apply the first coat of interior paint. Cut in around ceilings, windows, doors, and baseboards with a brush. Paint the grooves and knots first, then roll the larger flat areas.
Use long, even roller strokes and avoid overworking the paint. A roller that is too dry can leave thin coverage and a rough texture. A roller overloaded with paint can create drips in the grooves. The ideal roller is like a good houseguest: helpful, quiet, and not dripping all over the furniture.
Let the first coat dry fully, then inspect the walls in both daylight and evening light. Apply a second coat for even coverage and a richer finish. Deep colors, major color changes, and heavily textured paneling may require a third coat in certain spots.
Complete the Master Bedroom Redo
Painting the paneling changes the room, but the full transformation happens when the rest of the bedroom supports the new look. A few targeted updates can make the room feel professionally designed without requiring a total furniture replacement.
Update the Trim and Ceiling
Painting trim a clean white or soft contrasting neutral can sharpen the room immediately. If the ceiling is dingy or yellowed, repaint it in a ceiling white or a lighter version of the wall color. Fresh ceiling paint often makes a bedroom feel taller and cleaner.
Improve Lighting
Replace dated ceiling fixtures, dusty fan shades, or mismatched lamps. Add bedside lighting with warm bulbs for a softer evening mood. Layered light matters: one overhead fixture is useful, but it should not be the only source unless you enjoy getting ready for bed under the emotional atmosphere of a grocery store aisle.
Choose Bedding That Adds Contrast
Use bedding to balance the painted paneling. White linen, textured quilts, earthy throws, and neutral pillows work beautifully with painted pine walls. In a darker room, bright bedding keeps the space from feeling heavy. In a light room, darker blankets or patterned pillows add visual depth.
Anchor the Space With a Rug
An area rug softens the room and helps define the bed zone. Choose a rug large enough to extend beyond both sides of the bed. Tiny rugs beside a king bed tend to look like they are trying very hard but were not given enough budget.
Use Fewer, Better Accessories
Once the walls are painted, avoid filling every surface with decor. A large framed print, a statement mirror, two coordinated bedside lamps, and one or two personal objects can look more intentional than twenty small items competing for attention.
Common Mistakes When Painting Knotty Pine Paneling
- Skipping cleaning: Paint may peel or fail to adhere over furniture polish, wax, oils, or grime.
- Using ordinary primer only: Knots and tannins can bleed through the topcoat.
- Failing to scuff-sand glossy paneling: Primer may not bond securely to a slick finish.
- Painting before moisture problems are fixed: Peeling paint and stains can return quickly.
- Forgetting to test colors: A color that looks perfect online may look completely different beside warm flooring and low bedroom light.
- Rushing dry times: Primer and paint need time to cure properly. The wall is not being dramatic; it genuinely needs a break.
- Trying to make paneling look exactly like drywall: Painted paneling can look beautiful, but it is still paneling. Let its texture work for you.
Experience-Based Lessons From a Knotty Pine Bedroom Makeover
A knotty pine bedroom redo often begins with hesitation. Homeowners see dark walls, orange-toned wood, and a room that feels smaller than it actually is. The first instinct is usually demolition: remove every board, replace everything with drywall, and pretend the pine era never happened. But once people see how much texture and warmth painted paneling can offer, the project starts to feel less like a rescue mission and more like an opportunity.
One of the most common lessons is that preparation takes longer than painting. Cleaning, patching, sanding, priming, and taping may consume most of the project time, while the finish coats can feel surprisingly quick. That is not a sign that the project is moving slowly. It is a sign that the work is being done in the correct order. A bedroom wall that looks smooth and durable after painting is usually the result of boring preparation done well.
Another recurring experience is underestimating the knots. At first, a knot may appear harmless beneath one coat of primer. Then, after a day or two, it begins to show a faint yellow or amber shadow. This is why spot-priming knots and using a high-quality stain blocker is worth the extra effort. It is much easier to seal the problem before topcoats go on than to repaint an entire wall after the knots decide to stage a comeback tour.
Color selection also becomes more important than expected. Many people choose bright white because it seems safe, only to discover that a stark white can feel cold under warm bedroom lighting. Softer whites, warm neutrals, muted greens, and dusty blues often make painted pine look more refined. Testing large sample boards or painted poster sheets in morning, afternoon, and nighttime lighting can prevent expensive surprises.
Finally, the biggest transformation usually does not come from paint alone. It comes from the combination of painted walls, cleaner trim, updated lighting, better bedding, and less visual clutter. The room begins to feel larger because the dark wood is no longer dominating every surface. The grooves still add dimension, but they become background texture instead of the main event. That is the beauty of a painted knotty pine bedroom: it does not erase the room’s history. It simply gives that history a better color palette and a much nicer place to sleep.