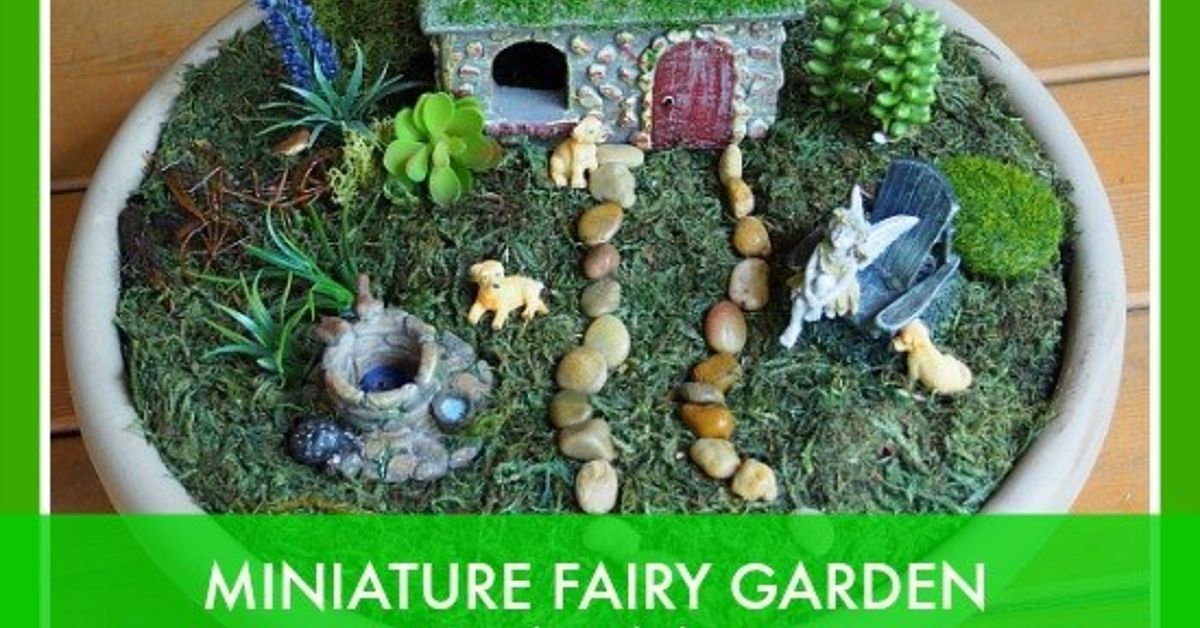
A miniature fairy garden in a planter is what happens when gardening, storytelling, and “I saved this tiny chair for a reason” finally meet for coffee. It is a small-scale landscape built inside a pot, bowl, trough, broken terra-cotta planter, basket, or any container with enough room for soil, plants, and a little imagination. The result can live on a patio, balcony, porch, windowsill, garden table, or shady backyard corner, bringing instant charm without requiring a full-size landscaping crew or a mortgage-sized budget.
The best part? A planter fairy garden is flexible. You can make it lush and woodland-like with mossy groundcovers, tiny ferns, and twig fences. You can build a sunny succulent village with pebbles, mini stepping stones, and a cottage so small it looks like it pays rent in acorns. You can even design a beach-themed fairy garden with shells, sand-colored gravel, and a driftwood bench for fairies who are clearly on vacation.
But a beautiful miniature fairy garden is not just decoration tossed into dirt. The planter needs drainage, the plants need similar light and water requirements, and the design needs enough open space so the scene looks magical rather than like a garden gnome yard sale. This guide walks you through how to choose the right planter, select miniature plants, arrange accessories, care for your little landscape, and avoid the common mistakes that turn fairy gardens into soggy fairy swamps.
What Is a Miniature Fairy Garden in a Planter?
A miniature fairy garden in a planter is a tiny decorative garden designed around a story. It usually combines small plants, miniature furniture, stones, moss, figurines, tiny houses, pathways, fences, and natural accents. Unlike a regular container garden that focuses mainly on plant display, a fairy garden creates a complete scene. Think of it as a living diorama with roots.
The planter is the stage. The plants become trees, shrubs, lawns, meadows, or forests. Pebbles become paths. A broken pot shard becomes a staircase. A twig becomes a rustic bridge. A small ceramic mushroom becomes, naturally, the town mayor.
This type of mini garden works especially well for small spaces because it delivers the feeling of a landscape without requiring an actual yard. Apartment dwellers, patio gardeners, parents looking for kid-friendly crafts, and anyone with a weakness for tiny doors can enjoy the project. It is creative, low-pressure, and endlessly customizable.
Why Use a Planter for a Fairy Garden?
Building a fairy garden in a planter gives you control. You control the soil, drainage, location, sunlight, plant choices, and overall size. If your fairy kingdom is getting too much afternoon sun, you can move it. If a storm is coming, you can carry it under cover. If winter is on the way, you can bring delicate accessories indoors before they begin looking like they survived a tiny natural disaster.
Planters also make maintenance easier. Weeds are fewer, soil stays contained, and the entire design remains at a comfortable working height. This is helpful for children, older gardeners, and anyone who enjoys gardening but does not enjoy kneeling in mulch while questioning life choices.
Choosing the Best Planter
Pick a Container With Drainage
The first rule of a healthy miniature fairy garden is simple: choose a planter with drainage holes. Plants in containers need oxygen around their roots, and excess water must be able to escape. Without drainage, water collects at the bottom, the potting mix stays soggy, and roots may rot. Fairies are whimsical, but they are not fond of basement flooding.
Terra-cotta pots, shallow bowls with drainage, wooden boxes, ceramic planters, metal tubs, and recycled containers can all work. If the container does not have holes, drill them if the material allows. For decorative containers that cannot be drilled, place plants in smaller nursery pots inside the outer container and remove them for watering.
Consider Size and Depth
A planter that is 10 to 18 inches wide is a comfortable starting size. It gives you room for a small focal point, a few plants, a path, and accessories without becoming difficult to move. A shallow dish can work for succulents, while ferns, herbs, and moisture-loving plants usually appreciate a little more root space.
Large planters allow more elaborate scenes, such as a cottage garden, fairy village, woodland trail, or multi-level broken pot design. Small planters are perfect for a single fairy house with one or two plants. The key is proportion. A huge fairy house in a tiny pot looks less enchanted cottage and more “real estate development gone wrong.”
Match the Planter to the Theme
The container itself can support the story. A weathered wooden box suggests a forest cabin. A blue ceramic bowl makes a sweet pond-side scene. A broken terra-cotta pot creates natural terraces and staircases. A vintage metal wash tub feels rustic and old-fashioned. A shallow modern planter can become a minimalist succulent fairy garden with clean lines and gravel paths.
Use the Right Soil
For most planter fairy gardens, use a high-quality potting mix rather than garden soil. Garden soil can become heavy and compacted in containers, limiting airflow and drainage. A lightweight potting mix holds moisture while still allowing oxygen to reach roots.
If you are planting succulents or cacti, use a cactus and succulent mix or improve drainage with mineral materials such as coarse sand, pumice, or perlite. Succulents dislike sitting in wet soil, and in a fairy garden they are often planted close together, so drainage matters even more.
For moisture-loving miniature plants such as baby tears, spike moss, dwarf ferns, or small tropical foliage plants, choose a potting mix that holds consistent moisture but still drains freely. The goal is “pleasantly damp,” not “enchanted bog.”
Best Plants for a Miniature Fairy Garden in a Planter
Plant selection determines whether your miniature fairy garden stays charming or turns into a jungle where the fairy cottage disappears by Tuesday. Choose slow-growing, compact plants that match the scale of the design and share similar needs for water and light.
Good Plants for Sunny Planters
For bright outdoor planters, succulents are popular because they stay compact, offer sculptural shapes, and tolerate dry conditions. Sedum, echeveria, hens and chicks, baby jade, and small crassula varieties can look like miniature shrubs or alien trees in the best possible way. Elfin thyme, creeping thyme, dwarf yarrow, thrift, and small-leaved herbs can also work in sunny fairy gardens with good drainage.
Good Plants for Shady or Indoor Planters
For indoor or shady fairy gardens, consider baby tears, spike moss, miniature ferns, dwarf umbrella plant, polka-dot plant, peperomia, miniature creeping fig, small-leaved ivy, and compact pilea. These plants add fine texture and a lush woodland feel. Many prefer bright indirect light rather than harsh direct sun.
Match Plants by Care Needs
Do not mix a cactus with baby tears unless you enjoy creating plant drama. Succulents prefer dry, bright conditions. Mossy tropical plants prefer more moisture and indirect light. Combining them in one planter makes watering nearly impossible because one plant is asking for a spa day while the other is filing a complaint about humidity.
A better approach is to choose one care style for the entire planter: sunny and dry, bright and moderately moist, or shady and humid. Your plants will last longer, and maintenance will be far easier.
Designing the Layout
Start With a Focal Point
Every miniature fairy garden needs a focal point. This might be a fairy house, a tiny bench, a miniature pond, a small arbor, a doorway tucked against a rock, or a dramatic plant shaped like a tree. Place the focal point slightly off-center for a more natural look.
Once the focal point is in place, build the rest of the scene around it. A path can lead to the house. A taller plant can stand behind it like a tree. Moss or groundcover can soften the front. Pebbles can define a patio. The design should guide the eye through the planter like a tiny walking tour.
Create Zones
Even in a small container, zones make the garden feel larger. You might create a cottage area, a woodland corner, a pebble path, and a sitting spot. In a round planter, arrange the scene so it looks good from multiple angles. In a rectangular planter, design it like a landscape viewed from the front.
Leave Breathing Room
One of the most common mistakes in a fairy garden planter is overcrowding. Tiny accessories are adorable, which is exactly how people end up with seven mushrooms, four benches, three fairies, a wheelbarrow, a mailbox, a bridge, a pond, and a dragon in a pot the size of a cereal bowl.
Use fewer pieces and let each one matter. Empty space makes the garden look intentional. A simple pebble path and one tiny door can be more magical than a cluttered miniature amusement park.
Step-by-Step: How to Make a Miniature Fairy Garden in a Planter
Step 1: Gather Supplies
You will need a planter with drainage holes, potting mix, small plants, miniature accessories, pebbles or gravel, moss or mulch, a small trowel, and water. Optional supplies include activated charcoal for enclosed terrarium-style containers, landscape fabric or a coffee filter to cover drainage holes, and natural materials such as bark, twigs, seedpods, shells, or stones.
Step 2: Prepare the Planter
Clean the planter if it has been used before. Cover the drainage holes with a coffee filter, mesh, or a small piece of screen to keep soil from washing out while still allowing water to drain. Add potting mix, leaving about an inch of space below the rim so watering does not cause a mudslide worthy of fairy news coverage.
Step 3: Place the Main Features
Before planting, set the fairy house, stones, steps, and large accessories on top of the soil. Move them around until the layout feels balanced. Planning first prevents the classic mistake of planting everything beautifully and then realizing the fairy house only fits sideways.
Step 4: Add Plants
Plant the tallest or most tree-like plant first, usually toward the back or side. Add lower plants next, then groundcovers or trailing plants near the front edge. Firm the potting mix gently around roots, but do not pack it tightly. Roots need air as much as they need moisture.
Step 5: Build Paths and Ground Cover
Add tiny gravel, pea pebbles, crushed shells, sand, or flat stones to create paths and patios. Moss can cover bare soil in woodland designs, while decorative gravel works beautifully in succulent fairy gardens. Use curved paths to make the planter feel deeper and more natural.
Step 6: Add Accessories Last
Place miniature furniture, signs, fairies, animals, lanterns, fences, and other details after watering and settling the plants. This keeps accessories cleaner and helps you avoid burying a tiny teacup under potting mix. Press items lightly into the soil so they stay in place.
Creative Theme Ideas
Woodland Fairy Cottage
Use a shallow terra-cotta or wooden planter, mossy groundcover, dwarf ferns, a bark-roof cottage, twig fencing, and pebble paths. Add a tiny bench under a small-leaved plant to create the look of a shaded forest retreat.
Succulent Desert Fairy Garden
Use a wide, shallow planter with cactus mix, small succulents, gravel, sand-colored stones, and a miniature adobe-style house. This design is low-maintenance and great for sunny patios or bright windowsills.
Broken Pot Fairy Garden
A broken terra-cotta pot can be turned into a terraced fairy garden. Use large shards as retaining walls and smaller pieces as steps. Add succulents or small trailing plants to each level, then finish with a tiny house at the top like a very exclusive hilltop property.
Tea Cup or Bowl Fairy Garden
For a tiny indoor version, use a teacup, small bowl, or mug with drainage handled carefully. Because many cups do not have holes, it is safest to keep plants in small inner pots or use faux plants if the container cannot drain. This style is charming on desks, shelves, or windowsills.
Watering and Maintenance
Container gardens dry out faster than in-ground gardens, so check moisture regularly. Outdoor fairy gardens may need frequent watering in hot weather, while indoor planters usually need less. Instead of watering on a strict schedule, test the soil with your finger.
For most foliage plants, water when the top inch of soil feels dry. Water thoroughly until excess drains from the bottom, then empty the saucer so the planter does not sit in water. For succulents, allow the mix to dry out more completely between waterings.
Trim plants lightly to maintain scale. Pinch back fast growers, remove yellow leaves, and replace plants that outgrow the scene. Clean accessories occasionally with a soft brush or damp cloth. If the garden is outdoors, bring delicate pieces inside during heavy rain, freezing weather, or intense sun.
Common Mistakes to Avoid
No Drainage
A planter without drainage is the fastest route to root rot. Decorative containers are tempting, but healthy roots need an escape route for excess water.
Wrong Soil
Heavy garden soil can compact in pots. Use potting mix for most fairy gardens and cactus mix for succulent designs.
Mixed Plant Needs
Plants in the same planter should enjoy similar light and water. Pair succulents with succulents, moist tropicals with moist tropicals, and shade plants with shade plants.
Too Many Accessories
Miniatures are addictive. Use restraint. Let the plants and scene breathe.
Ignoring Mature Size
A plant that looks tiny at the nursery may grow quickly. Choose compact varieties and be ready to prune or replace them.
Experience Notes: What Building a Planter Fairy Garden Teaches You
Making a miniature fairy garden in a planter teaches patience in the funniest way. At first, you think the hardest part will be choosing plants. Then you discover the true challenge is deciding whether the tiny bench should face the pebble path or the mushroom. This is the kind of decision that sounds ridiculous until you are twenty minutes deep into it, holding tweezers, whispering, “No, the fairy needs a better view.”
One of the most useful experiences is learning that scale matters more than quantity. A beginner often wants to include every cute accessory in the package. The planter quickly becomes crowded, and the story disappears. A better design usually happens when you remove half the decorations and let one path, one house, and a few well-placed plants do the work. The garden suddenly looks peaceful instead of like a fairy flea market.
You also learn that plants are living design partners, not plastic props. A tiny fern may unfurl beautifully and become the perfect woodland tree. A succulent may lean toward the light and change the shape of the scene. A groundcover may creep across the path and make everything look older and more natural. That slow change is part of the charm. The garden becomes better when it is allowed to grow, shift, and settle.
Watering is another lesson. Many people overwater because the planter is small and feels delicate. But small does not always mean thirsty. Succulent fairy gardens often prefer to dry out, while mossy or tropical designs may need steadier moisture. The best habit is to check the soil before watering. Your finger is often a better tool than a calendar.
Outdoor planter fairy gardens teach you about weather. Rain can wash gravel into the path, wind can knock over a miniature sign, and full afternoon sun can stress plants that looked perfectly happy in morning light. After a few weeks, you start placing the planter more thoughtfully. A bright porch with morning sun, a shaded patio table, or a protected balcony corner can make the whole garden easier to maintain.
Another practical experience is discovering the value of natural materials. Store-bought miniatures are fun, but twigs, bark, seedpods, pebbles, shells, and broken pot pieces often look more believable. A twig fence has character. A flat stone makes a convincing patio. Bark can become a roof, a bridge, or a tiny wall. The more natural the materials, the more the fairy garden feels like it belongs in the planter.
Finally, a miniature fairy garden reminds you that gardening does not have to be serious to be meaningful. It can be playful, small, experimental, and a little silly. It can be a weekend project with kids, a quiet creative break, or a decorative piece that makes guests stop and smile. In a world full of large tasks, a tiny garden is surprisingly satisfying. It gives you a whole landscape you can hold in your hands, and that is a kind of magic even the most practical gardener can appreciate.
Conclusion
A miniature fairy garden in a planter is one of the easiest ways to combine container gardening with creative storytelling. With the right planter, proper drainage, suitable potting mix, compact plants, and a balanced design, you can create a tiny world that thrives on a porch, patio, balcony, or windowsill. Whether you choose a mossy woodland cottage, a sunny succulent village, a broken pot staircase, or a teacup-sized indoor scene, the secret is simple: match the plants to the conditions, keep the design uncluttered, and let the story guide the details.
This little garden does not need to be perfect. In fact, the best fairy gardens often look slightly wild, as if the fairies moved in overnight and immediately started landscaping without a permit. Give the plants room to grow, adjust the accessories as the seasons change, and enjoy the small surprises. A planter fairy garden may be miniature, but the joy it brings is delightfully full-size.