An IKEA Expedit bookcase is practical, sturdy, and exceptionally good at holding everything from novels to baskets of objects nobody remembers buying. What it may lack is the warmth and character of real wood. Fortunately, you do not need to replace a perfectly useful cube shelf just because its factory finish feels a little too “college apartment circa Tuesday.”
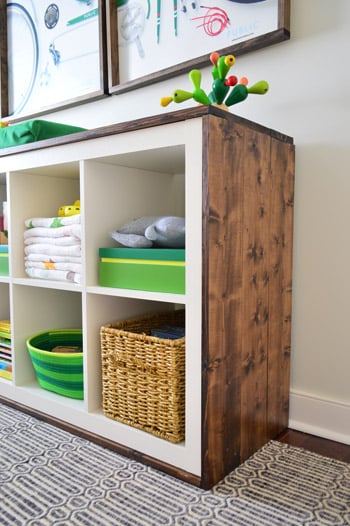
Wrapping an IKEA Expedit with wood means adding stained or clear-finished boards around its outer frame. The transformation is surprisingly dramatic: the white or dark laminate remains visible inside the cubes, while the new wooden shell creates a custom waterfall effect. The finished piece can function as a console, media stand, toy organizer, low bookcase, or handsome storage cabinet.
Important note: IKEA discontinued the Expedit and replaced it with the similar Kallax series. The same general method works for either model, but their dimensions and internal construction can differ. Measure your actual shelf instead of borrowing measurements from a photograph and hoping the woodworking universe feels generous.
Choose the Style of Your Wood Wrap
Before buying lumber, decide how much of the bookcase you want to cover. The most popular design wraps the top, both sides, and bottom, leaving the cube openings untouched. This creates a continuous wooden frame without interfering with Expedit inserts, baskets, or doors.
Solid boards
Joining several 1-by-6 boards produces a substantial, furniture-like surround. Three nominal 1-by-6 boards placed side by side create a panel about 16 1/2 inches deep because each board is actually approximately 5 1/2 inches wide. That generally provides enough material to cover the depth of an Expedit, with a small overhang that can be trimmed or incorporated into the design.
Pine and whitewood are affordable, easy to cut, and receptive to stain, although they dent more easily than hardwood. Poplar offers a smoother painted finish, while oak creates a stronger grain pattern and a higher material bill. Hardwood veneer plywood is another stable option, especially if you prefer one continuous surface instead of visible plank seams.
Appearance panels
Edge-glued appearance boards are sold in wider panels and require less assembly. A panel approximately 16 inches wide may cover the entire depth of the shelf with only a small amount of ripping. They cost more than basic lumber, but they eliminate the need to join three narrow boards. For a beginner without a pocket-hole jig, that trade can preserve both time and vocabulary.
Thin plywood or veneer
Quarter-inch plywood keeps the makeover lighter and changes the bookcase dimensions less dramatically. Cover exposed plywood edges with iron-on wood veneer banding for a finished appearance. Veneer is the thinnest option, but applying a large sheet smoothly requires careful adhesive work and firm, even pressure. It is less forgiving than attaching a solid panel.
Tools and Materials
- IKEA Expedit or Kallax shelf unit
- Solid lumber, appearance panels, or furniture-grade plywood
- Tape measure, pencil, and combination square
- Circular saw with a straightedge, table saw, or miter saw
- Pocket-hole jig and correctly sized screws, if joining narrow boards
- Orbital sander or sanding block
- 120-, 180-, and 220-grit sandpaper
- Pre-stain wood conditioner, if appropriate for the wood
- Wood stain or paint
- Clear protective topcoat
- Adhesive rated for wood-to-laminate or wood-to-melamine bonding
- Clamps, weights, or ratchet straps
- Optional brad nailer and carefully selected brads
- Wood filler, clean rags, gloves, eye protection, and dust mask
How To Wrap an IKEA Expedit Bookcase With Wood
1. Inspect and prepare the bookcase
Empty the Expedit and check that all fasteners are tight. Repair loose joints before adding wood because the wrap is decorative; it should not be expected to rescue a structurally failing shelf. Remove dust, wax, grease, and furniture polish from the exterior.
Keep the unit in its recommended orientation. The outer members of Expedit and Kallax shelves may contain particleboard, fiberboard, edging, and lightweight honeycomb-style filling rather than solid lumber. Current IKEA material information confirms that similar Kallax components use engineered panels and paper filling. Do not assume that every spot can securely hold a long screw or nail.
2. Measure every surface separately
Measure the width, height, and depth in several places. Older furniture may not be perfectly square, particularly after surviving a move involving stairs, a hatchback, and one overly optimistic friend.
For a waterfall-style surround, the top and bottom panels can extend across the original width plus the thickness of both side panels. If each side panel is 3/4 inch thick, add approximately 1 1/2 inches to the bookcase width. The side panels then fit between or beneath those horizontal panels, depending on your chosen joint layout.
Write a cutting list before touching the saw. Label every part as top, left, right, or bottom. Decide whether the front edges will sit flush with the Expedit or overhang slightly. If the shelf will remain open at the back, aligning the wrap with the front generally produces the cleanest appearance.
3. Acclimate and arrange the lumber
Allow solid wood to acclimate indoors before cutting and assembly. Wood responds to humidity, while engineered shelf panels move much less. Beginning with reasonably acclimated boards reduces the chance of later cupping, opening seams, or creating a top that resembles a gentle ski slope.
Lay all boards on a flat surface and arrange them for the best grain pattern. Alternate or coordinate the growth-ring direction when possible. Mark a large triangle across each completed arrangement so the boards remain in the intended order.
4. Join narrow boards into panels
If you are using three 1-by-6 boards per surface, join them before installation. Pocket-hole joinery is a convenient option: drill holes into the hidden face, apply a thin layer of wood glue to the mating edges, clamp the faces flush, and drive screws appropriate for the lumber thickness. Official pocket-hole guidance recommends setting the jig for the actual material thickness and using coarse-thread screws for softwood.
You can also edge-glue the boards with long clamps and cauls. Use enough pressure to close the joints, but not so much that the boards bow or squeeze out nearly all the adhesive. Let the panels cure fully before sanding them flat.
5. Cut and dry-fit the wrap
Cut the panels slightly oversized if you plan to trim them for a precise fit. Use a sharp blade and support the work securely. When cutting veneered plywood, painter’s tape over the cut line and a fine-tooth blade can help reduce splintering.
Place every panel around the bookcase without adhesive. Check the front alignment, corner joints, overhang, and access to wall-anchoring hardware. Confirm that inserts and doors still open correctly. This dry fit is the moment to discover a measurement error; discovering it after the adhesive grabs is less of a moment and more of an event.
6. Sand and finish before installation
Sand solid wood progressively, commonly beginning with 120 grit and moving through 180 grit. Use 220 grit only if it suits the stain and finish manufacturer’s directions. Sand with the grain, ease sharp edges lightly, and remove all dust.
Pine and similar softwoods can absorb stain unevenly. A compatible pre-stain conditioner helps reduce blotching. Test the complete finishing scheduleconditioner, stain, and topcoaton an offcut before treating the visible panels. The sample should come from the same lumber because a stain swatch printed on a can is more of a suggestion than a legally binding promise.
Apply stain in manageable sections, maintain a wet edge, and wipe away excess in the direction of the grain. Stain adds color but is not a complete protective finish. Once it has dried according to its label, add two or more thin coats of a suitable clear topcoat. Water-based polyurethane preserves a lighter wood tone, while many oil-based finishes add warmth or amber color.
Finish the front, exposed edges, and visible ends before assembly. Leave adhesive zones on the back unfinished or mask them off so the glue can contact bare wood. Allow all coatings to cure in a well-ventilated area.
7. Prepare the laminate for bonding
Standard woodworking glue is formulated primarily for porous, unfinished wood. The coated exterior of an Expedit is comparatively nonporous, so ordinary glue alone may provide an unreliable bond. Lightly scuff the attachment areas without sanding through the thin factory surface, then vacuum and wipe away residue.
Choose an adhesive specifically labeled for bonding wood to laminate, melamine, or coated engineered panels. Follow its instructions for surface preparation, open time, ventilation, and clamping. Contact cement bonds quickly and leaves little opportunity for repositioning; placing clean dowels between the surfaces allows you to align a panel before lowering it gradually.
8. Attach the panels in a controlled order
Install the top first if it establishes the alignment for the waterfall edge. Apply adhesive evenly without creating thick ridges. Position the panel, verify the overhang with a square, and clamp it using protective scrap blocks. Heavy, evenly distributed weights can work when clamps cannot reach.
Attach the sides after the top is stable, followed by the bottom. Ratchet straps around the protected unit can hold the side panels while the adhesive cures. Avoid overtightening; the goal is firm contact, not compressing the shelf into modern art.
Some established Expedit makeovers use adhesive and brad nails. If you follow that method, locate the dense structural portions first and select fasteners that cannot exit into a cubby. Use as few as necessary and keep them away from edges, factory hardware, and hollow areas. When the internal construction is uncertain, adhesive plus clamping is safer than firing long brads on faith.
9. Fill, touch up, and let the assembly cure
Fill visible nail holes with stainable filler matched to the finished color. Sand touch-up areas gently and repair any exposed raw wood with stain and topcoat. Remove adhesive squeeze-out according to the adhesive manufacturer’s instructions; dried glue can prevent stain from penetrating and may leave pale patches.
Do not load, move, or flip the bookcase until the adhesive reaches its specified handling strength. “Dry to the touch” and “ready to support a wooden shell while being dragged across the room” are not the same milestone.
10. Re-anchor the finished bookcase
Wrapping the unit adds weight but does not eliminate tip-over risk. Reinstall the IKEA wall restraint or another appropriate anti-tip system using fasteners suitable for the wall material. The U.S. Consumer Product Safety Commission recommends anchoring bookcases and other top-heavy furniture, particularly in homes where children may climb.
Place heavier objects in the lower cubes and avoid using an improvised raised base unless it is engineered to support and stabilize the entire unit. If you add legs, attach them to a continuous structural base rather than screwing them randomly into hollow shelf panels.
Common Mistakes to Avoid
- Copying someone else’s dimensions: Expedit and Kallax models vary, and nominal lumber sizes are not actual sizes.
- Finishing the glue side: Stain and clear coat can weaken an adhesive bond by sealing the wood pores.
- Skipping the dry fit: A 1/8-inch discrepancy becomes surprisingly noticeable at a waterfall corner.
- Using ordinary wood glue on slick laminate: Select an adhesive compatible with both surfaces.
- Driving fasteners into hollow areas: Engineered IKEA panels are not equivalent to solid lumber.
- Applying stain without a test: Pine can turn blotchy or much darker than expected.
- Loading the shelf too soon: Adhesives and finishes need adequate curing time.
- Forgetting the wall anchor: Added wood does not make a bookcase immune to gravity.
Project Experiences and Practical Lessons
The most common experience with this IKEA Expedit hack is that the project feels easy during planning and suddenly becomes very real when the lumber is resting on the bookcase. The wrap itself is only four surfaces, but each surface affects the next. A top panel that extends 1/4 inch too far changes the side alignment, the bottom joint, and your mood. Measuring the assembled unit and completing a full dry fit prevents most of that drama.
Board selection also matters more than many first-time builders expect. A twisted 1-by-6 may look acceptable in the store rack but becomes stubborn when joined into a wide panel. Select the straightest boards available by sighting down their length from both ends. Wider edge-glued panels cost more, yet they can save hours of joining and flattening. The least expensive lumber is not always the least expensive route once sanding discs and Saturday afternoon are included.
Another recurring lesson is to finish the wood before attaching it. Staining a loose board on sawhorses is comfortable; staining the underside of an assembled bookcase while crouched on the floor is an unsolicited fitness program. Pre-finishing also keeps stain off the cube interiors. Leave the rear bonding zones bare, label the panels, and protect the finished faces during installation.
Pine blotching is the cosmetic surprise most likely to appear. Conditioner helps, but a scrap test is still essential. The final color depends on the wood, sanding grit, conditioner, stain thickness, wiping time, and topcoat. Two boards from the same stack may finish differently. That variation can look charmingly rustic when intentional and like a minor lumber disagreement when it is not.
Attachment is usually the tense stage. Coated IKEA surfaces do not behave like unfinished lumber, and the lightweight internal construction complicates fastening. An adhesive rated for laminate or melamine, combined with careful scuffing and steady clamping pressure, is more dependable than simply spreading standard wood glue everywhere. If brads are used, test their length on a comparable setup and confirm where the shelf has dense material. A nail that enters a hollow section contributes enthusiasm but very little holding power.
Working alone is possible, although side panels have a habit of sliding just as the clamp is tightened. Temporary support blocks, painter’s tape, or a lightly tensioned strap can act as an extra pair of hands. Install one panel at a time and allow it to stabilize. Trying to glue all four surfaces simultaneously turns a furniture makeover into a low-budget game show.
The completed wrap makes the Expedit heavier, warmer-looking, and visually more substantial. It does not increase the published shelf-load rating or transform the internal panels into hardwood. Treat the wood surround as an attractive outer shell, continue using the shelf within its intended limits, and anchor it securely. With those expectations, the project offers an excellent balance: affordable cube storage underneath and custom-furniture personality on top.
Conclusion
Wrapping an IKEA Expedit bookcase with wood is an approachable furniture makeover when measurement, material compatibility, and patience receive equal attention. Solid boards create a convincing custom surround, while appearance panels or veneered plywood simplify construction. Careful sanding, stain testing, a protective topcoat, and the correct adhesive determine whether the result looks professionally intentional or merely very committed.
The best version of this IKEA hack respects what the Expedit is: a versatile engineered-wood shelf, not a block of solid oak hiding beneath laminate. Build the wooden shell accurately, avoid questionable fastening locations, allow everything to cure, and restore the wall anchor before filling the cubes. The result is warmer, more distinctive storageand a perfectly reasonable excuse to tell visitors you make custom furniture now.