Note: In GIMP, what many Photoshop users call the “Pen Tool” is officially called the Paths Tool. Same family, different name tag. Think of it as the polite open-source cousin who shows up with Bézier curves instead of a subscription bill.
If you have ever tried to cut out a person, draw a smooth curve, trace a logo, or make a clean line in GIMP using only the mouse, you probably discovered one harsh truth: your hand is not a plotter. It wiggles. It sneezes. It makes “straight” lines that look like nervous spaghetti. That is exactly why the Pen, or Paths, Tool exists.
The GIMP Paths Tool lets you create editable lines and curves using anchor points and handles. You can turn those paths into selections, stroke them as clean lines, fill them as shapes, use them for text effects, or save them for later. For beginners, it may feel strange at first because you are not painting pixels directly. You are building a flexible guide first, then deciding what to do with it. Once that idea clicks, the tool becomes one of the most powerful features in GIMP for photo editing, digital art, graphic design, and background removal.
What Is the Pen or Paths Tool in GIMP?
The Paths Tool is GIMP’s tool for creating Bézier curves. A Bézier curve is a smooth line controlled by points and handles. You click to place anchor points, then drag or adjust handles to control the shape of the curve. This sounds mathy, but do not worry. You do not need to know equations. You only need to understand that points decide where the line goes, and handles decide how it bends.
Unlike the Paintbrush Tool, which immediately changes pixels, the Paths Tool creates a temporary editable path. This path can be adjusted before it becomes a selection, outline, shape, or stroke. That means you can fix mistakes without repeatedly undoing your artwork like a raccoon trapped in a keyboard factory.
The Paths Tool is especially useful for:
- Removing image backgrounds with clean edges
- Drawing straight lines, curves, arcs, and custom shapes
- Creating precise selections around objects
- Making smooth outlines for icons, stickers, and logos
- Stroking a path with a brush, pencil, pattern, or solid line
- Creating curved text effects with Text along Path
- Saving reusable paths inside the GIMP file
How to Activate the Paths Tool in GIMP
To activate the Paths Tool, open GIMP and choose Tools > Paths from the main menu. You can also click the Paths Tool icon in the toolbox. The fastest method is the keyboard shortcut: press B.
Once selected, the cursor changes into a path-style pointer. In the Tool Options panel, you will usually see modes such as Design, Edit, and Move. Beginners should start in Design mode because that is where you create the path. Edit mode helps you adjust existing points and handles. Move mode lets you reposition the path.
Understanding Anchor Points and Handles
Before you draw anything fancy, you need to meet the two stars of the Paths Tool: anchor points and handles.
Anchor Points
Anchor points are the dots you place on the canvas. The path passes through these points. If you click once, you create a point. If you click somewhere else, GIMP connects the two points with a segment. A row of anchor points can form a straight line, a curve, or a closed shape.
Handles
Handles control the direction and curve of the line as it enters or leaves an anchor point. When you click and drag while creating a point, handles appear. Pulling the handles longer creates a wider, smoother curve. Shorter handles create tighter curves. Rotating handles changes the curve direction.
Here is the beginner-friendly translation: anchor points are the fence posts, and handles are the ropes deciding how gracefully the fence bends. If the curve looks weird, do not blame the universe. Adjust the handles.
How to Draw a Straight Line with the Paths Tool
Drawing a straight line is the easiest way to understand how paths work.
- Open a blank image or any project in GIMP.
- Press B to select the Paths Tool.
- Click once on the canvas to create the first point.
- Move your cursor and click again to create the second point.
- You will see a straight path segment between the two points.
- Go to Edit > Stroke Path.
- Choose line width, style, and color options.
- Click Stroke.
Important beginner lesson: the visible path is not the final line yet. It is a guide. To make it appear as actual pixels on your layer, you need to stroke it. This is where many new users panic and say, “Why is my line not real?” It is real emotionally, but not yet pixel-real.
How to Draw Curves with the Paths Tool
Curves are where the Pen or Paths Tool starts to feel powerful. Here is a simple method:
- Select the Paths Tool.
- Click and drag to create your first point with handles.
- Move to another area of the canvas.
- Click and drag again to create a curved segment.
- Adjust the handles until the curve looks smooth.
- Continue adding points if you need a longer curve.
The secret is to use fewer points than you think. Beginners often add too many anchor points, which makes the curve bumpy. A smooth curve usually needs only a few well-placed points. If your path looks like a potato wearing a necklace, delete extra points and try again.
How to Close a Path and Create a Shape
A closed path is a path where the final point connects back to the first point. Closed paths are useful when you want to make selections, filled shapes, stickers, icons, or cutouts.
To close a path, continue placing points around your shape until you return to the starting point. Then click the first point to connect the path. If you are tracing an object, zoom in and place points along the edge. Use curves for rounded areas and straight segments for flat edges.
For example, imagine tracing a coffee mug. You might use curved segments around the body, smaller curves around the handle, and straight-ish segments along the rim. Once closed, the path can become a selection, which allows you to cut, copy, mask, or recolor the object.
How to Turn a Path into a Selection
One of the most common uses of the GIMP Paths Tool is creating precise selections. This is perfect for background removal, product photo editing, and isolating objects.
- Create a closed path around your subject.
- Open the Paths dialog if it is not already visible.
- Select the path you created.
- Click Selection from Path, or use the path options to convert it.
- GIMP will create a selection based on the path.
After the selection appears, you can copy the subject, remove the background, add a layer mask, or invert the selection and delete the surrounding area. For cleaner background removal, add an alpha channel to your layer first by right-clicking the layer and choosing Add Alpha Channel. Without transparency support, deleting a background may leave a flat color instead of transparent pixels.
How to Remove a Background Using the Paths Tool
The Paths Tool is ideal when automatic selection tools struggle. Fuzzy Select and Foreground Select can be fast when the subject and background have strong contrast, but the Paths Tool gives you manual control. That makes it excellent for hair-free objects, products, buildings, cars, furniture, tools, and anything with a defined edge.
Step-by-Step Background Removal
- Open your image in GIMP.
- Duplicate the image layer so the original stays safe.
- Right-click the duplicate layer and choose Add Alpha Channel.
- Select the Paths Tool.
- Zoom in to 200% or more for accuracy.
- Click around the subject, using curves where needed.
- Close the path.
- Convert the path to a selection.
- Go to Select > Invert if the background is selected.
- Press Delete to remove the background.
For natural-looking cutouts, do not place the path directly on the outermost fuzzy edge. Place it slightly inside the subject edge if the background is messy. This avoids leaving an ugly halo. Nobody wants their product photo glowing like it just saw a ghost.
How to Stroke a Path
Stroking a path means drawing a visible line along the path. This is useful for line art, icons, decorative borders, arrows, diagrams, and clean digital sketches.
- Create a path.
- Choose your foreground color.
- Go to Edit > Stroke Path.
- Select a line width.
- Choose whether to stroke with a line or a paint tool.
- Click Stroke.
If you stroke with a simple line, GIMP creates a clean outline based on your settings. If you stroke with a paint tool, the result depends on the active brush, brush size, dynamics, and tool behavior. This can create more artistic strokes, such as textured lines, dotted borders, or hand-drawn effects.
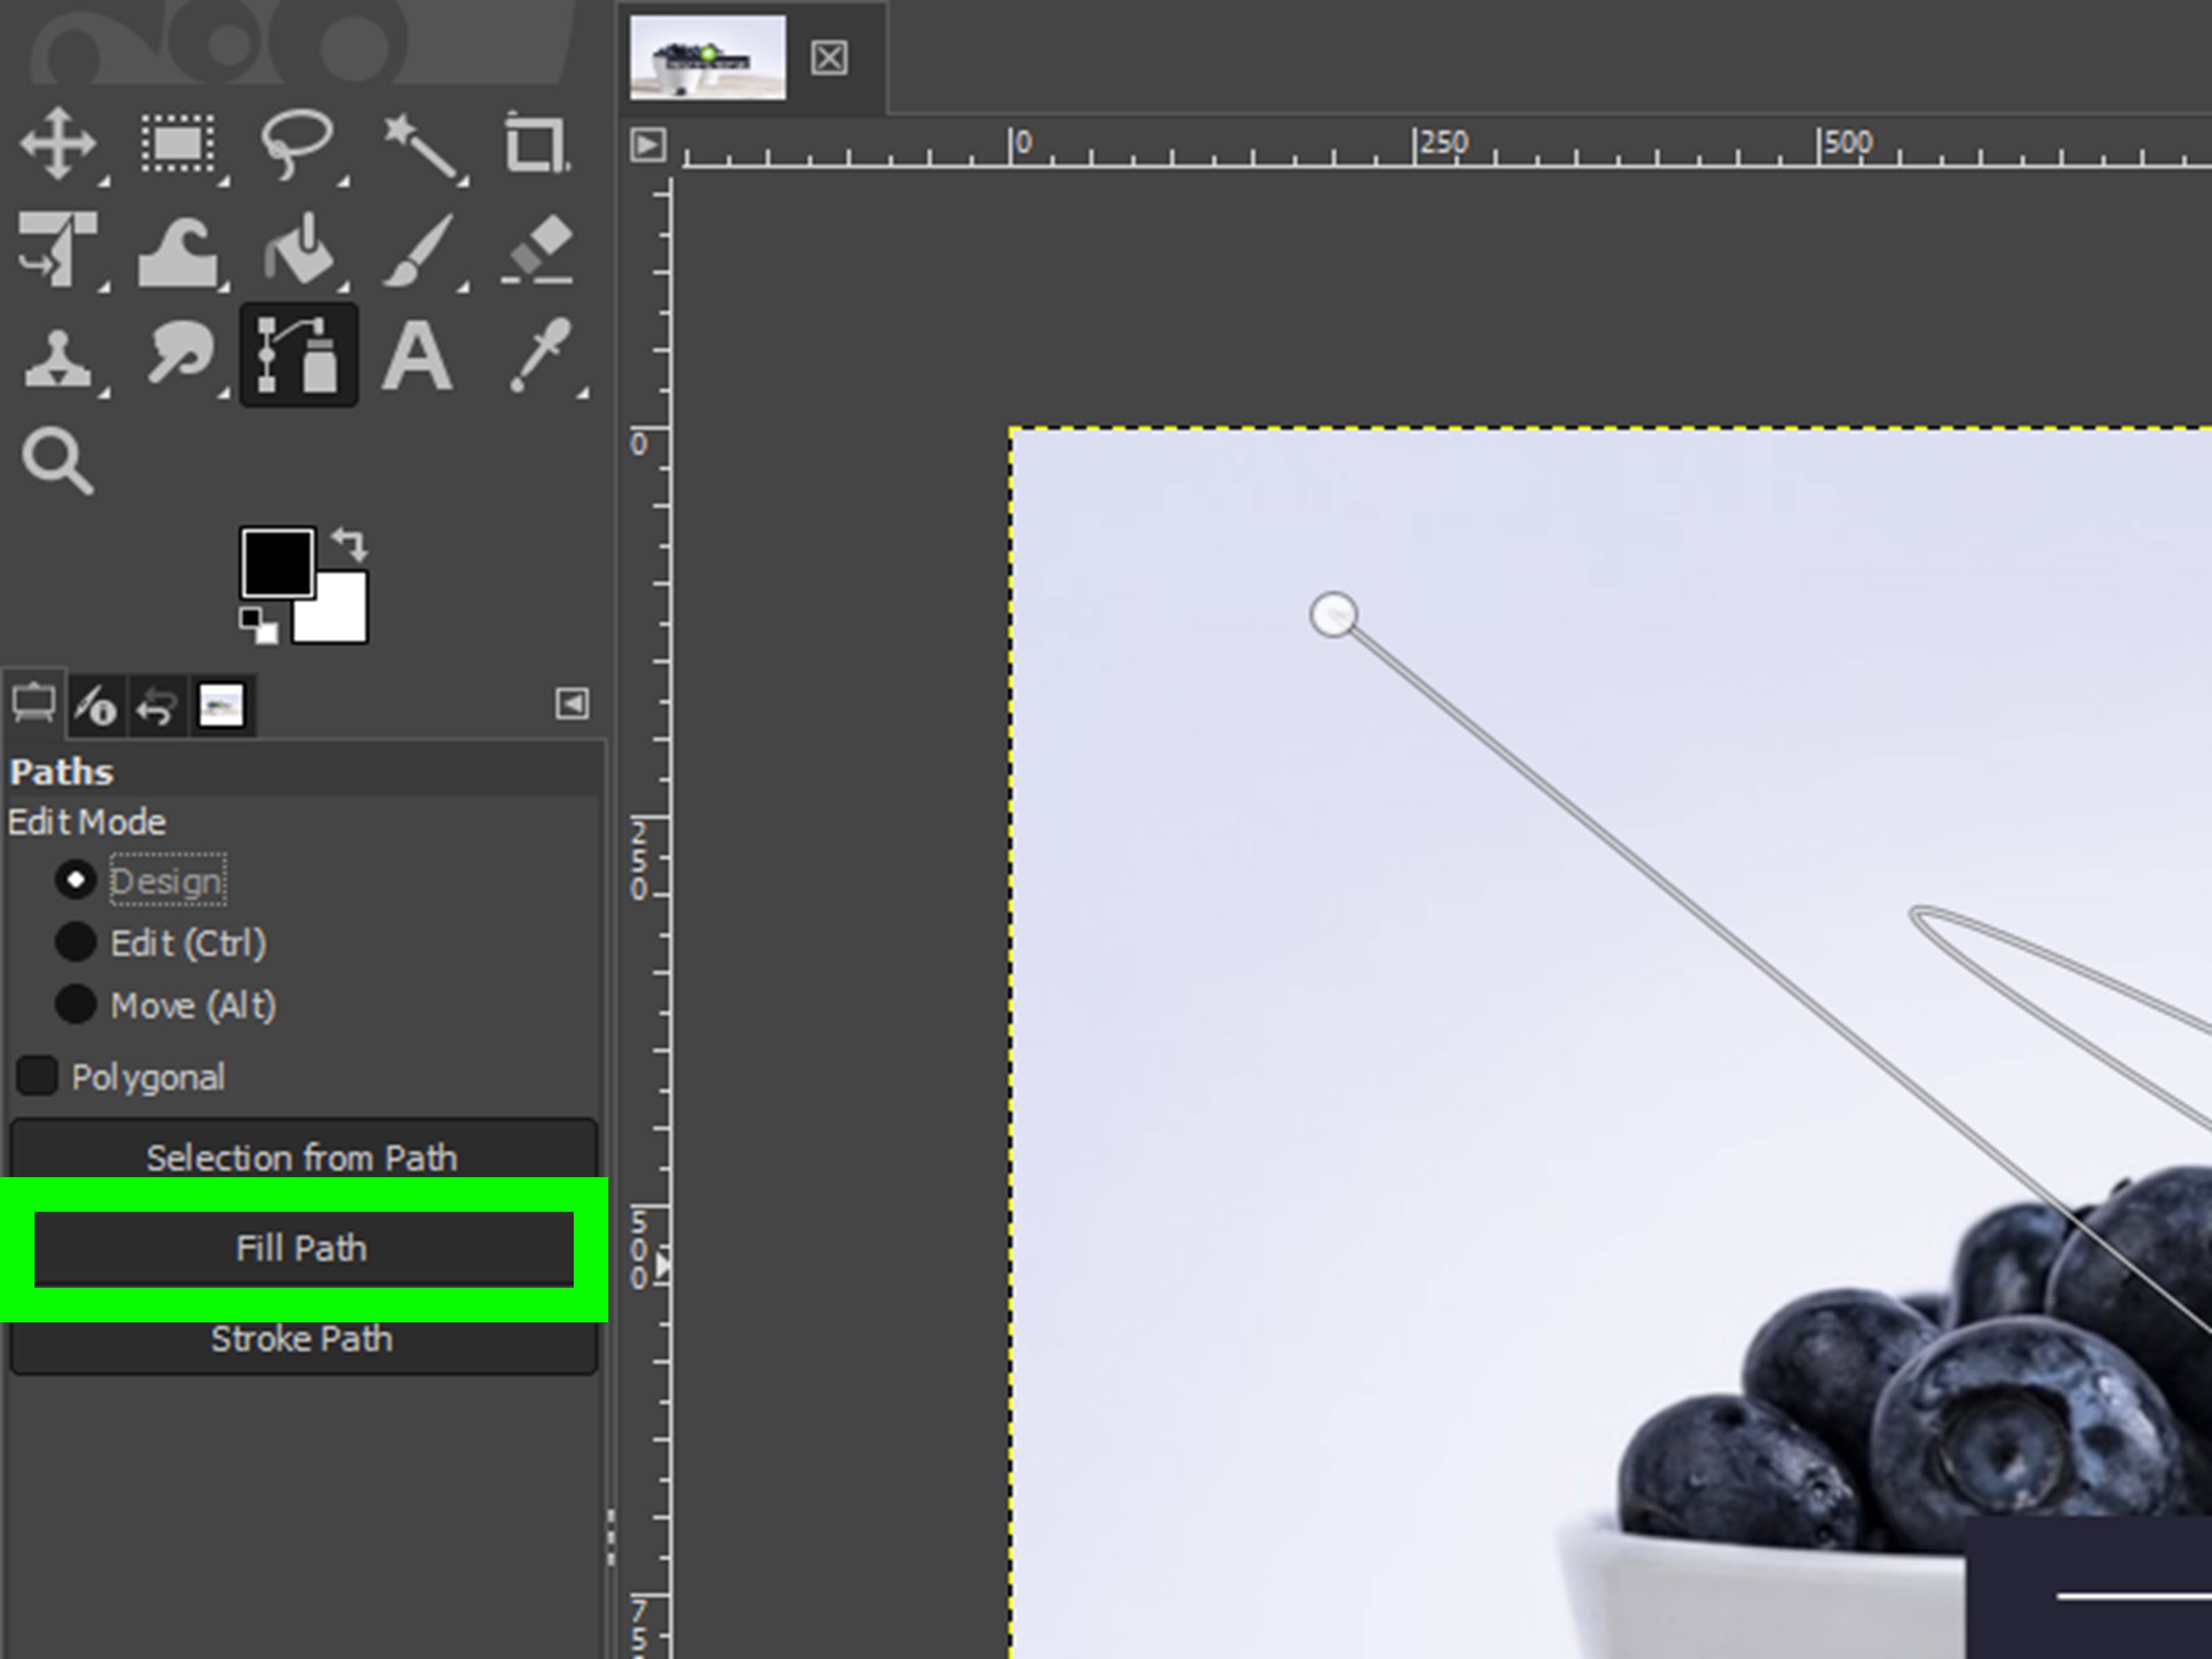
How to Fill a Path
Filling a path turns the enclosed path area into a filled shape. This is useful for simple graphics, labels, icons, and design elements.
- Create a closed path.
- Open the Paths dialog and select the path.
- Choose Edit > Fill Path.
- Select whether to fill with foreground color, background color, or pattern.
- Apply the fill.
If the path is not properly closed, the fill may behave unexpectedly. When in doubt, zoom in and make sure the first and last points connect. Tiny gaps can cause big headaches, like trying to fill a bucket with a hole in it.
How to Edit an Existing Path
One of the best reasons to use paths is that they remain editable. If a curve is not right, you do not need to start over. You can move points, adjust handles, add new nodes, or delete extra ones.
Move a Point
Select the Paths Tool, switch to Edit mode if needed, click the point, and drag it to a new position.
Add a Point
Click on an existing path segment where you want a new point. Adding points is helpful when you need more control in a detailed area.
Delete a Point
Select the point and use the appropriate delete action for your version of GIMP. You can also use path editing options in the Tool Options area. Removing unnecessary points often makes curves smoother.
Adjust Handles
Click a point and drag its handles to refine the curve. If the handle direction feels awkward, experiment slowly. Good path editing is less like hammering a nail and more like tuning a guitar. Small changes matter.
Using the Paths Dialog
The Paths dialog is where GIMP manages paths, similar to how the Layers dialog manages layers. You can show or hide paths, rename them, duplicate them, convert them to selections, stroke them, delete them, or move them between projects.
When you save your project as an XCF file, paths can be preserved. This is a major advantage. If you create a careful product cutout path today, you can reopen the file tomorrow and adjust it instead of retracing everything. Save your working files in XCF format before exporting final images as PNG, JPEG, or WebP.
How to Use Text Along a Path
The Paths Tool also helps create curved text. This is useful for badges, logos, stickers, circular labels, and playful social graphics.
- Create a path in the shape you want the text to follow.
- Add text with the Text Tool.
- Select the text layer.
- Use the Text along Path command.
- GIMP creates a new path based on the text shape.
- Stroke or fill the text path to make it visible.
If the text appears upside down or on the wrong side of the path, the direction of the path may be the issue. Reversing or flipping the path direction can help. Curved text takes practice, so start with short words before attempting a full inspirational quote around a flaming donut.
Beginner Mistakes to Avoid
Using Too Many Anchor Points
More points do not mean more precision. Too many points often create lumpy curves. Use fewer points and adjust handles carefully.
Forgetting to Stroke or Fill the Path
A path is only a guide until you stroke, fill, or convert it. If your line disappears when you switch tools, check the Paths dialog.
Editing the Wrong Layer
Before stroking, filling, deleting, or masking, make sure the correct layer is active. GIMP will do exactly what you ask, even if you asked the wrong layer. Software has no mercy.
Not Zooming In
Precision work needs zoom. When tracing an object, zoom in enough to see edges clearly. You can zoom out occasionally to check the overall shape.
Expecting Paths to Work Like a Brush
The Paths Tool is not for freehand drawing in the normal sense. It is for constructing editable lines and shapes. Once you accept that workflow, it becomes much easier.
Practical Exercises for Beginners
To get comfortable with the GIMP Pen or Paths Tool, try these quick exercises:
Exercise 1: Draw a Triangle
Create three points, close the path, then stroke it. This teaches straight segments and closed shapes.
Exercise 2: Draw an S-Curve
Use two or three points with handles to create a smooth S shape. Focus on handle length and direction.
Exercise 3: Trace a Simple Object
Use a photo of a mug, book, phone, or box. Trace the object, convert the path to a selection, and remove the background.
Exercise 4: Create a Badge
Draw a circle or custom shape, add text along the path, stroke the border, and fill the background. This combines several core skills in one project.
Best Workflow for Clean Results
A strong beginner workflow looks like this:
- Duplicate your image layer before editing.
- Use the Paths Tool to create the main outline.
- Keep the number of anchor points low.
- Adjust handles for smooth curves.
- Save the project as XCF to preserve paths.
- Convert the path to a selection only when ready.
- Use layer masks for non-destructive background removal.
- Export the finished file in the format your project needs.
This workflow keeps your edits flexible. Instead of destroying pixels too early, you create a path, refine it, and then apply it. That is the difference between editing like a careful designer and editing like someone chasing a mosquito with a frying pan.
Real-World Example: Cutting Out a Product Photo
Suppose you are editing a photo of a water bottle for an online store. The background is cluttered, so automatic selection tools grab the table, shadows, and possibly your hopes. The Paths Tool is a better choice.
Start by zooming in and placing anchor points around the bottle. Use straight segments for the sides and curves for the rounded cap and bottom. Close the path, convert it to a selection, then add a layer mask or delete the background after adding transparency. If the edge looks too sharp, feather the selection slightly before applying the mask. Finally, place the bottle on a clean white or transparent background.
The result is cleaner than most one-click methods because you made the decisions. That is the main power of the Paths Tool: control.
Experience-Based Tips for Using the GIMP Pen Tool Better
After working with the GIMP Paths Tool for real editing tasks, one lesson becomes obvious: speed comes after patience, not before it. Beginners often try to race around the edge of an object by clicking every few pixels. That feels productive, but it usually creates a jagged path that takes longer to fix. A better habit is to pause before placing each point. Ask yourself, “Where does this curve actually change direction?” Put points there. Let the handles do the heavy lifting between them.
Another useful experience is learning when not to use the Paths Tool. If the background is a flat color and the subject has a simple edge, Fuzzy Select may finish the job faster. If the subject has complicated hair, fur, smoke, or transparent fabric, the Paths Tool alone may look too hard-edged. In those cases, combine methods. Use paths for solid edges like shoulders, clothes, products, or furniture, then use masks, brushes, and selection refinements for soft details. GIMP rewards hybrid thinking.
When tracing objects, zooming is helpful, but do not stay zoomed in forever. If you work at 400% for too long, you may create a path that is technically detailed but visually awkward. Zoom out every few minutes to judge the full silhouette. The viewer will see the whole object, not your heroic battle with one corner of a shoelace.
It also helps to name your paths. A project with “Path,” “Path copy,” and “Path copy copy final maybe” becomes confusing fast. Use names like “Bottle outline,” “Logo curve,” or “Top badge text path.” Future you will be grateful, and future you is already tired.
For line art, stroke paths on a new transparent layer. This gives you freedom to erase, recolor, blur, duplicate, or lower opacity without damaging the original image. If you are making icons or graphics, keep strokes and fills separated on different layers. That simple habit makes revisions much easier.
For background removal, try using a layer mask instead of immediately deleting pixels. A mask lets you hide the background while keeping the original image data available. If you later notice that you cut too close to the object, you can paint on the mask to restore detail. This is much safer than destructive deletion, especially for client work, school projects, product listings, or anything you may need to revise.
The biggest confidence booster is repetition. Trace a mug, a shoe, a phone, a fruit, and a simple logo. By the fifth object, the tool feels less mysterious. By the tenth, you will start seeing anchor points in real life, which is both useful and mildly concerning.
Conclusion
The Pen, or Paths, Tool in GIMP is one of the best tools beginners can learn because it turns shaky mouse movement into clean, editable precision. It helps you draw smooth curves, create accurate selections, remove backgrounds, stroke lines, fill shapes, and design text effects. At first, anchor points and handles may feel unfamiliar, but the workflow is simple: create a path, refine it, then convert, stroke, fill, or save it.
The key is to work slowly, use fewer points, adjust handles carefully, and keep your edits flexible with layers, masks, and XCF files. Once you get comfortable, the Paths Tool becomes less like a scary technical feature and more like a digital ruler with superpowers. And thankfully, it never runs out of ink.