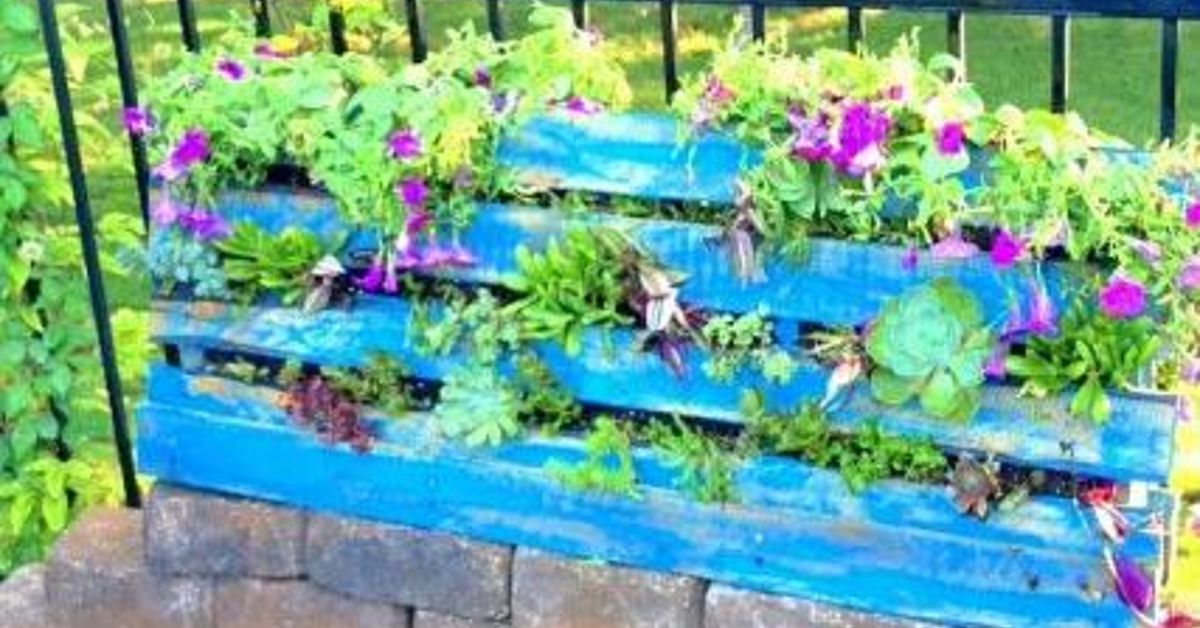
A blank wall, a tiny patio, and a grocery bill that keeps making dramatic entrances are three excellent reasons to build a pallet vertical garden. This DIY project turns an ordinary shipping pallet into a space-saving planter for herbs, leafy greens, strawberries, succulents, or colorful annual flowers. It is affordable, customizable, and surprisingly beginner-friendlyprovided you choose the pallet carefully and give drainage the respect it deserves.
The basic idea is simple: clean and prepare a safe wooden pallet, close the back and bottom with durable landscape fabric, fill the planting pockets with lightweight potting mix, add suitable plants, and secure the finished garden in an upright position. The result is a living wall that makes practical use of vertical space without demanding a large yard or a degree in structural engineering.
Why Build a Pallet Vertical Garden?
Vertical gardening is useful wherever floor space is limited. Instead of spreading containers across a balcony or crowding a narrow walkway, you grow upward. A pallet already has a sturdy frame and evenly spaced slats, so much of the planter’s structure is built in. That saves money and reduces the amount of cutting required.
Choose a Pallet That Is Safe to Use
Not every pallet belongs near soil, food crops, pets, or curious children. Pallets may be treated to control pests, exposed to spills, or used to transport unknown materials. Start with a pallet from a trusted source, such as a local garden center, hardware store, appliance retailer, or business that can tell you what it carried.
Read the Pallet Stamp
Look for an International Plant Protection Convention mark on the side. A pallet stamped HT has been heat-treated. A stamp containing MB indicates methyl bromide fumigation. For a home garden, especially one holding edible plants, the simplest cautious rule is to choose a clean, heat-treated pallet and reject pallets marked MB, pallets made from pressure-treated lumber, and pallets with no traceable history.
Also reject wood that is painted, oily, strongly scented, deeply stained, moldy, rotten, or splintering beyond repair. A stamp does not erase the pallet’s travel history. If the boards look as though they survived a chemical soap opera, find another pallet.
Tools and Materials
- One clean, heat-treated wooden pallet
- Work gloves, safety glasses, and a dust mask
- Stiff brush, mild soap, and clean water
- Sandpaper or an orbital sander
- Hammer, drill, or screwdriver
- Galvanized screws or exterior-grade nails
- Heavy-duty landscape fabric or geotextile fabric
- Exterior-grade staple gun and plenty of staples
- High-quality, lightweight potting mix
- Plants or seeds suited to shallow containers
- Wall brackets, masonry anchors, or anti-tip hardware
How to Make a Vertical Garden From a Pallet
Step 1: Inspect, Clean, and Dry the Pallet
Check every board for protruding nails, loose fasteners, cracked slats, rot, and sharp splinters. Tighten or replace anything unstable. Scrub the wood with a stiff brush, mild soap, and water, then rinse it thoroughly. Avoid soaking the pallet for hours; saturated wood becomes heavy and may warp. Set it in a sunny, ventilated place until it is completely dry.
Step 2: Sand Rough Surfaces
Sand the front slats, corners, edges, and any areas your hands will touch. You do not need furniture-grade perfection, but the surface should be safe to handle. Remove sanding dust before continuing. If you apply a garden-safe exterior sealer, coat only the clean, dry wood and let it cure according to the label. Leaving the wood unfinished is also acceptable, although it will weather and decay sooner.
Step 3: Decide Which Side Will Be the Front
Choose the more attractive, open side as the planting face and use the opposite side as the back. Stand the empty pallet temporarily in its intended location before attaching anything. This quick test helps confirm its orientation and prevents the classic DIY moment when you discover that you carefully built the entire project backward.
Step 4: Create the Planting Pockets
Lay the pallet face down. Stretch heavy-duty landscape fabric across the back, bottom, and two sides. Use two layers if the fabric is thin. Fold the edges several inches before stapling so the material is less likely to tear. Place staples every two or three inches, with extra staples around corners and load-bearing edges.
Do not seal the structure like an aquarium. Water must be able to drain from the bottom of every planting section. Landscape fabric should hold the potting mix while allowing excess water to pass through. Where pallet gaps are unusually large, attach an untreated board across the lower edge of each pocket before adding fabric. This creates a small soil shelf instead of asking fabric and optimism to carry everything.
Step 5: Add Lightweight Potting Mix
Use commercial potting mix rather than soil dug from the yard. Garden soil is generally too dense for a shallow container, compacts easily, and can drain poorly. A good container mix contains lightweight ingredients that retain some moisture while leaving air space around roots.
With the pallet still lying flat, pour potting mix into the openings. Work it into corners with your hands and firm it gently. Do not ram it down. Compacted mix reduces the oxygen available to roots. Fill each section to within about an inch of the slat above it so there is room for watering.
Step 6: Select the Right Plants
The best plants for a pallet vertical garden have compact growth, modest root systems, and similar light and moisture needs. Good edible choices include:
- Lettuce, arugula, spinach, and other leafy greens
- Parsley, cilantro, chives, thyme, oregano, and compact basil
- Strawberries
- Radishes and other small-rooted varieties
- Compact nasturtiums and edible violas
For an ornamental pallet garden, consider sedum, small succulents, trailing lobelia, alyssum, dwarf marigolds, petunias, and compact ferns suited to the available light. Group plants by their needs. Do not place drought-loving thyme beside a moisture-hungry fern and expect them to negotiate.
Put plants that tolerate drier soil near the top because upper pockets tend to dry first. Place moisture-loving plants lower down, where runoff may keep the mix damp longer. Avoid full-size tomatoes, squash, melons, and other large crops unless you add much deeper containers and independent supports. A standard pallet pocket is a studio apartment, not a four-bedroom root system.
Step 7: Plant While the Pallet Is Flat
Remove each transplant from its nursery pot, loosen tightly circling roots, and place the root ball into the potting mix through the opening between slats. Set plants at roughly the same depth they grew in their original containers. Fill around the roots and press lightly to remove large air gaps.
Allow enough space for the mature size of each plant. Tiny seedlings are masters of false advertising and can quickly crowd their neighbors. After planting, water gently until excess moisture begins to drain from the bottom.
Step 8: Let the Roots Settle
Keep the planted pallet horizontal for roughly one to two weeks, or until the roots begin holding the potting mix together. Water carefully during this period so the mix remains evenly moist but not waterlogged. The exact settling time depends on plant size, weather, and root growth. Larger, established transplants usually stabilize the pockets faster than newly germinated seedlings.
Step 9: Stand and Secure the Garden
A filled pallet can be very heavy, especially immediately after watering. Never rely on casually leaning it against a wall. Attach it to strong fence posts, wall studs, or appropriate masonry anchors. Use brackets or anti-tip straps rated for the expected load. Keep the pallet slightly away from siding so air can circulate and moisture does not remain trapped against the building.
Where to Place Your Pallet Garden
Choose the location according to the plants, not according to the wall that looks lonely. Most culinary herbs and fruiting crops perform best with at least six hours of direct sun, while leafy greens and some ornamentals tolerate partial shade. In very hot climates, morning sun with afternoon shade can reduce heat stress and slow moisture loss.
Make sure a hose or watering can can reach the location comfortably. A vertical planter mounted far from water may look stylish for a week before becoming modern art titled Regret in Brown.
Watering and Feeding a Pallet Vertical Garden
Shallow vertical pockets dry faster than in-ground beds. Check the mix with a finger, especially during warm, windy weather. Water when the upper inch feels dry, applying moisture slowly so it penetrates instead of rushing down the face. Start at the top and work downward, then inspect the lower pockets before watering them again; they may already have received runoff.
Potting mix loses nutrients through regular watering, so container plants may need periodic feeding. Use a balanced liquid or slow-release fertilizer according to the product label and the needs of the plants. More fertilizer is not more love. Excess can damage roots, produce weak growth, and wash away with drainage.
Seasonal Maintenance
Harvest herbs and greens frequently to keep plants compact and productive. Remove yellow leaves, dead flowers, and diseased material. Trim aggressive plants before they shade their neighbors. Inspect the fabric, staples, brackets, and wood every few weeks, especially after storms.
Because wood exposed to damp potting mix will eventually deteriorate, check for soft boards, rusting fasteners, and loose anchors. Replace damaged components before the pallet becomes unstable.
Common Mistakes to Avoid
- Using an unknown pallet: A clean appearance does not prove a safe history.
- Skipping drainage: Trapped water encourages root problems and wood decay.
- Using garden soil: It is usually too heavy and compact for shallow pockets.
- Overplanting: Crowding creates competition and poor airflow.
- Mixing incompatible plants: Combine species with similar sun and water requirements.
- Standing the pallet too early: Give roots time to stabilize the potting mix.
- Failing to anchor it: Wet soil turns a cute project into a serious tipping hazard.
- Watering every row equally: Lower pockets often stay wetter than upper pockets.
Real-World Experiences From Building a Pallet Vertical Garden
The first lesson many builders learn is that the pallet itself takes longer to prepare than expected. Finding a clean, clearly marked pallet can require several stops, but that effort is worthwhile. The best project begins with wood that is dry, solid, and boringly trustworthy. A free pallet with suspicious stains is not a bargain; it is a question mark with nails.
During one typical build, sanding looked like a minor task on the checklist and turned into the part that made the biggest difference. The pallet initially felt rough and industrial. After the sharp edges were rounded and the splinters removed, it looked intentional rather than abandoned. This matters when the garden is mounted near a doorway or seating area, where people brush against it regularly.
Fabric installation is another place where practical experience improves the instructions. A single line of widely spaced staples may hold while the pallet is empty, then pull loose as soon as damp potting mix adds weight. Folding the fabric edge, doubling thin material, and using close staple spacing creates a much stronger pocket. Corners deserve extra attention because that is where tension gathers. It is not exciting work, but neither is sweeping five gallons of soil off a patio.
The next surprise is the amount of potting mix a pallet can swallow. The openings look shallow from the front, yet the internal channels add up. Buying one extra bag prevents a half-filled project and an emergency garden-center trip while wearing soil-covered gloves. Lightly moistening the mix before filling can also reduce dust, but soaking it makes the pallet unnecessarily heavy.
Plant placement becomes easier when you think of the pallet as a small hillside. The top is sunnier, windier, and quicker to dry. The bottom is often cooler and wetter. Thyme, oregano, sedum, or drought-tolerant flowers usually cope better near the upper rows. Parsley, lettuce, and other moisture-loving plants often appreciate lower positions. This arrangement is not absolute, but it is a useful starting point.
Waiting for roots to establish is the test of patience. The planter looks finished, and the natural impulse is to stand it immediately for photographs. Leaving it flat, however, gives transplants time to grip the growing mix. When the pallet is finally raised, a few crumbs may fall, but the entire contents should not attempt an escape. Taking progress photos while it rests helps satisfy the urge to admire it without challenging gravity.
Watering reveals the biggest difference between a pallet garden and ordinary pots. A fast pour at the top can run down the wood and bypass root zones. Slow watering in several passes works better. After the first pass, wait a minute and water again. On hot days, check the upper corners first. They are often dry while the bottom row remains comfortably moist.
The most successful planting combinations are usually simple. One pallet devoted mainly to herbs is easier to manage than a botanical buffet containing succulents, lettuce, basil, ferns, and strawberries. A practical arrangement might include thyme and oregano on top, basil and chives in the middle, and parsley or leafy greens below. Plants with similar needs reduce guesswork and make irrigation more predictable.
Finally, anchoring should be treated as part of the build, not an optional finishing touch. The pallet becomes dramatically heavier after rain or deep watering. Secure brackets installed at the beginning provide peace of mind throughout the season. Once the structure is stable, the project becomes genuinely enjoyable: harvests are easy, the wall changes every week, and the garden attracts conversation without taking over the patio.
Conclusion
Learning how to make a vertical garden from a pallet is mostly an exercise in making smart choices before planting. Use a clean heat-treated pallet, build strong fabric pockets, choose lightweight potting mix, group compatible plants, let roots establish, and anchor the finished structure securely. Those steps turn a rough shipping frame into a productive, attractive garden for a balcony, fence, porch, or small backyard.
The project does not need to be perfect. Weathered wood, trailing leaves, and uneven growth are part of its charm. Start with a manageable plant palette, observe how water moves through the rows, and adjust as the season develops. Your first pallet garden may teach you a few lessons, but it will also give you fresh herbs, more growing space, and a convincing reason to talk to a wall.
Note: Use only a clean pallet with a known history. For edible crops, avoid pressure-treated wood, methyl-bromide-marked pallets, and any pallet exposed to unknown spills or chemicals.