A cinder block bench is the rare backyard project that looks impressively intentional without requiring a workshop full of tools, a degree in furniture design, or a weekend spent arguing with an instruction manual. With concrete blocks, outdoor-rated lumber, construction adhesive, and a little patience, you can create sturdy outdoor seating for a patio, porch, garden, or fire-pit area.
The basic idea is wonderfully simple: build two stable block supports, slide wood rails through aligned openings, and finish the bench with stain, paint, or outdoor cushions. The assembly itself can be quick, but thoughtful preparation makes the difference between a bench that feels solid and one that wobbles like a café table on an uneven sidewalk.
This guide explains how to make a cinder block bench safely, choose appropriate materials, prepare the foundation, weatherproof the wood, and customize the finished design.
Why Build a DIY Cinder Block Bench?
Concrete masonry units are durable, readily available, and naturally suited to outdoor projects. The most common concrete block sold in the United States has a nominal size of 8 by 8 by 16 inches, although its actual dimensions are usually slightly smaller. Modern blocks commonly sold as “cinder blocks” are generally concrete masonry units rather than blocks made with traditional coal cinders.
A DIY concrete block bench offers several practical advantages:
- It requires relatively few materials.
- The design can be resized for a small balcony or a wide patio.
- Concrete blocks tolerate outdoor exposure better than many inexpensive furniture materials.
- The wood can be refinished or replaced without rebuilding the entire base.
- Paint, stain, cushions, and planters make the industrial design easy to personalize.
It is also a forgiving beginner project. The blocks do most of the structural work, while the lumber forms the seating surface. There are no complicated joints to cut, and many versions can be assembled without power tools when the lumber is cut at the store.
Choosing a Cinder Block Bench Design
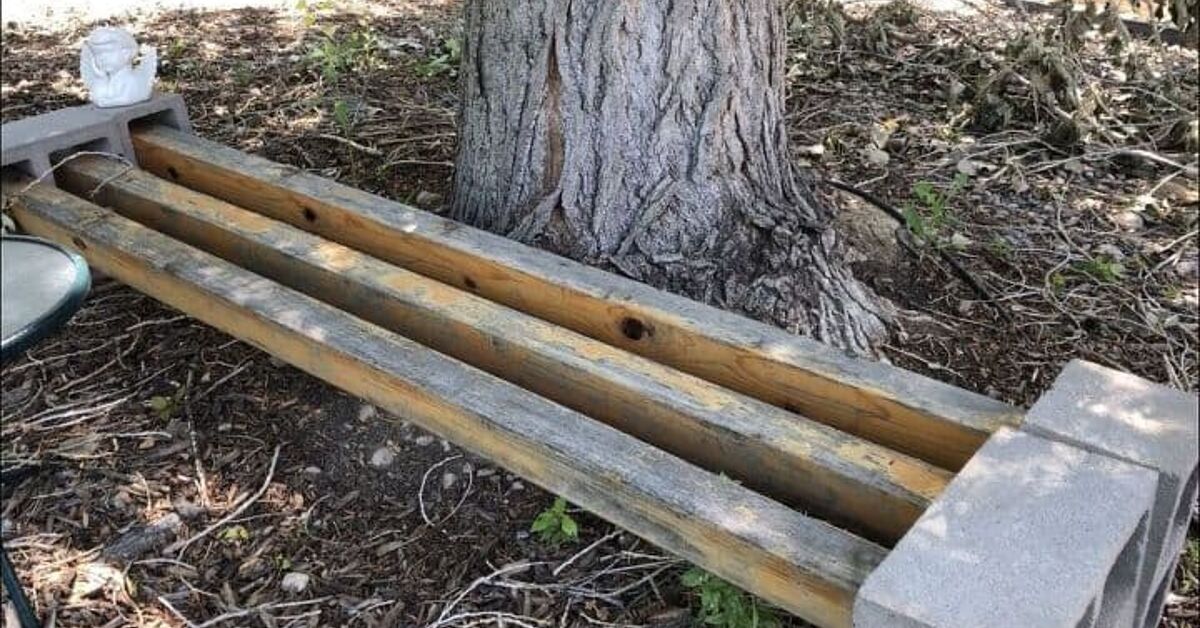
Two designs are especially popular. A beam-style bench uses several 4-by-4 posts inserted through the openings in the blocks. A plank-style bench uses stacked blocks as legs with one or more wide boards resting across the top.
Beam-Through-Block Bench
This guide focuses on the beam-style version because it creates a strong, modern seat without screws or complicated framing. A typical arrangement uses 12 concrete blocks, four exterior-rated 4-by-4 posts, and two block pedestals.
Block shapes vary slightly by manufacturer. Before buying all your lumber, bring a tape measure to the store or test a scrap of 4-by-4 lumber in the block opening. A nominal 4-by-4 post actually measures about 3 1/2 inches square, but the openings inside concrete blocks are not identical across brands.
Plank-Top Bench
A plank-top version may be preferable when the available blocks do not have suitable openings. Stack secure block bases and place an exterior-rated wood plank, framed seat, or concrete cap across them. This design is easy to cushion but should be fastened so the top cannot slide or tip.
Materials and Tools
Basic Materials
- 12 standard concrete masonry blocks
- Four 4-by-4 exterior-rated wood posts
- Exterior construction adhesive rated for masonry and wood
- Exterior wood stain, paint, or penetrating sealer
- Masonry primer and exterior masonry paint, if painting the blocks
- Crushed stone or compactable paver base, if installing on soil
- Outdoor cushions, optional
- Rubber or composite shims, optional
Recommended Tools
- Tape measure
- Four-foot level or a shorter carpenter’s level
- Caulking gun
- Stiff nylon brush
- 120- and 180-grit sandpaper
- Paintbrush or roller
- Hand tamper
- Work gloves
- Safety glasses
- Dust mask for sanding or cleaning dusty blocks
How Long Should the Wood Posts Be?
The correct post length depends on the intended seating capacity and the amount of overhang beyond the block supports. A finished bench around 6 feet long works well for two or three adults. Longer benches need careful support planning because wood can flex when the unsupported span becomes excessive.
Place the block pedestals approximately 5 to 6 feet apart for a common residential bench. Allow several inches of post to extend beyond each outer block face. Do not leave excessive overhang, especially where children may climb or sit on the ends.
For an unusually long bench, add a third support pedestal in the center rather than trusting longer lumber to behave like a bridge. Wood has many talents, but impersonating a suspension system should not be one of them.
How To Make a Cinder Block Bench Step by Step
Step 1: Select a Safe Location
Choose a level area with firm drainage. A concrete patio, properly installed paver surface, or compacted gravel pad is ideal. Avoid placing the bench directly on loose soil, thick mulch, or grass. These surfaces can settle unevenly after rain and cause the supports to lean.
Leave comfortable walking space around the bench. Keep it away from steep slopes, pool edges, vehicle paths, and areas where roof runoff regularly pours onto the ground.
If the bench will surround a fire pit, follow the fire-pit manufacturer’s clearance requirements. Wood seating should not be positioned where flames, sparks, or intense heat can reach it.
Step 2: Prepare and Level the Base
For installation on soil, remove grass and soft organic material beneath each pedestal. Excavate several inches, add compactable crushed stone, and tamp it firmly. Check the pad from front to back and side to side with a level.
Set the first blocks in place without adhesive. Press on each corner. A block that rocks now will not magically develop better manners after the bench is assembled.
Add or remove small amounts of base material until every block sits flat. Do not rely on thick layers of adhesive to correct major level differences. Adhesive bonds materials; it is not a substitute for a properly prepared foundation.
Step 3: Clean the Concrete Blocks
New blocks may carry dust, loose particles, or residue from storage. Scrub them with water and a stiff nylon brush, then allow them to dry thoroughly. If the blocks are older, remove dirt, algae, flaking paint, and oily contamination before applying primer or adhesive.
A pressure washer can speed up cleaning, but use moderate pressure. Very aggressive spraying can damage rough concrete edges and send dirty water on an unexpected tour of your clothes.
Drying matters. Trapped moisture can interfere with paint and adhesive. Follow the drying instructions provided by the coating and adhesive manufacturers rather than assembling damp materials.
Step 4: Paint the Blocks, If Desired
Painting the concrete blocks is optional, but it creates a more polished appearance and can reduce the amount of moisture absorbed by the porous surfaces. Use a primer made for masonry, followed by an exterior acrylic or masonry paint.
Coat the visible faces, edges, and the interiors of openings that may contact the wood. Concrete is porous, so more than one coat may be needed for even coverage. Follow the product label for temperature, drying time, and recoat instructions.
Neutral black, charcoal, white, and earth tones create a modern look. Bright colors work well in family gardens, while terracotta or muted green helps the bench blend with surrounding plants.
Step 5: Prepare the Wood Rails
Use pressure-treated lumber rated for the intended outdoor exposure or choose naturally decay-resistant wood such as cedar, redwood, or cypress. Straight posts with minimal twisting are easier to insert and create a flatter seat.
Sand every accessible face, paying special attention to corners, rough patches, and splinters. Slightly easing the sharp edges makes the bench more comfortable and helps the posts slide through the block openings.
Apply an exterior stain, paint, or penetrating wood sealer to all faces and cut ends. End grain absorbs moisture quickly, so it deserves deliberate coverage. Allow the finish to cure according to its label before assembling the bench.
If using recently purchased pressure-treated lumber, confirm that it is dry enough to accept the chosen finish. Wet lumber may reject stain or develop a blotchy surface. Product directions should determine the waiting period.
Step 6: Dry-Fit the Supports
Build each pedestal from six blocks. A common configuration uses two side-by-side stacks of three blocks, with the upper openings aligned toward the opposite support so the wood rails can pass through them.
Because block openings and shapes differ, arrange the upper course before applying adhesive. Confirm that four rails can sit parallel at a consistent height and that the wood does not bind against irregular interior edges.
Position the second pedestal at the intended bench length. Measure the distance at the front and back so the supports are parallel. Check both supports for level and plumb.
Step 7: Bond the Blocks
Once the dry layout works, mark the block positions with chalk. Disassemble one layer at a time and apply an exterior construction adhesive specifically labeled for concrete, masonry, and outdoor use.
Run continuous beads on solid bearing surfaces, keeping the adhesive slightly away from visible edges. Reposition the blocks carefully and press them into place. Remove squeezed-out adhesive while it is still workable, following the manufacturer’s cleanup instructions.
Recheck alignment after each course. Allow the adhesive to cure for the full period shown on the label before loading the bench. “It feels dry” and “it has reached useful strength” are not always the same thing.
Step 8: Insert the Wood Posts
With a helper supporting the opposite end, slide each post through the aligned block openings. Do not hammer a tightly fitting post into place. Forcing the wood can chip the block or make future removal extremely difficult.
If a post catches, identify the high spot and sand the wood slightly. Do not aggressively grind the inside of a structural masonry unit unless you understand how the alteration affects it.
Center the posts so the overhang is equal at both ends. Use a tape measure rather than trusting your eyes; human vision is excellent at admiring finished projects and surprisingly unreliable at judging a 1-inch mismatch.
Step 9: Test the Bench Carefully
After the adhesive has fully cured, inspect the blocks, rails, and foundation. Push gently from different directions and confirm that nothing rocks, shifts, or separates.
Apply weight gradually near the center and then near both ends. Do not immediately invite several adults to perform a synchronized bench test. If the span flexes noticeably, shorten it or install a center support.
Step 10: Add Comfort and Style
Wood rails are sturdy but not naturally luxurious. Add outdoor-rated seat cushions for comfort. Choose cushions made with quick-drying foam and weather-resistant fabric, and store them during severe weather.
Planters can be positioned beside the block supports, but avoid filling structural openings with wet soil when those openings also hold lumber. Constant moisture against wood encourages decay.
Important Safety Tips
- Concrete blocks are heavy. Lift with your legs and ask for help rather than twisting while carrying them.
- Wear gloves because block edges can be abrasive or sharp.
- Do not use cracked, severely chipped, or crumbling blocks.
- Use adhesive only in well-ventilated conditions and follow the label’s protective-equipment instructions.
- Keep the bench low and stable; improvised tall backrests or stacked decorative towers may tip.
- Anchor or redesign the bench when local wind, seismic activity, public use, or climbing children create additional risk.
- Do not use reclaimed treated wood of unknown origin for seating surfaces.
- Never burn scraps of pressure-treated wood.
Common Cinder Block Bench Mistakes
Skipping the Dry Fit
Nominal lumber and block sizes do not guarantee a perfect match. Test every critical connection before opening the adhesive. Discovering that one post will not pass through the final block after everything has been glued is the DIY equivalent of finding one puzzle piece under the sofa after framing the puzzle.
Building on Uneven Ground
Most stability problems begin below the blocks. Leveling the foundation may take longer than stacking the bench, but it is the step that prevents rocking, tilting, and uneven stress.
Using Interior Adhesive or Paint
Products intended for indoor trim are not automatically suitable for rain, heat, freezing temperatures, and masonry movement. Check that every adhesive, primer, paint, and sealer is rated for the materials and exposure conditions involved.
Leaving the Wood Unprotected
Even decay-resistant or pressure-treated wood benefits from proper maintenance. Moisture can collect where the rails pass through the blocks, so inspect those hidden contact areas periodically.
Making the Span Too Long
A bench can look solid while the unsupported center flexes under weight. Add a middle pedestal for longer designs. Extra support is less glamorous than dramatic slow-motion lumber failure, but considerably more useful.
Maintenance for a Long-Lasting Outdoor Bench
Inspect the bench at the beginning and end of each outdoor season. Look for settlement beneath the supports, cracked masonry, loose adhesive, peeling paint, splintered wood, and moisture damage.
Wash the bench with mild soap and water. Avoid harsh cleaners unless they are approved for the coatings. Touch up exposed concrete and reapply the wood finish when water stops beading or the surface begins to look dry and weathered.
Keep leaves and damp debris from collecting around the base. In freezing climates, good drainage is particularly important because repeated freezing and thawing can worsen cracks and ground movement.
Cinder Block Bench Customization Ideas
- Modern monochrome: Paint the blocks matte black and use warm cedar-colored rails.
- Coastal style: Pair white masonry paint with pale gray or natural wood.
- Garden seating: Add separate planters beside each support and use botanical-print cushions.
- Backless dining bench: Size the height and length to coordinate with an outdoor table.
- Corner layout: Build two benches at a right angle with independent supports.
- Movable design: Skip permanent bonding only when the low, temporary configuration remains stable and is never used where shifting creates a hazard.
Practical Experience: Lessons First-Time Builders Tend to Learn
The first surprise in this project is usually not the assembly. It is the weight. A concrete block may look manageable when sitting peacefully on a store pallet, but it becomes significantly more opinionated halfway between the vehicle and the backyard. Moving fewer blocks at a time, wearing gloves, and clearing the walking path beforehand makes the job safer and less exhausting.
The second lesson is that the foundation deserves more attention than the glamorous finishing steps. It is tempting to choose paint colors, arrange cushions, and imagine the completed patio while ignoring a slightly uneven patch of ground. Unfortunately, a small difference beneath one support becomes obvious after long rails connect both sides. Taking an extra 20 minutes to compact and level the base can prevent hours of later adjustment.
Another common discovery is that “standard size” does not mean “identical.” One block may have rougher openings, thicker internal webs, or a slightly different profile from another batch. Dry-fitting all four rails before gluing anything is therefore essential. Builders often find that rotating or swapping two blocks solves an alignment problem without cutting or grinding.
Wood preparation also affects the final result more than expected. Rough 4-by-4 posts can technically form a seat, but splinters and sharp corners make the bench feel unfinished. Sanding the top surfaces and softening the edges transforms basic construction lumber into something that feels much closer to outdoor furniture. Applying finish before inserting the rails is easier than attempting to stain wood trapped inside concrete openings.
Painted blocks create another practical lesson: patience is part of construction. Concrete can hold moisture long after the surface appears dry, and paint applied too early may peel or develop uneven areas. Letting cleaned blocks dry completely and following primer and paint recoat times produces a much more durable result. This is not the stage for aggressively optimistic scheduling.
During assembly, a helper becomes surprisingly valuable. Long wood posts are awkward to guide through two separated supports while keeping both ends level. One person can feed the rail while the other watches alignment and protects the block edges. The process becomes smoother, and fewer newly painted surfaces receive accidental scrapes.
Once assembled, many builders notice that the bench looks better with modest rather than excessive overhang. Short, even extensions beyond the block bases appear intentional. Long ends can invite people to sit beyond the supports, increasing leverage and flex. Measuring both sides keeps the design balanced and reduces unnecessary stress on the rails.
Comfort is the final reality check. A cinder block and timber bench can be structurally sturdy while still feeling like, well, a collection of cinder blocks and timber. Outdoor cushions make an enormous difference. They soften the seat, add color, and visually connect the bench with surrounding patio furniture.
The most useful overall lesson is that this simple project rewards careful sequencing: prepare the ground, clean and finish the materials, dry-fit everything, bond the supports, allow complete curing, and test gradually. None of those steps is complicated. Together, however, they create a bench that looks deliberate, sits securely, and lasts far longer than a hastily stacked version.
Conclusion
Learning how to make a cinder block bench is an approachable way to add affordable, customizable seating to an outdoor space. The project requires only basic materials, but its success depends on a level foundation, compatible block openings, exterior-rated products, protected wood, and sufficient curing time.
Start with a dry layout, make adjustments before applying adhesive, and add center support when extending the design. Finish the bench with cushions, paint, or nearby planters, and it can look less like leftover construction material and more like furniture that was always meant to be there.
Note: This bench is intended as a low residential seating project. Site conditions, materials, weather exposure, and local requirements vary. For public installations, elevated designs, permanent built-ins, or uncertain structural conditions, consult a qualified building professional.