Learning how to hold an archery bow looks simple from the outside. You pick up the bow, aim at the target, pull the string, and pretend you are the main character in a medieval movie. Easy, right? Not quite. In real archery, the way your bow hand touches the grip can decide whether your arrow lands in the gold or wanders off like it has weekend plans.
A proper archery bow grip is not about squeezing harder. In fact, “hold on tight” is usually terrible advice here. A tight grip can twist the bow, push the riser sideways, slap your forearm with the string, and make your arrows scatter left and right. That unwanted twisting is called bow torque, and it is one of the most common reasons beginners struggle with accuracy.
The good news is that a better bow grip is learnable. Whether you shoot a recurve bow, compound bow, longbow, or beginner training bow, the fundamentals are similar: relaxed hand, correct pressure point, steady bow arm, and repeatable setup. This guide breaks the process into 11 easy steps so you can build a cleaner, safer, more consistent shot.
Why Your Bow Grip Matters So Much
Your bow hand is one of the few places where your body directly influences the bow during the shot. If your hand is relaxed and positioned correctly, the bow can move straight forward as the arrow leaves the string. If your hand squeezes, twists, or changes pressure during the draw, the bow may rotate slightly. Even a tiny movement can send the arrow off course.
Think of your bow grip like the steering wheel of a car. If you yank it at the last second, you cannot blame the tires for going into the neighbor’s rose bushes. Likewise, if your grip changes during release, you cannot always blame the sight, arrow rest, stabilizer, or the innocent little arrow doing its best.
How to Hold an Archery Bow in 11 Easy Steps
Step 1: Start With a Safe Shooting Setup
Before you think about hand position, make sure your shooting area is safe. Point the bow only in a safe direction, shoot only at a proper target, and make sure there is a safe backstop behind it. Never draw or release a bow without an arrow, because dry firing can damage the bow and may injure the archer.
Also check that your bow is appropriate for your strength. If the draw weight is too heavy, your body will try to “survive” the shot instead of learning good form. That usually means raised shoulders, shaking arms, rushed releases, and a grip tighter than a jar lid that refuses to open.
Step 2: Stand Naturally Before You Grip the Bow
A better grip begins before your hand even touches the bow. Stand with your feet about shoulder-width apart, body balanced, and shoulders relaxed. Your stance should feel athletic but not stiff. If your body is twisted, leaning, or tense, that tension often travels into the bow hand.
For most beginners, a square stance works well: feet roughly parallel to the shooting line, hips steady, and head turned toward the target. The goal is to create a stable platform so your bow hand does not have to “rescue” the shot.
Step 3: Relax Your Bow Hand First
Before placing your hand on the grip, let your fingers relax. Shake your hand out if needed. The correct feeling is open and easy, not claw-like. Many archers improve instantly when they stop trying to control the bow with finger strength.
Your bow hand should support the bow, not strangle it. A helpful image is to imagine the bow resting against your hand rather than being grabbed by it. The more relaxed your hand stays, the less likely you are to create bow torque.
Step 4: Place the Grip Against the Thumb Pad
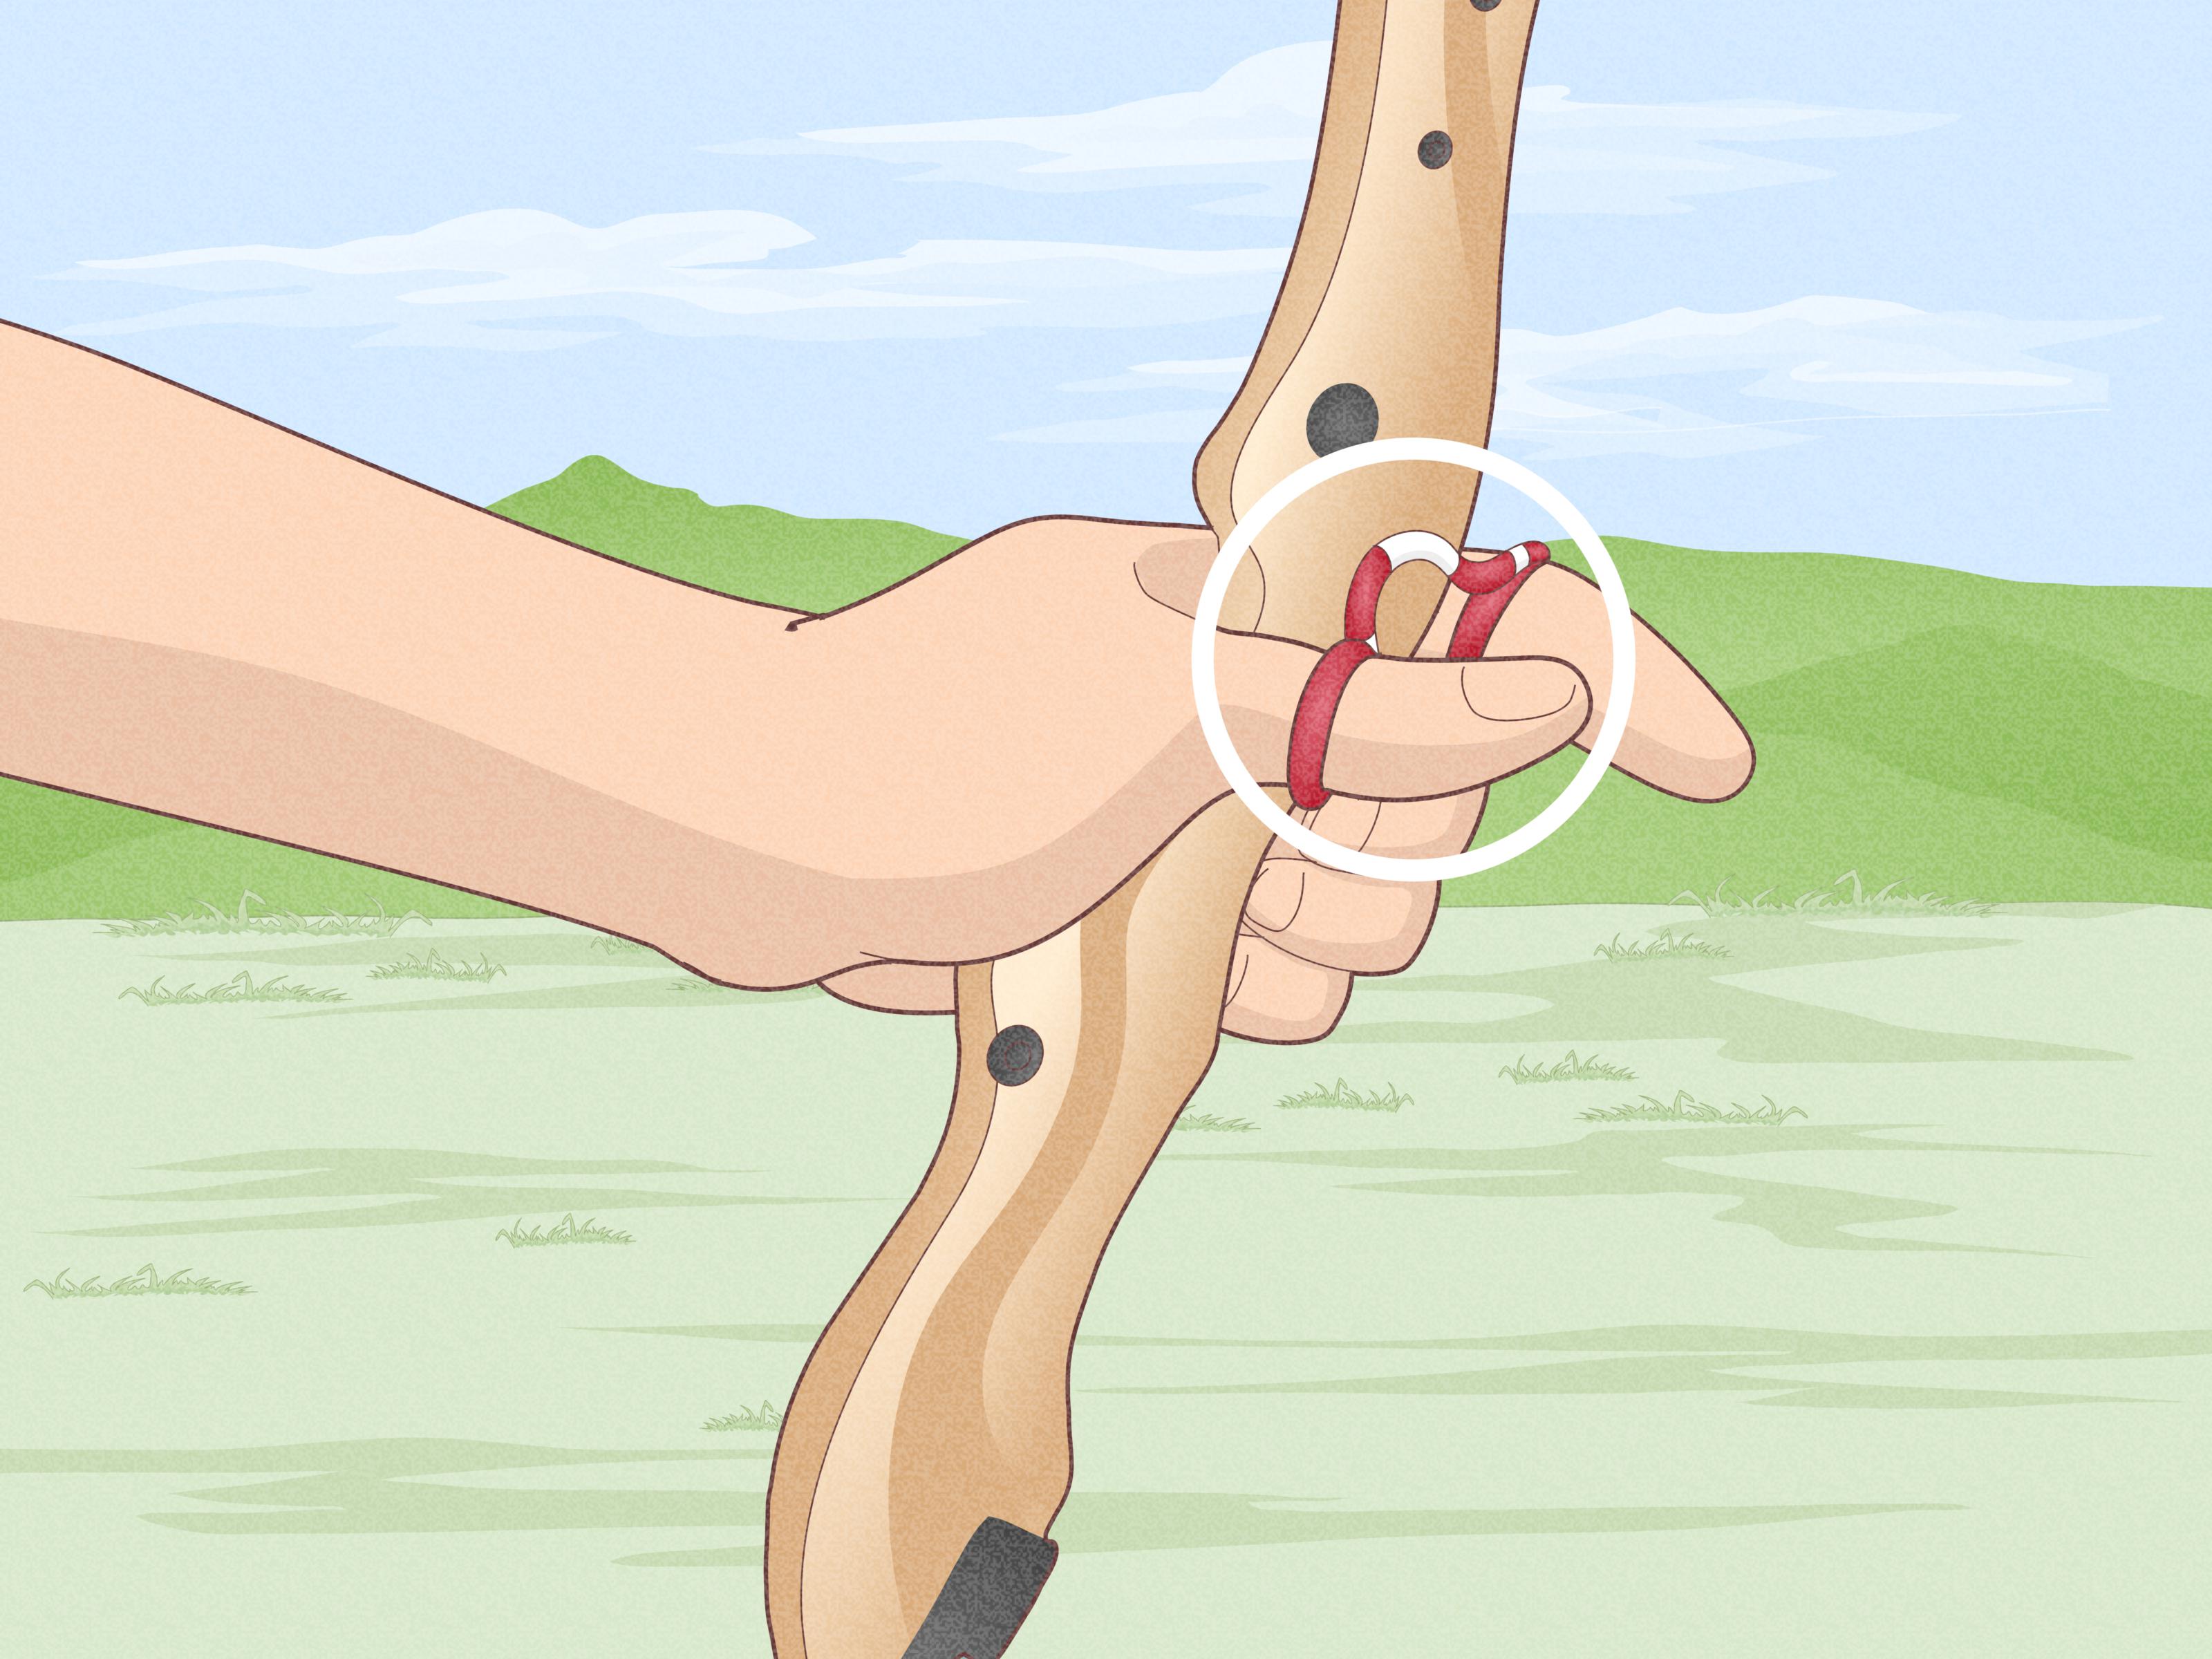
Slide your hand into the bow grip so the pressure sits on the thumb pad side of your palm. This is the fleshy area at the base of your thumb. Avoid placing the bow deep in the middle of your palm like you are holding a hammer or pistol grip.
The grip should generally line up near the lifeline of your palm, but the main pressure should stay on the thumb-side pad. This position creates a more stable connection through the bones of the arm and reduces the chance of the palm muscles twisting the riser.
Step 5: Set the Web of Your Hand in the Throat of the Grip
The deepest part of the bow grip is often called the throat. Slide your hand upward until the web between your thumb and index finger naturally meets that area. Do not jam your hand into the grip aggressively; just let it settle into the same place every time.
Consistency is the secret sauce. If your hand sits high on one shot, low on the next, and sideways on the third, your arrow groups will look like a weather map. Build the habit of placing your hand in the grip the same way before every draw.
Step 6: Angle Your Knuckles About 30 to 45 Degrees
Once your hand is placed correctly, your bow-hand knuckles should usually angle about 30 to 45 degrees away from the riser. This is one of the easiest visual checks for a proper archery grip. If your knuckles are vertical and parallel to the bow, your hand is probably too deep in the grip.
The 30- to 45-degree angle helps rotate your elbow away from the string path. That can reduce painful forearm slap and make your bow arm alignment cleaner. Your future forearm will thank you, possibly with a tiny parade.
Step 7: Point Your Thumb Toward the Target
Your thumb should generally point forward toward the target. This helps guide the pressure straight ahead instead of sideways into the riser. Keep the thumb relaxed, not pressed hard against the bow.
Many beginners accidentally push the side of the grip with the thumb. That tiny sideways pressure can cant or twist the bow. Instead, think of your thumb as a quiet direction marker. It points where the energy should go, but it does not need to boss everyone around.
Step 8: Let Your Fingers Rest Lightly or Float
Your fingers should not wrap tightly around the bow. Depending on your style and equipment, your fingers may lightly touch the front of the riser, curl gently, or float relaxed beside the grip. What matters most is that they do not squeeze during the shot.
If you are worried about dropping the bow, use a finger sling or wrist sling. A sling allows the bow to move naturally forward after release without forcing you to grab it. Many target archers rely on a sling because it encourages a relaxed bow hand and cleaner follow-through.
Step 9: Keep Your Wrist Neutral and Repeatable
Your wrist position should feel comfortable and repeatable. Some bows have high grips, some have low grips, and some have custom shapes, so there is not one perfect wrist angle for everyone. However, the wrist should not collapse dramatically inward or bend in a way that creates tension.
A neutral wrist helps transfer pressure straight through the bow arm. If your wrist changes angle while you draw, aim, or release, the grip pressure changes too. That is like moving the launch pad while the rocket is taking off. Technically exciting, but not ideal.
Step 10: Maintain the Same Grip Through the Draw
After you set your grip, do not keep adjusting it during the draw. Many archers start with a decent grip, then slowly tighten their fingers as the bow reaches full draw. This is usually caused by fear of dropping the bow, too much draw weight, or simple beginner nerves.
As you draw, keep the bow hand soft. Let the bow press into the thumb pad while your back and shoulder muscles do the real work. The bow hand should feel steady, but not active. If your grip pressure changes right before release, your arrow may change direction right along with it.
Step 11: Follow Through Without Grabbing the Bow
After the release, resist the urge to snatch the bow. A good follow-through allows the bow to move naturally. If you are using a sling, the bow may rock forward slightly in your hand. That is normal and often desirable.
Keep your bow arm directed toward the target until the arrow lands. Do not drop the bow immediately to admire your shot. That habit can pull the bow down at release and create inconsistent groups. The target is not going anywhere, so let the shot finish before you begin your celebration dance.
Common Bow Grip Mistakes to Avoid
The Death Grip
The death grip happens when an archer squeezes the bow like it owes them money. This is one of the fastest ways to create torque. If your knuckles turn white, your forearm feels tense, or your fingers clamp down during release, loosen up.
Holding the Bow Like a Pistol
Many bows have a grip shape that looks a little like a pistol handle, so beginners naturally grab it like one. Unfortunately, this places too much hand around the riser and makes twisting easier. Instead, seat the bow against the thumb pad and keep the knuckles angled.
Changing Grip Pressure While Aiming
Some archers grip lightly at first, then squeeze as they aim. This often happens when the sight pin starts floating. Remember, movement is normal. Do not try to freeze the bow by squeezing it. Let the sight settle and execute the shot smoothly.
Using Too Much Thumb Pressure
Your thumb should point forward, but it should not shove sideways into the bow. Side pressure from the thumb can cant the bow or affect left-right accuracy. Keep the thumb relaxed and let the pressure run straight through the grip.
Recurve Bow vs. Compound Bow Grip
The basic principles of a proper grip apply to both recurve and compound bows: relaxed hand, pressure on the thumb pad, angled knuckles, and minimal torque. However, the feeling can differ slightly.
With a recurve bow, many archers notice the bow wants to jump forward more clearly after release, especially with a sling. This makes a relaxed hand very important. With a compound bow, the grip may be narrower and the let-off at full draw may make it tempting to over-aim. Even then, the bow hand should stay quiet and consistent.
Traditional longbow shooters may use different grip styles depending on the bow design, but the same warning still applies: avoid unnecessary squeezing. The bow should be supported, not wrestled.
How to Practice a Better Archery Bow Grip
Use Blank Bale Practice
Blank bale practice means shooting at a close target without focusing heavily on scoring. Stand close enough to shoot safely and comfortably, then focus only on your grip, draw, release, and follow-through. This removes the pressure of aiming and lets your body learn the movement.
Check Your Knuckles Before Every Shot
Before drawing, glance at your bow hand. Are your knuckles angled? Is your thumb pointing forward? Are your fingers relaxed? A two-second check can save you from repeating the same mistake for 50 arrows.
Film Your Bow Hand
Ask a friend to record your bow hand from the front and side. Video often reveals hidden habits, such as squeezing during the last inch of draw or grabbing the bow immediately after release. Watching yourself may be humbling, but so is missing the target. Choose your teacher.
Use Light Draw Weight While Learning
A lighter bow helps you focus on form instead of survival. If your bow is too heavy, your grip will usually tense up. Build skill first, then increase draw weight gradually as your strength and consistency improve.
Quick Troubleshooting Guide
If Your Arrows Hit Left or Right
Check for bow torque. Make sure your hand is not deep in the palm, your fingers are not squeezing, and your thumb is not pressing sideways. Also confirm that your anchor, release, and sight setup are consistent.
If the String Slaps Your Forearm
Look at your bow-hand angle. A pistol-style grip can bring the forearm into the string path. Rotate the knuckles to about 30 to 45 degrees and rotate the elbow away from the string. An arm guard is useful, but it should not be a substitute for fixing form.
If Your Hand Gets Tired
You may be gripping too hard. The bow hand should not feel like it is doing heavy labor. If fatigue appears quickly, reduce grip pressure and check whether your draw weight is too high.
of Practical Experience: What a Better Bow Grip Feels Like
One of the most surprising experiences for new archers is discovering that a “better grip” often feels like almost no grip at all. At first, this can feel wrong. Your brain says, “Excuse me, we are holding a weapon-like object. Shouldn’t we clamp down?” But archery rewards trust more than panic. When the bow is seated properly against the thumb pad and supported by a relaxed hand, it feels stable without being squeezed.
A common beginner moment happens after the first few shots with a loose grip. The archer releases the string, the bow rocks forward slightly, and their eyes get very large. That little forward movement is not a disaster. It is often a sign that the bow is moving naturally instead of being yanked sideways by the hand. This is why a sling can be so helpful. It gives the archer permission to stay relaxed instead of grabbing the bow at the exact worst moment.
Another real-world lesson is that grip mistakes can hide inside “aiming problems.” Many archers spend weeks adjusting sights, changing arrows, blaming the wind, or giving the target suspicious looks. Then a coach moves their bow hand slightly onto the thumb pad, angles the knuckles, and suddenly the arrows group better. It feels like magic, but it is really mechanics. The bow finally gets to send the arrow forward without the hand steering it off course.
When practicing, pay attention to what your hand does under pressure. It is easy to keep a relaxed grip during the first shot of the day. It is harder when you are tired, when someone is watching, or when your last arrow landed beautifully and you desperately want to do it again. That is when the fingers sneak back onto the grip. They mean well, but they are terrible employees. Keep them relaxed.
One useful habit is to create a short pre-shot checklist: stance, relaxed hand, thumb pad, angled knuckles, draw, anchor, aim, release, follow-through. Repeat it until it becomes boring. Boring is wonderful in archery. Boring means repeatable. Repeatable means accurate. Accurate means you spend less time wondering why your arrow decided to explore the outer rings.
It also helps to practice at close range. Many beginners want to move back quickly because longer distances feel more impressive. But close-range practice builds the foundation. If your bow grip is inconsistent at 5 yards, distance will not fix it. Distance simply gives your mistakes more room to become dramatic.
Finally, remember that every archer’s hand is a little different. Grip shape, bow style, hand size, wrist angle, and shooting discipline all influence what feels best. The goal is not to copy another archer perfectly. The goal is to find a relaxed, low-torque, repeatable position that lets your bow perform consistently. Once you feel that clean shot leave the string, you will understand why grip matters so much. It is quiet, simple, and oddly satisfyinglike finally closing all your browser tabs.
Conclusion
Learning how to hold an archery bow correctly is one of the fastest ways to improve consistency. A better grip reduces torque, prevents unnecessary tension, protects your forearm, and helps your arrows group more predictably. The key is simple but not always easy: place the bow on the thumb pad, keep your knuckles angled, point your thumb toward the target, relax your fingers, and maintain the same hand position from setup through follow-through.
Do not rush the process. Practice close, shoot safely, use a bow you can control, and let good form become automatic. In archery, the quiet details matter. Your grip may not look flashy, but it is the handshake between you and the bow. Make it calm, consistent, and friendlyand your arrows will start acting a lot more civilized.