There is a special kind of joy in watching a homebrew test instrument stare down professional lab gear and refuse to blink. That is exactly why the idea of a DIY curve tracer is so catnip for electronics people. A curve tracer sounds intimidating, like something that belongs in a white lab coat next to a six-figure budget. In reality, its job is beautifully simple: apply voltage or current to a device, measure what comes back, and draw the electrical truth as a family of curves. No marketing fluff, no guesswork, just the transistor, diode, MOSFET, or mystery part on your bench telling you who it really is.
That is what makes the phrase “Homebrew Curve Tracer Competes With The Big Guns” so compelling. It does not mean a DIY build suddenly replaces every feature in a modern high-power semiconductor lab. It means something more interesting: with smart analog design, careful protection, a practical user interface, and an oscilloscope or computer doing the display work, a homemade curve tracer can deliver the core insight most engineers, restorers, experimenters, and serious hobbyists actually need. And sometimes that is the part that matters most.
What a Curve Tracer Actually Does
A curve tracer measures the current-voltage behavior of electronic devices. For a simple diode, that means revealing the forward knee, leakage, and sometimes reverse breakdown behavior. For a transistor or FET, things get more fun. Instead of a single line, you get a whole family of curves created by sweeping one variable while stepping another. Suddenly, gain, saturation, breakdown, leakage, threshold behavior, and device matching stop being abstract data-sheet promises and start becoming something you can actually see.
This is why curve tracers have stayed relevant for so long. They are not just pretty graph machines. They are practical tools for failure analysis, parametric characterization, classroom learning, parts matching, and debugging. If you are trying to compare transistors for a push-pull audio stage, inspect a suspect MOSFET, check whether a thrift-store bag of semiconductors is treasure or electronic confetti, or understand why one device gets grumpy sooner than another, a curve tracer earns its bench space fast.
Even a basic setup can be revealing. A resistor, a ramp or triangle waveform, and an oscilloscope in X-Y mode can trace the V-I behavior of two-terminal parts. Once you move into three-terminal devices, though, the magic comes from stepping base current or gate voltage while sweeping collector-emitter or drain-source voltage. That is where the humble curve tracer graduates from “neat demo” to “serious instrument.”
Why the “Big Guns” Became the Benchmark
Professional curve tracers earned their reputation honestly. Classic Tektronix machines became legendary because they gave engineers direct visual control over semiconductor behavior. Those instruments were not just test gear; they were electrical lie detectors. They made it possible to characterize devices, extract parameters, compare parts, investigate breakdown, and generate the kind of lab data that finds its way into design work, qualification, and failure reports.
Modern descendants and functional successors raised the bar even higher. Today’s advanced systems from companies like Keysight and Tektronix/Keithley do much more than draw old-school I-V families. They integrate source-measure units, pulsed sweeps, automated analysis, data export, software control, and protection features that keep both operator and device out of the danger zone. For high-power semiconductors, wide-bandgap devices, and serious characterization work, modern curve tracing has moved into territory involving pulsed I-V, capacitance, gate charge, reverse recovery, thermal effects, and breakdown studies. In other words, the modern lab version is less “cool graph” and more “semiconductor truth extraction engine.”
That sounds intimidating, but it also clarifies the real comparison. A homebrew curve tracer does not have to beat a professional analyzer at every spec-sheet category to be impressive. It only has to deliver a large chunk of the value at a tiny fraction of the cost and complexity. That is where the DIY story gets delicious.
How a Homebrew Curve Tracer Punches Above Its Weight
The homebrew designs that deserve attention are not random breadboards with a brave face. The good ones make careful choices. They use controlled sweeps, current limiting, sensible ranges, stable step generation, and measurement paths designed to keep noise and device stress under control. The better DIY instruments also understand a crucial truth: the display does not need to be built into the box if an oscilloscope or computer can do that job beautifully.
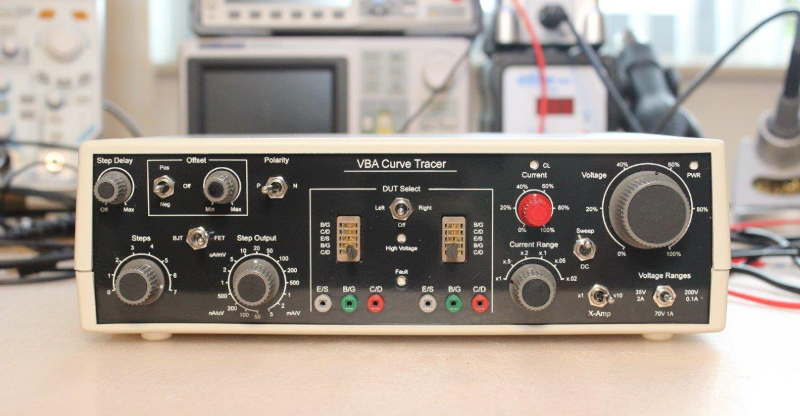
That design philosophy is one reason the VBA curve tracer got so much attention. The project was presented as a serious effort by a small team to create a curve tracer that could compete with professional instruments in practical bench work. That phrase matters. Practical bench work is where the magic lives. If your goal is to measure transistor families, compare devices, inspect gain behavior, look at breakdown onset, and learn more from a part in five minutes than a DMM could teach you in a week, then a well-executed DIY tracer is already playing in important territory.
The most successful homebrew tracers also borrow ideas from professional systems without copying them blindly. They use stepped drive for BJTs or FETs, shunt-based current measurement, selectable gain or sensitivity ranges, and enough protection to prevent the device under test from turning into a tiny silicon smoke machine. That last point deserves applause. Current limiting may not be glamorous, but it is the reason a curve tracer can safely explore interesting regions instead of becoming an unplanned cremation service for vintage parts.
The Features That Let DIY Compete
1. Controlled sweeps instead of chaos
A homebrew curve tracer becomes credible the moment its sweeps are repeatable. Repeatability is everything. One pretty trace is nice. Ten traces that behave the same way under the same conditions are instrumentation. Good DIY designs manage voltage ramps and stepped control signals with enough stability that the family of curves means something, rather than merely looking artsy.
2. Current limiting and device protection
This is where the grown-up engineering shows. Professional systems build in compliance limits, interlocks, and safeguards. A DIY instrument obviously will not always have the same safety envelope, but it can absolutely include solid current limiting and sensible range selection. That is the difference between tracing a transistor and bullying it.
3. Real measurement paths
Good homebrew tracers do not fake the data. They measure current through shunts, convert that into display voltage cleanly, and keep the scaling understandable. Some also allow gain changes for low-level current measurement, which is a big deal when you are trying to examine leakage or small-signal behavior without the trace disappearing into noise like a ghost in a cheap horror movie.
4. Oscilloscope or PC-assisted display
Using an external scope in X-Y mode is not a compromise; it is a smart move. It keeps the instrument simpler and lets the builder focus on sourcing, stepping, protection, and measurement. PC-based implementations go one step further by storing data, exporting plots, or adding software control. Suddenly the homemade instrument is not just educational; it becomes useful in actual bench documentation and comparison work.
5. Adaptability
A commercial monster system may cover extreme voltages, massive currents, pulsed testing, and exotic devices. A homebrew tool wins by being nimble. It can be optimized for small-signal transistors, common MOSFETs, diode characterization, tube experiments, or part matching. In bench terms, that adaptability is often more valuable than heroic maximum ratings you will never use.
Where the DIY Version Really Shines
The strongest argument for a homemade curve tracer is not cost, even though cost is a huge part of the story. It is insight per dollar. That ratio gets silly in a good way. For the price of a few precision parts, connectors, a case, and a respectable amount of stubbornness, you can get a tool that reveals device behavior in a visual, intuitive, immediately useful way.
Need to compare transistors for matching? A curve tracer makes it obvious. Need to inspect a MOSFET that passed a simple continuity check but still behaves like it has emotional issues? A curve tracer helps. Need to understand whether a diode’s knee and leakage look normal? There it is on the screen. Need to teach a student why nonlinear devices are called nonlinear? Welcome to the show.
This is also why DIY curve tracers remain attractive in an era of excellent source-measure units. An SMU is a brilliant instrument, and modern SMU-based I-V tracing is powerful. But a dedicated or semi-dedicated tracer still has a special appeal because it is direct. You turn the control. The curve responds. You zoom in on breakdown or turn-on behavior with your eyes, not just a spreadsheet. It feels like conversation rather than paperwork.
Where the Big Guns Still Win
Let us keep our soldering iron on the ground of reality. A homebrew curve tracer does not beat a modern industrial analyzer in high-power testing, automated production workflows, integrated safety systems, pulsed wide-bandgap characterization, or extreme measurement range. If you are validating SiC and GaN power devices, generating formal qualification data, or working anywhere near kilovolts and serious current, you want professional equipment and the protective features that come with it.
The big instruments also dominate when repeatability, traceability, automation, multi-channel synchronization, and software-driven analysis become mandatory rather than merely desirable. That is not a knock on DIY. It is just the difference between a sharp garage-built sports car and a factory race platform with telemetry, a pit crew, and a lawyer.
Still, for a surprising amount of bench work, the gap is narrower than people expect. That is the point. A thoughtfully designed homebrew curve tracer can absolutely compete on usefulness, learning value, and day-to-day diagnostic power. In the world of practical electronics, that is not a consolation prize. That is a win.
Bench Experience: What Using a Homebrew Curve Tracer Feels Like
The first real experience many people have with a homemade curve tracer is not technical. It is emotional. You clip in a device, turn the sweep up, and the screen suddenly stops being a screen. It becomes a confession booth for semiconductors. Good parts look calm and repeatable. Suspicious parts look weird in the most educational way possible. Curves bend where they should not, step spacing goes odd, breakdown arrives too early, or gain looks as if it woke up late and forgot its lunch. You start noticing personality in parts that all looked identical in a drawer five minutes earlier.
That is one of the best experiences related to this topic: the way a curve tracer changes how you think. Before using one, a transistor can feel like a black box with three legs and a reputation. After using one, it becomes a device with visible behavior across a range of conditions. That shift is addictive. It also makes you a better troubleshooter because you stop relying only on pass-fail checks. Instead of asking, “Does this part still sort of work?” you start asking, “How is it behaving, and is that behavior normal?” That is a much sharper question.
Another experience that stands out is part matching. On paper, that sounds dull enough to put coffee to sleep. On the bench, though, it is deeply satisfying. Take a handful of supposedly identical BJTs or MOSFETs, drop them in one by one, and watch the truth appear. Some parts line up beautifully. Others drift. A few wander so far off the family resemblance that you start wondering whether they were ever invited to the reunion. For audio projects, restorations, and experimental analog circuits, that visual comparison can save time, reduce guesswork, and make a design feel more intentional.
Then there is the educational experience. A homemade curve tracer is one of those rare tools that can please both the veteran engineer and the curious beginner. A beginner sees the diode knee or transistor family of curves and suddenly understands why textbooks keep making such a fuss. A seasoned builder appreciates how quickly the same instrument can reveal leakage, threshold quirks, breakdown onset, or mismatched gain. It is the same story from two different seats: one sees clarity, the other sees efficiency.
There is also a very specific joy in using a tool you built yourself. Commercial instruments are impressive, but they can feel distant. A homebrew curve tracer feels personal. You know why the shunt value was chosen. You know why that range switch is where it is. You know which part of the enclosure fought back during assembly and which calibration step made you question your life choices. When the instrument finally traces a clean family of curves, the result is not just data. It is proof that your design, wiring, debugging, and patience all came together into something genuinely useful.
Of course, the experience is not always glamorous. DIY gear can be fiddly. You may chase grounding noise, tweak scaling, improve protection, or realize your first front-panel labeling decision was made with the confidence of a raccoon wearing safety glasses. But that is part of the charm. Each improvement teaches you something about measurement, not just construction.
In the end, the experience of using a homebrew curve tracer is memorable because it blends discovery, craftsmanship, and practical bench value. It gives you a better view of your parts and, honestly, a better view of your own skills. That is why these projects keep turning heads. They are not just cheaper substitutes for expensive tools. They are invitations to understand electronics more deeply, one beautiful curve at a time.
Conclusion
A homebrew curve tracer competes with the big guns by doing something smart rather than something impossible. It focuses on the core job of curve tracing and executes it well: controlled sweeps, meaningful current measurement, usable displays, and enough protection to explore device behavior safely. It may not replace a high-end analyzer built for wide-bandgap power semiconductors, formal characterization, or extreme test conditions, but it absolutely can rival commercial tools where it counts for many users: insight, speed, learning, troubleshooting, and bench usefulness.
That is why this kind of project matters. It proves that great instrumentation is not just a function of budget. It is also a function of design discipline and a clear understanding of what the instrument needs to do. When a homemade curve tracer can help you match parts, diagnose failures, understand nonlinear behavior, and genuinely enjoy the process, it is not playing pretend. It is competing.