Some shelves quietly hold your books. Others walk into the room wearing work boots, carrying a coil of rhelves belong to the second group.
This project combines warm wood, rugged metal pipe, and textured rope to create storage that feels industrial, rustic, nautical, and slightly bohemian at the same time. The finished shelves can display plants, framed photos, small books, bathroom supplies, kitchen accessories, or the collection of ceramic animals you insist is “carefully curated.”
Better still, the design is customizable. You can build a compact two-tier shelf for a bathroom, a wider three-tier unit for a living room, or a tall installation that turns an empty wall into practical storage. The key is to plan the dimensions carefully, mount the pipe hardware securely, and make every rope knot consistent.
What Are Pipe and Rope Shelves?
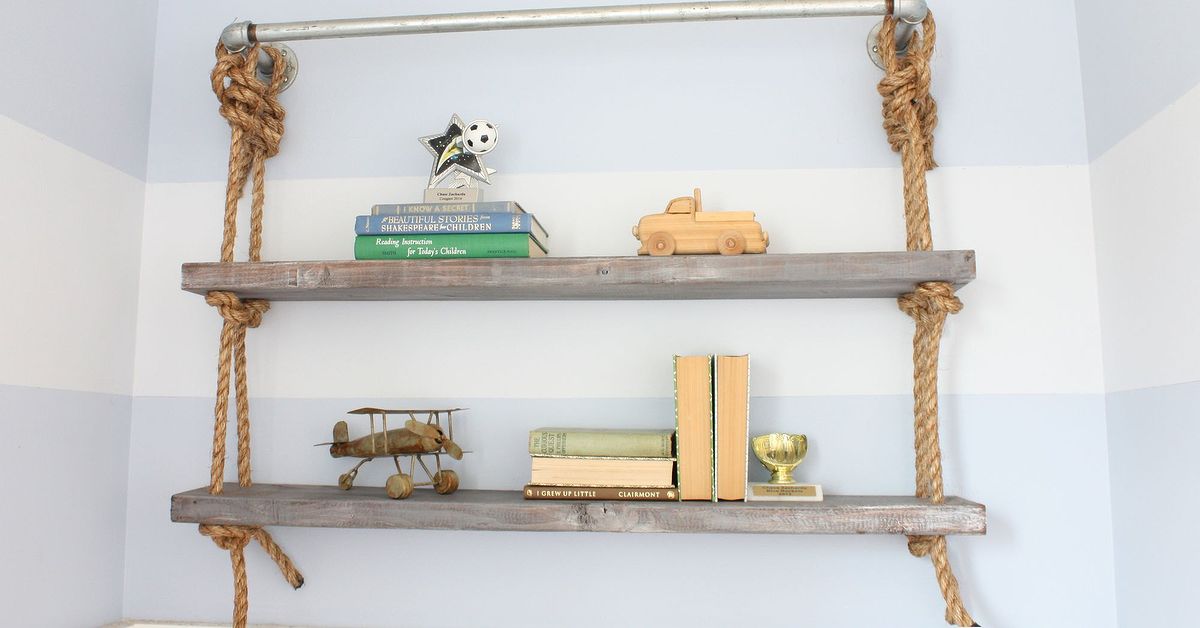
Pipe and rope shelves are wall-mounted or suspended shelves that combine metal plumbing pipe with rope-supported wooden boards. In a hybrid design, black steel pipe forms the main wall-mounted support while rope passes through the shelves and keeps them aligned vertically.
The pipe adds strength and an industrial appearance. The rope softens the design and introduces texture. Wood connects the two materials, preventing the project from looking like either a plumbing repair or the rigging from a small pirate ship.
There are several ways to arrange the components. A simple version uses two pipe arms extending from the wall, with the rope shelf suspended between or beneath them. A larger version uses vertical pipe rails, floor flanges, elbows, and horizontal supports. Another option uses a single pipe hanging bar with two rope loops supporting several boards.
Why This DIY Shelf Design Works
Open shelving makes use of vertical wall space without the visual bulk of a cabinet. Exposed brackets are also generally easier to install than concealed floating-shelf hardware. Pipe and rope deliberately become part of the design, so there is no need to hide every fastener behind complicated joinery.
The project is also forgiving. Minor differences in wood grain, rope texture, and pipe finish usually improve the handmade appearance. Measurements and mounting points still need to be accurate, but the materials do not have to look factory-perfect.
Materials for DIY Pipe and Rope Shelves
The following list is suitable for a basic three-shelf unit. Adjust quantities and dimensions to match your wall and intended storage.
- Three wood boards, approximately 30 to 36 inches long
- Two lengths of strong decorative rope
- Black steel or galvanized pipe nipples
- Two floor flanges
- Two 90-degree elbows
- Two short pipe sections for the projecting arms
- Wood screws suitable for the shelf boards
- Structural screws or manufacturer-rated wall anchors
- Sandpaper in medium and fine grits
- Wood stain, paint, or clear protective finish
- Painter’s tape and a pencil
- Optional pipe straps or clamps
- Optional felt pads, decorative beads, or metal end caps
Choosing Wood for the Shelves
Pine is affordable, widely available, and easy to cut, sand, stain, and drill. It works well for decorative shelves and moderate storage. Poplar offers a smoother appearance when the boards will be painted. Oak and maple cost more but provide greater hardness and a more refined grain.
A nominal 1-by-10 board provides useful depth without projecting too far into the room. Wider boards can hold larger objects, but deeper shelves create more leverage against the wall hardware. Keep that in mind before building a shelf deep enough to host a microwave, a library, and three generations of family photographs.
Inspect each board from both ends before buying it. Avoid pieces with severe twisting, deep cracks, loose knots, or obvious cupping. A little character is charming. A board shaped like a ski jump is less helpful.
Selecting the Rope
Braided cotton rope creates a soft, clean look and is relatively comfortable to knot. Manila and sisal rope have a rougher rustic texture but may shed fibers. Synthetic rope resists moisture and can be useful in bathrooms, laundry rooms, or covered outdoor areas.
A rope diameter between 3/8 and 1/2 inch is visually substantial for many small and medium shelves. The rope must fit through the drilled holes without excessive force. Purchase more than your calculated length so you have room for knots, adjustments, and trimming.
Choosing Pipe and Fittings
Half-inch or three-quarter-inch black pipe is commonly used for industrial-style furniture. Three-quarter-inch components create a heavier visual profile, while half-inch pipe appears slightly lighter and may suit a small shelf.
Make sure every fitting uses the same nominal pipe size and thread type. Test-assemble the pipe parts before mounting them. Plumbing fittings do not always tighten to the same final orientation, so a dry fit can reveal whether an elbow stops at an inconvenient angle.
Tools You Will Need
- Tape measure
- Stud finder
- Level
- Drill or driver
- Drill bit slightly wider than the rope
- Bits for pilot holes and wall fasteners
- Circular saw, miter saw, or handsaw
- Clamps
- Orbital sander or sanding block
- Wrench or pipe wrench
- Safety glasses and hearing protection
Ask a home center to cut the boards when a saw is unavailable. Confirm every measurement first, because “about this long” is not a cutting dimension, despite its popularity in enthusiastic weekend projects.
Plan the Shelf Before Cutting Anything
Begin by selecting the wall. Check for doors, windows, switches, vents, plumbing, and electrical lines. Consider how people move through the room so the shelves do not become a shoulder-level obstacle.
Locate the wall studs and mark them with painter’s tape. Securing the pipe flanges to studs usually provides the most reliable installation. When the design cannot align with framing, choose anchors specifically rated for the wall material and expected load. Do not assume that a random plastic anchor from the bottom of a toolbox can support a loaded shelving unit.
Measure the available width and decide how many shelves you need. A spacing of roughly 10 to 14 inches works for many decorative objects, although taller plants and framed art may require more room. Lay the objects on the floor first to test the arrangement.
Sketch the shelf from the front and side. Mark the board length, depth, pipe positions, rope holes, shelf spacing, and mounting height. This simple drawing prevents expensive improvisation later.
How to Build DIY Pipe and Rope Shelves
Step 1: Cut the Shelf Boards
Measure and mark all boards with a square so the cut lines are perpendicular to the edges. Clamp each board securely and cut it to length. When using a circular saw, support both sides of the workpiece and keep the power cord away from the blade path.
Place the cut boards on top of one another to compare them. Small differences become noticeable when the shelves hang in a vertical stack, so trim or sand the ends until the boards match.
Step 2: Mark the Rope Holes
Mark one hole near each corner, keeping every hole the same distance from the front, back, and side edges. Approximately 1 to 1 1/2 inches from the edges works for many boards, but the correct position depends on the board width and rope size.
Create a cardboard template or use the first board as a marking guide for the remaining shelves. Consistent hole placement keeps the rope vertical and reduces the chance of crooked shelves.
Step 3: Drill Clean Holes
Clamp a scrap board beneath the shelf to reduce tear-out as the drill bit exits. Drill straight through each marked point with a bit slightly larger than the rope. Test the fit before drilling every board.
Sand the inside edges of the holes. Sharp wood fibers can abrade the rope and make threading difficult. A rolled piece of sandpaper works well for smoothing the openings.
Step 4: Sand and Finish the Wood
Sand the faces, ends, and edges of every board. Begin with a medium grit to remove milling marks, then continue with a finer grit for a smooth finish. Lightly ease sharp corners so the shelves feel finished rather than freshly liberated from the lumber aisle.
Remove all dust before applying stain, paint, or clear sealer. Finish both sides and all edges to create a consistent appearance. Allow the coating to dry and cure according to the manufacturer’s directions before threading the rope.
Step 5: Clean and Assemble the Pipe
New black pipe may arrive with manufacturing oil, dust, labels, or residue. Clean it with a product appropriate for the pipe and chosen finish, while following ventilation and safety directions. Wear gloves, protect the work surface, and avoid coating the wood with oily fingerprints.
Thread the pipe components together by hand, then tighten them carefully with a wrench. Assemble both support arms and compare them on a flat surface. The arms should project equally and sit at matching angles.
For a typical wall-mounted bar design, each floor flange connects to a short pipe, a 90-degree elbow, and a horizontal pipe section. The two horizontal arms support the rope loops or a connecting pipe bar.
Step 6: Mount the Pipe Supports
Hold the assembled supports against the wall and mark the mounting holes. Use a level to align the flanges horizontally. Painter’s tape can help create a temporary reference line without drawing across the wall.
Drill appropriate pilot holes and secure the flanges with structural screws driven into studs whenever the layout allows. For masonry or hollow-wall installation, use fasteners designed for that material and follow their installation instructions exactly.
Tighten the fasteners gradually, checking the level before final tightening. The pipe supports should feel rigid and should not rotate, wobble, or pull away from the wall.
Step 7: Thread and Knot the Rope
Cut two equal rope lengths. Wrap tape tightly around each cut end before trimming to reduce fraying. Depending on the design, fold each rope over the pipe support to create four hanging strands, or pass the rope through a horizontal pipe bar.
Thread the strands through the holes in the top shelf. Tie a secure stopper knot beneath each hole. Measure down to the next shelf position and mark every strand with painter’s tape. Tie the next set of knots at the marks, add the second shelf, and repeat for the bottom board.
Do not fully tighten the knots until all shelves are installed. The ability to slide and retie them is extremely useful during leveling.
Step 8: Level Every Shelf
Place a level across the front edge and from front to back. Adjust the knots one at a time until the board sits correctly. A helper can hold the shelf while you tighten the rope.
Add temporary test weight to each shelf and recheck the level. Rope may settle as knots tighten. Make final corrections before trimming the excess ends. Leave short tails beneath the knots rather than cutting them flush.
Step 9: Test the Completed Unit
Inspect the flanges, screws, pipe joints, rope, knots, and boards. Apply gentle downward pressure while watching for movement. Add objects gradually instead of loading the entire shelf at once.
The safe capacity depends on the wall construction, fasteners, pipe configuration, board dimensions, rope, knots, and quality of installation. Follow the ratings supplied by hardware manufacturers and use a generous safety margin.
Styling Ideas for Pipe and Rope Shelves
For an industrial farmhouse look, combine dark pipe with medium-brown stained pine and natural manila rope. Add old books, ceramic containers, a trailing plant, and a framed black-and-white photograph.
For a coastal style, use whitewashed boards, galvanized pipe, and pale cotton rope. Keep the accessories light and simple: sea glass, woven baskets, shells, or blue-and-white pottery.
A modern version can feature matte-black pipe, smooth poplar boards, black rope, and minimal objects. Leave open space around the display so the shelving reads as an architectural feature rather than an emergency storage annex.
In a bathroom, use sealed boards and moisture-resistant rope. Store lightweight towels, jars, soaps, and decorative items. Avoid placing untreated wood where it receives direct water or constant steam.
In a kitchen, the shelves can hold mugs, small containers, cookbooks, or herbs. Keep them away from open flames, intense heat, and areas where grease accumulates. Heavy dishes and appliances require a more robust support system than a decorative rope shelf normally provides.
Common Mistakes to Avoid
Skipping the Stud-Finding Step
Attractive pipe flanges do not make weak wall fasteners stronger. Plan the shelf around framing whenever possible, particularly when displaying books or other dense objects.
Drilling Rope Holes by Eye
Small inconsistencies multiply across several shelves. Use a template so all holes align vertically.
Cutting the Rope Too Short
Knots consume more rope than many beginners expect. Extra length is inexpensive; rebuilding the project because the last knot hangs three inches too high is not.
Finishing the Boards After Assembly
Staining around rope and mounted pipe is messy. Complete the sanding and finishing process before final assembly.
Overloading the Shelves
Rope shelves may look sturdy while still depending on a small number of wall fasteners. Use them for objects appropriate to the verified capacity of the entire installation, not merely the apparent strength of the pipe.
Ignoring Rope Stretch
Some ropes stretch or settle after loading. Test the unit, wait for the knots to tighten, and level the shelves again before arranging the final display.
Practical Experiences and Lessons From Similar Builds
One of the first lessons people learn while building DIY pipe and rope shelves is that the planning stage matters more than the cutting stage. Cutting three boards is straightforward. Coordinating pipe lengths, fitting orientation, stud locations, rope holes, and shelf spacing is where the project earns its do-it-yourself credentials.
A common experience is returning to the hardware store because one pipe fitting was forgotten. Industrial shelving designs can require more small components than expected: floor flanges, nipples, elbows, tees, couplings, screws, washers, and optional clamps. Laying every component on the floor in its final arrangement before installation makes missing pieces obvious. Photographing the arrangement also provides a useful reference when the fittings inevitably roll beneath the workbench.
Builders also discover that threaded pipe does not always tighten into the exact position shown in a sketch. One elbow may stop facing upward while its partner points toward another zip code. The practical solution is to dry-fit the complete support, swap fittings when needed, and tighten components progressively rather than forcing one connection far beyond a sensible position.
Rope introduces a different challenge. Four knots tied at what appears to be the same height rarely produce a perfectly level shelf on the first attempt. Rope compresses, knots tighten, and small measuring differences become visible across a wide board. Marking each strand with tape helps, but final leveling still requires patience. Temporary weight can settle the knots before the excess rope is trimmed.
Another useful lesson concerns finish selection. Dark stain highlights the industrial character of black pipe, but it can also exaggerate blotching in soft pine. Applying a compatible wood conditioner before certain stains may produce a more even appearance. Paint is often easier when the boards contain mismatched grain or filler. A clear finish preserves natural wood color and works particularly well with cotton rope.
The most satisfying part of the build is usually installation day, when separate materials suddenly look intentional. Until then, the project resembles a pile of plumbing supplies beside several boards with suspicious holes. Once the flanges are mounted and the shelves are hanging, the contrast among metal, fiber, and wood creates depth that ordinary brackets rarely provide.
Experienced DIYers tend to load the shelves conservatively at first. A few framed photos, a small plant, and several lightweight books provide a sensible test. After checking the fasteners and level over several days, additional objects can be added within the hardware’s verified capacity. This gradual approach is much more pleasant than learning about anchor limitations through an unexpected midnight crash.
The project also teaches that visual balance matters. Filling every inch of every board can hide the rope and pipe details that made the shelf worth building. Grouping objects in odd numbers, varying their heights, and leaving open space allows the structure to remain part of the display.
Finally, homemade shelves invite future modifications. Boards can be repainted, rope can be replaced, and another tier can sometimes be added if the support system was designed for it. The best result is not merely extra storage. It is a custom feature that fits the wall, matches the room, and carries the quiet satisfaction of something built rather than simply unpacked.
Conclusion
DIY pipe and rope shelves offer a practical way to combine storage with character. The project uses accessible materials, requires only moderate woodworking skills, and can be adapted to rooms ranging from compact bathrooms to spacious home offices.
Success depends on accurate measurements, aligned rope holes, secure wall mounting, properly tightened knots, and realistic expectations about weight. Take time with those details and the finished shelves will look deliberate, balanced, and considerably more expensive than the collection of boards and plumbing parts that started the adventure.
Whether your style leans industrial, rustic, coastal, or modern, pipe and rope shelving can turn an unused wall into a functional focal point. It may also inspire the most dangerous sentence in home improvement: “Now that we know how to do this, we could build another one.”