Research basis: This article synthesizes common, documented U.S. holiday-craft approaches, including graduated stacked-button ornaments, foam-cone button trees, yarn-and-button topiaries, handmade holiday décor guidance, and small-parts safety advice.
A DIY button Christmas tree is proof that the button jar has been plotting its comeback all along. Those lonely shirt buttons, spare coat buttons, and mysterious plastic circles collected over the years can become cheerful holiday decorations with a little glue, a few smart color choices, and an acceptable amount of seasonal sparkle.
Button Christmas trees are affordable, customizable, and surprisingly forgiving. A crooked button can look whimsical. A mismatched green button can look vintage. A glittery gold button can look like it has been promoted to upper management. Whether you want a tabletop tree, a handmade ornament, a festive centerpiece, or an easy Christmas craft for older kids and adults, this project gives you plenty of room to make something that feels personal.
This guide explains how to make DIY button Christmas trees using foam cones, cardboard bases, thread, and simple craft supplies. You will also find decorating ideas, practical troubleshooting tips, storage advice, and creative ways to turn one tiny tree into a whole button-powered forest.
Why DIY Button Christmas Trees Are a Holiday Favorite
Christmas crafts are more fun when they do not require an engineering degree, a twelve-step paint process, or a trip to three different stores. Button trees are beginner-friendly because the basic shape already does most of the work. A foam cone naturally resembles a Christmas tree, while a stack of buttons can quickly form a miniature tree ornament.
They are also a wonderful stash-busting project. Instead of buying every decoration new, you can repurpose buttons from old shirts, sweaters, jackets, craft kits, and sewing boxes. That gives each tree a little history. One button may have come from a child’s outgrown cardigan, another from a favorite winter coat, and another from a shirt that lost its battle with spaghetti sauce in 2014.
DIY button Christmas trees work in almost every decorating style. Traditional crafters can use red, green, gold, and white buttons. Fans of modern holiday décor can create an all-white tree, a black-and-gold tree, or a colorful rainbow version. Rustic decorators can mix wooden buttons, twine, burlap, and cream-colored felt. There is no wrong choice, except perhaps using a button that still has dried oatmeal attached to it.
Supplies for a Button Christmas Tree Craft
The materials depend on the version you choose, but the classic tabletop button tree starts with a foam cone. Foam craft cones are widely available in craft stores and can be decorated with paint, fabric, ribbon, yarn, glitter, and lightweight embellishments. For a small display tree, an 8-inch to 12-inch cone is a comfortable size for beginners.
Basic Supplies
- Foam cone or sturdy cardboard cone
- Buttons in assorted sizes
- Hot glue gun and glue sticks, or strong craft glue
- Felt, yarn, paint, ribbon, or fabric for the base layer
- Scissors
- Small star, bow, bead, or ornament for the tree topper
- Optional: straight pins, pearl-headed pins, faux snow, tiny pom-poms, mini bells, or glitter
For a small button Christmas tree ornament, you will need buttons in graduated sizes, embroidery floss or thin wire, a needle, scissors, and a bead or star-shaped charm for the top. This version is especially useful when you want handmade ornaments that do not require a tabletop full of glue strings that look like festive spiderwebs.
Choosing the Right Buttons
Sort your buttons before you begin. Separate them by color, size, finish, and mood. Yes, buttons have moods. Matte wooden buttons feel cozy and rustic. Shiny green buttons feel classic and bright. Pearl buttons look elegant. Clear buttons can give a subtle icy effect, especially when paired with white felt or silver trim.
Use large buttons near the bottom of a cone and smaller buttons closer to the top. This creates a natural tree silhouette and prevents the finished design from looking like a button avalanche. Mixing button sizes also helps cover gaps, especially around the curved sides of the cone.
How to Make a Foam Cone DIY Button Christmas Tree
This is the classic version: a small cone completely covered in buttons. It looks impressive on a mantel, holiday table, bookshelf, entryway table, or desk. It also makes a charming handmade gift for teachers, neighbors, coworkers, and relatives who are impossible to shop for because they already own three waffle makers.
Step 1: Prepare the Cone
Start by covering the foam cone with a base layer. You can paint it green, wrap it in yarn, cover it with felt, or leave it plain if your buttons will overlap enough to hide the surface. A yarn-wrapped base adds texture and helps fill small gaps between buttons. A felt base gives the tree a soft, polished appearance.
If you are using yarn, place a small dot of glue near the bottom of the cone and begin wrapping upward in tight rows. Add tiny dots of glue every few inches to keep the yarn from sliding. Continue to the top, then trim the yarn and secure the end.
Step 2: Plan the Color Layout
Before gluing anything, place several buttons around the bottom row to test your arrangement. You might use classic green buttons with red accents, white buttons with silver details, or a playful mix of bright colors. Planning first is much easier than trying to remove a button after hot glue has decided it has found its forever home.
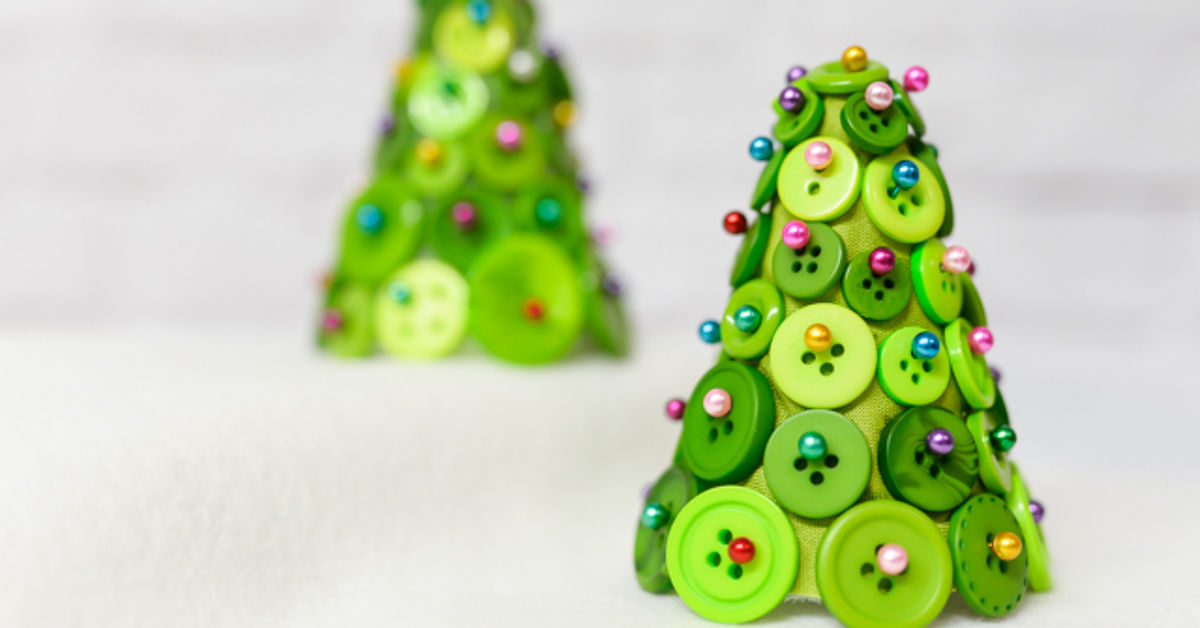
For a traditional Christmas look, use darker greens at the base and lighter greens near the top. Add red buttons in scattered clusters to resemble ornaments. For a snowy look, choose white, pale blue, clear, and silver buttons. For a vintage-inspired tree, mix muted reds, sage greens, mustard yellow, cream, and brown.
Step 3: Attach Buttons From Bottom to Top
Work in rows from the base of the cone upward. Glue the largest buttons first, placing them close together but not perfectly uniform. A slightly irregular arrangement looks more organic and handmade. After completing the first row, begin the next row just above it, overlapping buttons slightly where possible.
Use medium buttons to fill the middle section of the tree. Save tiny buttons for the upper portion and for filling awkward empty spaces. Turn the cone as you work so the design stays balanced. It is easy to make one side look like a glamorous holiday tree and the other side look like it missed its train home.
Step 4: Add Dimension and Detail
Once the main buttons are attached, inspect the tree from every angle. Fill visible gaps with small buttons, mini pom-poms, beads, sequins, or pearl-headed pins. A few tiny buttons placed on top of larger ones can create depth, making the tree look fuller and more decorative.
You can also add a narrow ribbon garland. Wind thin ribbon or metallic thread gently around the cone, securing it with tiny dots of glue. Keep it loose enough to create movement, but not so loose that it looks like your tree has been caught in a gift-wrapping accident.
Step 5: Finish With a Tree Topper and Base
Add a star, bow, snowflake, button flower, or decorative bead at the top. For the base, glue the cone onto a small wood round, coaster, saucer, candle lid, or cardboard circle covered in felt. This gives the tree stability and makes it look more finished.
A tiny gift box, miniature sled, faux snow, or a ring of small pinecones around the base can turn your button tree into a complete holiday vignette. Keep embellishments lightweight so the cone remains upright and does not develop a dramatic lean worthy of a Christmas disaster movie.
How to Make Stacked Button Christmas Tree Ornaments
Stacked button Christmas tree ornaments are smaller, faster, and perfect for gift tags, package decorations, classroom crafts, and actual Christmas trees. They are made by threading buttons from largest to smallest, creating a simple triangular tree shape.
Step-by-Step Ornament Method
- Choose 8 to 12 buttons in gradually decreasing sizes.
- Thread embroidery floss, thin wire, or strong string through the buttonholes.
- Begin with the largest button at the bottom.
- Add smaller buttons as you move upward, alternating colors or using one color family.
- Place a small star bead, gold button, or tiny bell at the top.
- Secure the top with a knot and leave a loop for hanging.
A clever variation is to use two or three buttons of the same size in a row before moving to smaller ones. This creates a wider tree shape. Another option is to use brown buttons at the bottom for a trunk, then stack green buttons above them. The result is tiny, cheerful, and much less likely to shed needles on your floor.
Creative DIY Button Christmas Tree Ideas
Monochrome Button Trees
Choose one color and use different shades, textures, and button sizes. An all-white button tree looks snowy and elegant. A gold tree can feel glamorous without requiring a chandelier budget. A red tree makes a bold holiday statement, especially when paired with white ribbon or small gold stars.
Rainbow Button Christmas Trees
Arrange buttons in color bands from red at the bottom to purple near the top, or scatter bright buttons randomly for a cheerful candy-store effect. Rainbow button trees are especially fun for children’s rooms, craft parties, and colorful holiday displays.
Rustic Farmhouse Button Trees
Use wooden buttons, linen ribbon, jute twine, burlap, and cream felt. Keep the colors soft: forest green, ivory, brown, muted red, and natural wood. Finish with a small plaid bow or a simple wooden star.
Vintage Button Trees
Vintage-style trees are a good excuse to use the buttons you have been saving “for something special.” Combine pearl buttons, old-fashioned shank buttons, muted colors, and small metal charms. Place the finished tree on a teacup saucer or a stack of old books for extra nostalgic charm.
Button Trees for Place Settings
Make mini trees about 4 to 6 inches tall and place one at each holiday table setting. Attach a small name tag to the base, and each tree becomes a place card and party favor. Guests can take them home after dinner, which is convenient because it gives everyone something to admire besides Uncle Ray’s annual debate about stuffing.
Tips for a Neater, Stronger Button Tree
Use a low-temperature glue gun when crafting with older children, and keep hot glue use under adult supervision. White school glue can work for lightweight buttons, but it usually needs more drying time and may not hold heavy buttons as reliably on a curved surface.
Do not apply a huge puddle of glue under every button. Large blobs can squeeze out through buttonholes and create a lumpy finish. Use a small dot in the center, press the button gently into place, and give it a few seconds to settle.
For a pin-based version, push straight pins through buttonholes and into the foam cone. This method makes it easier to rearrange buttons, but the finished decoration should be kept well away from young children and pets. Small buttons, pins, beads, and loose embellishments can create choking or injury hazards, so treat the tree as decorative craft décor rather than a toy.
To make a button Christmas tree last for several holiday seasons, avoid storing it loose in a crowded box. Wrap it lightly in tissue paper or bubble wrap, place it upright in a sturdy container, and label the box clearly. Your future self will be grateful when December arrives and the tree has not emerged looking like it survived a snowplow.
Common DIY Button Christmas Tree Problems and Easy Fixes
Problem: The Tree Looks Sparse
Use smaller buttons, beads, pom-poms, or sequins to fill gaps. You can also wrap the cone in yarn, felt, or glitter paper first so the background looks intentional rather than unfinished.
Problem: The Buttons Keep Falling Off
Check that the cone surface is clean and dry. Use an adhesive suited to craft foam and allow it to cure fully before moving the tree. Heavy buttons may need stronger glue or a pin-and-glue combination for extra support.
Problem: The Colors Feel Too Busy
Choose one main color, one accent color, and one metallic or neutral. For example, use green as the main color, red as the accent, and gold as the finishing detail. Limiting the palette makes even a mixed button collection look cohesive.
Problem: The Tree Will Not Stand Straight
Glue the cone to a wider base. A wood round, coaster, jar lid, or thick cardboard circle can make a surprising difference. Avoid placing heavy decorations only on one side, unless your decorating theme is “holiday landslide.”
DIY Button Christmas Trees: What the Crafting Experience Feels Like
Making DIY button Christmas trees is often less about perfection and more about the small rituals that happen while you create them. The first few minutes usually involve sorting buttons, which sounds simple until you discover that buttons have quietly reproduced in the sewing box. Suddenly, there are tiny navy buttons, giant coat buttons, shiny red buttons, one button shaped like a flower, and several pieces that may or may not be buttons but have been accepted into the group anyway.
The most satisfying part is watching a plain foam cone become recognizable as a Christmas tree. At first, the project can look like a craft-store experiment gone sideways. Then you add a few rows of green buttons, a cluster of red accents, and a topper. Somewhere around that point, the cone becomes festive. It is a small transformation, but it has the kind of cheerful payoff that makes you want to start another one immediately.
Many makers enjoy this project because it offers a low-pressure way to be creative. There is no exact pattern to follow and no single correct arrangement. A button that looks out of place can be moved. A gap can be filled with a tiny bead. A color combination that seemed questionable on the table can become charming once it is part of the full design. The craft rewards experimentation, which is especially helpful for people who believe they are “not crafty” but secretly own three bins of craft supplies.
Button Christmas trees can also become a social activity. Families can make a collection of small trees together, with each person choosing a theme. One person might make a traditional red-and-green tree, another might make a bright pink tree, and someone else may create a tree that is mostly gold because they found the glitter button container and never looked back. The finished group looks more interesting because every tree has its own personality.
For adults, this craft can feel pleasantly nostalgic. Buttons often carry quiet memories: a grandmother’s sewing tin, a school uniform, a favorite winter sweater, or a child’s old coat. Turning those everyday objects into Christmas décor gives them a second life. The result is not just a decoration; it is a small collection of materials that once belonged somewhere else and now belong together.
The project is also a useful reminder that holiday decorating does not need to be expensive to feel meaningful. A foam cone, a handful of buttons, and a little imagination can create something that looks handmade in the best possible way. It may not be perfectly symmetrical. It may have one button that refuses to sit flat. It may shed a tiny piece of glitter every time someone walks by. But that is part of its charm.
Once you finish your first DIY button Christmas tree, you may find yourself looking at every spare button differently. The missing button from an old cardigan is no longer clutter. It is a future ornament. The random gold button at the bottom of a drawer is no longer mysterious. It is a tree topper waiting for its moment. That is the magic of holiday crafts: they turn ordinary leftovers into something worth displaying.
Final Thoughts on DIY Button Christmas Trees
DIY button Christmas trees are simple enough for beginners, flexible enough for experienced crafters, and charming enough to earn a permanent place in your holiday décor collection. Start with a foam cone or a stack of buttons, choose a color story, and let the materials guide the design.
Make one for your mantel, create miniature versions for gifts, or build a whole forest in different colors and sizes. The best button Christmas tree is not the one with the most expensive supplies. It is the one that makes you smile every time you see it, even if one slightly crooked button insists on being the main character.
Note: DIY button Christmas trees are decorative crafts, not toys. Keep loose buttons, beads, pins, glue, and other small components away from babies, toddlers, pets, and anyone who may put small objects in their mouth.