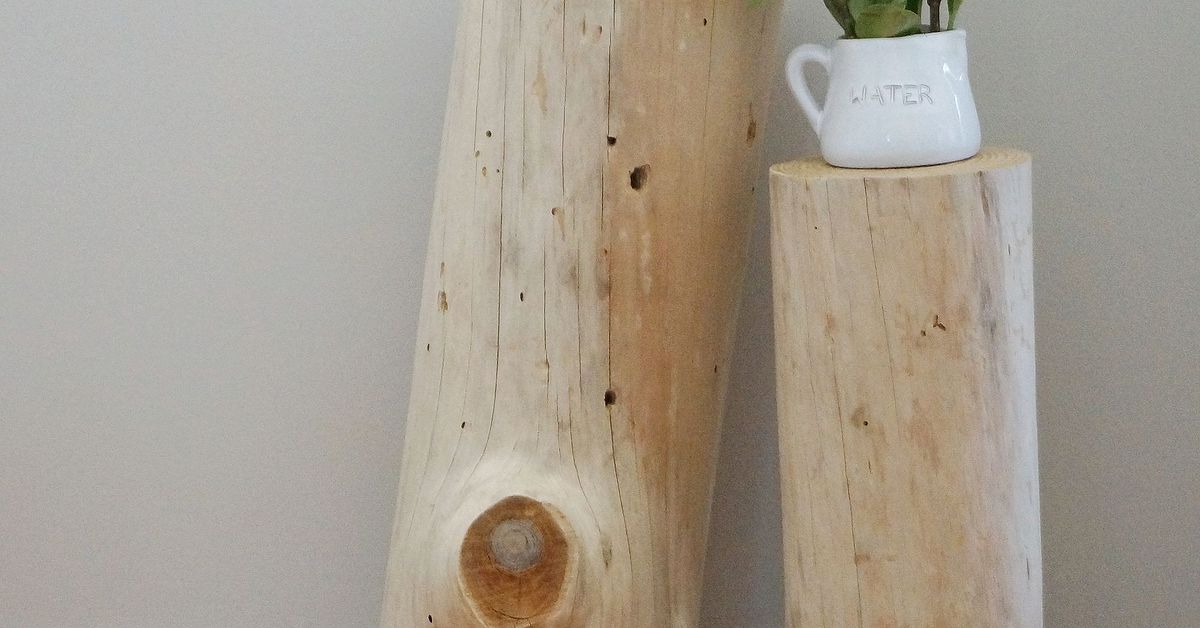
A tree stump is not the first object most people picture when they hear the phrase “elegant furniture.” It is heavy, irregular, occasionally inhabited by an insect with no respect for property rights, and shaped more like a forest leftover than a designer side table. Yet once the bark is cleaned away, the surfaces are leveled, and the wood is lightened to a soft ivory or driftwood tone, the humble stump becomes surprisingly sophisticated.
Bleached tree-stump tables combine two design ideas that should not get along but somehow do: rugged natural form and clean contemporary color. The knots, cracks, growth rings, and uneven contours remain visible, while the pale finish prevents the piece from looking too dark or cabin-like. The result can suit a minimalist apartment, a relaxed coastal room, a Scandinavian-inspired bedroom, or a modern farmhouse that has managed to resist covering every wall with motivational signs.
Whether you are considering a ready-made table or planning a DIY project, the most important details are not merely cosmetic. The stump must be dry, structurally sound, properly prepared, safely bleached, and sealed with a finish suited to its intended location.
What Is a Bleached Tree-Stump Table?
A bleached tree-stump table is a solid section of trunk or large branch that has been converted into a functional table and chemically or visually lightened. Most examples are used as side tables, drink tables, nightstands, plant stands, or sculptural accent pieces. Larger, carefully leveled stumps can also serve as coffee tables.
Unlike white paint, wood bleach reduces or alters color while allowing the grain to remain visible. That distinction gives the finished piece depth. It still looks like wood rather than a tree-shaped object wearing a coat of primer.
Tree-stump furniture has appeared in both casual DIY interiors and high-end design projects. Designers frequently use raw, reclaimed, faux-bois, and stump-shaped pieces to add natural texture beside polished upholstery, stone, glass, and metal. Home-design publications have also featured stumps as coffee tables, side tables, garden surfaces, and sculptural accents.
Why the Bleached Look Works
It Lightens a Visually Heavy Object
A stump is naturally dense and substantial. In a dark finish, it can dominate a small room. Bleaching softens that visual weight without disguising the organic silhouette. Pale wood reflects more light and tends to blend comfortably with cream walls, linen upholstery, light oak floors, and neutral rugs.
It Preserves Natural Character
Bleaching does not make every inch perfectly uniform. Growth rings may remain darker, end grain may absorb treatment differently, and knots may retain warm or gray-brown tones. These variations are not necessarily flaws. They are the details that keep the table from resembling a mass-produced plastic cylinder pretending it once had leaves.
It Creates Useful Contrast
Bleached stump tables are particularly effective in rooms with straight lines and smooth surfaces. A cylindrical stump beside a rectangular sofa introduces shape contrast. Its cracks and grain also provide texture next to glass, polished metal, boucle, leather, or tightly woven fabric.
Wood Bleach Is Not One Universal Product
The phrase “wood bleach” can describe several chemically different products. Choosing the wrong one may produce little change, uneven results, or a surface that solves a stain problem without creating the pale overall color you expected.
Two-Part Wood Bleach
Two-part, or A/B, wood bleach is generally the product used to remove a wood species’ natural color. These systems commonly rely on sodium hydroxide and hydrogen peroxide used in a manufacturer-specified sequence. They can create a much more dramatic transformation than ordinary household bleach, sometimes turning strongly colored wood remarkably pale while leaving the grain visible.
This is usually the best category for achieving a washed-out, blond, bone-white, or Scandinavian-style stump. Results vary by species, density, heartwood, sapwood, and previous staining, so testing is essential.
Oxalic Acid
Oxalic acid is often sold as “wood bleach,” but its specialty is correcting discoloration. It can reduce black water marks, iron reactions, rust-related stains, and certain dark patches without necessarily stripping away all of the wood’s natural color. It is useful when a stump has isolated staining but may not provide the all-over pale transformation associated with two-part bleach.
Household Chlorine Bleach
Household bleach may lighten some dyes, mildew discoloration, or surface pigments, but it is not usually the most effective choice for removing a wood species’ inherent color. It should not be treated as a casual substitute for a product formulated specifically for bleaching wood.
Most importantly, never mix household bleach with ammonia, acids, vinegar, or other cleaners. Dangerous gases can be released. Chemical work should be performed with appropriate gloves and eye protection, adequate ventilation, and strict adherence to the product label.
Choosing the Right Stump
Use Responsibly Sourced Wood
The ideal stump comes from a tree that was already removed because of storm damage, construction, disease, utility work, or routine arborist service. Local tree companies, sawmills, firewood suppliers, municipal crews, and neighbors may have suitable sections available. Obtain permission before collecting wood; “rustic” is not a legal defense for carrying somebody else’s tree trunk into your vehicle.
Inspect It Before Bringing It Indoors
A good furniture stump should feel solid rather than soft or spongy. Avoid pieces with widespread rot, deep fungal breakdown, extensive hollowing, or loose sections that crumble under pressure. Small drying checks can add character, but cracks that divide most of the diameter may affect stability.
Recently felled wood can contain beetles or other insects associated with weakened, dying, or freshly cut trees. Many nuisance wood borers brought indoors in lumber do not establish an ongoing household infestation, but the stump should still be inspected for fresh powder, active tunnels, insects, damp bark, or decay before entering a living space.
Consider the Species
Dense hardwoods such as oak, maple, ash, walnut, and elm can make substantial tables, although they may also be extremely heavy. Softer woods are easier to shape but more vulnerable to dents. Birch can provide attractive bark if the design retains it, while cedar offers pronounced texture and aroma. Because wood species react differently to bleach and finish, no color outcome should be promised until a hidden area has been tested.
Drying Is the Step You Cannot Rush
A freshly cut stump may contain a surprising amount of water. As it dries, it loses moisture unevenly from the exterior and interior. Shrinkage can produce checking, splitting, bark separation, movement, and changes in height or diameter. Thick end-grain sections usually dry far more slowly than ordinary boards.
Wood continues to exchange moisture with the surrounding air, and protective coatings can slow that exchange but cannot stop it completely. USDA wood research emphasizes that dimensional stability improves when wood is fabricated at a moisture level appropriate for the environment where it will be used. Electrical moisture meters provide a practical way to check progress, although readings can vary with species, meter design, depth, and internal moisture gradients.
Place the stump in a dry, sheltered area with airflow around all sides. Elevate it on small blocks rather than leaving it directly on concrete. Rotate it periodically and take moisture readings at several points. Drying may require many months, particularly for a large diameter. A calendar estimate is less reliable than actual measurement and observation.
Some cracking is normal and often visually appealing. The goal is not necessarily to prevent every check; it is to let most major movement occur before flattening, bleaching, and applying the final finish.
How to Make a Bleached Tree-Stump Table
1. Decide Whether to Remove the Bark
Removing the bark creates a cleaner, more contemporary silhouette and reduces the chance of loose fragments falling onto the floor. A drawknife, chisel, scraper, and stiff brush can help, depending on how tightly the bark remains attached.
Keeping the bark creates a more woodland-inspired appearance, but bark may loosen as the wood dries. If it is retained, inspect it carefully and accept that occasional maintenance may be required. Do not assume a glossy finish can permanently persuade unstable bark to remain employed.
2. Flatten the Top and Bottom
A stump table needs two reasonably parallel surfaces. Depending on the equipment available, flattening can be done with a router sled, chainsaw followed by planing, large belt sander, hand plane, or professional milling service. The table does not need mathematical perfection, but a drink placed on top should not begin an unsupervised journey toward the carpet.
Check stability on a known flat surface. Minor irregularities can later be corrected with adjustable feet, felt pads, or recessed glides.
3. Sand Progressively
Begin with a grit coarse enough to remove saw marks and torn fibers, then work through progressively finer abrasives. The top usually deserves the smoothest treatment because it will be touched and cleaned frequently. The sides can remain slightly textured if a more organic look is desired.
Sanding and cutting generate fine wood dust that can irritate the skin, eyes, and respiratory system. Work with dust collection or strong ventilation, wear suitable respiratory and eye protection, secure loose clothing, and follow the safety instructions for every power tool. OSHA identifies both airborne wood dust and finishing chemicals as significant woodworking hazards.
4. Clean and Test the Surface
Vacuum the wood carefully and remove residual dust according to the finishing product’s instructions. Test the bleach on the underside or another concealed section. A test patch reveals the number of applications required, the degree of color change, and whether the wood develops yellow, gray, pink, or uneven areas.
5. Apply the Correct Bleaching Product
Use only a wood-bleaching system intended for the result you want. For overall natural-color removal, follow the directions supplied with a two-part wood bleach. Do not improvise chemical proportions, combine brands, use metal tools unless approved, or save a mixed solution for later experimentation.
Apply the treatment evenly to complete surfaces rather than chasing individual pale spots. End grain may react more quickly than side grain, so monitor the top closely. Additional applications should be made only when permitted by the label and after the specified waiting time.
6. Neutralize or Rinse as Directed
Different products require different aftercare. Some call for rinsing, some specify a neutralizing procedure, and others provide their own second-stage treatment. Follow the label rather than adopting a universal internet recipe. Allow the wood to dry completely after any water-based process before evaluating the final color or sanding raised grain.
7. Perform a Light Final Sanding
Water and bleaching chemicals may raise wood fibers. Once the stump is completely dry, sand lightly with a fine abrasive to restore a smooth touch without removing too much of the newly lightened surface. Vacuum again before finishing.
8. Seal the Table
A clear water-based finish is often chosen when the goal is to preserve a pale, cool color. Some oil-based finishes add amber warmth, which may be attractive but can partially reverse the fresh bleached appearance. Always test the complete bleach-and-finish combination on a hidden area.
Several thin coats are generally easier to control than one heavy coat. Follow the finish manufacturer’s drying, recoating, sanding, ventilation, and disposal instructions. Seal the top, sides, and bottom to slow moisture exchange more evenly, while remembering that no coating makes solid wood immune to seasonal movement. General wood-finishing guidance also recommends proper surface preparation and progressively finer sanding between appropriate stages.
9. Add Floor Protection
A finished hardwood stump can weigh far more than it appears to weigh, which becomes obvious at the exact moment somebody tries to lift it with one hand. Install felt pads, rubber feet, low-profile glides, or locking casters suited to the floor and the table’s weight. Feet can improve airflow and help compensate for a slightly uneven base.
How to Style Bleached Tree-Stump Tables
Use One as a Quiet Side Table
Place a medium-height stump beside a sofa or lounge chair. The pale grain adds interest without competing with artwork or patterned textiles. Keep the top lightly styled with a lamp, a small ceramic bowl, or a stack of books.
Pair Two Different Sizes
A pair of stumps at slightly different heights can function as flexible nesting tables. They need not be identical. Variation in diameter, grain, and shape makes the arrangement look collected rather than purchased as a matching set.
Create a Natural Nightstand
A narrow stump can work beside a low bed, especially in a room with white bedding, linen curtains, woven rugs, and simple wall lighting. Confirm that the top is large enough for practical essentials; rustic charm loses points when the alarm clock falls off every morning.
Mix It With Refined Materials
The most compelling interiors often pair stump tables with materials that contrast rather than imitate them. Try pale wood beside a velvet chair, black metal lamp, marble tray, glass vase, or tailored sofa. Too many rough woodland objects in one room can shift the mood from “organic modern” to “an unusually comfortable campsite.”
Use Outdoor Versions Carefully
A stump can serve as an outdoor garden table, but bleaching does not make wood weatherproof. Exterior placement requires an appropriate outdoor finish, drainage, ground clearance, and periodic maintenance. Even then, sunlight and moisture will gradually alter the color and encourage checking.
Common Problems and Practical Fixes
The Color Is Uneven
Uneven bleaching may result from remaining finish, resin, mixed heartwood and sapwood, inconsistent sanding, or irregular chemical application. Let the wood dry before judging it. Lightly blend the surface and repeat the approved treatment only if the product instructions allow it.
The Stump Keeps Cracking
New cracks usually indicate continued moisture movement. Small checks can remain as natural detail. Larger openings may be left visible, stabilized professionally, or filled with a compatible product after the wood has reached a stable condition. Filling too early can lead to separation as movement continues.
The Clear Finish Makes It Yellow
The topcoat may be warming the color. Test a clear water-based finish designed to remain relatively non-ambering. Remember that “clear” describes transparency, not necessarily color neutrality.
The Table Wobbles
Identify whether the problem comes from an uneven floor or a nonparallel base. Adjustable glides are often the simplest solution. Severe rocking may require additional flattening rather than an ambitious tower of felt pads.
The Surface Feels Fuzzy
Raised grain is common after a water-based treatment. Allow complete drying, then sand lightly with a fine abrasive. Aggressive sanding may expose darker wood beneath the bleached layer.
Workshop Lessons: What the Project Feels Like in Real Life
A typical first stump-table project begins with confidence. The stump looks reasonably small beside the driveway, the bark seems almost ready to fall away by itself, and the entire job appears achievable in one energetic weekend. Then somebody tries to move it. That is usually the moment the project reveals its first lesson: solid wood is not emotionally invested in your schedule.
The most successful builds tend to improve when the maker stops treating drying time as wasted time. During the early weeks, new cracks may appear and the bark may loosen. The top that looked flat after cutting can change slightly as moisture leaves the wood. Waiting allows these changes to occur before the detailed work begins. It is less exciting than sanding, but it prevents hours of beautiful finishing from being applied to a piece that is still rearranging itself.
Bark removal is another stage that looks simple in photographs. On one section it may peel off in a satisfying sheet. Two inches later it may cling to the trunk as though protected by a long-term lease. Switching between a scraper, chisel, brush, and patient hand work usually produces a cleaner result than attacking every area with maximum force. Leaving a few natural creases is often better than gouging the wood while chasing absolute smoothness.
Flattening teaches a similar lesson. A stump does not need to become a precision-machined cylinder, but the top and bottom must cooperate. Checking with a straightedge and level throughout the process saves time. It is easy to sand one side repeatedly, create a new low spot, correct the opposite side, and accidentally turn furniture making into a slow demonstration of geological erosion.
The first bleach test is usually the most informative five square inches of the entire project. Wood that looks uniformly brown may reveal pale sapwood, darker heartwood, hidden mineral staining, or dramatic end-grain absorption. Testing the full finishing system matters as much as testing the bleach. A stump can look perfectly cool and creamy after bleaching, then become noticeably warmer when the topcoat is applied.
Many makers discover that the best result is not the whitest possible result. One controlled application may leave subtle tan lines and gray knots that emphasize the tree’s history. Repeated bleaching can produce a more uniform appearance, but it can also remove some of the visual contrast that made the stump interesting in the first place. The stopping point is an aesthetic decision, not a competition.
Small imperfections often become favorite features. A narrow crack can create a bold line across the top. A knot may remain several shades darker than the surrounding wood. Slight asymmetry can make the piece look sculptural from one angle and surprisingly delicate from another. The project works best when those characteristics are edited rather than erased.
The final lesson arrives when the table enters the room. A stump that appeared modest in the workshop may look much larger beside a sofa. Before applying the final coats, it helps to test the dimensions with a cardboard circle or position the unfinished stump temporarily near its future location. Scale, height, and walking clearance matter more than an impressive finish.
Once completed, a bleached tree-stump table tends to attract attention precisely because it is difficult to categorize. It is furniture, natural sculpture, reclaimed material, and evidence of patient handwork at the same time. Guests may ask where it was purchased. The honest answer can be satisfyingly simple: it used to be a tree, and then it became a very demanding side table.
Final Thoughts
Bleached tree-stump tables prove that natural furniture does not have to look dark, rough, or aggressively rustic. With a sound piece of wood, sufficient drying time, careful flattening, the correct bleaching product, and a compatible clear finish, a stump can become a refined accent that works in both traditional and contemporary rooms.
The strongest designs preserve evidence of the original tree rather than attempting to manufacture perfect uniformity. Growth rings, knots, asymmetry, and controlled cracks provide the personality. Bleaching simply changes the visual volume, replacing deep forest tones with a lighter surface that feels fresh, calm, and unexpectedly versatile.
Note: This article synthesizes practical information from the USDA Forest Products Laboratory, OSHA, CDC, Popular Woodworking, WOOD Magazine, Fine Woodworking, Better Homes & Gardens, Architectural Digest, Apartment Therapy, Penn State Extension, University of Minnesota Extension, Colorado State Forest Service, and The Home Depot. Chemical products and wood species vary, so users should follow the current manufacturer label and obtain professional assistance when a stump is exceptionally large, unstable, decayed, or difficult to mill.