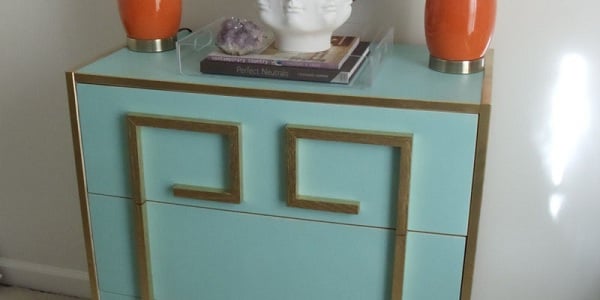
A plain dresser is like plain toast: technically useful, emotionally underwhelming. A DIY Greek key dresser fixes that problem with a pattern that looks polished, graphic, and just dramatic enough to make people ask, “Wait, did you buy that from a boutique furniture store?” You, of course, get to smile like a mysterious design wizard and say, “Nope. Weekend project.”
This makeover works because it blends two things homeowners love: practical storage and decorative detail that feels custom. The Greek key motif adds clean geometry, a hint of classical style, and just enough structure to make an old dresser feel fresh again. Better yet, you do not need a fancy workshop or a TV crew dramatically whispering about “the vision.” You need a solid dresser, a good plan, and the self-control not to rush the drying time. That last one is the true test of character.
Why a Greek Key Dresser Is Such a Smart DIY Project
A Greek key dresser has strong lines, timeless energy, and the rare ability to look expensive without requiring trust fund behavior. The pattern can lean glam, traditional, modern, coastal, or Hollywood Regency depending on the color palette and hardware you choose. Paint it navy with brass pulls and it looks tailored. Paint it white on white and it feels breezy and architectural. Paint it black with a gold Greek key overlay and suddenly your thrift-store find starts acting like it has opinions about champagne.
It is also a practical upgrade. Dressers offer large flat drawer fronts, which makes them ideal for geometric layouts. Unlike curvy chairs or fussy side tables, a dresser gives you a big, cooperative canvas. That means you can create the Greek key pattern with trim, stencil work, paint, adhesive overlays, or even a combination of techniques if you are feeling ambitious and mildly dangerous.
Pick the Right Dresser Before You Touch a Paintbrush
Not every dresser is a makeover soulmate. The best candidate is structurally sound, has drawers that slide reasonably well, and does not smell like it has survived three floods and one cigar lounge. Solid wood is wonderful, but laminate and MDF can work too if you prep them properly.
What to look for
- Sturdy frame with minimal wobble
- Flat drawer fronts for easy pattern layout
- Hardware that can be updated or reused
- Minor cosmetic flaws rather than major structural damage
- Enough visual space on the front to let the Greek key pattern shine
If the dresser has deep scratches, old hardware holes, or chipped veneer, do not panic. Wood filler, sanding, primer, and strategic trim can hide a surprising number of sins. Furniture redemption is one of the most satisfying forms of justice.
Materials and Tools for a DIY Greek Key Dresser
- Dresser
- Screwdriver
- Cleaner or degreaser
- Sandpaper in medium and fine grits
- Tack cloth or lint-free cloth
- Wood filler and putty knife
- Primer
- Furniture paint or cabinet and trim paint
- Painter’s tape
- Measuring tape and ruler
- Pencil
- Miter box or saw if using wood trim
- Adhesive or brad nails for trim
- Caulk for smoothing gaps if needed
- Clear topcoat or furniture wax
- New drawer pulls or knobs
You can create the Greek key design in two main ways. The first is painted pattern, using tape or a stencil. The second is raised trim, using thin molding or overlays attached to drawer fronts. Painted designs are easier for beginners. Raised trim looks more custom and luxurious. If your goal is “designer furniture on a grocery budget,” trim is usually the winner.
Step-by-Step: How to Make a DIY Greek Key Dresser
1. Remove the drawers and hardware
Take off the knobs or pulls, remove the drawers, and label the hardware if you plan to reuse anything. This makes cleaning and painting easier and prevents the very sad experience of gluing yourself to a drawer pull with wet paint nearby.
2. Clean like your finish depends on it
Because it does. Dust, wax, polish residue, and mystery grime will sabotage your makeover faster than bad lighting sabotages a fitting room. Wash the dresser thoroughly and let it dry completely. Pay extra attention around drawer pulls and edges, where old buildup loves to hide.
3. Repair damage and smooth the surface
Fill dents, chips, and extra hardware holes with wood filler. Let it dry, then sand the repairs smooth. Scuff-sand the rest of the dresser to dull the existing finish and help the primer grip. You do not always need to strip every inch down to bare wood, but you do need the surface to be clean, even, and ready to cooperate.
4. Prime the dresser
Primer is the unsung hero of a long-lasting furniture makeover. It helps paint adhere, blocks old stains, and gives you a more even finish. If you are working with slick surfaces, dark wood, or anything that might bleed through, do not skip this step. If the dresser is MDF, be extra careful to seal those thirsty edges well.
5. Paint the base color
Choose a durable furniture paint or cabinet-and-trim enamel in your preferred finish. Satin is a sweet spot for many dressers because it looks polished without shouting. Apply thin, even coats and let each coat dry thoroughly before adding the next. Two coats are typical, but dark woods, bold colors, and dramatic transformations may need more.
Popular color combinations for a Greek key dresser include:
- Black with gold trim
- Navy with white detail
- White with natural wood top
- Emerald green with brass hardware
- Soft gray with crisp white pattern
6. Plan the Greek key layout before committing
This is not the moment for wild optimism. Measure each drawer front carefully and sketch the pattern first. Greek key designs look best when the spacing is consistent and the lines feel intentional. Uneven geometry turns “classic motif” into “I did this at 11:47 p.m. while eating crackers.”
Use painter’s tape, graph paper, or even cardboard templates to test the scale. A chunky pattern feels bold and modern. A slimmer pattern feels more refined. If you are using trim, dry-fit every piece before attaching anything.
7. Create the Greek key pattern
For a painted Greek key dresser: mark the layout, tape off clean lines, and apply paint in light coats. Remove the tape carefully while the paint is still slightly soft for crisp edges.
For a raised-trim Greek key dresser: cut thin molding, lattice strips, or decorative overlays to size. Attach them with a strong adhesive, small brads, or both, depending on the material. Press firmly, check alignment constantly, and fill tiny seams with paintable caulk if needed. Once the trim is secure and dry, paint the drawer front as one finished surface or use a contrasting color on the raised detail.
8. Add detail to the frame if needed
Some of the best DIY Greek key dressers keep the pattern only on the drawer fronts. Others continue the trim around the dresser frame for a more built-in look. There is no law here. If the dresser already has pretty shape and legs, letting the drawers carry the drama is often enough. If the piece is boxy and plain, a little frame trim can help it look more custom.
9. Seal the finish
Once the paint is fully dry, protect your work with a clear topcoat or furniture wax, depending on your paint type and desired finish. This step matters on a dresser because drawers, corners, and top surfaces take daily abuse from hands, jewelry, books, chargers, and whatever else seems to breed on bedroom furniture overnight. Apply thin coats, sand lightly between coats if the product requires it, and resist the urge to rush reassembly.
10. Upgrade the hardware
New hardware is the jewelry of the project. It can shift the final look from decent to memorable in about five minutes. Brass pulls feel warm and classic. Lucite feels glam. Matte black looks sharp and modern. If your dresser has existing hardware you love, clean and polish it. If not, this is the perfect time to swap it out and pretend you always had excellent taste at the hardware store.
Design Ideas to Make Your Greek Key Dresser Look More Expensive
Use contrast strategically
A tone-on-tone Greek key pattern looks subtle and elegant, while a high-contrast combination makes the detail pop. White on ivory whispers. Black on cream enters the room like it pays property taxes on time and judges everyone’s throw pillows.
Try a stained wood top
If your dresser top is solid wood, consider staining it instead of painting it. That mix of painted body and warm wood top adds depth and keeps the project from looking too flat.
Mind the sheen
A higher sheen can make geometric trim stand out beautifully, but every flaw will also show up like it is seeking attention. Satin and semi-gloss are the most forgiving choices for many DIYers.
Do not overcrowd the pattern
The Greek key motif needs breathing room. Leave margins at the drawer edges so the design feels framed, not cramped. Think tailored blazer, not overstuffed suitcase.
Common Mistakes to Avoid
- Skipping the cleaning step
- Using thick paint coats that drip or pool
- Rushing the dry time between coats
- Eyeballing the pattern instead of measuring it
- Choosing trim that is too chunky for the drawer size
- Forgetting to test primer or paint on laminate or MDF
- Reinstalling drawers before the finish has cured
The biggest mistake, though, is trying to finish the project in one caffeine-fueled burst. A Greek key dresser looks high-end when the lines are crisp and the finish is smooth. That takes patience. Annoying, yes. Effective, also yes.
Where a DIY Greek Key Dresser Works Best
This piece fits beautifully in a bedroom, guest room, nursery, hallway, or even a dining area as a statement storage cabinet. In a bedroom, style it with a lamp, a tray, and a mirror. In a guest room, it instantly makes the space feel more deliberate. In an entryway, it gives you storage with personality, which is really all furniture should strive for.
Final Thoughts
A DIY Greek key dresser is one of those projects that delivers more drama than difficulty. With the right prep, a clean pattern layout, and a durable finish, you can turn a plain secondhand dresser into a custom-looking statement piece that feels both timeless and personal. It is practical furniture wearing a fabulous outfit, and honestly, that is the dream.
If you want a project that feels approachable but still looks like you know what you are doing, this is a strong choice. Start with a solid piece, respect the prep work, and let the Greek key motif do what it does best: make everything look smarter, sharper, and a little more expensive than it actually was.
Experiences and Lessons From Making a DIY Greek Key Dresser
The first time I tried a Greek key furniture makeover, I had the confidence of a home-renovation host and the measurement habits of someone guessing cake ingredients. That combination was educational. I learned fast that geometric furniture projects are less about artistic chaos and more about patience, symmetry, and pretending the ruler is your best friend. Once I slowed down and started measuring every section twice, the project stopped fighting me and started looking intentional.
One of the biggest surprises was how much the prep work affected the final look. Before doing the project, I thought the exciting part would be the pattern. In reality, the cleaning, sanding, filling, and priming did most of the heavy lifting. On one drawer, I got lazy and painted over an area that still had a slight sheen from the old finish. Naturally, that was the exact spot where the paint decided to behave like a suspicious roommate and not fully commit. After that, I became a firm believer in proper prep, mostly because I enjoy learning lessons only once when possible.
I also found that the Greek key pattern looks very different depending on scale. On paper, a tight little pattern seemed elegant. On the actual dresser, it looked busy and a bit fussy. Widening the lines made the whole piece feel calmer and more custom. That experience changed the way I look at furniture makeovers in general. Bigger is not always better, but breathing room almost always is. A bold, simple motif tends to read more expensive than a tiny complicated one that makes your eyes work overtime.
Another lesson came from hardware. I thought the dresser would be all about the paint and trim, but once I swapped in new brass pulls, the whole piece leveled up. It went from “nice DIY project” to “where did you get that?” in about ten minutes. That was a useful reminder that small details matter, especially on furniture you touch every day. Hardware is not just functional. It is mood-setting jewelry for storage.
Maybe the most satisfying part of the whole experience was seeing how a tired old dresser changed the feel of the room around it. Before the makeover, it was just there, minding its business and looking vaguely apologetic. Afterward, it became the anchor piece. Suddenly the lamp looked better, the mirror looked more intentional, and the random decorative objects on top seemed like they had finally found proper employment.
That is why I love projects like this. A DIY Greek key dresser is not only about saving money or upgrading furniture. It is about changing the relationship you have with an object. Instead of settling for something dull, you build something with style, function, and a little personality. Also, it is deeply satisfying to point at a piece of furniture and think, “I made that look expensive with trim, paint, and stubbornness.”