Clay has always had a flair for drama. Leave it too wet and it slumps like a tired pancake. Let it dry too fast and it cracks like a desert with opinions. Ask it to travel through a 3D printer nozzle, hold a shape, stack layer after layer, and later survive a kiln? Now we are negotiating with a very fancy mud.
That is exactly why 3D printing with clay is so fascinating. It blends old-school ceramics with modern digital fabrication, turning a material used for thousands of years into something that can follow G-code, repeat complex forms, and build objects a potter’s wheel would politely refuse to attempt. The secret is not magic. It is the custom extruder.
A standard plastic 3D printer extruder is designed to push filament. Clay is not filament. Clay is heavy, sticky, inconsistent, and moody enough to deserve its own weather report. To print it successfully, makers often modify desktop printers, build syringe-style paste systems, use augers, or create direct-extrusion mechanisms that push real clay through larger nozzles. The result is a new creative zone where pottery, engineering, sculpture, architecture, and experimental design shake hands over a very messy workbench.
What Makes Clay 3D Printing Different?
In ordinary FDM printing, a plastic filament melts, exits a hot nozzle, cools, and hardens. Ceramic 3D printing with clay works differently. The printer extrudes a soft ceramic paste at room temperature. The shape is not “done” when the print finishes. It must dry slowly, shrink predictably, possibly be bisque fired, glazed, and fired again. In other words, the printer starts the object, but the ceramic process finishes it.
This changes everything. Layer height, wall thickness, moisture content, nozzle diameter, print speed, and drying conditions all matter. A vase that looks perfect on the printer bed may still warp, crack, or shrink during drying and firing. The craft does not disappear; it simply moves into new territory. Instead of centering clay on a wheel, the maker centers the material inside a workflow.
The Custom Extruder: The Real Hero Wearing Clay
The custom extruder is the heart of the system. It must move thick clay smoothly, consistently, and with enough force to avoid gaps. Unlike plastic filament systems, clay extruders often use a cartridge, tube, piston, auger screw, compressed air, or ram-based mechanism. Some designs mount directly onto accessible machines such as an Ender 3, making the experiment cheaper and more approachable for hobbyists.
A good ceramic extruder needs three things: pressure, control, and clean flow. Pressure pushes the clay. Control keeps the bead consistent. Clean flow prevents clogs, blobs, and the dreaded “ceramic spaghetti monster,” which looks artistic only if you planned it that way.
Why Not Use a Normal 3D Printer Extruder?
Because a regular filament extruder would lose the argument immediately. Clay cannot be pulled from a spool. It cannot be heated into a neat molten line. It needs a larger passage, a stronger pushing mechanism, and a nozzle that can handle grit, grog, and moisture variation. The custom extruder turns a plastic printer into a paste-deposition machine.
That is why many clay-printing conversions focus less on the motion system and more on the material delivery system. The printer already knows how to move in X, Y, and Z. The challenge is convincing clay to come out at the right time, in the right amount, without staging a tiny landslide.
How Clay Moves Through the Printer
Most clay 3D printing systems follow a simple idea: load prepared clay into a container, pressurize or mechanically push it, and guide it through a nozzle. The nozzle lays down a bead. That bead supports the next bead. Keep doing this and eventually you have a bowl, lamp shade, tile, sculpture, or experimental object that looks like it came from a pottery studio and a robotics lab sharing a lunch table.
In cartridge systems, clay is packed into tubes and pushed with air or a plunger. In auger systems, a rotating screw meters the clay forward. In direct-extrusion systems, thick clay can be pushed without watering it down too much. Each approach has trade-offs. Air systems can be simple, but pressure control can be tricky. Augers can offer steady flow, but they add mechanical complexity. Direct extrusion can handle fuller-bodied clay, but the motor, frame, and extruder must be strong enough to manage the load.
Clay Consistency: The Goldilocks Problem
The clay cannot be too wet or too dry. If it is too wet, printed walls sag, layers flatten, and tall forms collapse with the quiet sadness of a failed soufflé. If it is too dry, the extruder struggles, the nozzle clogs, and the print may split as it exits. The goal is a clay body that is soft enough to flow but stiff enough to stack.
Many makers wedge clay carefully before loading it. Air bubbles are the enemy. A trapped pocket of air can create inconsistent flow or sudden spurts. For handmade pottery, an air bubble is annoying. For clay 3D printing, it is a tiny gremlin hiding inside your toolpath.
Nozzle Size Matters
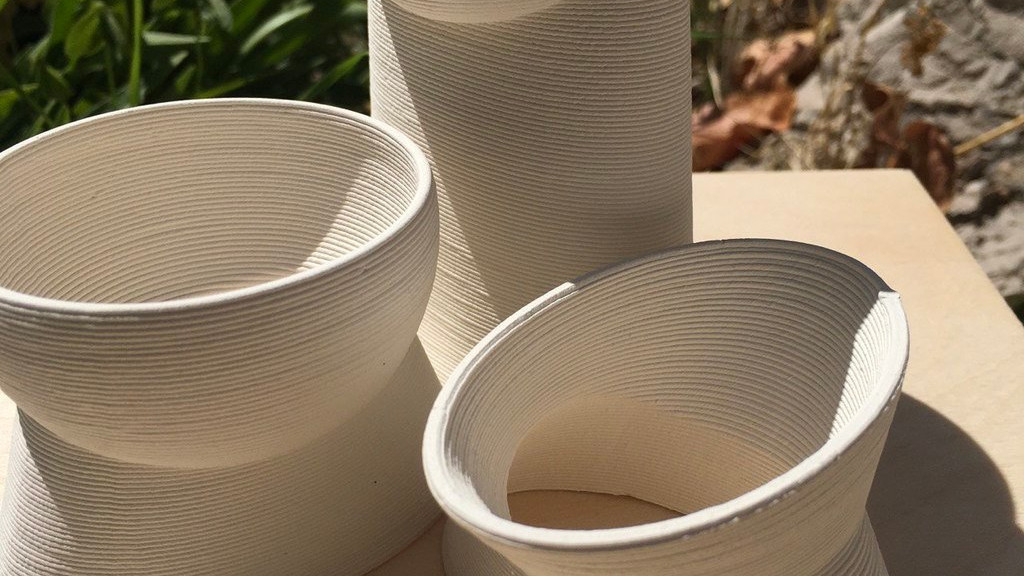
Clay printers commonly use larger nozzles than plastic printers. A 0.4 mm nozzle may be normal for PLA, but ceramic paste often works better through nozzles measured in millimeters, not fractions of a millimeter. Larger nozzles reduce clogging and create stronger walls, though they also produce more visible layers. In clay printing, visible layers are not always a flaw. They can become the signature texture of the finished piece.
Designers often use the layered look intentionally. Rippled surfaces, stacked coils, and rhythmic toolpaths can make a 3D-printed ceramic piece feel both digital and handmade. It is a wonderful contradiction: the object is machine-guided, but the clay still shows its personality.
Designing for Ceramic 3D Printing
Designing for clay is not the same as designing for plastic. Overhangs are risky. Thin walls are fragile. Sharp corners can dry unevenly. Tall, narrow forms may wobble unless the print speed, layer height, and clay stiffness are tuned carefully. Successful clay models often use gradual curves, generous bases, continuous paths, and walls thick enough to survive handling, drying, and firing.
Vase mode, spiralized toolpaths, and parametric textures are popular because they keep the extrusion continuous. Stopping and starting can create blobs or weak points. A continuous coil-like print is usually kinder to the material. Clay appreciates kindness, preferably in the form of stable humidity and not being rushed.
Think About Shrinkage Before Printing
Ceramic objects shrink as water leaves the clay and as the piece is fired. The exact amount depends on the clay body, firing temperature, and process. This means a printed mug, planter, or tile may need to be designed larger than the intended final size. For functional pieces, shrinkage is not a side note. It affects lids, handles, fit, volume, and whether your “perfectly sized” espresso cup becomes a thimble for a squirrel.
From Print Bed to Kiln
Once the printer finishes, the object is still delicate. Freshly printed clay is called greenware. It may look solid, but it can deform easily. Removing it from the print surface requires patience. Drying should be slow and even. Covering the object loosely with plastic, rotating it, or controlling airflow can reduce cracking and warping.
After drying completely, the piece can be bisque fired. This first firing hardens the clay and prepares it for glazing. Then comes glaze application and a final firing, depending on the clay body and surface goal. Some experimental prints are left unglazed to show texture. Others use glaze to highlight layer lines, pool in grooves, or create contrast between digital geometry and ceramic surface chemistry.
What Can You Make With a Clay 3D Printer?
The obvious answer is vases, bowls, planters, cups, and sculptural forms. But the more exciting answer is: objects that are hard to make any other way. Clay 3D printing can create complex lattice walls, twisted vessels, textured tiles, parametric lamps, architectural modules, porous structures, and experimental forms that would be slow or nearly impossible by hand.
For artists, the custom extruder opens a new kind of mark-making. For designers, it allows fast ceramic prototyping. For educators, it connects digital modeling with physical material behavior. For engineers, it offers a playground for paste extrusion, rheology, toolpath strategy, and additive manufacturing research. For everyone else, it provides the joy of watching a robot squeeze mud into something beautiful.
Why Custom Extruders Matter for Accessibility
Dedicated ceramic 3D printers can be excellent, but they are not always cheap. Custom extruders and conversion projects lower the barrier. A maker with a desktop printer, basic fabrication skills, and a willingness to test messy prototypes can explore clay printing without buying a full professional system.
This accessibility matters. Innovation often starts when people modify tools they already own. The Ender-style conversion approach is especially interesting because it uses a familiar motion platform. Instead of building an entire printer from scratch, the maker focuses on the clay delivery system, firmware settings, mounting hardware, and slicing changes.
The DIY Advantage
DIY clay printing is not always polished, but it teaches quickly. A failed print explains material behavior better than a dozen perfect marketing photos. Too much pressure? Blob city. Too little pressure? Gaps everywhere. Clay too wet? The wall slumps. Clay too stiff? The extruder protests. Every test becomes a tiny ceramic engineering seminar.
Common Problems and Practical Fixes
Clogging usually comes from clay that is too dry, particles that are too coarse, or a nozzle that is too small. Sieving or choosing a smoother clay body may help. So can using a larger nozzle.
Layer collapse often means the clay is too wet, the print is too fast, the walls are too thin, or the design is too tall without enough support. Slowing down and increasing wall thickness can make a big difference.
Inconsistent extrusion may come from trapped air, uneven clay packing, pressure changes, or a slipping drive mechanism. Careful loading is boring, but so is brushing dried clay out of a failed print at midnight.
Cracking during drying usually points to uneven moisture loss. Slow drying, controlled airflow, and thoughtful geometry help. Wide bases, thick-to-thin transitions, and sharp edges deserve extra attention.
The Future of Clay 3D Printing
Clay 3D printing is still young compared with traditional ceramics, but it is growing fast. Studios, universities, product designers, and architecture researchers are experimenting with ceramic extrusion because it offers a rare combination: digital repeatability and natural material character.
Future systems will likely improve in several areas: better flow control, smarter slicing for soft materials, more reliable multi-material printing, larger build volumes, automated drying strategies, and improved feedback sensors. Imagine a clay printer that can detect bead width in real time, adjust pressure automatically, and compensate for material variation before a print fails. That is not science fiction; it is the logical next step for a field already blending robotics and pottery.
Even so, the charm of clay printing may always come from its imperfections. Plastic prints aim for precision. Clay prints often aim for expression. A slight ripple, seam, or layer shift can become part of the final voice of the object. The custom extruder does not erase the hand of the maker; it adds another hand, one driven by stepper motors and suspiciously comfortable around mud.
Experience Notes: Lessons From Working Around Clay 3D Printing
The first lesson of clay 3D printing is humility. You can spend hours designing a graceful vessel in CAD, slice it perfectly, prepare the printer, load the extruder, press start, and still watch the first layer come out like a confused noodle. This is not failure. This is clay introducing itself.
One of the most useful experiences is learning to treat the extruder like part of the ceramic process, not just a printer accessory. With plastic printing, you often think in temperatures, retraction, and bed adhesion. With clay, you think in pressure, moisture, friction, compression, and drying. The custom extruder becomes a bridge between two worlds. It must be engineered, but it must also respect the material.
Packing the clay carefully is more important than beginners expect. If the barrel has air pockets, the print may pulse, skip, or suddenly spit. The best loading process feels almost ceremonial: wedge the clay, compress it evenly, avoid trapped air, clean the nozzle, and test the flow before committing to a full print. It is not glamorous, but neither is scraping a collapsed pot from a printer bed with the emotional expression of someone who has seen things.
Another lesson is that simple designs are not boring. In fact, they are often the best teachers. A straight cylinder can reveal whether the clay is too wet, whether the layers are bonding, whether the Z height is correct, and whether the extrusion rate is consistent. Once those basics are stable, then spirals, waves, folds, and parametric textures become much easier to control.
The drying stage deserves more respect than it usually gets. A freshly printed piece can look finished, but it is still vulnerable. The excitement of removing it too soon can ruin the print. Slow drying feels painfully untechnical after all the motors and software, but it is where many ceramic pieces are saved or lost. A loose plastic cover, a calm shelf, and patience can be more valuable than another firmware tweak.
Custom extruders also teach maintenance habits. Clay gets everywhere. It dries inside threads, hides around seals, and turns small gaps into future clogs. Cleaning immediately after printing is not optional. The best tool is not always the fanciest wrench; sometimes it is a sponge, a bucket, and the discipline to clean before the clay becomes geological.
The most rewarding experience is seeing the fired result. The printed layers shrink, harden, and become permanent. What began as software and wet clay becomes ceramic: solid, durable, and strangely alive. That transformation is why custom clay extruders are worth the trouble. They do not just let a 3D printer handle mud. They let makers explore a new craft language where code becomes form, form becomes clay, and clay becomes something that can sit on a table for decades.
Conclusion
3D printing with clay, thanks to a custom extruder, is more than a clever printer hack. It is a meeting point between ancient material knowledge and modern digital fabrication. The custom extruder solves the central challenge: moving thick, real clay through a controlled nozzle so it can build stable layers. From there, the maker still needs ceramic judgment, patient drying, smart design, and respect for shrinkage and firing.
The beauty of this technology is not that it replaces traditional pottery. It expands it. A wheel can make forms that feel human and immediate. A hand-built sculpture can carry the touch of the maker. A clay 3D printer can create patterns, structures, and repetitions that would be exhausting by hand. Together, they give artists and engineers a wider vocabulary.
So yes, the custom extruder is the star. It is the device that turns a desktop motion system into a clay-printing machine. But the real achievement is bigger: it proves that innovation does not always require abandoning old materials. Sometimes the future arrives covered in clay, wearing layer lines, and asking where the kiln is.