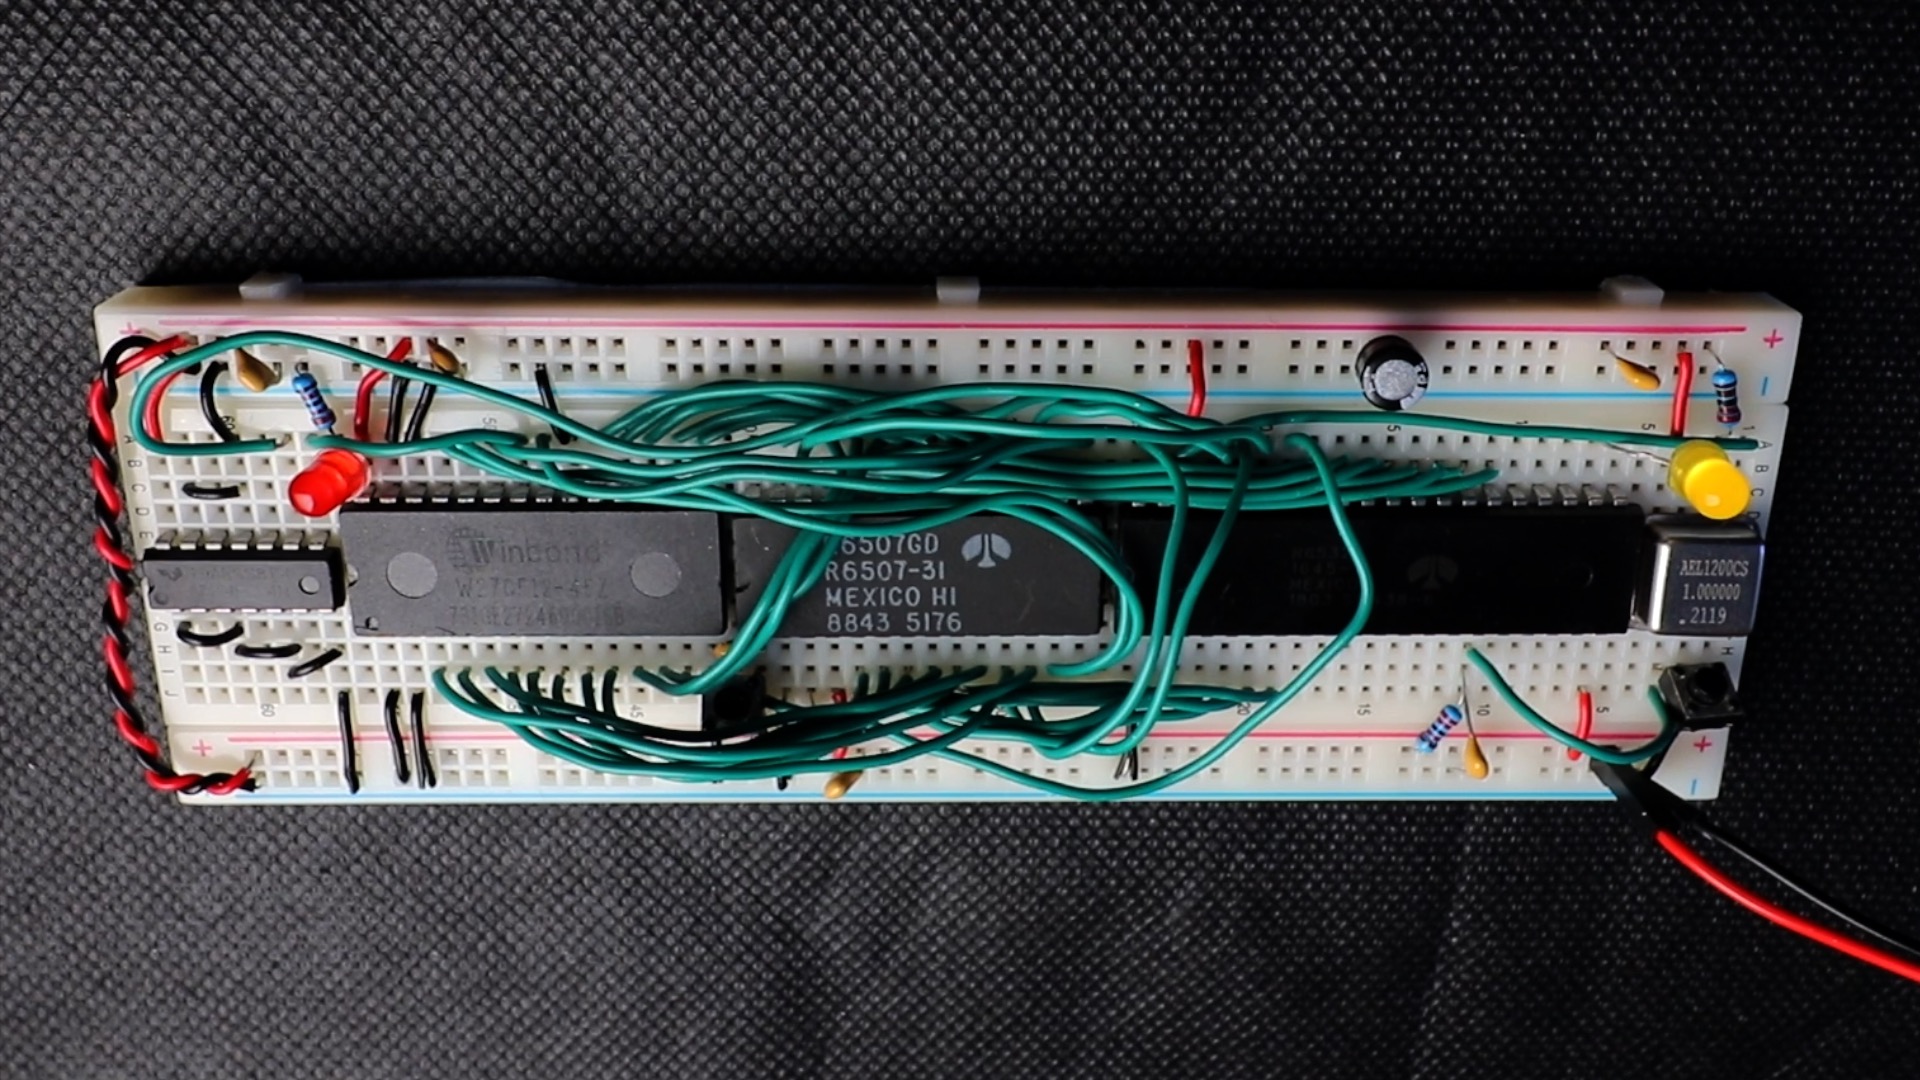
There is something wonderfully unreasonable about trying to fit a complete 6502 retrocomputer onto a single solderless breadboard. It is the electronics version of packing for a weekend trip using only the pockets of your jacket. You know it should not work. You know you will regret at least three decisions. And yet, when the first LED blinks under software control, all doubts politely leave the room.
The 6502 microprocessor has a special place in computing history. It powered or influenced legendary machines such as the Apple II, Commodore PET, Commodore 64, Atari 2600, BBC Micro, and the Nintendo Entertainment System. Decades later, it remains one of the best chips for learning how computers actually work because it is simple enough to understand, yet real enough to be dangerous in the best possible way.
But a minimalist 6502 retrocomputer on one breadboard is not simply a smaller version of a normal build. It is a design argument. Every chip must earn its rent. Every jumper wire needs a reason to exist. Every square millimeter matters. The result is a compact lesson in CPU architecture, memory mapping, address decoding, software-driven I/O, and the ancient art of not knocking one jumper loose while fixing another.
Why the 6502 Is Still a Perfect Retrocomputing Teacher
The original MOS Technology 6502 became famous in the 1970s because it was inexpensive, capable, and approachable. While competing processors could cost many times more, the 6502 helped make affordable home computers realistic. Its architecture is modest by modern standards: an 8-bit data bus, a 16-bit address space, a small group of registers, and a compact instruction set. That modesty is exactly why hobbyists still love it.
Modern computers hide almost everything behind layers of abstraction. A 6502 build does the opposite. The address bus is right there. The data bus is right there. Read/write control, reset, clock, ROM, RAM, and I/O all become physical signals you can trace with a logic probe. Instead of saying “the program accesses memory,” you can watch the CPU place an address on the bus and select the correct chip. It is computer science with the lid removed.
The Challenge: One Breadboard, Too Many Pins
A typical solderless breadboard gives you a friendly grid of holes, but it is not magical real estate. A classic 40-pin 6502 alone takes a huge chunk of available space. Add a ROM, RAM, clock circuit, reset circuit, address decoding logic, and a peripheral chip such as a 6522 VIA, and the board starts looking like rush-hour traffic in wire form.
This is why a single-breadboard 6502 computer is such an interesting engineering puzzle. The project is not merely about shrinking. It is about choosing components that combine functions, reducing glue logic, accepting constraints, and deciding what the computer absolutely must do. A full-featured homebrew machine with serial ports, video output, keyboard input, expansion headers, and generous debugging connectors will not politely squeeze into one breadboard. A minimalist machine might.
The Minimalist Trick: Use the Right 6502-Family Parts
One clever way to shrink the design is to use 6502-family chips that already remove some of the bulk. The 6507, for example, is closely related to the 6502 but comes in a smaller 28-pin package. It reduces the number of accessible address lines, which limits memory space, but the reward is physical space saved on the breadboard.
That tradeoff matters. A full 6502 can address 64 KB of memory. A reduced-pin variant such as the 6507 cannot expose the full address bus externally, so the memory map becomes much smaller. For a minimalist retrocomputer, that is not necessarily a disaster. If the goal is to run small programs, blink LEDs, experiment with timing, and learn the fundamentals, a smaller address space can be perfectly acceptable.
Another useful chip is the 6532 RIOT, short for RAM-I/O-Timer. The name sounds like a tiny electronic punk band, but it is actually a practical space saver. It combines a small amount of RAM, input/output lines, and a timer in one package. Instead of placing separate RAM and I/O chips on the breadboard, a designer can use one multifunction chip and save precious room.
What Counts as a Complete Retrocomputer?
A minimalist 6502 retrocomputer does not need to be a tiny Apple II. To qualify as a real computer, it needs a CPU, memory, a clock, reset behavior, some kind of input/output, and software stored somewhere the processor can read after reset. That sounds simple until you build it.
The CPU needs a stable clock. The reset vector must point to valid code. ROM must appear at the correct address when the processor fetches its first instruction. RAM must be available for variables and stack operations. I/O must be mapped so software can interact with the outside world. If any one of these pieces is wrong, the computer will not politely display an error message. It will simply do nothing, which is a very old-school way of saying, “Good luck, detective.”
Memory Mapping: The Tiny City Plan Inside the Machine
Memory mapping is one of the most important ideas in any 6502 homebrew computer. The processor sees a range of addresses. The hardware designer decides which addresses connect to RAM, which connect to ROM, and which connect to I/O. Because the 6502 uses memory-mapped I/O, peripherals are accessed using the same load and store instructions used for memory.
In a larger design, you might map RAM to the lower part of the address space, ROM to the upper part, and I/O somewhere in the middle. In a minimalist single-breadboard computer, the map may be much tighter. A small ROM can hold startup code. A small RAM region can handle variables and stack use. A few addresses can control LEDs, buttons, timers, or software-driven serial tricks.
The important point is that the map must match both the hardware wiring and the software assumptions. If the program expects ROM at one address but the decoder selects RAM there instead, the CPU will wander into nonsense. This is not “undefined behavior” in the modern software sense. It is more like a raccoon got into the address bus.
Address Decoding Without a Chip Explosion
Address decoding is the logic that decides which chip responds to a given address. A generous design can use decoders, gates, programmable logic, or multiple support chips. A minimalist breadboard design cannot be so luxurious. It may use only a few logic gates, sometimes just enough to separate ROM, RAM, and I/O.
The fewer logic chips you use, the more compromises you accept. Some address ranges may mirror each other. Some unused space may select the same device repeatedly. This can look wasteful, but in small 6502 systems it is often a smart trade. Simple decoding reduces parts count, wiring complexity, propagation delay, and the number of opportunities for one jumper wire to ruin your afternoon.
That simplicity has another benefit: speed. Each layer of logic adds delay. At low clock speeds, sloppy decoding may still work. At higher speeds, the memory chip needs enough time to place valid data on the bus before the CPU samples it. Minimal glue logic can be both smaller and faster, provided the designer understands the timing margins.
Clock, Reset, and the Ritual of First Power
No retrocomputer is alive until it has a clock. The 6502 family relies on a clock signal to step through instruction cycles. A breadboard build may use a crystal oscillator module, a simple oscillator circuit, or a slow manual clock for debugging. A slow clock is especially useful because it lets builders see bus activity one cycle at a time.
Reset is equally important. When the 6502 resets, it reads a vector from memory to discover where execution should begin. That means the ROM must be correctly placed in the address map, and the reset vector must contain the right startup address. If the reset circuit is unreliable, the CPU may begin in a confused state. In human terms, that is like waking up and trying to make coffee in the laundry room.
Software-Driven I/O: Making Less Hardware Do More
Minimalist hardware often pushes work into software. Instead of adding a dedicated UART, display controller, or complex peripheral interface, a tiny 6502 system may use software-driven I/O. That can mean toggling output pins directly, reading input pins in loops, timing signals by hand, or using a simple timer to create predictable delays.
This approach is not as convenient as adding modern modules, but it teaches an essential lesson: software and hardware are partners. On a minimalist retrocomputer, code is not floating in a cloud of abstraction. It is touching pins, waiting for cycles, and working around the exact behavior of the board. A simple LED blink program becomes a hardware validation tool. A button input becomes a lesson in pull-up resistors, debouncing, and patience.
What Can a Single-Breadboard 6502 Actually Do?
A tiny 6502 retrocomputer will not stream video, host a web server, or run a modern operating system. That is not the point. Its value is in doing small things transparently. It can blink LEDs from ROM code. It can count. It can read switches. It can drive simple output patterns. It can use a timer. With careful design, it may communicate over a simple serial interface or run a compact monitor program.
The real achievement is not raw capability. The achievement is that a recognizable computer exists in such a small physical space. The CPU fetches instructions. Memory responds. I/O changes state. Software controls hardware. That loop is the heartbeat of every computer, whether it sits on one breadboard or inside a multi-billion-transistor processor.
Why Breadboards Make Everything Harder
Solderless breadboards are wonderful for experiments, but they are not ideal high-speed digital platforms. Long jumper wires add capacitance and inductance. Power rails may have breaks. Contacts can be loose. A wire that looks connected may not be connected. A wire that should not be connected may be making just enough contact to cause haunted behavior.
For a single-breadboard 6502 computer, layout discipline matters. Keep data and address bus wiring tidy. Use short jumpers where possible. Add decoupling capacitors near IC power pins. Check power rails before inserting chips. Avoid running critical clock lines through a scenic tour of the entire board. The computer may be retro, but signal integrity still has modern expectations.
Debugging: The Part Where the Computer Teaches You Manners
Debugging a breadboard 6502 is a humbling experience. The most common problems are not exotic CPU bugs. They are reversed chips, missing grounds, swapped address lines, floating inputs, incorrect reset vectors, bad ROM images, and one jumper wire off by a single row. The machine is usually not broken. It is simply obeying your wiring more literally than you hoped.
A logic probe, multimeter, EEPROM programmer, and patience are essential tools. Many builders also use an Arduino or logic analyzer to watch the address and data buses. Being able to see the CPU fetch from the reset vector or loop through a known address range turns debugging from guesswork into investigation.
A good first program is intentionally boring. Do not start with a monitor, keyboard driver, and grand dreams of writing a tiny operating system named “Breadnix.” Start with an LED. Then blink it. Then change the pattern. Then read a switch. Each successful step proves another piece of the system.
The Beauty of Constraints
The most interesting part of squeezing a 6502 retrocomputer onto one breadboard is not the final photo. It is the design thinking required to get there. Constraints force clarity. Do you really need that peripheral? Can a smaller chip replace two larger ones? Can the address decoder be simplified? Can software handle timing that hardware would normally manage?
This is why minimalist retrocomputing feels fresh even in an era of cheap microcontrollers. A modern microcontroller can blink an LED with fewer parts, less power, and less drama. But it hides the computer inside a black box. A single-breadboard 6502 build exposes the machine. You are not merely using a computer; you are negotiating with one signal at a time.
Lessons for Beginners Building a 6502 Breadboard Computer
Start Bigger Before Going Smaller
If you are new to 6502 projects, build a more spacious version first. A two- or three-breadboard design gives you room for debugging headers, clean bus wiring, and separate modules. Once you understand the memory map, reset behavior, clocking, and I/O, shrinking the design becomes much easier.
Respect the Datasheet
Pinouts, timing diagrams, voltage levels, and setup times are not decorative paperwork. They are the rules of the game. The 6502 family is forgiving compared with many modern chips, but it still expects clean power, valid logic levels, and properly timed signals.
Keep Software Simple at First
Write tiny test programs. Use known addresses. Confirm that ROM is being read. Confirm that RAM works. Confirm that I/O changes when software writes to it. The smaller the test, the easier it is to identify the mistake. Complex software on unproven hardware is just a mystery novel with too many suspects.
Why This Project Matters
A minimalist 6502 retrocomputer is more than a nostalgic toy. It is a compact demonstration of computing fundamentals. It shows how a CPU interacts with memory, how address decoding selects hardware, how software controls pins, and how careful design can make a tiny system feel complete.
It also keeps the culture of hands-on computing alive. The early personal computer era was full of machines that invited curiosity. You could study schematics, inspect memory maps, and understand large parts of the system. A single-breadboard 6502 brings that spirit back to the workbench. It reminds us that computers are not magic. They are organized electricity with opinions.
Hands-On Experience: What a Minimalist 6502 Build Teaches on the Bench
The first real experience builders get from a minimalist 6502 breadboard computer is respect for physical space. On paper, five or six chips look easy. On a breadboard, those chips become a small neighborhood with zoning problems. The CPU wants room. The ROM wants room. The RAM or RIOT chip wants room. The oscillator wants a quiet corner. The reset circuit wants to be close enough to matter. Then the jumper wires arrive and behave like colorful spaghetti with electrical consequences.
A useful habit is to place the largest chips first and route the buses deliberately. Address lines should move in a predictable direction. Data lines should stay grouped. Power and ground should be verified before anything expensive is inserted. This sounds obvious until the first time a misplaced jumper sends a signal to the wrong pin and the board responds with complete silence.
The second major lesson is that minimalism increases the value of every decision. A full-size 6502 build can add a 6522 VIA, a 6551 ACIA, extra RAM, LEDs on the bus, and debugging headers. A single-breadboard version asks a sharper question: what is the smallest system that still feels like a computer? That question changes the design process. Instead of adding features, the builder removes assumptions.
The third lesson is that software becomes part of the hardware strategy. When I/O is limited, code must be clever. A delay loop is no longer just a beginner exercise; it may be the timing engine for visible output. A memory write is not just a store instruction; it may be a signal on a pin. Assembly language feels immediate because the distance between instruction and physical result is tiny. Load a value, store a value, and something outside the CPU changes. That directness is addictive.
Debugging also becomes a strangely satisfying ritual. You learn to check the reset vector first, because the CPU cannot begin correctly without it. You learn to confirm the clock, because without a clock the processor is an expensive rectangle. You learn to test ROM contents, because a single wrong byte can send execution into nowhere. Most importantly, you learn not to assume that a wire is correct just because it looks confident.
There is also a pleasant emotional rhythm to the project. At first, the breadboard looks impossible. Then the power rails make sense. Then the CPU wiring becomes less intimidating. Then the memory map clicks. Then the first LED blinks, and suddenly the mess of wires becomes a machine. It may be a tiny machine. It may only perform a task that a 555 timer could do with fewer complaints. But it is programmable, understandable, and built from visible parts. That makes it feel alive in a way polished modern boards rarely do.
The best experience from building or studying a single-breadboard 6502 retrocomputer is the shift in perspective. After working at this level, words like “bus,” “address,” “instruction,” “I/O,” and “memory” stop being abstract. They become pins, voltages, timing, and choices. That is the lasting reward of the project: not just a small retrocomputer, but a bigger understanding of what every computer is doing under the hood.
Conclusion
Squeezing a minimalist 6502 retrocomputer onto a single breadboard is a delightful act of engineering discipline. It takes a historically important processor family, trims the supporting hardware to the essentials, and turns a humble breadboard into a working lesson in computer architecture. The project is small, but the ideas are large: memory maps, bus timing, address decoding, software-controlled I/O, and the practical reality that computers only do what the wires allow.
For hobbyists, students, and retrocomputing fans, this kind of build is worth studying because it makes the invisible visible. It proves that a computer does not need a glossy case, a touchscreen, or a cloud account to be fascinating. Sometimes all it needs is a CPU, a little memory, a clock, a few chips, and a builder stubborn enough to make it fit.
Note: Before powering any 6502 breadboard project, verify chip orientation, pinouts, voltage levels, reset wiring, clock signals, and power rails. Retrocomputing is fun; accidental smoke testing is less charming.