Drawing whiskers on your face sounds easy until one side looks like a sleek house cat and the other looks like a squirrel who just read bad news. The good news? You do not need professional special-effects makeup, a Hollywood trailer, or an art degree to create cute, clean whiskers. With the right product, a steady-ish hand, and a few simple tricks, you can turn a plain face into a cat, mouse, bunny, fox, tiger, puppy, or any other whiskered character in minutes.
This guide walks you through simple ways to draw whiskers on your face using makeup, face paint, eyeliner, or costume cosmetics. It also covers skin prep, symmetry, whisker placement, mistake fixes, setting tips, and safe removal. Whether you are getting ready for Halloween, a school event, a costume party, a theater performance, or a last-minute “I forgot the costume” situation, these 12 steps will help your whiskers look intentional instead of accidental.
Before You Start: Choose Face-Safe Products
Before the fun begins, choose products made for skin. Use cosmetic-grade face paint, eyeliner, cream makeup, or water-activated face paint. Avoid craft paint, acrylic paint, markers, permanent pens, or anything that was designed for paper, walls, wood, or “maybe the garage.” Your face is not a poster board with eyebrows.
For kids or sensitive skin, look for labels such as “non-toxic,” “hypoallergenic,” “cosmetic grade,” or “made for face and body.” A small patch test on the arm a day or two before a big event is smart, especially if the makeup is new. If there is redness, itching, swelling, or stinging, skip that product. Cute whiskers are not worth an angry rash.
Simple Ways to Draw Whiskers on Your Face: 12 Steps
Step 1: Wash and Dry Your Face
Start with clean skin. Use a gentle cleanser to remove oil, sunscreen, sweat, or leftover makeup. Pat your face dry with a towel instead of rubbing. Makeup grips better on clean, dry skin, and your whisker lines will look sharper. If your face is oily, the whiskers may slide around like tiny black noodles.
Step 2: Moisturize Lightly
Apply a thin layer of lightweight moisturizer, especially if your skin feels dry. Let it absorb for a few minutes before drawing. This helps the makeup glide smoothly and prevents patchy lines. Do not use a heavy, greasy cream right before painting because it can make the product smear.
Step 3: Pick Your Whisker Tool
Your tool affects the final look. A black eyeliner pencil creates soft, beginner-friendly whiskers. Liquid eyeliner gives crisp, dramatic lines. Water-activated face paint with a thin brush works well for kids, parties, and larger designs. Cream makeup is great for theater or long wear, but it may need powder or setting spray.
If you are a beginner, start with a pencil liner or a small face-paint brush. They are easier to control and easier to fix. If you want sharp cat whiskers for photos, a waterproof liquid liner can give you that clean “yes, I planned this” finish.
Step 4: Decide What Animal You Want to Be
Not all whiskers are the same. Cat whiskers are usually long, elegant, and slightly upward. Mouse whiskers are shorter and rounder, often paired with a tiny nose. Bunny whiskers can be soft and playful, with pink cheeks. Tiger whiskers may be thicker and more dramatic, especially with stripes. Fox whiskers can angle outward and upward for a mischievous look.
Choosing the animal first helps you avoid mixing styles. Otherwise, you may end up as a cat-mouse-rabbit hybrid, which is adorable but difficult to explain at parties.
Step 5: Mark the Whisker Area
Most whiskers begin on the upper cheek area, near the sides of the nose and above the corners of the mouth. Smile gently and notice where your cheeks lift. That area is a natural place for whisker dots and lines.
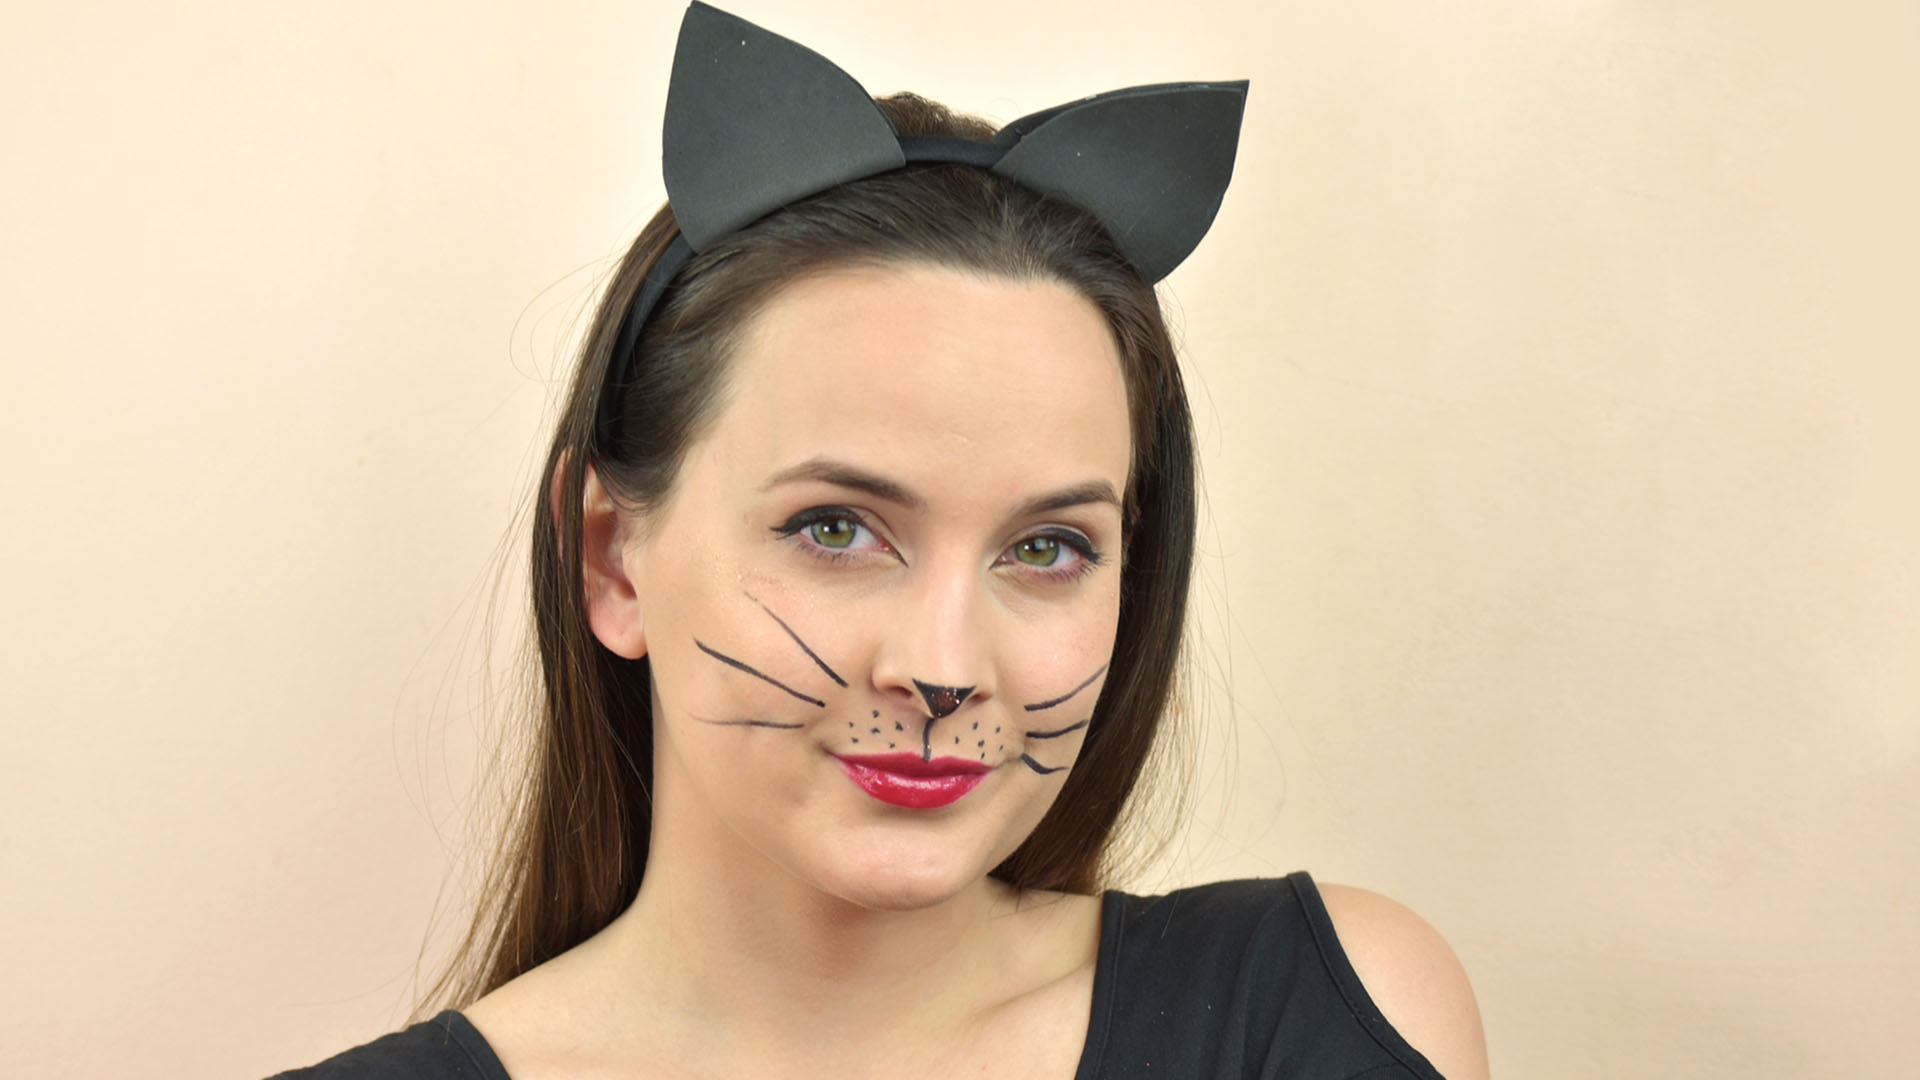
For a classic cat face, add three small dots on each side between the nose and upper lip. These dots act as your starting points. They also make the design instantly recognizable, even if your whisker lines are simple.
Step 6: Draw the Nose First
A whisker look usually works best when you draw the nose before the lines. For a cat, color the tip of your nose in black or pink, then draw a short vertical line from the bottom of the nose to the cupid’s bow. For a mouse, make the nose smaller and rounder. For a bunny, try a soft pink oval or heart shape.
The nose acts like the anchor of the design. Once it is in place, your whiskers have a center point and the whole face looks more balanced.
Step 7: Add Whisker Dots
Place three to six dots on each side of the face. Keep them roughly even, but do not obsess. Real animals are not measuring their whisker dots with a ruler, and neither should you. The dots should sit above the upper lip and spread slightly toward the cheeks.
For a cute look, make the dots round and small. For a bold cartoon style, make them larger. If you are doing makeup for a child, dots alone plus a nose can be enough for a fast, low-smudge design.
Step 8: Draw Three Lines on Each Side
Now comes the main event: the whiskers. Start near the dots and draw three lines outward on each cheek. Angle the top line slightly upward, the middle line straight outward, and the bottom line slightly downward. This creates a natural fan shape.
Use light pressure at first. It is easier to darken a faint line than to erase a thick one. For smoother lines, rest your pinky lightly against your cheek for stability and flick your wrist outward. Think of it like drawing a tiny shooting star, but on your face.
Step 9: Keep Both Sides Balanced
Symmetry makes whiskers look polished. After drawing one line on the left side, draw the matching line on the right side before moving to the next. This helps both sides stay similar. If you draw all three lines on one side first, the second side may slowly become its own independent art project.
Stand back from the mirror after each pair of lines. Small differences are fine. Big differences can be corrected with a cotton swab and a little makeup remover.
Step 10: Fix Mistakes Without Panic
If a whisker smears, do not scrub your whole face. Dip a cotton swab in micellar water or gentle makeup remover, then roll it over the mistake. Let the area dry before redrawing. For tiny corrections, use a clean angled brush or the corner of a damp cloth.
If the line is slightly crooked, you can thicken it a little and make the other side match. Makeup is wonderfully forgiving. Many “mistakes” become “style choices” if you say it confidently.
Step 11: Set the Whiskers
If you need the whiskers to last, set them. For pencil or cream products, lightly tap translucent setting powder over the lines. For face paint, let it dry completely and avoid touching it. A cosmetic setting spray can help adult makeup last longer, but use caution around children and always follow the product directions.
For long events, pack a small touch-up kit: cotton swabs, the product you used, and a compact mirror. Whiskers near the mouth can fade after eating, drinking, laughing, or dramatically explaining your costume for the tenth time.
Step 12: Remove Everything Gently
At the end of the day, remove the whiskers before bed. Use a gentle cleanser, micellar water, cleansing balm, or makeup remover. Let the remover dissolve the product before wiping. Do not scrape at your skin, especially around the nose and mouth.
After removing the makeup, wash your face and apply moisturizer. If your skin feels irritated, keep things simple and skip extra active skincare products for the night. Your skin has already attended the party.
Best Whisker Styles for Different Looks
Classic Cat Whiskers
Classic cat whiskers are the easiest and most popular. Draw a black nose, a short line to the upper lip, small whisker dots, and three clean lines on each side. Add a winged eyeliner look if you want a glamorous cat costume.
Mouse Whiskers
Mouse whiskers look best with a tiny round nose, short whisker lines, and soft cheek dots. Gray or brown eyeliner can make the look gentler than black. This style is perfect when you want something cute, quick, and not too dramatic.
Bunny Whiskers
Bunny whiskers pair well with a pink nose, rosy cheeks, and white face paint around the mouth. Keep the whiskers soft and slightly curved. Add two front teeth with white face paint if you want a playful cartoon effect.
Tiger or Lion Whiskers
For tigers and lions, use stronger lines and add orange, brown, or gold shading around the cheeks. Draw thicker whisker pads and add black dots. A few forehead stripes can instantly move the look from “house cat” to “small jungle celebrity.”
Common Mistakes to Avoid
The biggest mistake is using the wrong product. Anything not made for skin can irritate your face or be difficult to remove. Another common problem is drawing the whiskers too low. If the lines start near the chin, the design may look droopy. Keep the whiskers centered around the upper cheeks.
A third mistake is overloading the brush or liner. Too much product makes lines blob at the beginning. Wipe off extra product before touching your face. Finally, avoid placing glitter close to the eyes. Sparkly whiskers may sound magical, but glitter in the eye is not the kind of drama anyone ordered.
Helpful Tips for Kids, Parties, and Beginners
For kids, keep the design fast. A nose, dots, and three whiskers per side are usually enough. Use water-based face paint that washes off easily. Ask the child to sit still and make it fun: “freeze like a statue” works better than “please stop moving your entire head like a curious owl.”
For parties, set up a small mirror and use disposable applicators or clean brushes. Do not share eye products directly between people. If you are painting several faces, clean your tools often and avoid applying makeup over cuts, irritated skin, or breakouts.
For beginners, practice once on paper and once on your hand before drawing on your face. The motion matters more than artistic talent. Smooth whiskers come from quick, confident strokes, not slow, nervous scratching.
Experience Notes: What Actually Works in Real Life
In real-life costume situations, the simplest whisker designs often look the best. People sometimes think they need full-face paint, dramatic shading, nose contour, cheek highlights, and enough liner to frighten a raccoon. But in photos and at parties, the recognizable details do the heavy lifting: nose, dots, whiskers. Those three elements tell the story immediately.
One practical experience that comes up again and again is this: draw the whiskers after the rest of your makeup is finished. If you apply foundation, blush, powder, or contour after drawing whiskers, you may blur the lines. Whiskers should be one of the final steps, right before setting spray or powder. This keeps them crisp.
Another helpful lesson is to match the whisker style to the event. For a child’s birthday party, soft face paint is usually better than waterproof liner because it is easier to remove. For a school play or dance performance, stronger lines may be better because the audience sees the face from a distance. For a Halloween party, waterproof eyeliner can survive heat, snacks, and the mysterious humidity that appears whenever people wear costumes indoors.
Lighting also matters. A design that looks bold in the bathroom mirror may look lighter outside at night. If the event is outdoors, slightly darker whiskers can photograph better. If the event is during the day, softer lines often look more natural. Take one quick phone photo before leaving. The camera is brutally honest, like a tiny art critic in your pocket.
People with oily skin may notice whiskers fading around the mouth and cheeks. A light dusting of powder before and after drawing can help. People with dry skin may see cracked lines if they skip moisturizer. The sweet spot is skin that is clean, lightly hydrated, and not slippery.
For group costumes, consistency makes everyone look coordinated. If three friends are cats, decide whether the whiskers are black, brown, short, long, curved, or straight before starting. Otherwise one person becomes a glamorous panther, one becomes a cartoon kitten, and one becomes “unclear woodland creature with ambition.” Still fun, but less unified.
The best final tip is to embrace personality. Perfect whiskers are nice, but expressive whiskers are better. A tiny upward flick can make a cat look sassy. Short round whiskers can make a mouse look sweet. Thick, bold whiskers can make a tiger look powerful. Makeup is temporary, so play with it. If it goes wrong, remove it, redraw it, and tell everyone the first version was just the rehearsal.
Conclusion
Learning how to draw whiskers on your face is one of the easiest costume skills you can master. With skin-safe makeup, a clean face, a simple nose shape, balanced dots, and three lines on each cheek, you can create a cat, bunny, mouse, fox, tiger, or lion look in minutes. The secret is not perfection. The secret is placement, confidence, and knowing when to stop before your cute kitten becomes a full abstract mural.
Keep your products safe, your lines light at first, and your remover nearby. Once you understand the basic whisker pattern, you can customize it for any costume, mood, or last-minute party invitation. A few small lines can completely change your faceand unlike a full mascot suit, they still let you eat snacks.