Granite is tough, elegant, and perfectly capable of making a kitchen look like it belongs in a magazine spread where nobody ever spills spaghetti sauce. But after cutting, installing, repairing, or living with granite for a while, the edges can look dull, rough, cloudy, or slightly chipped. That unfinished edge is small, but it can make the whole countertop look like it left the party before dessert.
The good news? Polishing granite edges is not mysterious wizardry. It is mostly patience, the right diamond polishing pads, steady movement, water control, and the discipline not to skip grits like a DIY daredevil. Whether you are smoothing a cut edge, refreshing a worn countertop edge, or trying to match a glossy surface, the process is simple once you understand what each step is doing.
This guide explains simple ways to polish granite edges safely and effectively. You will learn what tools to use, how to move through the polishing sequence, when to polish by hand, when to use a variable-speed grinder, how to avoid common mistakes, and how to finish the job so the edge looks clean, smooth, and professionally cared for.
Why Granite Edges Lose Their Shine
Granite edges can become dull for several reasons. A freshly cut edge is naturally rough because saw blades leave fine marks in the stone. Countertop edges near sinks may collect soap film, mineral deposits, and water spots. Edges in busy kitchens can also get tiny scratches from cookware, trays, cleaning pads, or the occasional enthusiastic air fryer relocation.
Granite is hard, but it is not magic armor. The polished face of a slab is created through repeated abrasion using finer and finer grits. The edge needs the same treatment. If the edge was not polished to the same level as the top, it will look flat, gray, or chalky next to the glossy surface.
The goal is not to “paint on” shine. Real granite edge polishing means refining the stone surface until the scratches become so fine that the edge reflects light smoothly. That is why diamond polishing pads are the hero of the job. They gradually remove visible scratches and replace them with finer ones until the granite looks polished instead of sanded.
Before You Start: Safety Comes First
Granite polishing can create dust, slurry, noise, and flying grit. If you use power tools, treat the job seriously. Wear safety glasses or a face shield, hearing protection, work gloves, and a properly fitted respirator when dust may be present. If you are not experienced with grinders or polishers, get help from a qualified adult or professional. A countertop is replaceable. Fingers and lungs are not.
Whenever possible, use wet polishing. Water helps cool the stone and pads, reduces dust, and makes the polishing process smoother. Never dry grind granite indoors without serious dust control. Silica-containing stone dust is hazardous when inhaled. Use wet methods, ventilation, and HEPA cleanup instead of sweeping dry dust around like you are decorating the room with invisible trouble.
Tools and Materials You Need
You do not need a truck full of fabrication-shop equipment for a small edge-polishing project, but you do need the right basics. The most useful setup includes a variable-speed wet polisher or variable-speed angle grinder, a set of diamond polishing pads, a hook-and-loop backing pad, clamps, clean water, towels, painter’s tape, a stone-safe cleaner, and a penetrating granite sealer if the edge needs sealing afterward.
Recommended Diamond Pad Grits
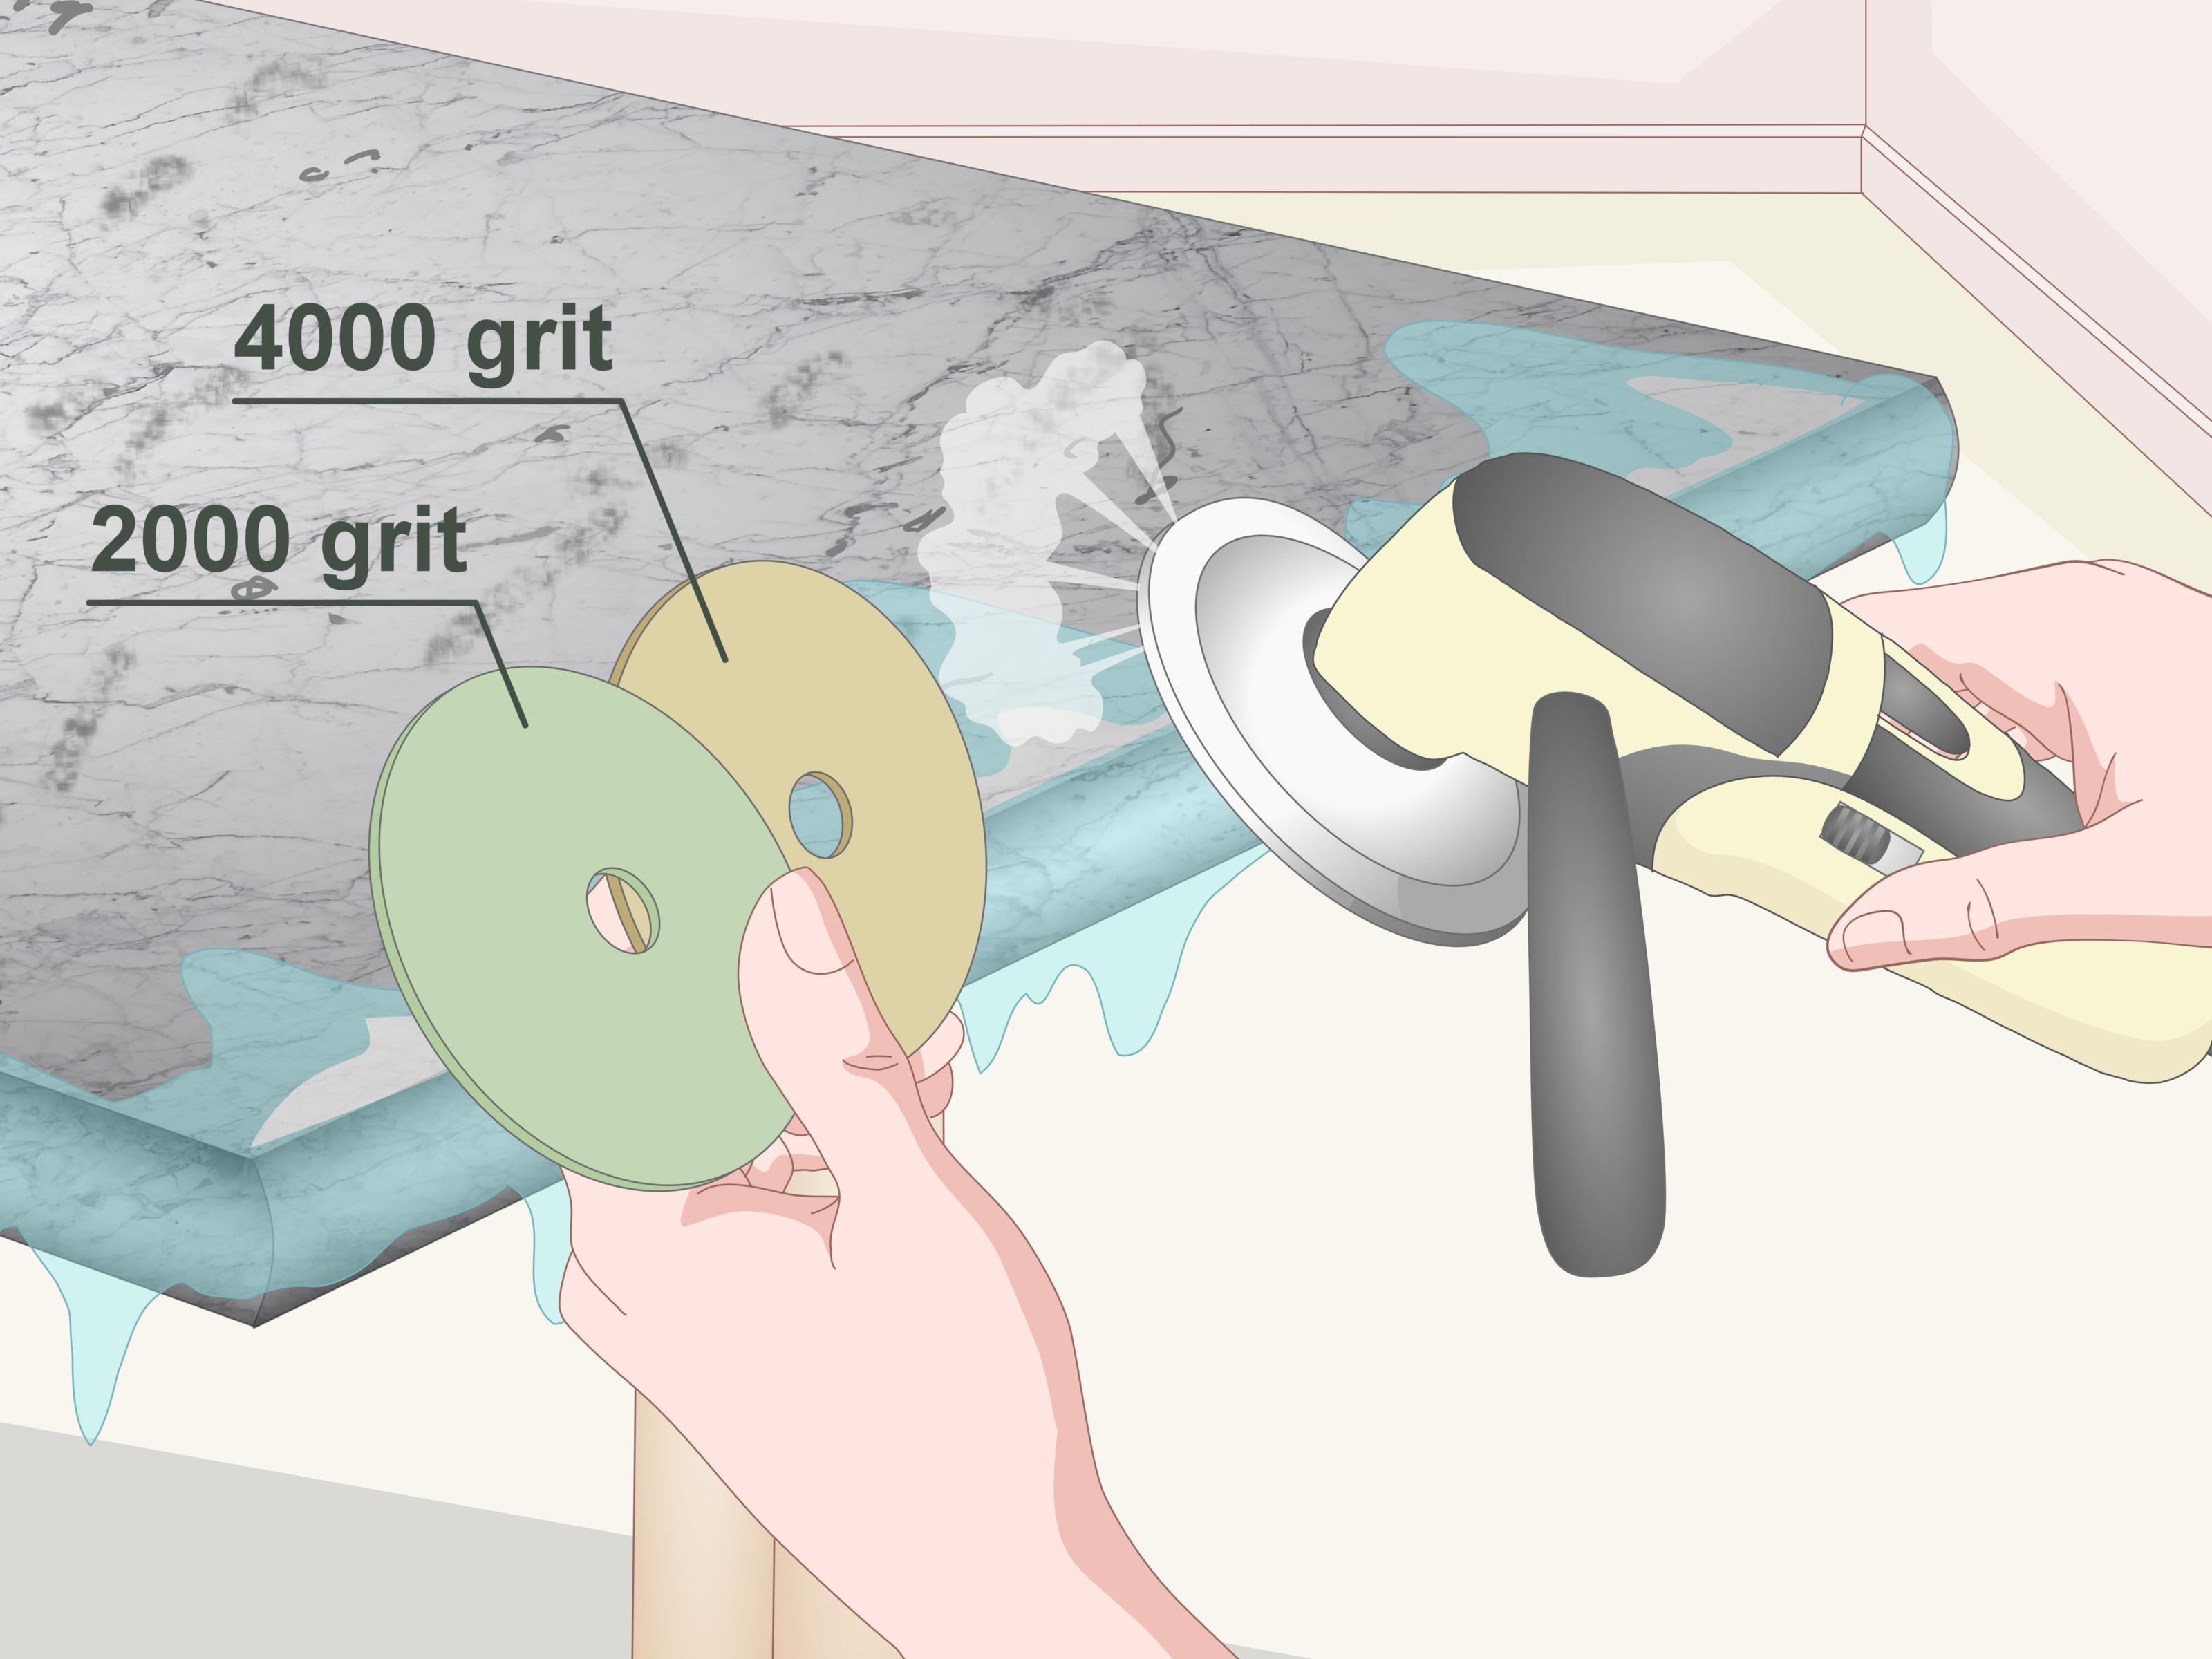
A common polishing sequence for granite edges is 50, 100, 200, 400, 800, 1500, and 3000 grit. Some kits include a final buff pad, sometimes called a black or white buff depending on the stone color and product system. The exact sequence can vary, but the principle stays the same: start coarse enough to remove saw marks, then move through progressively finer pads until the edge reaches the shine you want.
If the edge is already smooth and only slightly dull, you may not need to start at 50 grit. Starting too coarse can create extra work. For a lightly faded edge, you might begin at 400 or 800 grit, test a small hidden area, and move upward. For a freshly cut, rough edge, start lower.
Step 1: Clean and Inspect the Granite Edge
Begin by cleaning the edge with a pH-neutral stone cleaner or mild soap and water. Remove grease, dust, old polish, and dried debris. Dry the area and inspect the edge closely under good light. Look for saw marks, chips, scratches, uneven spots, and dull patches.
This inspection tells you where to start. Deep saw marks need coarse pads. Light haze may only need fine pads and polishing compound. Chips may need stone epoxy before polishing. If the granite has cracks, loose pieces, or major damage, call a stone professional before using a grinder. Polishing a cracked edge without repair can turn a small problem into a very expensive vocabulary lesson.
Step 2: Protect Nearby Surfaces
Use painter’s tape to protect cabinets, walls, appliances, and the polished top surface near the edge. If you are polishing a loose granite piece, place it on a stable workbench and clamp it firmly. If you are working on an installed countertop, cover the floor and cabinets with plastic or towels because wet polishing creates slurry.
Granite slurry looks harmless, but it dries into a fine residue that loves corners, seams, and cabinet hardware. Keep towels nearby and wipe often. Good prep saves cleanup time and prevents the job from becoming a kitchen archaeology project.
Step 3: Start With the Right Grit
Attach the first diamond polishing pad to the backing pad. Use the lowest grit needed for the condition of the edge. For a rough cut edge, start with 50 or 100 grit. For a previously polished but dull edge, start with 400, 800, or even 1500 grit.
Keep the tool speed moderate. Many polishing pads work best at lower to medium RPM, but always follow the pad manufacturer’s instructions. Too much speed can overheat the pad, burn the resin, or leave uneven marks. Too much pressure can also create dips along the edge. Let the diamond abrasive do the work.
Step 4: Use Water and Steady Movement
Wet the granite edge and keep it damp as you polish. Move the pad smoothly along the edge in overlapping passes. Do not hold the pad in one place. Think of the tool as a slow, controlled paintbrush, not a drill sergeant punishing one tiny spot.
For a flat edge, keep the pad level and follow the line of the countertop. For a bullnose, eased, or rounded edge, gently roll the pad with the curve. The goal is even contact. If the pad touches only one part of the profile, the shine will be uneven.
Step 5: Rinse Between Every Grit
After each grit, rinse the edge, wipe away slurry, and inspect the surface. This is not optional. Coarse particles left behind can scratch the granite during the next finer step. It is like washing a car with sand in the sponge: technically you are cleaning, but emotionally you are committing a crime.
Before moving to the next grit, make sure the scratches from the previous grit are consistent and that saw marks are gone. If you still see deep lines after 100 grit, do not jump to 200 and hope for a miracle. Stay with the current grit until the surface is ready.
Step 6: Move Through the Full Polishing Sequence
Continue polishing through each grit: 50, 100, 200, 400, 800, 1500, and 3000. The edge will change gradually. At low grits, it will look smooth but dull. Around 800 grit, you should begin to see a soft sheen. By 1500 and 3000 grit, the edge should become noticeably reflective.
Some granite colors polish faster than others. Dark granite often shows shine more dramatically, while lighter or speckled granite can look more satin even when properly polished. Do not judge the edge only by mirror reflection. Compare it with the top surface and look for consistency in texture, color depth, and smoothness.
Step 7: Buff for Extra Shine
If your pad kit includes a final buff pad, use it after the 3000 grit pad. A buff pad can deepen the shine and help the edge blend with the polished top. Use light pressure, keep the tool moving, and avoid overheating the granite.
You can also use a granite polishing compound for minor touch-ups, especially on edges that are already smooth. Apply it according to the manufacturer’s directions and buff with a soft cloth or appropriate pad. Polishing compound is useful for refreshing shine, but it will not remove deep saw marks by itself.
Step 8: Clean, Dry, and Seal the Edge
Once the edge looks right, clean it thoroughly with a stone-safe cleaner and dry it completely. If the edge absorbs water or darkens quickly when damp, apply a penetrating granite sealer. Work in small sections, wipe off excess sealer before it dries on the surface, and let it cure according to the product directions.
Sealing does not create the polish, but it helps protect the stone from staining and moisture absorption. After sealing, you can maintain the edge with gentle cleaning and occasional stone-safe polish. Avoid vinegar, lemon juice, harsh bathroom cleaners, abrasive powders, and rough scouring pads. Granite likes drama in its veining, not in its cleaning products.
Simple Hand-Polishing Method for Small Touch-Ups
If you only have a tiny dull spot, small scratch, or slightly rough edge, hand polishing may be enough. Use diamond hand pads or very fine stone polishing pads. Start with the finest grit that improves the area. Keep the edge damp, rub in small circles or short strokes, rinse often, and move to finer grits until the finish blends in.
Hand polishing is slower, but it gives you control and reduces the risk of accidentally changing the edge shape. It is ideal for small exposed edges on granite tiles, vanity tops, shelves, or repairs. It is not ideal for polishing a long countertop edge from rough cut to glossy finish unless you have the patience of a museum statue.
Wet Polishing vs. Dry Polishing
Wet Polishing
Wet polishing is usually the better choice for granite edges because water reduces dust and heat. It helps pads last longer and often produces a cleaner finish. The downside is mess. You need towels, controlled water flow, and careful cleanup.
Dry Polishing
Dry polishing can be useful in certain repair situations where water is impractical, but it creates more dust and heat. If dry polishing is used, choose pads designed for dry use, work outdoors or in a highly controlled area, use dust extraction when possible, and wear proper respiratory protection. Never assume a basic paper mask is enough for stone dust.
Common Mistakes to Avoid
Skipping Grits
Skipping from 100 grit to 1500 grit may feel efficient, but it usually leaves scratches behind. Each grit removes the marks from the previous grit. Skip a step and the granite will remember.
Using Too Much Pressure
Pressing harder does not make granite polish faster. It can overheat pads, create uneven spots, and wear out equipment. Use steady, moderate pressure and let the diamonds cut.
Polishing a Dirty Edge
Dirt, metal particles, old adhesive, and coarse grit can scratch the stone. Clean before you start and rinse between steps.
Forgetting the Edge Shape
Flat edges, eased edges, bevels, and bullnose profiles all require slightly different pad angles. Follow the shape that is already there. Do not accidentally turn a crisp bevel into a mystery curve.
Using Household Acid Cleaners
Vinegar, lemon-based cleaners, and harsh chemicals can dull natural stone finishes. Use pH-neutral stone cleaners instead.
When to Call a Professional
DIY polishing is reasonable for small touch-ups, tile edges, vanity tops, and minor dullness. However, call a professional if the granite has deep chips, cracks, uneven seams, heavy scratches, complex edge profiles, or a finish that must perfectly match a large countertop surface.
A professional stone fabricator has water-fed tools, dust-control systems, profile wheels, polishing machines, and experience matching finishes. Hiring help may cost more upfront, but it can prevent expensive damage. If the countertop is new or under warranty, check with the installer before polishing it yourself.
Maintenance Tips After Polishing Granite Edges
After polishing, keep the edge looking good with simple habits. Wipe spills quickly, especially oils, wine, coffee, and acidic foods. Clean with a stone-safe cleaner or mild soap and water. Dry the edge near sinks to prevent mineral buildup. Use cutting boards, trivets, and soft cloths.
Test the seal occasionally by placing a few drops of water on the stone. If the water beads, the sealer is still doing its job. If the water darkens the granite quickly, it may be time to reseal. Proper care keeps the polished edge smooth, rich, and bright for years.
Experience Notes: What Real Granite Edge Polishing Teaches You
The first thing experience teaches is that granite polishing rewards patience more than muscle. Beginners often think the grinder is the star of the show. It is not. The real star is consistency. A calm hand, steady passes, clean water, and full grit progression matter more than pressing hard or rushing the process. When you move too fast, the edge looks patchy. When you press too hard, the pad grabs, heats up, or leaves uneven shine. The best results usually come from light pressure and repeated passes that look almost boring while you are doing them.
Another practical lesson is to test before committing. Granite varies a lot. Some slabs polish quickly and glow after 1500 grit. Others need more time at 3000 grit or a buff pad to match the top. Dark stones show mistakes more clearly, while busy speckled stones can hide small flaws. Before polishing a visible front edge, practice on a scrap piece or an inconspicuous section. That tiny test can save you from turning a simple touch-up into a full countertop rescue mission.
Water control also matters more than people expect. Too little water creates dust and heat. Too much water can make it hard to see your progress and can splash slurry everywhere. The sweet spot is a damp, controlled surface where the pad glides and the residue can be wiped away easily. Keep a spray bottle, sponge, or controlled water feed nearby. Wipe frequently. You should be inspecting the edge after every grit, not polishing blindly and hoping for a grand reveal.
One of the most common beginner surprises is that shine appears late. At 50, 100, and 200 grit, the edge may look discouragingly dull. That is normal. Those early steps are for shaping and removing scratches, not creating sparkle. The transformation begins around the medium and fine grits. By the time you reach 1500 and 3000, the stone should start reflecting light. If it does not, the problem is usually leftover scratches from an earlier grit. Go back one or two steps instead of trying to force the final pad to fix everything.
Finally, the best-looking edge is not always the glossiest edge. It is the edge that matches the countertop. If the top has a high-gloss polish, aim for a reflective edge. If the surface is honed or satin, stop earlier and keep the finish softer. The goal is harmony. A granite edge should look like it belongs to the slab, not like it was borrowed from a disco ball. With the right tools, safe methods, and a little patience, polishing granite edges becomes less intimidating and surprisingly satisfying.
Conclusion
Polishing granite edges is a simple process when you respect the stone and follow the right sequence. Clean the edge, protect the surrounding area, start with the correct diamond pad grit, polish with steady movement, rinse between steps, and work gradually toward a finer finish. Wet polishing is usually the safest and cleanest option because it controls heat and reduces dust. For small dull spots, hand polishing may be enough. For deep damage, cracks, or complex profiles, a professional stone fabricator is the smarter choice.
The secret is not speed. It is progression. Granite shines because each grit removes the marks left by the one before it. Skip the process and the edge will look unfinished. Follow it carefully and even a rough, dull edge can become smooth, bright, and worthy of the countertop it belongs to.