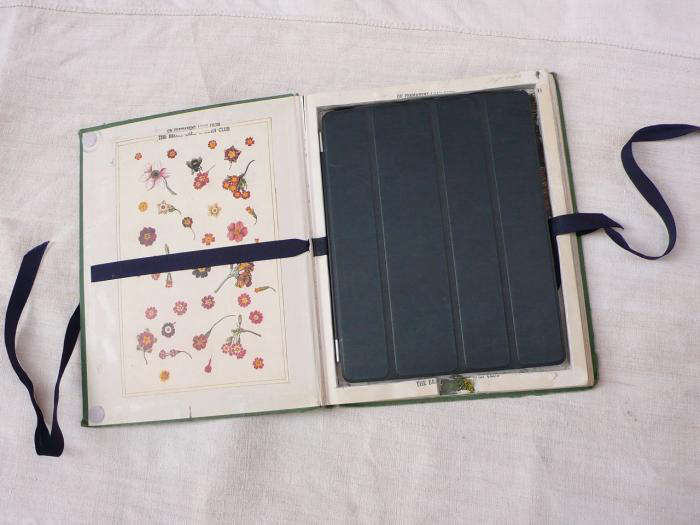
Some people buy an iPad cover. Other people look at an old garden book with a faded rose on the front and think, “Yes, this should protect my expensive rectangle of glass.” If you belong to the second group, welcome. You are among friends, crafters, upcyclers, and people who own at least one drawer labeled “useful scraps.”
A DIY vintage garden book iPad cover is exactly what it sounds like: a protective tablet case made from the hard cover of an old book, preferably one with botanical charm, sturdy boards, and enough character to make your tablet look like it wandered out of a cozy greenhouse library. It is practical, beautiful, inexpensive, and wonderfully sneaky. On a coffee table, it looks like a charming gardening manual. Open it, and there is your iPad, ready for recipes, plant care notes, video calls, or pretending you are “reading” while actually watching garden makeover videos.
This project combines basic bookbinding ideas, simple craft techniques, and smart tablet protection. You do not need to be a professional binder, woodworker, or wizard with a glue brush. You do need patience, careful measuring, and the emotional strength to cut into a book. Choose a damaged or unwanted vintage garden book rather than a rare collectible. We are upcycling here, not committing literary crimes in the conservatory.
Why Turn a Vintage Garden Book Into an iPad Cover?
A vintage garden book has a built-in personality that most mass-produced tablet cases simply cannot match. Floral illustrations, linen-textured covers, gold-stamped titles, faded greens, and old-fashioned typefaces create instant charm. If your style leans cottagecore, botanical, farmhouse, grandmillennial, or “I own pruning shears and strong opinions about hydrangeas,” this DIY iPad cover fits beautifully.
It is also a smart upcycling project. Many thrift stores, estate sales, library sales, and used bookstores have hardcovers that are too damaged for collectors but still have sturdy covers. A worn spine, outdated plant advice, or missing pages may make a book less useful as reading material, but perfect as a tablet case. Instead of letting it gather dust, you can give it a second life as a functional accessory.
The finished cover can protect the front and back of your iPad from light bumps and scratches, especially if you add felt, foam, elastic corners, and a secure closure. It is not meant to replace a rugged shockproof case for mountain biking, toddler wrestling, or dropping your tablet down the stairs. But for home use, travel, coffee shops, garden journaling, and desk storage, it is a stylish and surprisingly useful solution.
Best Books to Use for This DIY iPad Cover
The best candidate is a hardcover garden book that is slightly larger than your iPad. Measure your tablet first, then choose a book with at least 1/2 inch of extra space on all sides. For many standard iPads, a hardcover around 10.5 by 8 inches works well. For an iPad mini, a smaller plant guide or compact gardening encyclopedia may be enough. For larger iPad Pro models, look for oversized garden reference books or coffee-table-style botanical volumes.
Look for These Features
Choose a book with firm covers, a sturdy spine, and boards that do not bend easily. A clothbound cover is ideal because it feels good in the hand and already looks vintage. The spine should open smoothly without cracking apart. If the book smells musty, has mold spots, or sheds dust like an ancient attic goblin, leave it behind. Your iPad deserves charm, not mildew.
Avoid rare, signed, first-edition, historically important, or family-heirloom books. This project requires removing pages or altering the cover, so use a book that is damaged, unwanted, inexpensive, or already headed for the donation bin. The goal is rescue, not regret.
Materials and Tools You Will Need
Gather everything before you begin. Craft projects are more fun when you are not walking around with gluey fingers searching for scissors.
- One vintage hardcover garden book
- Your iPad or a cardboard template cut to the same size
- Craft knife or utility knife with a sharp blade
- Cutting mat
- Ruler or metal straightedge
- Pencil
- Acid-free PVA glue or strong bookbinding glue
- Foam brush or glue brush
- Thin craft foam, felt, cork sheet, or bookcloth for lining
- Elastic cord or flat elastic for corner holders
- Needle and heavy thread, or strong adhesive for securing elastic
- Binder clips or clamps
- Wax paper or parchment paper
- Optional: magnetic snap, ribbon tie, leather strap, or button closure
- Optional: clear matte sealant for a fragile cover
For adhesive, acid-free PVA is a strong choice because it dries clear, remains flexible, and works well with paper, board, and cloth. Hot glue can work for some quick details, but it often creates lumps and may fail over time. Super glue is strong but unforgiving, and one wrong move can bond your fingers together faster than you can say “botanical disaster.”
Step-by-Step Guide: How to Make a Vintage Garden Book iPad Cover
Step 1: Measure Your iPad Carefully
Place your iPad on a sheet of paper and trace around it. Mark the camera location, charging port, speakers, buttons, and any place you do not want covered. Add a small allowance around the edges so the iPad can slide in and out without scraping. If your tablet already has a slim protective shell, measure it with the shell on.
Now compare this template with the inside of your book cover. The book should be taller and wider than the iPad, but not so oversized that it becomes awkward to hold. A little extra border looks elegant. Too much border looks like your tablet moved into a mansion and cannot afford the property taxes.
Step 2: Remove the Book Pages
Open the book carefully and locate the hinge area where the text block connects to the cover. Using a sharp craft knife, cut along the inside hinge where the first and last pages attach. Work slowly and keep the blade angled away from your hand. Remove the text block in one piece if possible. Save attractive pages or botanical illustrations for future crafts, gift tags, framed art, or bookmarks.
After the pages are removed, you should have the front cover, spine, and back cover intact. Clean away loose paper fibers. If the inner spine feels weak, reinforce it with book repair tape, cotton bookbinding cloth, or a strip of sturdy fabric glued neatly into the hinge.
Step 3: Strengthen the Cover
Vintage book covers can be beautiful but tired. If the boards feel flimsy, cut two pieces of thin chipboard or mat board slightly smaller than the inside front and back covers. Glue them down evenly and press under a heavy book while drying. Use wax paper between glued areas and anything you do not want permanently attached. That includes your worktable, your ruler, and your favorite mug.
Let the cover dry fully before moving on. Rushing glue is the fastest way to create bubbles, warped boards, and a cover that looks like it has been through a thunderstorm.
Step 4: Add a Soft Interior Lining
The inside of the cover should be smooth enough to protect the iPad from scratches. Felt, thin craft foam, cork, microfiber, or bookcloth can all work. Cut the lining to fit the inside covers, leaving a neat border around the edge. Dry-fit each piece before gluing.
Apply a thin, even layer of PVA glue with a brush. Place the lining carefully, smooth from the center outward, and press out air bubbles. A bone folder is helpful, but a clean ruler edge wrapped in cloth can also work. Clamp or press the cover flat until dry.
Step 5: Create Elastic Corner Holders
Elastic corner straps are simple, adjustable, and friendly to future iPad upgrades. Place your iPad template on the right side of the open cover. Mark four corner points. Cut four short pieces of flat elastic, each long enough to stretch diagonally across a corner of the iPad.
You can attach the elastic by sewing it through the lining and board before the final lining layer goes down, or by gluing and reinforcing the ends under small fabric patches. Sewing is stronger, but gluing is easier. If you use glue, choose a strong flexible adhesive and let it cure completely. Test the hold gently before trusting it with your tablet.
Make sure the elastic does not cover the screen, camera, speakers, charging port, or important buttons. The iPad should sit snugly, not feel like it is being held hostage.
Step 6: Add a Closure
A closure keeps the cover from flopping open in a bag. The easiest option is a ribbon tie glued under the lining on the front and back covers. A leather strap with a snap gives a more polished look. A button-and-elastic loop feels charming and handmade. A magnetic closure can work, but keep magnets away from areas where they may interfere with device functions or accessories.
For a garden-book style, consider a soft moss-green ribbon, twine, vintage brass button, or small leather tab. The closure should match the book’s personality. A neon plastic latch on a faded rose encyclopedia is not illegal, but it may make the aesthetic police clear their throats.
Step 7: Test the Fit
Once all glue is dry, place your iPad into the elastic corners. Close the book slowly. Check whether the tablet is pressing too hard against the front cover. Shake the closed cover gently over a soft surface to test security. Open it again and check that the iPad is easy to remove.
If the fit is too tight, replace the elastic with slightly longer pieces. If it is too loose, shorten the elastic or add a thin foam pad beneath the tablet. Do not force the cover closed. A DIY case should protect the device, not squash it like a pressed flower.
Design Ideas for a More Beautiful Finished Cover
The magic of this DIY tablet case is in the details. A vintage garden book already brings character, but small design choices can make the project look intentional rather than improvised.
Keep the Original Cover Art
If your book has a beautiful floral illustration or gold lettering, let it shine. Gently wipe the cover with a dry microfiber cloth. If the cloth cover is fragile, avoid water or harsh cleaners. For paper dust jackets, consider removing and preserving the jacket separately, then using the hard cover underneath.
Add Botanical Endpapers
If the inside covers look plain, line them with botanical wrapping paper, vintage seed catalog pages, pressed-flower-style scrapbook paper, or scans of old plant illustrations. Use copies rather than valuable originals. This gives the inside a finished look and makes opening the cover feel like stepping into a tiny greenhouse.
Create a Pocket
Add a flat pocket on the left inside cover for notes, seed packets, stickers, a microfiber cloth, or a slim stylus. Use cardstock, fabric, or a trimmed book page. Keep the pocket thin so it does not press into the iPad screen when closed.
Build in a Stand
For hands-free use, add a fold-out stand to the back cover using sturdy cardboard covered in fabric or bookcloth. Another option is to attach a removable triangular support with Velcro. This is useful if you want to watch garden tutorials, read recipes, or follow plant-care instructions while potting herbs. Just keep soil, water, and fertilizer far away from your tablet. Basil is lovely; basil water inside a charging port is not.
Common Mistakes to Avoid
The most common mistake is choosing a book that is too small. Your iPad needs room for padding, elastic, and closure. Another mistake is using too much glue. Thick glue layers cause wrinkles, bumps, and slow drying. Apply adhesive thinly and evenly.
Do not use brittle or crumbling covers. A case needs structure. If the spine is separating, reinforce it before adding the tablet. Also avoid adhesives directly on the iPad. This sounds obvious, but every craft table has seen decisions made during “just one quick step” energy. Use a cardboard template while testing glue, elastic placement, and closures.
Finally, do not skip drying time. Let glued boards dry under weight for several hours, preferably overnight. The cover will look cleaner, lie flatter, and last longer.
Safety Tips for Cutting, Gluing, and Crafting
Use a sharp craft knife with a proper handle and cut on a self-healing mat. A dull blade requires more pressure and is more likely to slip. Always cut away from your body and keep fingers outside the cutting path. Replace blades when they drag or tear paper.
Work in a ventilated area when using adhesives, especially strong craft glues. Keep glue away from children, pets, food, and your own fingertips. If you use super glue for any small hardware detail, handle it carefully and avoid touching bonded surfaces. Wear disposable gloves if you are prone to becoming one with your project.
Let all adhesives cure completely before inserting the iPad. Moisture trapped inside the cover can warp materials or leave residue. Your finished cover should feel dry, clean, and smooth before the tablet goes anywhere near it.
How to Care for Your DIY Vintage Book iPad Cover
Keep the cover dry and store it away from direct sunlight. Vintage cloth and paper can fade if left in bright light for long periods. Wipe the outside gently with a dry cloth. Avoid household cleaners unless you have tested them on a hidden spot, because many old covers do not appreciate modern cleaning enthusiasm.
If the elastic loosens over time, replace it. If a corner begins to peel, add a small amount of glue and clamp it flat. If the cover starts to bow, store it under a heavy book overnight. Think of this as spa treatment for your tablet disguise.
Creative Ways to Use Your Garden Book iPad Cover
This project is perfect for gardeners who use tablets outdoors, home cooks who follow recipes, artists who sketch botanical ideas, and readers who like their technology with a little old-world charm. You can also make one as a gift for a plant lover, teacher, writer, or anyone who likes vintage decor.
Pair the cover with a digital garden planner, plant identification app, recipe collection, or e-book library. It looks especially good on a potting bench, kitchen shelf, desk, or bedside table. The beauty of the project is that it makes modern technology feel warmer and more personal.
Experience Notes: What Making a Vintage Garden Book iPad Cover Teaches You
There is something unexpectedly satisfying about turning an old garden book into an iPad cover. At first, the project seems like a clever disguise. By the end, it feels like a conversation between two eras. On one side, you have a book that may have taught someone how to prune roses, grow beans, or argue passionately with weeds. On the other side, you have a tablet that can pull up a video on composting, store a digital seed inventory, and remind you to water the fern you definitely forgot about yesterday.
The first real lesson is that measuring matters more than enthusiasm. Enthusiasm is wonderful. It gets you to the craft table. Measuring keeps your iPad from sticking out of the book like a bookmark with Wi-Fi. Before cutting anything permanent, make a cardboard template. Slide it into the cover, close the book, test the edges, and check the corners. This one small step prevents most problems.
The second lesson is that old materials have opinions. A vintage garden book may look sturdy, but the spine can be dry, the boards can be slightly warped, and the cloth may lift near the corners. Work gently. Use thin glue layers. Press everything flat. Give the cover time to dry. A project like this rewards patience in a way that many modern snap-together accessories do not.
The third lesson is that handmade does not mean messy. Clean edges, matching elastic, smooth lining, and a thoughtful closure can make the finished cover look boutique-level. The trick is restraint. You do not need to add lace, buttons, ribbon, pressed flowers, paint, charms, tassels, and a tiny motivational quote all at once. Let the original book cover lead the design. If it has faded green cloth and gold lettering, a simple leather tab may be enough. If it has colorful floral art, a plain felt lining may balance it beautifully.
The fourth lesson is practical: an iPad cover must actually work. It should open comfortably, hold the device securely, protect the screen, and allow access to ports and buttons. Pretty is nice. Pretty plus functional is the goal. After the first test fit, you may need to adjust elastic tension, trim a lining edge, or move a closure. That is normal. DIY projects are basically tiny negotiations with reality.
The final lesson is emotional, and it may surprise you. Upcycling a vintage garden book makes you notice objects differently. A worn book at a thrift store stops being “old stuff” and becomes raw material. A scrap of felt becomes a lining. A ribbon becomes a closure. A damaged cover becomes useful again. The finished case carries more personality than anything pulled from a plastic package. It says, “I like technology, but I also appreciate tomatoes, typography, and second chances.” Honestly, that is a strong personal brand.
Conclusion
A DIY vintage garden book iPad cover is a charming project for anyone who loves upcycling, gardening, books, and useful handmade design. With a sturdy hardcover, careful measuring, soft lining, strong adhesive, and secure elastic corners, you can create a tablet case that feels personal, practical, and beautifully nostalgic. It will not turn your iPad into a rugged outdoor survival device, but it will protect it from everyday scratches while making it look like it belongs in a sunroom beside a cup of tea and a thriving rosemary plant.
The best part is that no two covers are exactly alike. Your finished piece depends on the book you choose, the lining you love, and the small details you add. Whether you keep it simple or add a pocket, stand, or ribbon closure, the result is a functional accessory with a story. That is the joy of DIY: you do not just make a thing; you make a thing with character.
Note: Use only unwanted or damaged books for this project, and avoid altering rare, collectible, signed, or sentimental volumes.