Note: This article is written in copy-ready HTML. Replace the sample image paths with your own step-by-step photos before publishing.
Few paper crafts have survived cafeteria tables, rainy afternoons, classroom downtime, and sleepover giggle storms quite like the paper fortune teller. Also known as a cootie catcher, chatterbox, or origami fortune teller, this simple folded paper toy turns one square sheet into a tiny machine of suspense. Will you get “You will own a dragon”? “You must do ten jumping jacks”? “You will forget why you walked into the kitchen”? The future is mysterious, and apparently, made of printer paper.
In this guide, you’ll learn how to fold a fortune teller in 7 easy steps, complete with picture placeholders, folding tips, troubleshooting advice, fortune ideas, and ways to customize your paper game for kids, parties, classrooms, family nights, or nostalgic adults who still remember the thrill of choosing “blue.”
The best part? You do not need fancy origami paper or advanced crafting skills. If you can fold a napkin, you can make a paper fortune teller. If you cannot fold a napkin, congratulationsyou are still qualified. Let’s begin.
What Is a Paper Fortune Teller?
A paper fortune teller is a traditional origami toy made from a square sheet of paper. The folded shape has four outer flaps for fingers, four visible sections often labeled with colors, and eight inner flaps that hide fortunes, jokes, dares, questions, or silly predictions.
Players choose a color, number, or word while the person holding the fortune teller opens and closes it in alternating directions. After a few rounds, one hidden flap is lifted to reveal the final message. Is it scientifically accurate? Absolutely not. Is it wildly entertaining? Yes, and that is what matters.
Supplies You’ll Need
- One square sheet of paper
- Scissors, if you are starting with rectangular paper
- Markers, crayons, colored pencils, or pens
- A flat surface for folding
- Your finest fortune-writing imagination
Best Paper Size for a Fortune Teller
A 6 x 6-inch or 8 x 8-inch square works beautifully. Standard origami paper is perfect, but regular printer paper works too. If you start with 8.5 x 11-inch letter paper, simply trim it into a square first. Avoid thick cardstock for your first try because it can be stubborn, bulky, and emotionally unavailable.
How to Fold a Fortune Teller in 7 Easy Steps
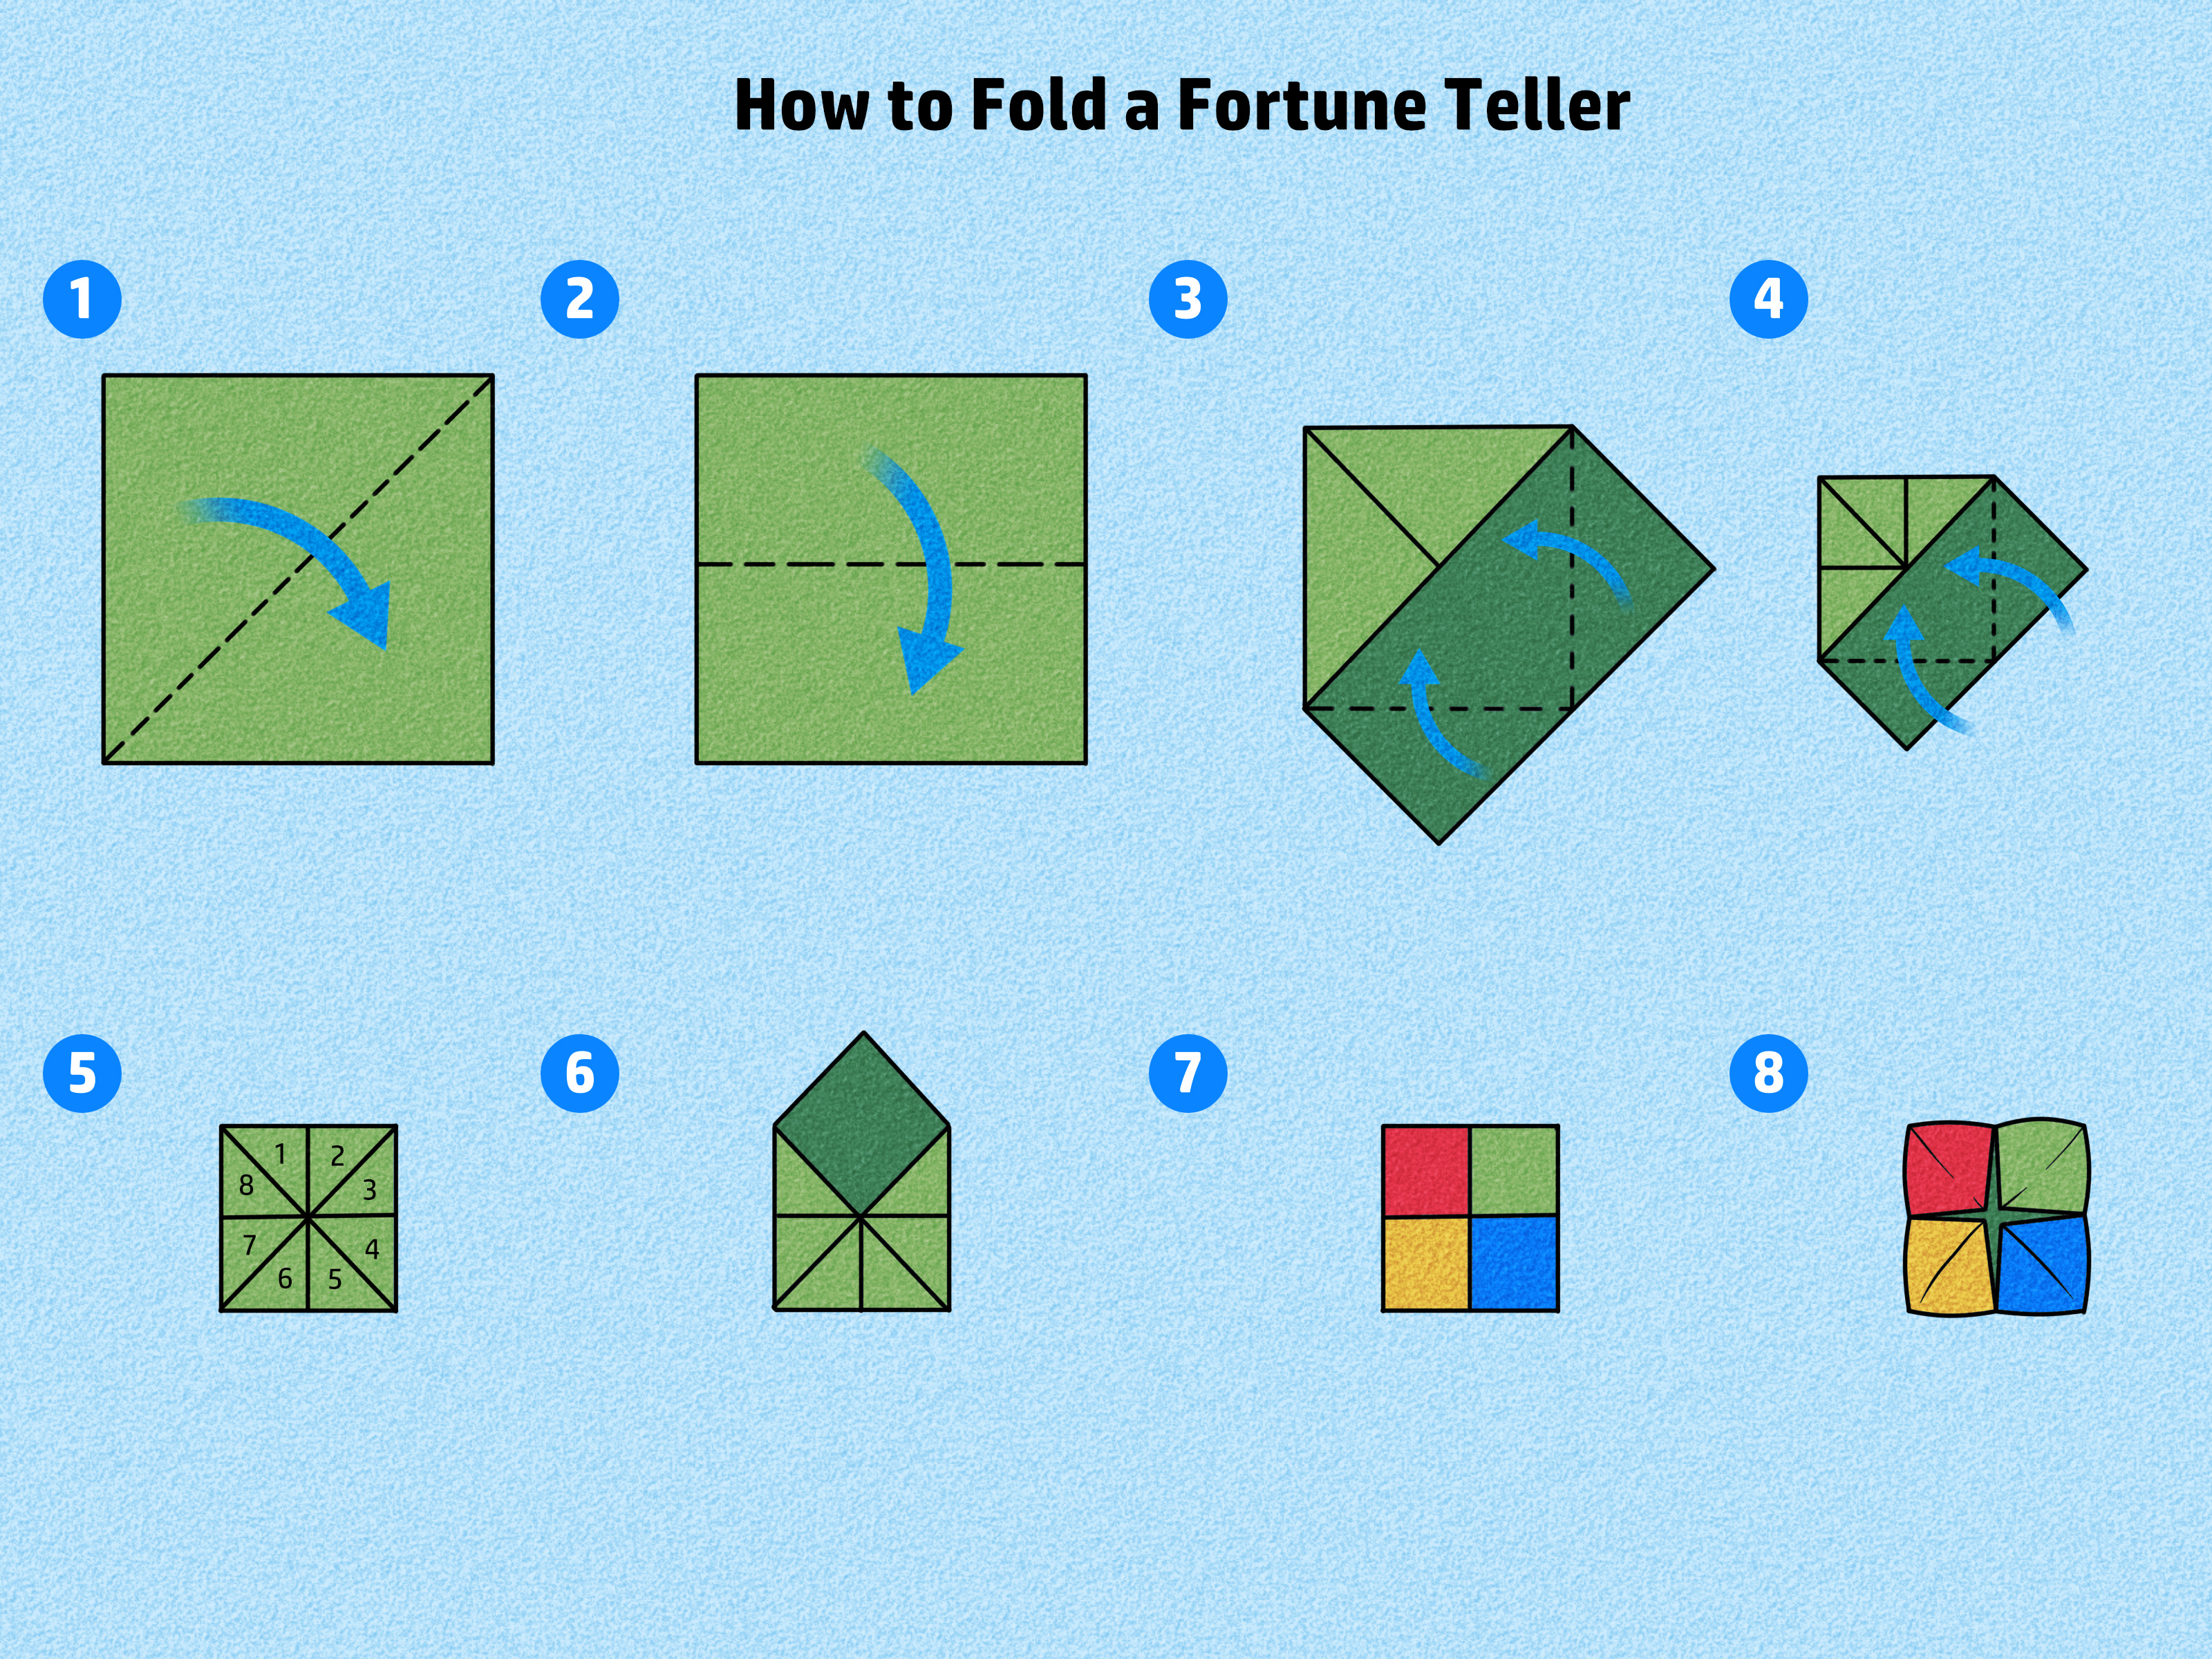
Step 1: Start With a Square Piece of Paper

Place your square paper on a flat surface. If one side is colored or patterned, place that side facing down if you want the color to show on the outside later.
If you are using regular letter paper, fold one top corner diagonally until the edge lines up with the opposite side. Trim off the extra rectangular strip. When you unfold it, you’ll have a square. This step matters because a fortune teller depends on even corners. A crooked square will still work, but it may look like it had a difficult morning.
Step 2: Fold the Paper in Half Both Ways

Fold the paper in half from top to bottom. Crease firmly, then unfold. Next, fold it in half from left to right. Crease again, then unfold.
You should now see a cross-shaped crease running through the center of the square. These guide lines help you fold the corners accurately in the next step. Use your fingernail, a ruler edge, or the side of a pen cap to sharpen each crease. Strong creases make the final fortune teller easier to open and close.
Step 3: Fold Each Corner Into the Center

Take one corner and fold it into the center point where the creases meet. Repeat with the remaining three corners. You should end up with a smaller square made of four triangular flaps.
Try to make the corner tips meet neatly in the middle without overlapping too much. A tiny gap is fine. A mountain range of overlapping paper is less fine, but still survivable.
This fold is sometimes called a “blintz fold” in origami. Delicious name, useful technique.
Step 4: Flip the Paper Over and Fold the Corners Again

Carefully flip the folded square over so the smooth side faces up. Now fold each of the four new corners into the center again.
After this step, your paper should look like an even smaller square with four triangular flaps meeting in the middle. The layers will feel thicker now, so press each crease firmly. This is the stage where the fortune teller starts to look less like “paper with ambitions” and more like an actual toy.
Step 5: Fold the Square in Half to Create Finger Pockets

Fold the square in half so the four small square flaps are on the outside. Crease it well, then unfold. Rotate the paper and fold it in half the other way. Crease again.
These folds help the fortune teller bend correctly. When you unfold it slightly, you’ll notice four little pockets forming on the outside. Those pockets are where your thumbs and index fingers will go.
Step 6: Put Your Fingers Into the Pockets and Shape It

Slip your thumbs and index fingers into the four outside pockets. Gently push the corners toward the center while opening and closing your fingers. The fortune teller should pop into a 3D shape.
Do not yank it open like you are starting a lawn mower. Paper has feelings, or at least tear lines. Work slowly, adjust the pockets, and pinch the folds until the fortune teller opens smoothly in two directions.
Step 7: Add Colors, Numbers, and Fortunes

Flatten the fortune teller slightly so you can write on it. On the four outside flaps, write colors, animals, symbols, or short words. On the inside flaps, write numbers. Lift each numbered flap and write a hidden fortune underneath.
Classic fortunes include predictions like “You will have a lucky day,” “A surprise is coming,” or “You will eat something delicious.” For kids, you can add jokes, kindness challenges, movement prompts, or silly dares. For adults, try party questions, icebreakers, date-night prompts, or office-friendly fortunes like “You will find the stapler before 4 p.m.” Optimism is important.
How to Play With a Paper Fortune Teller
Once your fortune teller is folded and decorated, ask a friend to choose one of the outside colors or words. Spell that word aloud while opening and closing the fortune teller once for each letter. For example, if the player chooses “green,” move the fortune teller five times: G-R-E-E-N.
Next, show the numbers inside and ask the player to pick one. Open and close the fortune teller that many times. Then ask them to choose another number. Lift the flap with that number and read the hidden fortune underneath.
That is the basic game, but you can make your own rules. The paper fortune teller is flexible, forgiving, and much cheaper than hiring a wizard.
Fun Fortune Ideas to Write Inside
Silly Fortunes for Kids
- You will become friends with a talking sandwich.
- You will laugh so hard milk almost comes out your nose.
- A dog will secretly think you are cool.
- You will find treasure under a couch cushion.
- You must dance like a robot for ten seconds.
Positive Fortunes
- You will learn something new today.
- Someone appreciates your kindness.
- Your next idea will be a good one.
- You are braver than you think.
- A small win is coming your way.
Party and Icebreaker Prompts
- Tell everyone your funniest childhood snack obsession.
- Name one song you secretly love.
- Choose someone to give a compliment to.
- Share your most dramatic “I need coffee” moment.
- Invent a superhero name for yourself.
Common Mistakes and Easy Fixes
The Fortune Teller Will Not Open Smoothly
This usually means the creases are too soft or the pockets need reshaping. Fold the paper in half both ways again, press the creases firmly, and gently work your fingers into the pockets.
The Corners Do Not Meet in the Center
Your paper may not be perfectly square, or the first folds may be slightly uneven. Start again with a carefully trimmed square, and use the center crease point as your target.
The Paper Tears
Thin paper can tear if you pull too hard, while thick paper can crack along creases. Use regular printer paper or lightweight origami paper for the easiest folding experience.
The Fortunes Show Through the Paper
If your paper is very thin, use a pencil or light-colored pen. You can also write fortunes on small stickers and place them under the flaps.
Creative Ways to Customize Your Fortune Teller
A fortune teller can be much more than a playground game. Teachers can use it for vocabulary review, math facts, reading questions, or social-emotional learning prompts. Parents can use it for chores, kindness challenges, family conversation starters, or rainy-day activities. Party hosts can use it for games, table decorations, or custom favors.
Try a birthday fortune teller with messages like “Cake is in your future” or “Pick the next party game.” Make a Halloween version with bats, ghosts, pumpkins, and spooky dares. Create a Valentine’s Day version with compliments and friendship notes. For a classroom version, replace fortunes with quiz questions. Suddenly, studying feels like a game, which is the educational equivalent of sneaking vegetables into mac and cheese.
Why Fortune Tellers Are Great for Kids
Folding a paper fortune teller helps children practice fine motor skills, sequencing, focus, and following directions. Decorating it encourages creativity, handwriting, and decision-making. Playing with it builds turn-taking, conversation, and laughter. That is a lot of learning from one square of paper.
It is also a low-cost, low-mess craft. There is no glue, glitter, paint water, or mysterious sticky patch on the table. For parents and teachers, this is a small miracle.
Experience Section: What I Learned From Folding Fortune Tellers
The first time you fold a fortune teller, it may feel like the paper is testing your character. One corner refuses to line up. Another corner looks innocent but secretly shifts when you crease it. Then you flip the paper, fold everything again, and wonder why your childhood self made this look so easy. The truth is that fortune tellers are simple, but they reward patience. The cleaner the early folds, the better the final toy works.
One useful experience is to slow down during the first two steps. Many people rush through the starting creases because they seem boring. But those creases are the map for the whole project. When the center point is clear and the square is even, every corner has a place to go. When the first folds are sloppy, the final fortune teller may still open, but it can feel lopsided. Think of the early creases like setting up a tent: not glamorous, but very important unless you enjoy collapse.
Another lesson is that paper choice matters more than beginners expect. Standard printer paper is a great practice material because it is easy to find, folds cleanly, and handles mistakes well. Origami paper looks prettier and is already square, which saves time. Cardstock, however, can make the toy too stiff, especially for small hands. Construction paper can work, but it may tear near the pockets if it is too fibrous. For group activities, pre-cut squares are a lifesaver. They prevent the “my square is actually a rectangle wearing a disguise” problem.
Writing the fortunes is often the most memorable part. Kids usually start with simple predictions, then quickly turn into tiny comedy writers. Instead of only writing “yes” or “no,” encourage specific and playful messages. A fortune like “You will discover a cookie” is more fun than “good luck.” A prompt like “Compliment the person on your left” turns the game into a social activity. A dare like “Speak in a robot voice until your next turn” keeps everyone involved. The best fortune tellers create reactions, not just answers.
For classrooms, I have found that fortune tellers work especially well when connected to a learning goal. Students can write multiplication problems under the flaps, vocabulary words on the outside, or reading comprehension questions inside. Because the format feels like a game, even reluctant learners often participate. It is hands-on, visual, and interactive, which helps break up worksheet fatigue. The toy becomes a mini review tool that students actually want to open.
For parties or family nights, the secret is to match the fortunes to the mood. A birthday fortune teller can include compliments, jokes, and party challenges. A sleepover version can include “Would you rather?” questions. A holiday version can include themed prompts, like “Name one thing you are thankful for” or “Do your best reindeer impression.” Adults can enjoy them too, especially when the messages are witty but not embarrassing. Nobody needs a paper toy causing a family scandal over mashed potatoes.
The final experience-based tip is to make more than one. The first fortune teller teaches your hands the pattern. The second looks cleaner. The third makes you feel like an origami genius with a tiny paper empire. Once you understand the folds, you can create themed versions in minutes. That is the charm of this classic craft: it is simple enough for beginners, creative enough to repeat, and nostalgic enough to make almost everyone smile.
Conclusion
Learning how to fold a fortune teller is easy, fun, and surprisingly satisfying. With one square piece of paper, a few crisp folds, and a handful of clever fortunes, you can create a classic origami toy that works for kids, classrooms, parties, family activities, and nostalgic grown-ups who still believe the color blue has powerful destiny energy.
Follow the seven steps carefully: start with a square, make guide creases, fold the corners to the center, flip and repeat, fold to form pockets, shape it with your fingers, and decorate it with colors, numbers, and hidden messages. Once you get the hang of it, you can make a paper fortune teller in just a few minutes.
Whether you call it a fortune teller, cootie catcher, chatterbox, or “that folded paper thing from school,” this craft proves that simple ideas often last the longest. Now grab a sheet of paper and start folding. Your future may be uncertain, but your afternoon just got more entertaining.