Note: Prices in this guide are realistic estimates for a small to medium basement area and can vary by region, floor condition, product brand, and whether your basement already has moisture issues. The goal is simple: make the floor cleaner, brighter, safer, and more livable without accidentally funding a yacht for your local contractor.
Yes, You Can Make Over a Basement Floor on a Tiny Budget
A basement floor has a special talent for making an otherwise useful room feel like a storage dungeon. One day you are thinking, “This could be a cozy family room,” and the next you are staring at gray concrete, mystery stains, old paint flakes, and that one crack that looks like it has been practicing dramatic acting. The good news? You do not need a luxury renovation budget to make a basement floor look dramatically better.
A smart basement floor makeover for less than $300 usually means working with what you already have: the concrete slab. Instead of installing expensive hardwood, custom tile, or wall-to-wall carpet, you clean, repair, seal, paint, stain, or cover selected areas with affordable materials. The result can be surprisingly fresh, modern, and practical.
The secret is not buying the fanciest product on the shelf. The secret is preparation. Basement floors deal with moisture, temperature changes, foot traffic, dust, and sometimes the occasional “why is this corner damp?” moment. A successful makeover starts by checking moisture, fixing small cracks, cleaning thoroughly, and choosing a finish that matches how the basement is actually used.
Start With the Basement Reality Check
Before you spend one dollar, look at the floor like a detective with a mop. A basement floor is below grade, which means moisture can move through concrete or enter through cracks, wall-floor seams, plumbing leaks, poor drainage, or high humidity. Covering those problems with pretty paint is like putting sunglasses on a raccoon and calling it a pet. It may look better briefly, but it is still trouble.
Do a Simple Moisture Test
A basic moisture check can save you from peeling paint, bubbling vinyl, mildew odors, and a weekend of regret. Tape a square of clear plastic to the concrete floor, sealing all four edges with painter’s tape. Leave it in place for 24 to 48 hours. If condensation forms underneath or the concrete darkens, the slab may be too damp for certain coatings or peel-and-stick products.
If moisture is minor and occasional, you may be able to improve the space with cleaning, dehumidification, crack repair, and breathable or moisture-tolerant coatings. If water actively seeps through the floor or wall seam, stop and solve the water problem first. Paint is not a sump pump, no matter how confidently the label is written.
Check for Mold, Mildew, and Odors
Musty smells often mean moisture is hanging around. Clean hard surfaces with detergent and water, dry everything thoroughly, and remove damaged porous materials if they are moldy. Keep basement humidity under control with ventilation or a dehumidifier. A pretty floor matters, but a dry basement matters more.
Choose the Best Low-Cost Basement Floor Makeover Method
For a budget under $300, the most practical options are concrete floor paint, concrete stain, epoxy-style coating kits for small areas, peel-and-stick vinyl tiles in dry spaces, interlocking foam or rubber tiles for activity zones, and large washable rugs over sealed concrete. Each option has strengths, weaknesses, and a personality. Yes, flooring has personality. Concrete paint is the practical friend. Peel-and-stick tile is the stylish cousin. Rubber tile is the gym buddy who owns too many water bottles.
Option 1: Paint the Concrete Floor
Painting is often the best basement floor makeover for less than $300 because it creates a cleaner, brighter surface at a low material cost. Concrete floor paint, porch and patio paint, masonry floor paint, or latex-based concrete floor paint can work well in basements when the slab is dry and properly prepared.
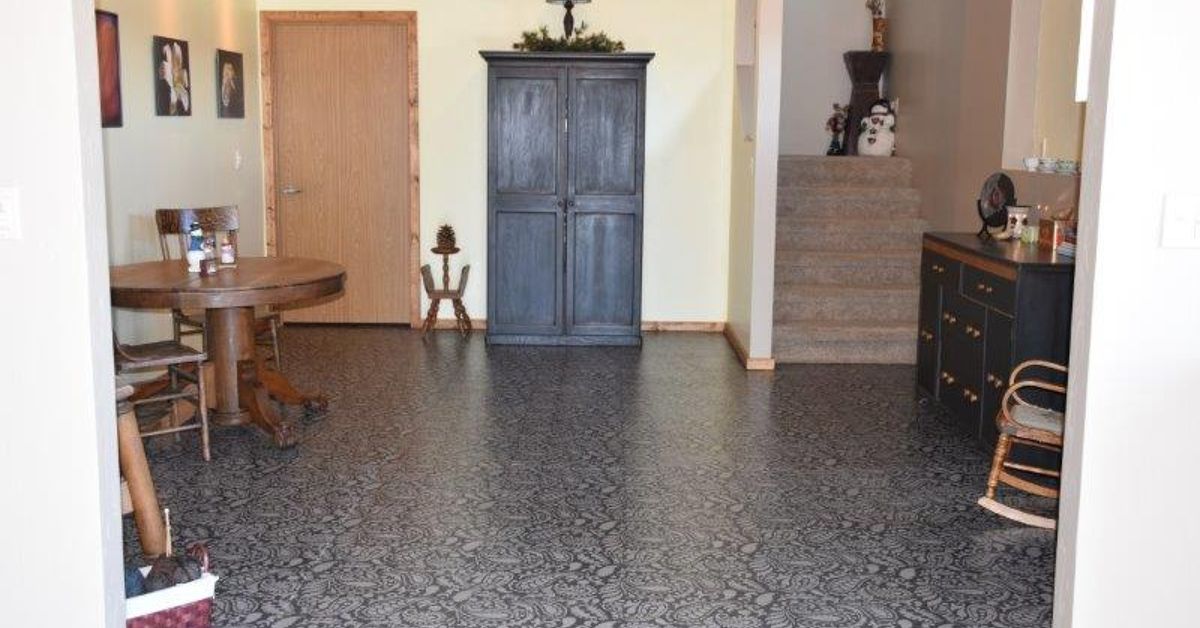
A painted concrete floor can make the room feel finished without adding floor height, trapping moisture, or requiring advanced tools. Choose a satin or low-sheen finish if you want a modern look that hides minor imperfections better than a glossy surface. Light gray, warm greige, soft taupe, and muted blue-gray are great choices for making a basement feel less like a secret government bunker.
Option 2: Use Concrete Stain for a More Natural Look
Concrete stain can be an affordable choice if your floor is in decent shape and you like a mottled, stone-like effect. Stain does not hide flaws as much as paint, but it can add depth and character. Water-based stains are generally more DIY-friendly than acid stains and come in a wider range of colors.
This option works best when the floor is clean, unsealed, and not covered with old adhesives or heavy patch marks. If your concrete has scars from previous flooring, paint may be more forgiving.
Option 3: Add Peel-and-Stick Vinyl Tiles in a Dry Basement
Peel-and-stick vinyl tiles can create a dramatic before-and-after moment, especially in laundry rooms, hobby corners, or small basement entries. They are inexpensive, easy to cut, and available in wood-look, stone-look, checkerboard, and modern patterns.
The caution: peel-and-stick vinyl needs a clean, smooth, dry surface. If your basement floor sweats or has moisture vapor issues, adhesive tiles may lift or curl. For best results, reserve this option for dry basements and smaller zones rather than the entire lower level.
Option 4: Use Interlocking Foam or Rubber Tiles for Zones
If your basement doubles as a home gym, playroom, workshop, or yoga corner, interlocking foam or rubber tiles can be a clever budget move. Instead of covering the entire basement, cover the area where comfort matters most. This approach stretches the budget and gives the room a more intentional layout.
Foam tiles are softer and cheaper, but they dent more easily. Rubber tiles are more durable and better for exercise equipment, but they may cost more. Either way, avoid trapping moisture underneath. Lift tiles occasionally to check that the floor stays dry.
Option 5: Seal the Floor and Add a Large Rug
Sometimes the cheapest makeover is also the smartest: clean the concrete, patch cracks, apply a clear sealer or floor paint, and add a large indoor-outdoor rug. This gives you comfort, color, and style without permanently covering the whole slab.
Indoor-outdoor rugs are useful in basements because many are easier to clean and more moisture-tolerant than traditional rugs. Choose low-pile styles, use a breathable rug pad if needed, and avoid thick carpet pads that can hold dampness like a sponge with commitment issues.
A Realistic $300 Basement Floor Makeover Budget
Here is a practical sample budget for refreshing a basement floor without overspending. This plan works especially well for a painted concrete floor with a rug or small tiled accent area.
Sample Budget Breakdown
- Concrete cleaner or degreaser: $12 to $25
- Scrub brush, roller covers, tray, tape, and supplies: $30 to $55
- Concrete crack filler or patch compound: $10 to $25
- Concrete primer or bonding primer: $25 to $45
- Concrete floor paint or porch and floor paint: $40 to $90
- Anti-slip additive: $5 to $15
- Optional indoor-outdoor rug or foam tile zone: $60 to $120
Total: roughly $182 to $375 depending on size and product choices. To stay under $300, prioritize the floor finish and skip extras until later. A clean, patched, painted floor usually makes the biggest visual impact for the money.
How to Make Over a Basement Floor for Less Than $300
This step-by-step plan focuses on painting the concrete because it offers the best balance of price, durability, and DIY friendliness. You can adapt the same preparation steps for stain, sealer, or peel-and-stick tiles.
Step 1: Empty and Sweep the Basement
Move furniture, boxes, tools, holiday decorations, and that treadmill everyone swears they are “about to start using” out of the work area. Sweep thoroughly, then vacuum dust from cracks, edges, and corners. Concrete dust can interfere with adhesion, so do not rush this part.
Step 2: Wash and Degrease the Floor
Use a concrete cleaner or degreaser to remove dirt, oil, old residue, and grime. Scrub with a stiff brush, rinse as directed, and let the floor dry completely. A clean surface is essential for paint, primer, stain, or adhesive to bond properly.
Step 3: Remove Loose Paint or Old Adhesive
If the floor has old peeling paint, scrape and sand loose edges. If old adhesive remains from carpet or vinyl, remove as much as possible. Be cautious with very old flooring materials because some older adhesives or tiles may contain asbestos. If you suspect asbestos, do not sand or scrape aggressively. Get professional guidance before disturbing it.
Step 4: Patch Cracks and Small Holes
Use concrete crack filler or patch compound for small cracks, chips, and pits. Follow the product’s drying time before sanding or coating. This step makes the finished floor look cleaner and reduces places where dirt can collect.
Step 5: Prime the Floor if Needed
Primer helps paint bond and creates a more even finish. Some floor paints do not require primer, while others perform better with it, especially on porous or patched concrete. Read the label. The label is not decorative literature; it is the difference between “wow” and “why is this peeling?”
Step 6: Paint in Thin, Even Coats
Use a roller with an extension pole and work from the far corner toward the exit. Apply thin coats rather than one thick coat. Thick paint takes longer to cure and can peel more easily. Two thin coats usually look better and last longer.
Add an anti-slip additive if the floor may get damp or if you want more traction. Basements are not the place for accidental figure skating.
Step 7: Let the Floor Cure Before Heavy Use
Dry-to-touch time is not the same as fully cured. Many floor coatings need several days before heavy furniture, rugs, or exercise equipment go back in place. Follow the product directions. Waiting is annoying, but peeling paint is more annoying and has fewer snacks.
Design Ideas That Make a Cheap Basement Floor Look Expensive
A budget floor does not have to look basic. The right color, pattern, and finishing details can make a basement feel designed instead of merely “less dusty than before.”
Paint a Faux Tile Pattern
Use painter’s tape to create a simple tile grid, checkerboard, or large-scale geometric pattern. A soft gray-and-white checkerboard can brighten a laundry area, while a charcoal border can make a rec room feel more finished.
Create a Painted Rug
A painted rug is a fun way to define a seating area without buying a huge rug. Tape off a rectangle, paint a contrasting border, and add a simple stencil if you are feeling brave. Keep the pattern large and simple so it does not look busy.
Use One Color Everywhere for a Clean Look
If the basement is small, one continuous floor color can make it feel larger. Light neutrals reflect more light, which matters in a room that may have tiny windows or no natural light at all.
Add Rugs Only Where Comfort Matters
Instead of covering the entire basement, place rugs in seating, play, or reading zones. This makes the room feel cozy while keeping most of the floor easy to inspect and clean.
Common Mistakes to Avoid
Budget projects fail most often because homeowners skip boring steps. Unfortunately, boring steps are where the magic hides.
Mistake 1: Painting Over Damp Concrete
If moisture is coming through the slab, paint may blister, peel, or discolor. Test first, improve drainage or humidity control, and choose products appropriate for your conditions.
Mistake 2: Skipping Surface Prep
Paint and adhesive need a clean surface. Dust, oil, wax, old sealer, and loose paint can ruin adhesion. Cleaning is not glamorous, but neither is redoing the project next month.
Mistake 3: Choosing Regular Wall Paint
Wall paint is not designed for floors. Use a product labeled for concrete floors, porch and patio floors, masonry floors, or appropriate basement use.
Mistake 4: Covering the Whole Floor With Carpet
Traditional carpet can feel warm, but it can also trap moisture and odors in a basement. If you want softness, consider area rugs, carpet tiles designed for basement use, or removable floor mats that can be lifted and dried.
Best Basement Floor Makeover Plan for Different Uses
For a Laundry Room
Use concrete floor paint or peel-and-stick vinyl in a dry laundry area. Choose a light color so lost socks have fewer places to hide. Add a small washable rug near the machines.
For a Home Gym
Seal or paint the concrete, then add rubber mats only under workout equipment. This protects the floor, improves comfort, and keeps costs under control.
For a Kids’ Play Area
Paint the floor with a durable coating and add interlocking foam tiles in the play zone. Use bright storage bins and a washable rug to make the space cheerful without permanent expensive flooring.
For a Workshop
Stick with concrete paint, epoxy-style coating, or sealer. Choose durability over softness. Add anti-slip texture and keep the surface easy to sweep.
Experience Section: What a $300 Basement Floor Makeover Really Feels Like
The most useful lesson from a low-budget basement floor makeover is that the project is less about flooring and more about discipline. The tempting part is buying the pretty paint, opening the can, and imagining the basement becoming a Pinterest-worthy lounge by dinner. The real work starts before that. You sweep, vacuum, scrub, rinse, wait, patch, wait again, tape, prime, and suddenly you understand why contractors own knee pads and speak in sighs.
In a real basement, the floor is rarely perfect. There may be hairline cracks, uneven patches, faded stains, paint drips from old wall projects, and suspicious marks left by furniture that moved in during the Clinton administration. The trick is to aim for “clean, intentional, and much better,” not “luxury hotel lobby.” Once that mindset clicks, the project becomes more enjoyable. You stop fighting every tiny flaw and start using color and layout to make the space feel fresh.
A good experience is to divide the basement into zones. Paint the main floor one calm color, then create a rug area with either an actual indoor-outdoor rug or a painted border. This makes the room feel planned even when the budget is small. For example, a soft gray painted floor with a navy washable rug can make a basement TV corner feel finished for very little money. Add a floor lamp, a thrifted side table, and suddenly the old concrete room becomes a place where people might willingly sit.
Another experience worth noting: drying time tests your character. The floor may look ready after a few hours, but dragging furniture across it too soon can scuff or dent the finish. Give the coating time to cure. Put felt pads under furniture legs. Lift heavy items instead of sliding them. Your future self will be grateful, and your floor will not look like it lost a fight with a bookshelf.
Lighting also changes everything. A newly painted basement floor can still look dull under one sad ceiling bulb. After the floor makeover, add brighter LED bulbs, a shop light in the work zone, or a warm floor lamp in the seating area. The floor will look cleaner, the room will feel bigger, and you will wonder why you spent years letting the basement live in cave mode.
The best part of a sub-$300 basement floor makeover is the confidence it gives you. You learn that not every home upgrade needs demolition, financing, or a dramatic before-and-after video with ukulele music. Sometimes the biggest transformation comes from cleaning well, choosing the right product, and finishing the job carefully. The basement may not become a luxury suite overnight, but it can become usable, brighter, and less embarrassing when someone asks, “Can I see downstairs?”
Conclusion: A Better Basement Floor Does Not Need a Big Budget
A basement floor makeover for less than $300 is absolutely possible when you focus on smart preparation, moisture control, and affordable finishes. Paint, stain, sealed concrete, peel-and-stick tiles, rubber mats, foam tiles, and area rugs can all work when matched to the right basement conditions.
The winning formula is simple: fix moisture first, clean like you mean it, repair small damage, choose a basement-friendly finish, and use rugs or mats only where they add comfort. Do that, and your basement can go from “unfinished storage cave” to “usable bonus space” without draining your savings account.
And remember: the goal is not perfection. The goal is a cleaner, brighter, more practical floor that makes the basement feel like part of the home instead of a place where cardboard boxes go to retire.