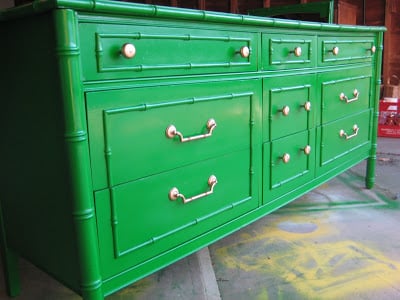
A bamboo-styled dresser already has something many modern furniture pieces would trade a drawer full of socks to possess: personality. Its sculpted joints, wrapped-looking corners, and tropical lines practically beg for a dramatic makeover. Yet these dressers often arrive wearing a tired brown finish, scuffed lacquer, or a yellowed coat that makes them look less “Palm Beach chic” and more “forgotten guest room, circa 1987.”
The solution is not another cautious coat of beige. This is a project about embracing color, respecting the original details, and turning an overlooked dresser into the loudestand best-dressedpiece in the room. A successful bamboo styled dresser redo combines careful preparation with a fearless color choice, smooth application, updated hardware, and enough patience to let the finish cure properly.
Whether your dresser is genuine bamboo, solid wood carved to resemble bamboo, veneer, laminate, or MDF, this guide explains how to identify the surface, choose suitable products, avoid common refinishing disasters, and create a colorful statement piece that still functions beautifully.
Why Bamboo-Styled Furniture Deserves a Second Look
Bamboo-inspired furniture has visual rhythm. The raised nodes, rounded rails, decorative corners, and repeated horizontal details create natural shadows that become even more noticeable under colorful paint. Unlike a plain box dresser, it provides built-in texture before you open the first paint can.
The word “bamboo” can be misleading, however. Some vintage pieces contain real bamboo or rattan components, while others are carved hardwood, molded resin, veneer, laminate, or engineered wood designed to imitate bamboo. Before buying primer or attacking the dresser with a power sander, inspect the back, underside, damaged edges, drawer interiors, and manufacturer label.
Solid wood usually reveals continuous grain around edges. Veneer has a thin decorative wood layer over another material. Laminate often has a printed, highly uniform surface, while MDF may appear dense and fiber-like where chipped. Each surface can be painted, but aggressive sanding can cut through thin veneer or damage laminate. Cleaning, gentle scuffing, repair, and a compatible bonding primer are therefore more important than sanding everything into submission.
Plan the Makeover Before Opening the Paint
Check the Dresser’s Condition
Pull out every drawer and inspect the case for loose joints, cracks, missing guides, warped bottoms, odors, water damage, and signs of insects. Make sure the drawers open without wrestling you for control. A beautiful finish cannot compensate for a drawer that requires two hands, one knee, and a motivational speech.
Tighten loose screws, reglue sound joints when appropriate, replace damaged drawer guides, and fill nonstructural dents with a filler compatible with the dresser material. If the top has major bubbling or swollen particleboard, decide whether it can be stabilized, covered with a new panel, or replaced before investing time in decorative work.
Photograph and Label Everything
Take several “before” photographs, including close-ups of hardware placement. Number the drawers with painter’s tape and place their screws in labeled bags. Older furniture is not always perfectly symmetrical, so a drawer that fits wonderfully in the upper-left opening may behave like an offended cat when moved to the lower-right position.
Take Safety Seriously
If the dresser has an old painted finish of unknown origin, do not immediately dry-sand it. Lead-containing coatings can create hazardous dust when scraped or sanded. Use an appropriate test method, follow lead-safe practices, or consult a qualified professional when the history of the finish is uncertain. Work with ventilation, protect nearby surfaces, wear suitable eye and respiratory protection, and follow every product label. EPA guidance emphasizes controlling dust, isolating the work area, and using lower-dust methods when painted surfaces may contain lead.
A refinished dresser should also be anchored securely to the wall using hardware appropriate for both the furniture and the wall construction. Dressers and other clothing-storage units can tip forward, particularly when drawers are opened or climbed on. Follow current CPSC guidance and avoid assuming that any random plastic strap is automatically safe or suitable.
Tools and Materials for a Colorful Dresser Redo
- Protective drop cloths and painter’s tape
- Screwdrivers and labeled storage bags
- Mild degreasing cleaner and clean water
- Lint-free cloths and a vacuum
- Wood filler or surface-appropriate repair compound
- Fine sanding sponges or sandpaper
- Bonding or stain-blocking primer
- Furniture, cabinet, or trim paint
- A quality angled brush for bamboo details
- A four-inch fine-finish roller for flat surfaces
- Optional clear protective topcoat
- New knobs, pulls, or refinishing supplies for existing hardware
- Wall-anchoring hardware
Buy products as a compatible system whenever possible. A primer, paint, and topcoat from unrelated product families may work together, but “may” is not the most comforting word after three days of prep. Read manufacturer instructions regarding surface compatibility, recoat windows, ventilation, and cure time.
Choosing a Fearless Color
Color is not merely decoration on bamboo-styled furniture. It changes how the sculpted details read. Dark green can make the piece feel botanical and sophisticated. Coral creates a playful coastal mood. Cobalt blue gives it an energetic, collected look. Glossy black feels formal, while raspberry, red-orange, peacock blue, and sunny yellow turn the dresser into functional artwork.
Use the Room as Your Color Map
Pull a shade from artwork, curtains, bedding, or a patterned rug. For contrast, place a warm-colored dresser against a cool wall or a deep jewel tone against a pale neutral background. Complementary and high-contrast combinations help painted furniture become a focal point rather than disappearing into the room. Design publications regularly demonstrate that unexpected color, contrasting drawer fronts, decorative patterns, and new hardware can give an ordinary dresser a custom identity.
Test Before Committing
Paint a large sample board and view it beside the dresser throughout the day. Small chips can be deceptive because saturated colors change dramatically with lighting and sheen. A blue that looks elegant in the store may become electric under cool LEDs, while a deep green may look nearly black in a shaded room.
Consider painting the dresser body and drawer fronts in the same color for a sculptural effect. A two-tone scheme can emphasize the frame, while a contrasting interior offers a surprise whenever a drawer opens. Gold, aged brass, polished nickel, black, ceramic, or wood hardware can then reinforce the intended style.
Step-by-Step Bamboo Styled Dresser Redo
1. Remove Drawers and Hardware
Empty the dresser completely. Remove pulls, knobs, decorative plates, and removable feet. If hardware screws vary in length, keep each one with its original pull. Set the dresser on blocks or a sturdy work surface so the bottom edges are accessible.
2. Clean Every Paintable Surface
Vacuum dust from corners and decorative joints. Wash the exterior with a mild degreasing cleaner, then wipe it with clean water to remove residue. Allow the surface to dry fully. Furniture polish, skin oils, aerosol cleaners, and mystery grime can interfere with adhesion, so cleaning is not the glamorous part of the makeover, but it is the part preventing future heartbreak.
3. Repair Damage
Fill unwanted holes, dents, and shallow chips. Let the repair compound dry, then smooth it without flattening intentional bamboo details. Reglue loose trim only after confirming how it was originally attached. Replace missing decorative sections when feasible, or simplify the design symmetrically so the repair appears intentional.
4. Scuff the Existing Finish
If the coating is stable and lead is not a concern, lightly dull glossy areas with fine sandpaper or a sanding sponge. The goal is to create a uniformly matte surface, not excavate the dresser’s entire geological history. Hand-sand around nodes, curves, and corners to preserve their shape. Vacuum thoroughly and wipe away remaining dust before priming.
Professional-style furniture finishing guidance consistently emphasizes cleaning, repairing, scuffing glossy surfaces, removing dust, and applying thin, controlled layers. Fine-finish rollers work well on broad areas, while brushes provide access to curves and recessed details.
5. Apply the Correct Primer
Use a bonding primer on slick laminate, sealed wood, or glossy coatings. Choose a stain-blocking primer when tannins, old stains, or discoloration may bleed through. Apply primer in thin coats, brushing carefully around bamboo-like joints and rolling flat drawer fronts.
After the primer dries according to its label, inspect the surface under angled light. Sand obvious dust nibs or rough patches gently, remove the dust, and spot-prime exposed repairs. A smooth primer coat functions like shapewear for paint: it does not perform miracles, but it makes everything above it look considerably more polished.
6. Paint From the Details Outward
Begin with recessed areas, corners, and decorative nodes using an angled brush. Immediately roll adjacent flat surfaces before the brushed paint begins to set. This reduces visible transition marks. Apply two or more thin coats rather than one heroic, dripping coat.
Follow the stated recoat time. Sanding lightly between coats may improve smoothness when the product instructions permit it. Pay special attention to the top, drawer edges, and areas around pulls because these receive frequent contact.
7. Create a Custom Hardware Finish
Original bamboo-style pulls can be worth saving. Clean them thoroughly and inspect for damage. Depending on the material, they may be polished, painted with a compatible metal coating, or left aged for contrast. When replacing hardware, measure the center-to-center distance between screw holes before shopping.
Hardware can calm or amplify a bold color. Warm brass looks luxurious against navy, green, coral, and raspberry. Black hardware adds graphic contrast to yellow or pale blue. Clear acrylic pulls keep the focus on sculpted drawer fronts, while ceramic knobs make the piece feel relaxed and eclectic.
8. Decide Whether a Topcoat Is Necessary
Some furniture and cabinet paints are designed to perform without a separate clear coat. Others benefit from additional protection, particularly on the dresser top. Check the paint manufacturer’s recommendation before sealing. An incompatible clear finish can change the sheen, affect color, or cause yellowing over pale shades.
Remember that dry time and cure time are not the same. A surface may feel dry enough to touch while remaining vulnerable to dents, scratches, or objects sticking to it. Treat the dresser gently until the coating system reaches its full cure, and use protective pads beneath accessories.
9. Reassemble and Anchor the Dresser
Reinstall hardware only after the finish is firm enough to resist impressions. Insert each labeled drawer into its original opening. Test the movement, adjust guides if needed, and avoid forcing swollen or misaligned drawers against fresh paint.
Finally, anchor the dresser securely and style the top with restraint. A colorful bamboo dresser already has plenty to say. It does not need twelve tiny objects shouting over it.
Styling the Finished Statement Piece
A bold dresser works best when the surrounding room gives it visual breathing room. Place it against a light wall for strong contrast, or create a color-drenched effect by using a wall shade from the same family. Add a round mirror to soften the dresser’s horizontal lines, or hang a large piece of art that repeats its color in small amounts.
Natural textures such as linen, cane, jute, woven baskets, and pale wood help connect the painted finish to the bamboo-inspired shape. Metallic lamps add polish, while white ceramic accessories keep the arrangement fresh. In a bedroom, the dresser can be paired with neutral bedding and one patterned pillow carrying the same accent color.
Common Mistakes That Can Spoil the Redo
Assuming Every Surface Is Solid Wood
Sanding veneer, laminate, and MDF as though they are thick hardwood can cause permanent damage. Identify the construction first and use the gentlest preparation method capable of producing adhesion.
Skipping the Cleaning Step
Primer cannot reliably bond through furniture polish, grease, or oily residue. A quick dusting is not the same as proper cleaning and rinsing.
Applying Thick Paint
Heavy coats collect around decorative nodes, soften crisp details, and create sags. Thin coats take longer emotionally but usually save time physically because they require fewer repairs.
Closing Drawers Too Soon
Freshly painted contact points may stick together. Give edges additional curing time and open drawers periodically during the early curing period when permitted by the coating instructions.
Choosing Color Only From a Phone Screen
Digital color varies by screen and lighting. Test actual paint in the room where the dresser will live.
Experience Notes From a Realistic Weekend Dresser Redo
The following project-diary-style experience reflects common lessons from hands-on bamboo-inspired furniture makeovers. The first surprise usually arrives during cleaning. A dresser that appears merely dusty may release decades of polish, nicotine-colored residue, makeup, adhesive, and something suspiciously similar to pancake syrup. Two cleaning passes can reveal a completely different surface from the one that came through the door.
The second surprise is how long hardware removal takes. One pull comes off immediately, another has a stripped screw, and a third appears to have been installed by someone who considered glue a personality trait. Photographing the hardware and labeling every drawer feels excessively organized at first, but it becomes brilliant when reassembly begins.
Color selection is often the most enjoyable and intimidating stage. A safe navy may seem sensible, but a saturated coral, leafy green, or glossy berry color can better honor the playful bamboo silhouette. The useful question is not, “Will everyone like this?” It is, “Will this color make the piece look intentional in its room?” Furniture does not need unanimous approval. It is not running for office.
Primer creates the first real glimpse of the transformation. Once the old brown finish disappears, the raised joints and curved corners become more sculptural. This is also when every overlooked dent suddenly introduces itself. Stopping to fill and reprime those areas may feel annoying, but the repairs are much easier before the final color goes on.
The first paint coat often looks alarming. Brush marks appear, coverage seems uneven, and the bold color may look far louder than expected. That stage is normal. The second thin coat typically deepens the color and unifies the sheen. Working from detailed areas toward flat sections helps prevent paint from building up around the faux-bamboo nodes.
Hardware provides the final plot twist. Old brass-tone pulls that looked dull against brown can become elegant against green or cobalt. Sometimes they need only cleaning rather than a completely new finish. Preserving original hardware can also maintain the dresser’s character and avoid the challenge of matching uncommon screw spacing.
The hardest lesson is patience after painting. A surface that feels dry the next morning can still be soft. Setting a lamp on it too early may leave a ring, while tightening hardware aggressively can twist the paint beneath the backplate. Allowing adequate cure time is less exciting than revealing the finished dresser immediately, but it protects every hour already invested.
The most satisfying moment comes when the drawers slide back into their numbered openings and the hardware catches the light. The same dresser that once looked tired becomes the visual anchor of the room. More importantly, the project demonstrates that bold color is not reckless when supported by thoughtful preparation. Fearless color and careful workmanship are not opposites; together, they are what make the redo successful.
Conclusion: Let the Dresser Be the Fun One
A successful No fear of Color, Bamboo Styled Dresser Redo does not begin with paint. It begins with understanding the furniture, correcting functional problems, choosing compatible materials, and preparing the surface patiently. Once that foundation is secure, color can do what it does best: reveal shape, create mood, and turn ordinary storage into a memorable design feature.
Choose the green, coral, cobalt, raspberry, or yellow that keeps returning to your mind. Test it in the room, apply it carefully, and give it time to cure. The result will feel more personal than mass-produced furniture and far more interesting than another apologetic neutral. Your dresser already has bamboo-inspired swagger. It might as well have a color worthy of it.