Buying a birthday card is easy. Making one is a tiny act of heroismlike returning a shopping cart, but cuter.
A DIY birthday card says, “I spent actual minutes of my one precious life thinking about you,” which is basically
the love language of paper.
Below are 18 handmade birthday card ideas you can pull off with basic supplies (and minimal emotional damage),
plus quick personalization tricks, message prompts, and a longer “real-life crafting” section at the end to keep
you company while the glue dries.
Before You Start: A “Looks Fancy” Supply List
You don’t need a craft room. You need a small pile of reliable stuff:
- Cardstock (heavier than printer paper) + a few scraps of patterned paper
- Adhesive that behaves: double-sided tape or a tape runner (less warping than wet glue)
- Scissors + a craft knife (optional) + a ruler
- Black pen (for outlines/lettering) + 1–2 markers
- Extras: washi tape, ribbon/twine, stickers, foam dots, sequins/confetti
Pro move: pre-cut and fold a few blank card bases. Future-you will feel like a genius (and might even mail the
card on time).
The 10-Second Personalization Formula
- One “only you” detail: an inside joke, favorite snack, hobby, or catchphrase.
- One specific compliment: “You make Mondays survivable,” beats “You’re the best.”
- One mini wish: “May your coffee be strong and your meetings be canceled.”
Jump to an Idea
18 DIY Birthday Card Ideas
-
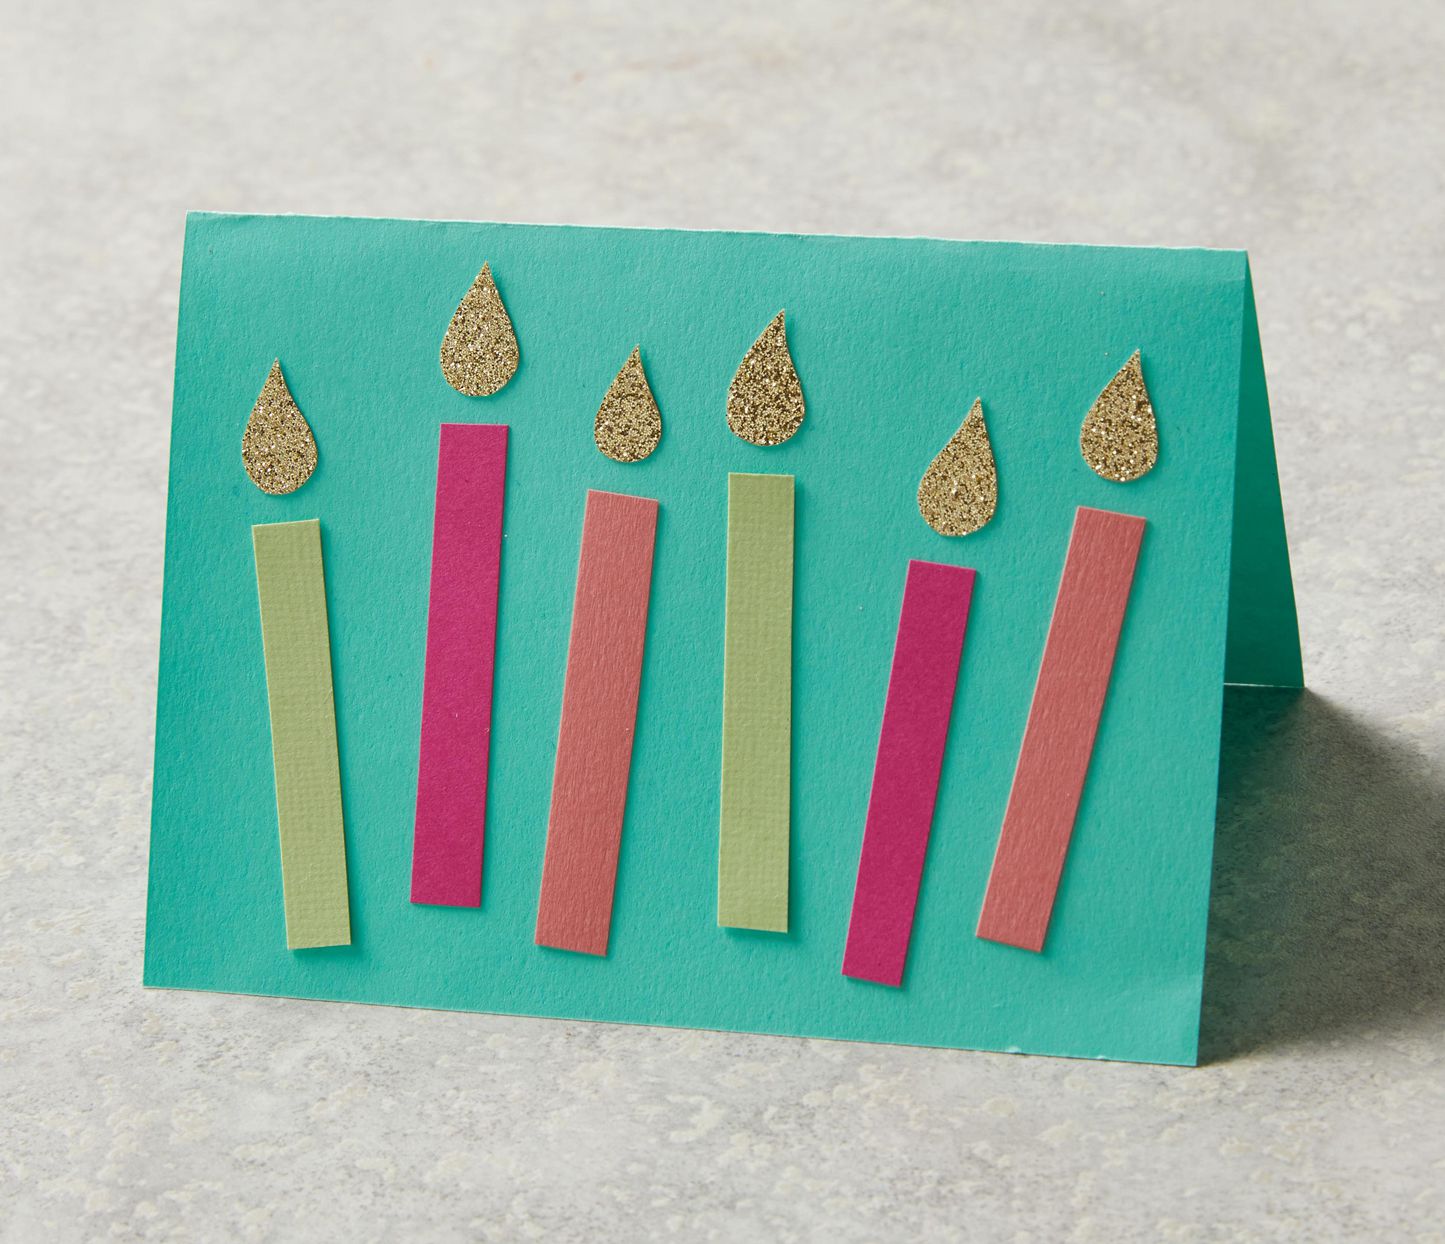
1) Paper Candle Parade
Cut skinny rectangles from bright paper to make “candles,” then draw tiny flames and sprinkle stars or dots
around them. Add the age as a cluster of candles or keep it mysterious with “a respectable number.”- Best for: kids, milestone birthdays, last-minute wins
- Make it personal: color-match their favorite outfit, sports team, or vibe
-
2) Balloon Pop Cutout
Cut one big balloon shape from patterned paper and tape it to the front. Draw the string with pen or marker,
then write a tiny message on the balloon like “Floatin’ into a new year.”- Best for: clean, modern designs that still feel cheerful
- Make it personal: write their nickname inside the balloon instead of “Happy Birthday”
-
3) Gift Box + Ribbon Wrap
Turn the card into a present: glue a “box” panel on the front, then wrap ribbon around it and add a bow.
It’s basically a gift that says, “Surprise! The gift is my effort.”- Best for: anyone who loves tidy, classic birthday aesthetics
- Make it personal: use a ribbon color that matches their wedding/birthday-party theme
-
4) Cut-Out Age Number
Glue a patterned paper panel to the card front, then cut out a big number (or initials) from the panel so the
base color shows through. Add a few stickers or a thin border for polish.- Best for: milestone birthdays and “I planned this” energy
- Make it personal: cut the number from paper that matches their hobby (music notes, florals, comics)
-
5) Confetti Shaker Window
Cut a window (circle, star, balloon) in the card front, tape clear plastic behind it, then add foam tape as a
frame. Pour in sequins/confetti and seal with a backing panel. Shake responsibly.- Best for: kids, sparkle-lovers, and people who enjoy interactive things
- Make it personal: use confetti colors that match their favorite candy wrapper
-
6) Pop-Up Cake Slice
Create a simple pop-up by folding a small rectangle inside the card and cutting two slits to form a “step.”
Attach a paper cake slice to the step so it pops forward when opened.- Best for: big reactions with medium effort
- Make it personal: decorate the cake slice like their actual favorite cake
-
7) Pocket Card With a Tiny Surprise
Glue three sides of a small paper rectangle to create a pocket on the inside. Slide in a tea bag, a tiny note,
a photo, a gift card, or a “party pack” (balloon + a pinch of confetti + one candle). Yes, it still counts as a card.- Best for: long-distance birthdays and “I wish I could be there” moments
- Make it personal: tuck in a playlist QR code or a mini “coupon” for lunch together
-
8) Photo Strip “Then & Now”
Print 3–4 small photos and arrange them like a photo booth strip. Add captions: “Then,” “Now,” “Still iconic.”
Pair with a short note about a favorite memory.- Best for: best friends, partners, parents, sentimental legends
- Make it personal: include one hilariously unflattering photo (with love)
-
9) Watercolor Wash + Bold Lettering
Paint a simple wash (one or two colors), let it dry, then write “HAPPY BIRTHDAY” in thick marker or a brush pen.
The contrast looks expensive even if your paint palette is a mug of water.- Best for: minimalist friends, artsy cousins, “I appreciate aesthetics” coworkers
- Make it personal: paint in their favorite color family (sage, blush, ocean blues)
-
10) Embroidered Mini Motif
Poke small holes in cardstock with a needle (on a protected surface), then stitch a tiny icon: a heart, star,
balloon, or ice cream cone. Keep stitches simplestraight lines are enough.- Best for: keepsakes, crafty friends, “I will save this forever” people
- Make it personal: stitch their pet silhouette in two colors
-
11) Scratch-Off Secret Message
Color a patch of cardstock with bright crayons, then paint over it with a mix of acrylic paint + a little dish
soap. When it dries, write “Scratch here” and hide a message underneath.- Best for: kids, teens, and anyone who loves surprises
- Make it personal: hide an inside joke or a birthday “quest” clue
-
12) Letterboard-Style Message Card
Draw a grid of thin lines to mimic a letterboard. Add white “letters” with a paint pen or tiny cut-out paper
squares. Keep the message short and punchy: “YOU. CAKE. NOW.”- Best for: trendy, photo-worthy cards
- Make it personal: include their most-used phrase in all caps (as nature intended)
-
13) Cricut-Style Insert Card Look (No Machine Required)
Cut a simple border frame from cardstock (a rectangle with the middle cut out). Slide in a contrasting “insert”
panel behind it, then add a bold icon (cake, star, balloon) on top. Clean, modern, and very “I own good scissors.”- Best for: crisp designs and fast assembly
- Make it personal: use metallic paper for the insert to make it pop
-
14) Origami Party Hat Topper
Fold a tiny paper party hat and glue it near the top of the card. Add a pom-pom dot or a small sticker as the
hat’s “fluff,” then draw a little string under it like it’s ready for chaos.- Best for: playful, kid-friendly cards
- Make it personal: decorate the hat with their favorite pattern (stripes, stars, florals)
-
15) Sprinkle “Lollipop” Treat Card
Glue a circle of cardstock (or a cupcake liner cut-down) as the “candy,” then sprinkle real craft sprinkles
(or confetti dots) on top. Add a paper stick or straw and write “You’re sweet.”- Best for: kids, teachers, sweet-tooth friends
- Make it personal: match the “sprinkles” to their favorite ice cream flavor
-
16) Mini Accordion “Reasons You Rock”
Fold a long strip of paper into an accordion and glue the ends inside the card. On each panel, write one reason
you appreciate them. It’s a birthday card and a confidence booster in one.- Best for: partners, best friends, family members
- Make it personal: include one “ridiculously specific” compliment (they’ll know it’s real)
-
17) Upcycled Collage Memory Card
Cut shapes from old wrapping paper, magazines, or leftover gift bags and build a collage: a cake, a bouquet,
a skyline, a disco ballwhatever fits them. Finish with a short handwritten note.- Best for: zero-waste crafters and anyone who loves texture
- Make it personal: collage in clues to your favorite shared memory (movie stub, map scrap, etc.)
-
18) Minimalist “Big Type” Card
Write one oversized word on the front: “CELEBRATE,” “LEGEND,” or “YOU.” Add a tiny sub-line underneath:
“Because the world got better when you showed up.” Clean design, maximum meaning.- Best for: adults, coworkers, and people who hate clutter
- Make it personal: choose a word that fits their identity (chef, coach, chaos gremlin)
Pro Tips That Make DIY Cards Look “Professionally Handmade”
- Use less glue than your heart wants. Tape runners keep paper flatter and cleaner.
- Pick two main colors. Three if you’re feeling wild. Five if you’re making a circus card (valid).
- Center things on purpose. Or offset things on purpose. “On purpose” is the secret ingredient.
- Outline once. A thin black outline around a cutout makes it look sharper instantly.
- Leave whitespace. Empty space is not “unfinished.” It’s “designer.”
What to Write Inside (So the Card Doesn’t Just Sit There Being Pretty)
Steal these formats and customize one line:
- Funny: “Another year older, still undefeated. Happy Birthday!”
- Sweet: “You make people feel seen. I’m grateful you’re in my life.”
- Short: “Big love. Big cake. Big wishes.”
- Coworker-safe: “Hope your day is bright and your inbox is quiet.”
- Long-distance: “Wish I could celebrate with you in personsaving you a hug for later.”
Real-Life Crafting Experiences: The Good, the Glue, and the Glitter (Extra )
If you’ve never made a DIY birthday card before, your first experience will probably follow a classic storyline:
confidence, chaos, and a surprisingly heartfelt ending. It usually starts with a bold plan“I’ll make something
simple!”and then you look up at the clock and realize your “simple” idea somehow involves a pop-up mechanism,
glitter, and a tiny ribbon bow that refuses to behave like a bow.
The most common “moment” people report is the adhesive turning on them. Glue sticks can be moody. Liquid glue can
wrinkle paper like it’s trying to age it into a vintage artifact. This is why seasoned crafters love tape runners
and double-sided tape: they’re boring, dependable, andhonestlygoals. Another universal experience is the Great
Smudge Incident. You write the perfect message, close the card too soon, and the ink transfers like a tiny betrayal.
The fix is simple: give the ink a minute, or use a quick blast of air (gentlythis is a card, not a sail).
Then there’s the “I don’t have the right supplies” panic, which is rarely true. Some of the most memorable
homemade greeting cards come from the stuff already on the table: a scrap of wrapping paper, a ticket stub, a
paper bag cut into a kraft panel, or the last three inches of ribbon you were about to throw away. That’s also
where your card starts to feel personal. The materials carry little hints of real lifeyour shared movie night,
the concert you both loved, the snack wrapper from the road trip, the doodle you made while on the phone.
A funny thing happens while making the card: you start thinking about the recipient in specific detail. Not just
“they like birthdays,” but “they laugh at terrible puns,” or “they always check on people when they’re stressed,”
or “they still get excited about balloons like a completely reasonable adult.” This is why DIY birthday card ideas
hit differently. Even if the front isn’t perfectly centered, the intention is. And when you write something
specificone memory, one compliment, one wishthe card becomes less of a product and more of a tiny time capsule.
The last real-life experience is the best one: watching someone open it. People tend to touch handmade cards
differently. They pause. They trace the paper edges. They shake the shaker window like it’s a snow globe.
They laugh at the tiny details you added just for them. The card gets set on a shelf instead of tossed in a drawer.
And that’s the whole point: you didn’t just say “Happy Birthday.” You showed it.
Conclusion
The best DIY birthday card ideas aren’t the most complicatedthey’re the most specific. Pick one design from the list,
add one personal detail, and write one sincere line. That’s how a simple piece of cardstock turns into a keepsake.