Every garden has one item that refuses to behave: the hose. You coil it neatly on Monday, and by Wednesday it looks like a green anaconda tried to escape across the patio. A garden hose is useful, hardworking, and absolutely determined to ruin your curb appeal. The good news? You do not have to choose between watering your hydrangeas and maintaining a yard that looks like a grown-up lives there.
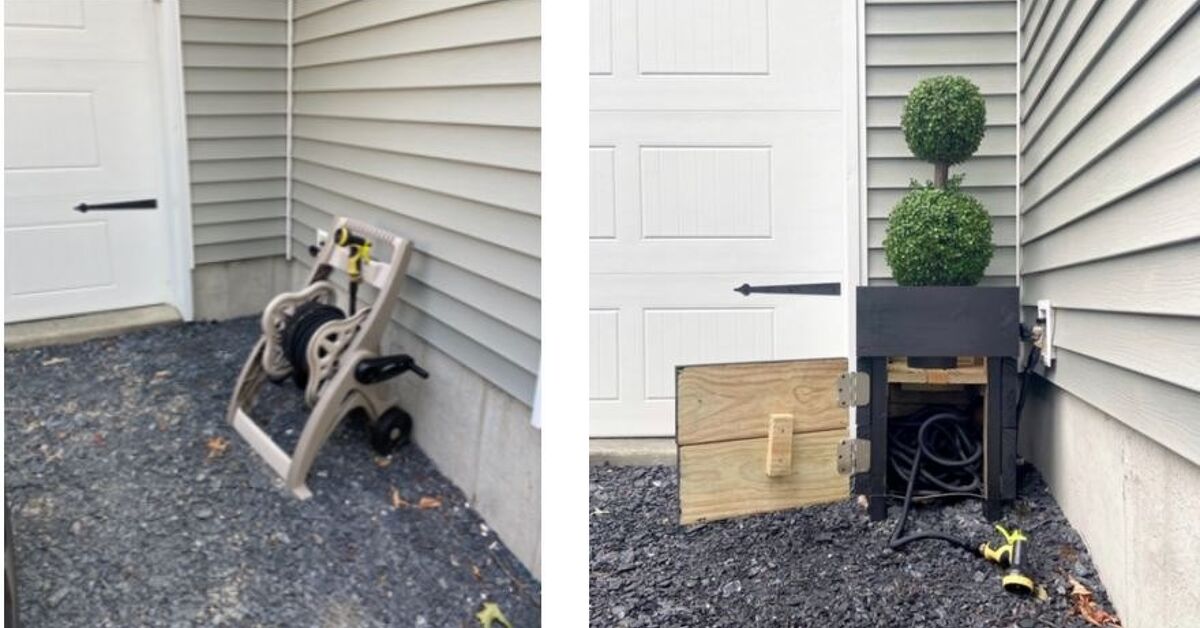
A DIY planter that conceals your garden hose solves two problems at once. It hides the hose, adds flowers or herbs, and gives your outdoor space a polished, intentional look. Think of it as a tiny garden disguise: storage below, beauty above, chaos officially evicted.
This guide walks you through how to build a sturdy, attractive hose-hiding planter using common materials, beginner-friendly tools, and practical garden design principles. The project works well near a spigot, along a patio, beside a raised bed, or anywhere your hose currently lounges like it pays rent.
Why Build a DIY Garden Hose Planter?
A hose reel is functional, but it is not always pretty. A hose pot can be attractive, but many models tip, crack, or look too small for a full-size 50- to 100-foot hose. A custom planter gives you more control over size, style, drainage, and placement.
The best version of this project has three jobs. First, it stores the hose in a protected lower compartment. Second, it supports a shallow planter tray or removable planter insert on top. Third, it blends into your landscape rather than announcing, “Hello, I am hiding plumbing accessories.”
It can also extend the life of your hose. Proper storage helps reduce kinks, sun exposure, accidental lawn mower encounters, and the mysterious tangles that seem to form when no one is watching. When the hose has a dedicated home, you are more likely to coil it correctly after watering instead of performing the classic “I’ll deal with that later” toss.
The Basic Design: Storage Below, Plants Above
This DIY hose planter is essentially a wooden box with ventilation, a side opening for the hose, and a removable planting section on top. The lower compartment holds the coiled hose. The upper section holds soil and plants, either in a lined tray or in separate nursery pots hidden behind a decorative rim.
For most homes, a box about 24 inches wide, 24 inches deep, and 24 to 30 inches tall works well for a standard 50-foot hose. For a bulky 100-foot hose, increase the footprint to about 30 inches square. Always measure your hose when it is loosely coiled before cutting wood. Hoses are like jeans: the label says one thing, but the real fit depends on flexibility, thickness, and how much patience you have.
Materials You’ll Need
Choose outdoor-rated materials because this project will face sun, rain, soil moisture, and occasional splashback from watering. Cedar and redwood are excellent choices because they resist decay better than many softwoods. Pine is more affordable, but it needs a high-quality exterior finish and more maintenance.
Suggested Materials
- Cedar boards or exterior-grade lumber for the frame and sides
- 1×2 or 2×2 boards for internal cleats and corner supports
- Exterior deck screws or stainless-steel screws
- Wood glue rated for exterior use
- Landscape fabric or hardware cloth for the planter tray
- Plastic nursery pots, a removable liner, or a shallow planter insert
- Exterior wood stain, sealant, or paint
- Small rubber feet, pavers, or risers to lift the box off the ground
- Optional: decorative trim, handles, casters, hinges, or a hose guide
Tools You’ll Need
- Tape measure
- Pencil
- Circular saw, miter saw, or handsaw
- Drill and drill bits
- Sander or sanding block
- Clamps
- Jigsaw or hole saw for the hose opening
- Paintbrush or rag for stain
- Safety glasses and gloves
Before You Build: Plan the Placement
The planter should sit close enough to the outdoor faucet that the hose connects without stretching. At the same time, leave room to open the top, remove the planter insert, and coil the hose comfortably. A great location is beside a patio, near a garden bed, or along a walkway where the planter looks decorative rather than suspiciously box-like.
Avoid placing the planter directly against siding if water might collect behind it. Leave a few inches of airflow. Also avoid low spots where rainwater puddles. Even rot-resistant wood lasts longer when it is not sitting in a miniature swamp. Raise the planter slightly on feet, bricks, or pavers to improve airflow underneath.
Step-by-Step: How to Build the Hose-Hiding Planter
Step 1: Measure Your Hose Coil
Disconnect the hose, drain it, and coil it loosely on the ground. Measure the width and height of the coil. Add at least 4 inches of clearance on all sides so the hose can slide in and out without scraping. If you use a heavy rubber hose, add even more space. Heavy hoses are wonderful until they decide to wrestle you in public.
Step 2: Cut the Frame Pieces
Cut four vertical corner supports from 2×2 lumber. For a medium planter, cut them about 24 inches tall. Then cut horizontal rails for the top and bottom frame. You will need pieces for the front, back, and sides. Dry-fit everything on a flat surface before driving screws. A square frame now prevents a wobbly box later.
Step 3: Build the Bottom Frame
Attach the lower rails to the corner supports using exterior screws. Pre-drill pilot holes to reduce splitting, especially when working with cedar. The bottom frame should be strong enough to hold the walls but open enough for drainage and airflow. Do not build a sealed floor unless you add multiple drainage holes.
Step 4: Add the Side Panels
Attach boards horizontally or vertically around three sides of the box. Leave small gaps between boards if you want extra ventilation. For a more refined look, use tight boards and drill discreet ventilation holes near the back or bottom. The front can be solid, slatted, or designed as a removable panel.
If your yard has a modern style, keep the boards straight and simple. For a cottage garden, add trim and a slightly weathered finish. For farmhouse style, use vertical boards with a top cap. The hose will not care, but your patio will absolutely notice.
Step 5: Cut the Hose Opening
Use a jigsaw or hole saw to cut a rounded opening on the side closest to the spigot. A 2- to 3-inch opening usually works for standard hoses and couplings. Sand the edges smooth so the hose does not rub against rough wood. For extra protection, install a rubber grommet, a short piece of PVC pipe, or a metal hose guide around the opening.
Step 6: Create the Top Planter Support
Install interior cleats around the inside top edge of the box. These cleats will support a removable planter tray, plastic liner, or set of nursery pots. Keep the planting area separate from the hose compartment. Soil and hoses are not enemies, exactly, but they should not be roommates.
The easiest method is to place several plastic nursery pots inside the top opening and hide them behind a wooden rim. This keeps the planted section removable and improves drainage control. Another option is to build a shallow wooden tray lined with landscape fabric and a waterproof liner, but make sure excess water can escape away from the hose compartment.
Step 7: Add Drainage
Drainage is not optional. Container plants need oxygen around their roots, and waterlogged soil can lead to rot. Drill drainage holes in any planter insert you build. If using nursery pots, make sure each pot has holes and sits slightly elevated. Avoid filling the bottom of pots with rocks as a “drainage fix.” A proper potting mix and actual drainage holes are much more reliable.
Direct excess water away from the hose storage section when possible. A simple removable tray with holes can drain to the back or sides. If water drips into the hose compartment occasionally, it is not a disaster, but the box should be ventilated and able to dry.
Step 8: Sand and Finish
Sand rough edges, corners, and the hose opening. Apply an exterior stain, paint, or sealant according to the product directions. If you are growing edible herbs, use finishes appropriate for garden use and avoid applying questionable chemicals to surfaces that will contact soil. Let the finish cure fully before planting.
Step 9: Install the Hose and Plants
Place the planter near the spigot. Feed the hose through the side opening, connect it to the faucet, and coil the rest inside the box. Set the planted insert or nursery pots on top. Test the hose by pulling out several feet and recoiling it. If it snags, widen the opening or smooth the interior corners.
Best Plants for a Hose-Hiding Planter
Choose plants based on sunlight, local climate, and how often you want to water. Since this planter may sit near a wall or patio, pay attention to reflected heat. Containers dry out faster than in-ground beds, especially in summer.
Sunny Locations
For full sun, try petunias, lantana, calibrachoa, marigolds, sedum, thyme, rosemary, or ornamental grasses. These plants can handle bright light and bring color or texture to the planter. Herbs are especially useful near a hose because they enjoy regular attention, and you can casually harvest rosemary while pretending you planned dinner.
Part-Shade Locations
For part shade, consider begonias, coleus, impatiens, ferns, heuchera, or trailing ivy. Mix upright plants with trailing varieties to soften the edges of the box. A classic container formula is “thriller, filler, spiller”: one tall focal plant, several medium plants, and a few trailing plants to drape over the sides.
Design Ideas to Make It Look Custom
A DIY planter does not have to look homemade in the “oops” sense of the word. Small details can make the piece feel intentional and high-end.
- Add a top cap: A simple mitered frame around the top gives the planter a finished look.
- Use trim: Thin trim boards can create a shaker-style panel effect.
- Paint it black: Matte black or charcoal gives the planter a modern, architectural feel.
- Match your deck stain: Repeating an existing outdoor finish helps the planter blend in.
- Add hidden casters: Locking casters make the planter easier to move for cleaning.
- Install handles: Side handles help when repositioning the box.
- Use a hinged top: A hinged planter platform can work if the plants are lightweight and removable.
Common Mistakes to Avoid
Making the Box Too Small
The number one mistake is underestimating the hose. A stiff 100-foot hose needs more space than a lightweight expandable hose. Build bigger than you think you need. A roomy box is convenient; a tight box turns every watering session into a low-budget escape room.
Skipping Ventilation
A sealed wooden box traps moisture. Add gaps, holes, or an open bottom so air can circulate. This helps the hose dry and reduces musty odors.
Letting Soil Drain Directly Onto the Hose
Soil runoff can make the hose compartment muddy. Use removable pots, a tray, or landscape fabric to keep potting mix where it belongs.
Forgetting Winter Storage
In cold climates, disconnect and drain the hose before freezing weather. Water left inside can expand and damage the hose. Store the hose in a garage, shed, or protected area during winter if possible.
Maintenance Tips for Long-Term Success
Once or twice a season, remove the plants and inspect the hose compartment. Sweep out leaves, rinse away dirt, and check for signs of rot or insect activity. Tighten loose screws if the wood expands and contracts with weather changes. Refresh exterior stain or sealer as needed.
Keep the hose loosely coiled rather than sharply bent. Avoid yanking it through the opening at an angle. If the hose rubs against one side, add a smoother guide or widen the opening. The goal is graceful storage, not a daily tug-of-war with irrigation equipment.
Budget-Friendly Variations
If you want a cheaper version, build the frame from pine and paint it thoroughly with exterior paint. Use leftover deck boards for the sides. Repurpose a large storage cube, barrel, or wooden crate if it is sturdy enough and can be ventilated. You can also skip the built-in planter tray and simply place a lightweight rectangular planter on top.
For renters, avoid permanent installation. Use a freestanding design with a removable hose and potted plants. Choose a size you can move when needed. A renter-friendly hose planter can make a patio feel finished without drilling into walls or annoying the landlord, which is generally a hobby best avoided.
Experience Notes: What Actually Matters When You Use It
The first thing you notice after building a hose-hiding planter is how much calmer the garden feels. A hose lying across the patio creates visual noise, even when the rest of the space is tidy. Once it disappears into a planter, the area suddenly looks more deliberate. The faucet area becomes part of the design instead of the place where curb appeal goes to take a nap.
In real use, the side opening is more important than many people expect. If the opening is too small or has sharp corners, the hose catches every time you pull it out. A rounded, sanded opening makes the whole project feel smoother. Adding a short PVC sleeve or rubber edge guard is a small upgrade that pays off quickly. It protects the hose, protects the wood, and protects your mood when you are trying to water before work.
The second practical lesson is to keep the planting section removable. It may seem elegant to build one integrated planter box, fill it with soil, and call it done. But removable pots are easier to water, replace, rearrange, and lift out when you need to inspect the hose. They also prevent the entire structure from becoming extremely heavy. A box full of wet soil has the charming portability of a sleeping rhinoceros.
Plant choice also affects daily convenience. Trailing flowers look beautiful, but if they hang directly over the hose opening, they may get brushed every time the hose moves. Place trailing plants on the front and sides, then keep the hose-opening side a little cleaner. Herbs, compact annuals, and small ornamental grasses are especially practical because they offer style without blocking access.
Another useful experience-based tip is to position the planter slightly forward from the wall. When it sits too close to siding or fencing, leaves and moisture collect behind it. A few inches of breathing room make cleaning easier and help the wood dry after rain. If the planter is on a patio, placing it on small risers or rubber feet prevents the bottom from staying damp.
Finally, accept that hose storage works best when it is easy. If coiling the hose into the planter feels annoying, you will eventually stop doing it. Keep the interior spacious, avoid complicated lids, and make the top section simple to remove. The best DIY projects are not the ones that look clever for one weekend. They are the ones you still use six months later because they quietly make life better.
Note: This article is written from synthesized practical guidance on DIY planter construction, outdoor hose storage, container drainage, wood selection, and seasonal garden maintenance.