A backsplash from reclaimed pallets can turn an ordinary kitchen wall into a wat curl up in a corner and cry. With weathered grain, nail holes, saw marks, and natural color variation, pallet wood brings character that factory-perfect materials often try very hardand charge very handsomelyto imitate.
However, building a reclaimed pallet backsplash requires more than dismantling the first pallet you find behind a grocery store and gluing it above the counter. Shipping pallets may have unknown cargo histories, embedded fasteners, moisture damage, chemical contamination, insects, or treatment marks that need to be understood. The wood must also be cleaned, dried, prepared, installed, sealed, and kept an appropriate distance from heat-producing appliances.
This guide explains how to select safer pallet wood, design the layout, prepare the boards, install the backsplash, protect it from kitchen splashes, and avoid the mistakes that can turn rustic charm into rustic regret.
Why Choose a Reclaimed Pallet Wood Backsplash?
A reclaimed wood backsplash introduces warmth into a room dominated by hard surfaces. Stainless steel, stone counters, painted cabinets, and glossy appliances can sometimes make a kitchen feel more like a laboratory than a place where pancakes happen. Wood softens that look immediately.
It Creates a One-of-a-Kind Surface
No two pallet boards age in exactly the same way. One plank may be honey-colored and smooth, while the next has dark knots, gray weathering, rough saw marks, or old nail holes. Those differences create depth and movement across the wall.
You can arrange the boards horizontally for a wider-looking room, vertically to emphasize ceiling height, or in a herringbone pattern for a more decorative result. Random-width planks create a relaxed farmhouse appearance, while boards milled to a consistent width look cleaner and more contemporary.
It Reuses Existing Material
Reclaimed pallets can keep usable lumber in circulation and reduce the need to purchase newly milled decorative wood. The environmental benefit is strongest when the pallets are obtained legally, have a known history, and can be prepared without excessive waste.
It Can Be Budget-Friendly
The raw boards may be inexpensive or free, although the complete project is not automatically cost-free. You may still need a pry bar, metal detector, saw blades, sandpaper, adhesive, finish nails, caulk, stain, and a protective clear coat. Free lumber has a charming habit of introducing you to several paid accessories.
Start With the Right Pallets
Wood selection is the most important part of the project. A beautiful layout cannot compensate for boards that smell like chemicals, harbor mold, or leave mysterious oily marks on the wall.
Choose Pallets With a Traceable History
The best pallets come from a source that can tell you what they carried and where they were stored. Pallets used for dry building materials, packaged paper products, furniture, or other clean goods are generally more suitable candidates than pallets associated with chemicals, automotive fluids, pesticides, raw meat, or unknown industrial cargo.
Ask permission before taking any pallet. Some pallets remain the property of a manufacturer, distributor, rental pool, or logistics company. Brightly painted pallets are especially likely to belong to a managed pallet network rather than the nearest enthusiastic DIYer.
Understand Pallet Treatment Marks
International shipping pallets may display an IPPC mark with a country code, facility number, and treatment abbreviation. “HT” indicates heat treatment, while “MB” indicates methyl bromide fumigation. These marks relate to phytosanitary treatment intended to limit the spread of wood pests. They do not certify that a pallet is clean, food-safe, or free from spills encountered during its working life. or an indoor kitchen project, favor clean, dry, heat-treated wood with a known cargo history. Reject pallets marked “MB,” pallets without enough information to evaluate them, and any board showing suspicious staining or odor.
Reject Problem Wood Immediately
Do not use pallet boards that have:
- Oil, chemical, or unidentified liquid stains
- A persistent chemical, petroleum, musty, or sour odor
- Visible mold or extensive black spotting
- Rot, soft fibers, or severe water damage
- Active insects, exit holes, or fresh wood dust
- Unknown paint or coating
- Deep cracks that make the board structurally unstable
Do not attempt to “seal in” contamination with polyurethane. A clear finish is a protective coating, not a witness-protection program for questionable lumber.
Tools and Materials
A typical reclaimed pallet backsplash project may require:
- Clean, approved pallet boards
- Work gloves, safety glasses, and suitable dust protection
- Pry bar, hammer, nail puller, and locking pliers
- Handheld metal detector
- Stiff nylon or brass-bristle brush
- Random-orbit sander and sandpaper in several grits
- Miter saw, circular saw, jigsaw, or table saw
- Tape measure, pencil, level, and straightedge
- Stud finder
- Construction adhesive rated for wood and the wall substrate
- Brad nailer or finish nails, when appropriate
- Wood stain or whitewash, if desired
- Durable interior clear finish
- Paintable or clear kitchen-and-bath caulk
- Electrical box extenders and longer device screws, if required
- A noncombustible insert for the cooking zone, when needed
How to Prepare Pallet Wood for a Backsplash
1. Dismantle the Pallets Carefully
Wear gloves and eye protection. Work slowly with a pallet breaker, pry bar, reciprocating saw, or nail puller. Pallet boards are often dry and brittle, so aggressive prying can split them around every nail hole.
Cutting through the fasteners with a reciprocating saw is fast, but it can leave metal fragments inside the boards. Those fragments must still be located and removed before further milling.
2. Inspect for Hidden Metal
Remove visible nails, screws, staples, and wire. Then scan every face and edge with a handheld metal detector. Reclaimed lumber can hide broken nail shafts that are nearly invisible but highly capable of damaging a saw blade or becoming a projectile. Woodworking guidance for reclaimed lumber recommends scanning after the obvious fasteners have been removed because fragments are easily overlooked. >3. Dry-Clean Before Adding Water
Brush away dirt, bark, grit, and loose fibers with a stiff nylon or brass-bristle brush. Vacuum the boards thoroughly. Dirt dulls blades and can become embedded in the surface during sanding.
If the wood’s history is clean and the boards require additional washing, use a modest amount of mild detergent and water rather than saturating them. Rinse carefully, wipe off excess moisture, and allow the boards to dry completely in a well-ventilated area. Wood that remains damp behind a sealed backsplash may warp or encourage mold growth.
4. Let the Boards Acclimate Indoors
Stack the boards flat with spacers between layers and let them adjust to the kitchen’s indoor temperature and humidity. Avoid carrying damp outdoor boards directly inside and attaching them tightly to the wall. As the wood dries, it may shrink, twist, or open gaps.
5. Mill the Boards to a Practical Thickness
Full pallet boards can be unnecessarily thick for a backsplash. Thick planks project around outlets, collect more dust along the top edge, and may interfere with faucets, trim, or appliances.
When equipment and experience allow, resaw or plane the boards to relatively thin, consistent planks. Many decorative wall installations work well with boards roughly 1/4 to 3/8 inch thick, although the final dimension should suit the wood’s stability, the installation method, and the depth of nearby trim.
6. Sand Without Erasing the Character
Begin with a coarse or medium grit where necessary to remove splinters, embedded dirt, and dangerous roughness. Progress to a smoother grit suitable for the chosen finish. The goal is a cleanable surface that still looks reclaimednot a board polished until it forgets its entire childhood.
Collect sanding dust at the tool whenever possible and wear appropriate eye and respiratory protection. Wood dust can irritate the eyes, skin, and respiratory system, and some people develop sensitization after repeated exposure. ion>
Plan the Backsplash Before Installation
Measure the Entire Area
Measure the height and width of each backsplash section separately. Kitchens are rarely as square as they look in photographs. Note cabinets, window trim, outlets, switches, countertop upstands, range hoods, and any place where the wall changes direction.
Add extra material for trimming, split boards, pattern matching, and mistakes. Reclaimed wood has more defects than new paneling, so buying or collecting exactly the visible square footage is an excellent way to run out with three boards left to install.
Create a Full Dry Layout
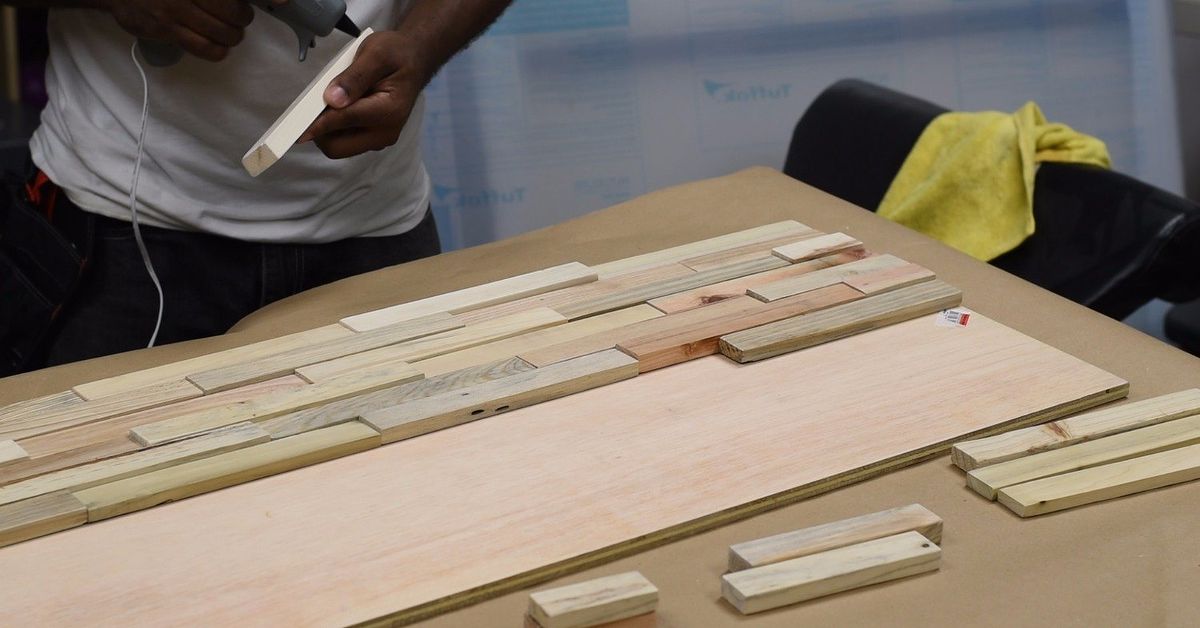
Arrange the prepared boards on the floor or a large work surface. Mix light and dark pieces, distribute prominent knots, and prevent several identical widths from clustering in one area.
For horizontal boards, stagger end joints so they do not form an accidental ladder. For herringbone or chevron patterns, draw a centerline and make a template. Patterned layouts create more offcuts and require much more careful alignment than straight planks.
Decide How to Handle the Cooktop Area
Pallet wood is combustible. Appliance clearances depend on the exact range or cooktop, its listing, the manufacturer’s instructions, and applicable local codes. Residential code guidance generally requires appliances to be installed according to their labels and manufacturer-specified clearances from combustible materials. practical design is to use reclaimed wood along the general backsplash and install stainless steel, tempered glass, tile, stone, or another approved noncombustible surface directly behind the cooking area. This also makes grease cleanup easier. Never assume that applying clear finish makes wood noncombustible.
How to Install a Reclaimed Pallet Backsplash
1. Prepare the Wall
Turn off power to the affected outlets and switches at the breaker. Remove faceplates and verify that the power is off. Clean grease and residue from the wall, patch holes, sand raised repairs, and make sure the surface is dry, flat, and sound.
If the wall has peeling paint, moisture damage, loose drywall paper, or an active leak, repair the problem before covering it. A decorative backsplash should not become expensive camouflage.
When renovating a pre-1978 home, disturbing old painted surfaces may create hazardous lead dust. The EPA recommends determining whether lead-based paint may be present and following lead-safe work practices when cutting, sanding, scraping, or otherwise disturbing the surface. >2. Mark Level Reference Lines
Do not assume the countertop is perfectly level. Use a level to draw a reference line for the first course. Small errors in the first row become large, highly visible errors by the time the boards reach the upper cabinets.
3. Cut Around Outlets and Obstacles
Measure carefully and cut openings with a jigsaw or oscillating tool. The finished opening should remain hidden behind the electrical faceplate without blocking access to the box.
The added wood thickness may require listed box extenders and longer device screws so outlets and switches remain properly supported and flush with the finished surface. Electrical requirements vary, so consult a licensed electrician when the correct arrangement is uncertain.
4. Attach the Boards
Construction adhesive can provide broad holding power, while finish nails or brads can keep the pieces aligned as the adhesive cures. The adhesive must be compatible with both the wood and the existing wall surface. Follow the manufacturer’s instructions for bead size, open time, temperature, and cure time.
Apply adhesive in a controlled pattern rather than covering the entire back with a thick layer. Press the board into place, check it against the reference line, and use nails where appropriate. Wall-plank installation guidance commonly recommends a clean, smooth substrate, construction adhesive, and small finish nails to hold boards while the adhesive sets. eave a small movement space at walls, cabinets, and other fixed boundaries. Cover perimeter gaps with trim or a neat bead of flexible caulk rather than forcing the wood into a rigid, edge-to-edge fit.
5. Seal the Countertop Joint
Apply a thin, continuous bead of clear or color-matched kitchen-and-bath caulk where the backsplash meets the countertop. This joint is one of the most likely places for water, crumbs, and cooking residue to enter.
6. Finish the Exposed Edges
Use matching wood trim, a simple square-edged border, or metal profile trim where the backsplash ends. A deliberate edge makes reclaimed material look designed rather than abandoned halfway through installation.
Staining and Sealing the Wood
A kitchen backsplash must be wipeable. Raw pallet wood absorbs tomato sauce, cooking oil, coffee, water, and fingerprints with astonishing enthusiasm. A durable protective finish is therefore essential.
Choose the Desired Appearance
- Clear water-based polyurethane: Preserves a lighter, more natural color and generally adds less amber tone.
- Oil-based polyurethane: Produces a warmer color and can deepen the grain.
- Whitewash: Brightens the wall while allowing knots and texture to remain visible.
- Wood stain: Helps unify boards with strongly mismatched colors.
- Matte or satin sheen: Hides minor surface irregularities better than a high-gloss finish.
Test the Finish First
Apply the complete stain-and-sealer system to several offcuts. Reclaimed boards can absorb finish unevenly because they may contain different species, grain densities, weathered areas, and traces of old coatings.
Apply Multiple Controlled Coats
Follow the finish manufacturer’s instructions rather than relying on a universal schedule. Many clear finishes call for thin coats, complete drying between applications, light sanding with fine paper, and careful dust removal before recoating. Product guidance commonly recommends fine sanding around 220 grit between cured coats to improve adhesion and smoothness. eal the face, cut ends, joints, and other exposed surfaces thoroughly. When prefinishing boards before installation, verify that the adhesive can bond to the treated back or leave appropriate bonding areas unfinished. Allow the final coating to cure fully before exposing the backsplash to splashes, steam, or aggressive cleaning.
Design Ideas for a Reclaimed Pallet Backsplash
Natural Mixed-Tone Planks
Combine tan, gray, brown, and lightly weathered boards for an informal farmhouse look. Keep the cabinets and counters relatively simple so the wood remains the main feature.
Charcoal-Stained Pallet Wood
A dark stain can make rough boards feel modern and dramatic, especially with white cabinets and warm metal hardware. Test carefully because soft pallet wood may absorb dark stain unevenly.
Whitewashed Coastal Style
A thin whitewash reduces strong color differences while preserving grain and nail holes. Pair it with pale cabinets, brushed nickel, and understated counters for a relaxed coastal effect.
Wood With a Metal Range Insert
Run pallet boards across the sink and prep areas, then center a stainless-steel panel behind the range. The contrast looks intentional while placing a more cleanable, noncombustible material in the busiest cooking zone.
Framed Herringbone Panel
Instead of covering every wall, create a framed herringbone feature between two upper cabinets. This limits cutting, reduces visual clutter, and gives the reclaimed material the appearance of custom artwork.
Common Mistakes to Avoid
- Using an unknown pallet: A treatment stamp does not reveal everything the pallet transported.
- Installing damp wood: Moist boards can shrink, cup, twist, or support mold after installation.
- Skipping the metal scan: Broken fasteners can damage tools and injure the operator.
- Leaving the surface too rough: Deep texture traps grease and makes routine cleaning difficult.
- Using unsealed wood: Kitchen stains will quickly become part of the “patina,” whether invited or not.
- Ignoring appliance instructions: Wood should not be placed in a heat zone unless the appliance listing and local requirements permit it.
- Starting without a layout: Poorly distributed colors and joints can make the finished wall look patchy.
- Covering a damaged wall: Leaks, mold, loose paint, and electrical problems must be corrected first.
- Forgetting outlet depth: Added wall thickness may require approved electrical box extensions.
- Over-sanding every board: Excessive sanding can remove the texture that made reclaimed wood attractive in the first place.
How to Clean and Maintain the Backsplash
Wipe ordinary splashes promptly with a soft, slightly damp cloth. For greasy marks, use a small amount of mild dish soap diluted in water, then wipe the area with a clean damp cloth and dry it.
Avoid soaking the boards, spraying cleaner directly into joints, or using harsh abrasives that can scratch the protective coating. Steam cleaners are also a poor match for a wood backsplash because concentrated heat and moisture may affect the finish, joints, or adhesive.
Inspect the countertop joint, sink area, board ends, and cooking-zone edges periodically. Replace cracked caulk and repair worn finish before water reaches the bare fibers. A small maintenance coat is easier than removing an entire wall of warped wood while quietly reconsidering every decision that led to that moment.
Field-Tested Experiences and Practical Lessons
The following lessons reflect recurring experiences reported across reclaimed-wood projects and professional installation guidance. They are useful because pallet projects rarely fail during the exciting design stage. Problems tend to appear later, usually while the adhesive is curing and the hardware store is closing.
Collect More Boards Than the Measurement Suggests
A backsplash that visually requires 25 square feet of wood may consume considerably more once cracked ends, deep stains, warped sections, nail damage, and unattractive boards are removed. Having extra material also makes the layout more selective. Instead of using a badly twisted plank because it is the last one available, you can choose a straighter board and maintain your dignity.
Prepare One Sample Panel First
Before processing every board, assemble four or five sample pieces on scrap plywood. Sand them to the intended level, apply the selected stain, add the clear coat, and view the sample under the kitchen lighting. Warm LEDs, cool LEDs, and daylight can make the same wood look surprisingly different.
The sample also reveals whether rough saw marks remain cleanable. Texture that looks wonderfully rustic from six feet away may feel like a collection of tiny grease shelves when examined beside a stove.
Sort Boards Into Visual Groups
Separate the lumber into light, medium, dark, gray, knotty, and relatively plain groups. During dry layout, pull boards from each group rather than working through one pallet at a time. This prevents one side of the backsplash from becoming dark and dramatic while the other side looks as though it was built from a different tree, decade, and emotional state.
Use the Straightest Boards Near Reference Lines
Place straight, stable pieces along the countertop, beneath cabinets, and beside vertical trim. Slightly irregular boards are easier to hide in the middle of the field, where neighboring planks can help absorb small variations. A crooked first course makes every later course more difficult.
Prefinish Whenever the Layout Allows
Applying stain and clear finish before installation makes it easier to coat the edges and prevents runs down the wall. It also avoids sanding dust in a functioning kitchen. However, finish and adhesive compatibility must be tested. Keep designated bonding areas clean when required by the adhesive manufacturer.
Expect Color to Change Under Clear Finish
Clear coating usually deepens the grain and darkens weathered wood, even when the product is described as crystal clear. Testing is especially important with gray pallet boards. Some become rich and warm; others lose the pale, dry appearance that made them appealing.
Do Not Rush the Cure Time
A finish that feels dry may not be ready for normal kitchen use. Installing faceplates, wiping aggressively, or exposing the surface to steam too soon can leave impressions or cloudy areas. Follow the product’s full cure guidance, not merely its “dry to touch” time.
Use a Removable Backer for Greater Flexibility
Homeowners who may change the design later can mount the boards to thin plywood panels and then fasten those panels securely to studs. This method adds thickness and must be planned around outlets and trim, but it can reduce direct adhesive contact with the original wall. It is particularly useful in workshops, coffee stations, and less moisture-intensive kitchen areas.
Treat the Sink and Range as Separate Design Zones
The sink challenges the backsplash with water, while the range adds heat, grease, and cooking residue. A successful design does not have to use identical material everywhere. Wood can cover the lower-risk prep zones, with tile, glass, stone, or metal placed where performance matters more than uninterrupted rustic texture.
Keep a Few Finished Offcuts
Store several sealed pieces after the project is complete. They can be used to test cleaners, compare finish wear, replace a damaged board, or help match the original color during future maintenance. Label the leftover stain and clear finish with the product name, sheen, and application date. Six years later, “the can with the brown stuff” will not be a sufficiently detailed maintenance record.
Is a Pallet Wood Backsplash Right for Your Kitchen?
A reclaimed pallet backsplash is a strong choice for homeowners who enjoy natural variation, hands-on preparation, and a surface that will develop character over time. It works particularly well in farmhouse, industrial, rustic, cottage, and eclectic kitchens.
It may be less suitable for anyone who wants perfectly uniform color, grout-free commercial-style sanitation, or maintenance that consists of spraying the wall with whatever cleaner happens to be closest. In those cases, wood-look porcelain, ceramic tile, metal, or glass may provide a similar visual effect with easier maintenance.
The best version of this project combines rustic appearance with disciplined preparation. Use traceable wood, reject questionable boards, remove hidden metal, control dust, let the material dry, plan the layout, respect appliance clearances, and apply a durable finish. When those steps are handled properly, discarded shipping lumber can become a distinctive kitchen feature rather than merely an adventurous story for your insurance adjuster.
Conclusion
Building a backsplash from reclaimed pallets is an approachable way to add warmth, texture, and history to a kitchen. The project can be economical, environmentally thoughtful, and highly customizable, but only when the lumber is selected with care.
Never treat every pallet as interchangeable. Favor clean, dry, heat-treated boards with a known history, and reject anything marked by spills, mold, odors, insects, or uncertain coatings. Prepare the wood thoroughly, scan for hidden metal, smooth dangerous splinters, and create a full dry layout before attaching a single plank.
Finish the surface with a durable, cleanable coating, seal the countertop joint, and use an approved noncombustible material wherever appliance instructions or local requirements make wood inappropriate. The finished backsplash should look relaxed and timeworn, but the process behind it should be careful, deliberate, and decidedly less improvised.