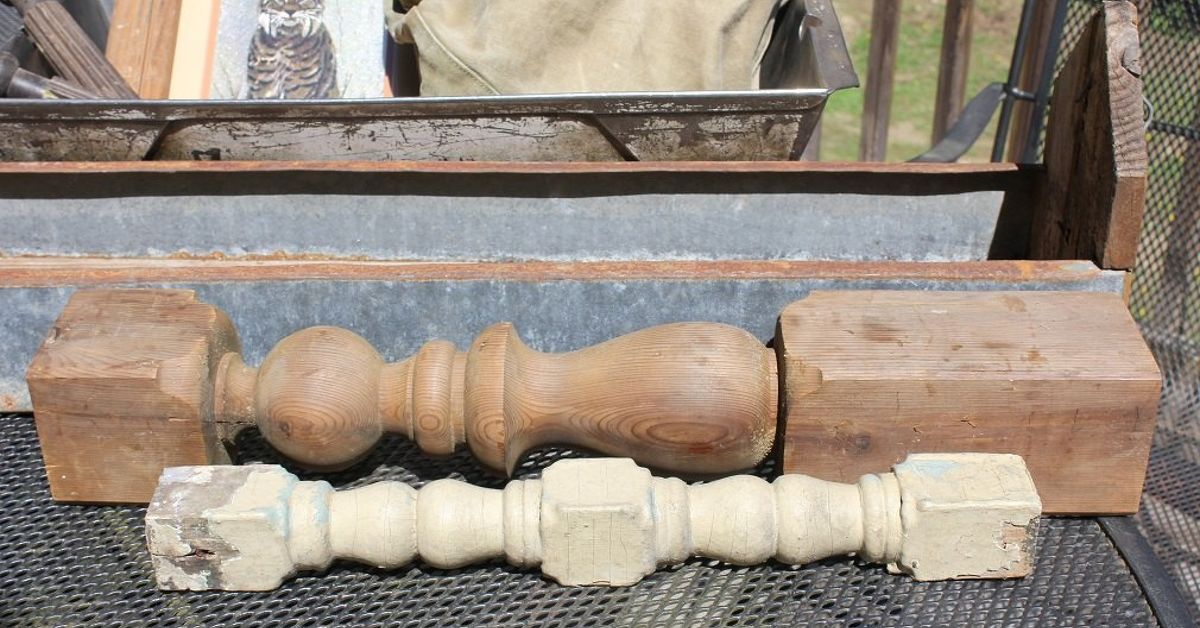
Old spindles are the quiet drama queens of the salvage world. They sit in dusty corners of thrift stores, garage sales, and architectural salvage shops looking like scraps from a staircase that lost its confidence. But give them a saw, a sturdy base, a little paint, and a candle cup, and suddenly they become charming DIY candlestick holders worthy of a mantel, dining table, wedding centerpiece, or cozy reading nook.
This project is perfect if you love farmhouse decor, vintage wood, budget-friendly crafts, and the deeply satisfying feeling of saying, “Oh, that? I made it from an old chair leg.” Making candlestick holders from old spindles is also surprisingly beginner-friendly. You do not need a professional woodshop, a truckload of expensive tools, or the patience of a museum restorer. You need a few basic supplies, safe work habits, and a willingness to let imperfect wood be part of the story.
In this guide, you will learn how to choose the right spindles, cut them safely, add stable bases, drill candle openings, finish the wood, and style your finished holders. We will also cover the practical details that matter most: balance, fire safety, paint choices, old finishes, and how to keep your candle holders from looking like a middle-school woodshop accident with a taper candle stuck in it.
Why Old Spindles Make Beautiful Candlestick Holders
Spindles, also called balusters when they come from stair railings, are already shaped like decorative candlesticks. Their turned profiles, rounded details, grooves, beads, and curves do most of the design work for you. That is why old stair spindles, chair spindles, table legs, crib rails, and salvaged furniture parts are so useful for DIY candle holders.
Instead of buying new wood and trying to carve it into something interesting, you are starting with a piece that already has character. A single spindle can become one tall candlestick holder. Several shorter sections can become a varied set. A chunky chair leg can turn into a statement pillar candle stand. Even mismatched spindles can look intentional when they are painted the same color or grouped together in odd numbers.
The Best Spindles to Use
Look for spindles that are solid, dry, and free from deep cracks. A little age is wonderful. Rot is not. Choose pieces that stand straight when placed upright and avoid anything that wobbles badly unless you plan to trim it square. Hardwood spindles are excellent because they feel weighty and durable, but many softwood pieces work well too, especially if you add a wide base.
Good sources include architectural salvage stores, thrift shops, flea markets, estate sales, broken chairs, old stair railings, porch railings, and leftover furniture parts. If a spindle has a beautiful profile but one damaged end, do not reject it immediately. You can often cut away the bad section and save the best part.
Tools and Materials You Will Need
Before you start, gather everything in one place. This keeps the project moving and prevents the classic DIY scavenger hunt where you spend 35 minutes looking for a pencil you were definitely just holding.
Materials
- Old wooden spindles, chair legs, stair balusters, or similar salvaged wood pieces
- Wood rounds, square plaques, scrap boards, or plywood pieces for bases
- Metal candle cups, taper candle inserts, or heat-resistant candle plates
- Wood glue
- Wood screws or dowels, depending on your design
- Wood filler, if needed
- Sandpaper in 120-grit and 220-grit
- Primer, paint, stain, wax, or clear sealer
- Felt pads for the bottom
- Taper candles, flameless candles, or small pillars that fit your holder safely
Tools
- Measuring tape or ruler
- Pencil
- Hand saw, miter saw, or circular saw
- Drill
- Forstner bit, spade bit, or drill bit sized to your candle cup
- Clamps
- Screwdriver or driver bit
- Level or small square
- Dust mask or respirator
- Safety glasses
- Drop cloth or work mat
Safety First: Old Wood, Paint, Dust, and Fire
DIY should be fun, not a dramatic origin story for an emergency room visit. Because this project involves old wood, sanding, drilling, finishing products, and candles, take a few safety steps seriously.
Check for Old Paint
If your spindle came from an older home, an antique chair, or any unknown source, assume the existing finish may contain lead until you know otherwise. Lead-based paint was commonly used in older homes before it was restricted in the United States, and sanding it can release hazardous dust. If you suspect lead paint, do not dry sand it casually in your garage while wearing flip-flops and optimism. Use a lead test kit, follow lead-safe practices, or seal the old finish under a new coating instead of disturbing it.
Make the Holder Stable
A candle holder must be sturdy and difficult to tip over. Tall spindle candlesticks need wider bases than short ones. A good rule of thumb is this: the taller and narrower the spindle, the wider and heavier the base should be. If your holder feels even a little tippy without a candle, it is not ready for use.
Use Candle Cups or Inserts
Wood is beautiful, but it is also flammable. Do not place a burning candle directly into a raw wooden hole. Use a metal candle cup, taper insert, glass votive holder, or heat-resistant candle plate. The insert helps catch wax, protects the wood, and creates a cleaner finished look. Flameless LED candles are the safest choice, especially for homes with children, pets, curtains, or relatives who say, “I’m just going to light one candle” and then forget about it.
Step-by-Step: How to Make Candlestick Holders From Old Spindles
Step 1: Plan the Height and Style
Start by deciding what kind of candlestick holders you want. A set of three staggered heights works beautifully on a mantel or dining table. For example, you might cut one spindle to 6 inches, another to 9 inches, and another to 12 inches. Odd-numbered groupings tend to look more natural and decorator-approved, even if your actual design process is “I had three pieces left.”
Think about the candle type too. Taper candles look elegant and traditional. Small pillar candles feel chunky and rustic. Tea lights and votives are easy to use when placed in glass or metal cups. Flameless candles work well for holiday displays, bookshelves, and areas where open flame is not practical.
Step 2: Clean the Spindles
Wipe the spindles with a damp cloth to remove dirt, cobwebs, and mystery garage dust. If the wood is greasy, use a mild cleaner and let it dry completely. Avoid soaking old wood, especially if it is cracked or has loose paint. Moisture can swell the grain and make finishing more difficult.
Inspect each spindle for nails, staples, screws, or hidden metal hardware. Remove any metal before cutting or drilling. A saw blade meeting a surprise nail is not a charming DIY moment. It is a tiny metal thunderstorm.
Step 3: Cut the Spindles to Size
Mark your cut lines with a pencil. Try to cut at points where the spindle profile naturally begins or ends, such as below a rounded bead or above a narrow neck. These natural transition points make the finished candlestick look intentional.
Clamp the spindle securely before cutting. Because spindles are round or irregular, they can roll if you try to hold them by hand. Use a miter box, clamp, or scrap wood cradle to keep the piece stable. Cut slowly and squarely. If the cut is slightly uneven, sand the bottom flat later.
Step 4: Choose and Prepare the Base
The base is what turns a pretty spindle into a functional candlestick holder. You can use a round wood plaque, square craft board, scrap pine, plywood, a vintage wooden coaster, or even a layered base made from two pieces of wood.
For a tall spindle, choose a base that extends at least 1 to 2 inches beyond the spindle on all sides. For a short holder, a smaller base may be enough. Sand the base smooth, paying attention to the edges. If you want a more decorative look, stack a small round disc on top of a larger square base, or use trim pieces to create a pedestal effect.
Step 5: Attach the Spindle to the Base
There are several ways to attach the spindle. The simplest method is wood glue plus a screw from the underside of the base. Drill a pilot hole through the base and into the bottom of the spindle. Add wood glue where the spindle meets the base, then drive a screw upward through the base into the spindle. Wipe away excess glue with a damp cloth.
If you prefer not to use screws, you can use a dowel joint. Drill matching holes in the base and the spindle, glue a short dowel into place, and clamp until dry. This creates a clean look, but it requires careful alignment. For beginners, the screw method is usually faster and stronger.
After attaching the spindle, check it with a level or simply step back and look at it from multiple angles. If it leans dramatically, loosen and adjust before the glue fully sets. A tiny lean can look rustic. A big lean looks like the candlestick has had a long day.
Step 6: Drill the Candle Opening
Mark the center of the top of the spindle. Use a Forstner bit or spade bit sized to your metal candle cup or insert. For taper candles, many inserts require a hole around 3/4 inch to 7/8 inch, but measure your specific insert before drilling. For tea lights or votive cups, you may need a wider recess.
Clamp the holder securely. Drill slowly and keep the bit perpendicular to the top surface. If you have a drill press, this step is easier because it creates straight, even holes. If you are using a hand drill, a simple scrap-wood guide can help you keep the hole straight. Drill only deep enough for the insert to sit securely. Do not drill so deep that you weaken the top of the spindle.
Step 7: Test the Candle Cup or Insert
Place the metal candle cup or insert into the hole. It should sit snugly without rocking. If it is too tight, sand the opening gently. If it is too loose, use a small amount of heat-resistant adhesive appropriate for metal and wood, or choose a slightly larger insert. Avoid using hot glue near areas that may warm during candle use.
Set the candle in place and check the balance again. A holder that is stable when empty may become top-heavy with a tall taper. If it wobbles, add a wider base, attach weight underneath, or reserve that piece for flameless candles only.
Step 8: Sand for a Smooth Finish
Sand the spindle and base with 120-grit sandpaper to smooth rough areas, then move to 220-grit for a finer finish. Sand with the grain where possible. On turned details, fold the sandpaper and work gently around curves and grooves. The goal is not to erase every sign of age. The goal is to remove splinters, rough edges, and anything that will catch dust or snag a table runner.
If you like a distressed look, do not over-sand old edges. Let the carved details keep their worn character. If you want a crisp painted finish, fill dents and gaps with wood filler, let it dry, and sand smooth.
Step 9: Paint, Stain, or Seal
This is where your salvaged spindle starts acting fancy. For farmhouse style, paint the holder white, cream, black, sage green, dusty blue, or warm gray. After the paint dries, lightly sand raised details to reveal hints of the old finish underneath. For a rustic look, stain the wood and seal it with a clear protective coat. For a holiday look, try deep red, forest green, antique gold, matte black, or metallic bronze.
If you are painting over old glossy finish, use primer first. If you are using stain, make sure the wood is clean and evenly sanded. If you are sealing with wax or clear coat, apply thin layers and let each layer dry according to the product instructions. Work in a well-ventilated area and wear protective gear when needed.
Step 10: Add Felt Pads and Final Details
Once the finish is fully dry, add felt pads to the bottom of each base. This protects tables, shelves, and mantels from scratches. You can also add small labels underneath with the date you made them, especially if the candlestick holders are gifts.
Insert the candle cups, place the candles, and style your new holders. Group them with greenery, books, mirrors, framed art, ceramic vases, pinecones, dried oranges, or seasonal garland. Just keep flammable decorations away from any real flame.
Design Ideas for Spindle Candlestick Holders
Farmhouse White
Paint the holders warm white, then distress the raised edges with fine sandpaper. This style works beautifully with reclaimed wood, linen table runners, eucalyptus stems, and white taper candles. It is simple, cozy, and looks like it wandered out of a charming country inn.
Moody Matte Black
Matte black paint gives old spindles a modern, dramatic look. Pair black holders with ivory candles for a classic contrast, or use dark burgundy candles for fall and winter. This style works especially well when the spindle profile is ornate because the single color lets the shape shine.
Natural Wood
If the spindle has beautiful grain, skip paint and use stain or clear sealer. Natural wood candlestick holders look warm and timeless. They work with rustic, traditional, cottage, and transitional decor. Add brass candle cups for a slightly elevated look.
Colorful Cottage Style
For a cheerful cottage look, paint each holder a different muted color such as butter yellow, pale blue, blush, or soft green. Keep the candles simple so the colors feel playful rather than chaotic. This is a great option for spring tablescapes and casual entertaining.
Holiday Centerpiece
Paint a group of spindle holders in red, green, gold, white, or black and arrange them down the center of a dining table. Add evergreen clippings, ornaments, ribbon, or berries around the bases. Use flameless candles if the arrangement includes greenery or fabric.
Common Mistakes to Avoid
Making the Base Too Small
The most common mistake is choosing a base that looks cute but does not support the height of the candle holder. A narrow base may photograph nicely but tip easily in real life. Stability matters more than dainty proportions.
Skipping the Candle Insert
Never rely on a bare wooden hole to hold a burning candle. Use a proper insert, cup, or glass holder. It improves safety and gives the project a more finished appearance.
Ignoring Old Paint Risks
Old paint can be beautiful, but it may also be unsafe to sand. Test first, seal it, or handle it with lead-safe methods. Do not create dust from mystery paint indoors.
Rushing the Finish
Paint and sealer need time to dry and cure. If you add candles too soon, you may dent the finish or trap odors. Let each coat dry fully before moving to the next step.
Using Real Candles in Risky Places
Open flames do not belong near curtains, shelves full of paper, low-hanging greenery, or busy areas where pets and people can bump the table. When in doubt, use flameless candles. They have come a long way from the orange plastic “tiny campfire” look of the past.
How to Style Your Finished Candlestick Holders
Spindle candlestick holders are versatile because they add height without taking up much visual space. Place a pair on a mantel with a mirror behind them to reflect candlelight. Use three different heights as a dining table centerpiece. Put one tall holder on a stack of books beside a framed photo. For a wedding or party, create multiple sets from matching spindles and paint them all the same color for an elegant collected look.
For everyday decor, keep the styling simple. A few candles, a small vase, and a tray are enough. For seasonal displays, change the surrounding accents instead of repainting the holders every month. In spring, add flowers. In fall, add mini pumpkins. In winter, add greenery and ribbon. In summer, pair them with shells, woven textures, and pale candles.
Budget Breakdown
This project can be very affordable, especially if you already have basic tools. Old spindles often cost only a few dollars each at salvage shops or thrift stores. Craft wood bases are inexpensive, and paint leftovers from previous projects work perfectly. Candle cups or taper inserts may be the only specialty item you need to buy.
For a small set of three candlestick holders, expect to spend roughly $10 to $30 if you shop wisely and use leftover supplies. If you buy premium paint, decorative bases, brass inserts, and antique spindles, the cost can go higher. Even then, handmade holders usually cost less than comparable boutique decorand yours come with better bragging rights.
Personal Experience: What This Project Teaches You
One of the best parts of making candlestick holders from old spindles is how quickly the project changes your eye for discarded materials. Before doing a project like this, an old chair leg may look like junk. Afterward, it looks like a future Christmas centerpiece. A broken stair baluster becomes potential mantel decor. A box of odd wooden parts at a flea market suddenly starts whispering, “Take us home; we have candle-holder energy.”
The first lesson is that balance matters more than beauty at the beginning. A spindle may have a perfect shape, but if the bottom is uneven or the base is too small, the holder will never feel trustworthy. During my own spindle projects, I learned to test the piece repeatedly: before gluing, after gluing, after drilling, and again after adding the candle. This may feel excessive, but it saves you from finishing a gorgeous holder that leans like it is listening for gossip.
The second lesson is that paint can rescue almost anything. Raw, mismatched spindle pieces can look confusing on the workbench. One may be oak, another pine, another painted brown, and another covered in a finish best described as “haunted maple syrup.” But once they receive the same primer and paint color, the whole set suddenly makes sense. This is especially true with matte black, warm white, and soft greige. A unified color makes mismatched shapes look curated instead of accidental.
The third lesson is to respect old finishes. Salvaged wood carries history, but sometimes it also carries questionable paint, flaking varnish, and dust from places you would rather not identify. I prefer cleaning first, testing if needed, and sanding only as much as necessary. If the old surface has a beautiful chippy look but may not be safe to disturb, sealing it under a clear coat can preserve the character without creating a cloud of risky dust. The goal is “vintage charm,” not “archaeological sneeze.”
Another useful experience is learning how important the candle insert is. Early DIY candle projects often focus on shape and paint, but the insert is what makes the holder feel finished. A metal cup or taper socket gives the candle a proper seat, keeps wax contained, and makes the piece look less improvised. Even if you plan to use flameless candles most of the time, adding a cup creates a more professional result.
This project is also a great reminder that handmade decor does not need to be perfect to be beautiful. A tiny nick in the wood, a shallow dent, a slightly uneven groove, or an old nail hole can become part of the charm. In fact, over-refining salvaged spindles can remove the very thing that made them interesting. I like to smooth the rough edges but leave enough age so the finished candlestick still looks like it had a previous life.
Finally, making spindle candlestick holders is satisfying because the finished item is useful right away. You can style it on a mantel the same day the paint dries. You can give a set as a housewarming gift. You can make seasonal versions without starting from scratch each time. And every time someone asks where you bought them, you get to smile casually and say, “I made them from old spindles,” as though you are the sort of person who just casually rescues architectural scraps and turns them into decor. Which, after this project, you officially are.
Conclusion
Learning how to make candlestick holders from old spindles is one of those DIY projects that delivers a big decorative payoff without demanding expert-level woodworking skills. The process is simple: choose solid spindles, cut them to attractive heights, attach stable bases, drill properly sized openings, add safe candle inserts, sand carefully, and finish with paint, stain, or sealer. The result is custom home decor that feels vintage, personal, and far more expensive than it actually is.
The key is to balance creativity with safety. Use sturdy bases, avoid placing flames directly against wood, handle old painted surfaces responsibly, and choose flameless candles whenever the display includes greenery, fabric, children, pets, or general household chaos. With those precautions in place, old spindles can become elegant candlestick holders for everyday styling, holidays, parties, weddings, and handmade gifts.
So the next time you see a dusty box of salvaged spindles, do not walk past it too quickly. Somewhere inside that pile may be a beautiful set of candlestick holders waiting for a second actand possibly a dramatic debut on your dining table.